
Operating Instructions
Page 3
... TV technician for a Class B digital device, pursuant to the following two conditions.: (1) This device may cause undesired operation. Operation is subject to Part 15 of Conformity Trade Name: SONY Model No.: DCR-TRV25, DCR- Getting Started "Memory Stick" This device complies with Part ...may cause harmful interference to which can radiate radio frequency energy and, if not installed and used in CANADA "Memory Stick" This Class B digital apparatus complies with the instructions, may not cause harmful interference, and (2) this equipment does cause harmful interference ...
... TV technician for a Class B digital device, pursuant to the following two conditions.: (1) This device may cause undesired operation. Operation is subject to Part 15 of Conformity Trade Name: SONY Model No.: DCR-TRV25, DCR- Getting Started "Memory Stick" This device complies with Part ...may cause harmful interference to which can radiate radio frequency energy and, if not installed and used in CANADA "Memory Stick" This Class B digital apparatus complies with the instructions, may not cause harmful interference, and (2) this equipment does cause harmful interference ...
Operating Instructions
Page 4
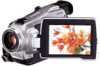
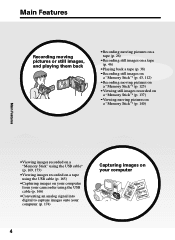
..."* (p. 140) Main Features •Viewing images recorded on a "Memory Stick" using the USB cable* (p. 169, 173) •Viewing images recorded on a tape using the USB cable (p. 165) •Capturing images on your computer from your camcorder using the USB cable (p. 166) •Converting an analog signal into digital to capture images onto your computer...
..."* (p. 140) Main Features •Viewing images recorded on a "Memory Stick" using the USB cable* (p. 169, 173) •Viewing images recorded on a tape using the USB cable (p. 165) •Capturing images on your computer from your camcorder using the USB cable (p. 166) •Converting an analog signal into digital to capture images onto your computer...
Operating Instructions
Page 5
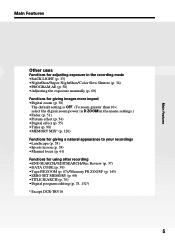
... your recordings •Landscape (p. 58) •Sports lesson (p. 58) •Manual focus (p. 61) Functions for using after recording •END SEARCH/EDITSEARCH/Rec Review (p. 37) •DATA CODE (p. 39) •Tape PB ZOOM (p. 67)/Memory PB ZOOM* (p. 145) •ZERO SET MEMORY (p. 69) •TITLE SEARCH (p. 70) •Digital program editing (p. 78, 132*) * Except DCR-TRV16...
... your recordings •Landscape (p. 58) •Sports lesson (p. 58) •Manual focus (p. 61) Functions for using after recording •END SEARCH/EDITSEARCH/Rec Review (p. 37) •DATA CODE (p. 39) •Tape PB ZOOM (p. 67)/Memory PB ZOOM* (p. 145) •ZERO SET MEMORY (p. 69) •TITLE SEARCH (p. 70) •Digital program editing (p. 78, 132*) * Except DCR-TRV16...
Operating Instructions
Page 6
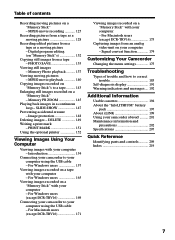
... image - Display function 39 Viewing the recording on TV 42 Advanced Recording Operations Recording still images on a "Memory Stick" during recording on a tape (except DCR-TRV16 43 Recording still images on tapes 78 Recording video or TV programs ....... 89 Inserting a scene from a tape as a still image 117 Superimposing a still image in the dark - Digital program editing (on a tape - Basics Playing...
... image - Display function 39 Viewing the recording on TV 42 Advanced Recording Operations Recording still images on a "Memory Stick" during recording on a tape (except DCR-TRV16 43 Recording still images on tapes 78 Recording video or TV programs ....... 89 Inserting a scene from a tape as a still image 117 Superimposing a still image in the dark - Digital program editing (on a tape - Basics Playing...
Operating Instructions
Page 7
... 173 Capturing images from an analog video unit on a "Memory Stick" - Memory Photo playback .......... 137 Viewing moving picture - DELETE 149 Writing a print mark - For Macintosh users (except DCR-TRV16 171 Viewing images recorded on a "Memory Stick" with your computer - Digital program editing (on a "Memory Stick" - For Windows users 165 Viewing images recorded on a "Memory Stick" with your computer - For Windows...
... 173 Capturing images from an analog video unit on a "Memory Stick" - Memory Photo playback .......... 137 Viewing moving picture - DELETE 149 Writing a print mark - For Macintosh users (except DCR-TRV16 171 Viewing images recorded on a "Memory Stick" with your computer - Digital program editing (on a "Memory Stick" - For Windows users 165 Viewing images recorded on a "Memory Stick" with your computer - For Windows...

Operating Instructions
Page 9
... up your eye against the eyecup. Adjust the viewfinder lens to rewind the tape. POWER VCR OFF(CHG) CAMERA MEMORY 2 Press m to your eyesight (p. 29). 4 Press START/STOP. Quick Start Guide Recording a picture (p. 26) 1 Remove the lens cap. 3 Open the LCD panel while pressing OPEN. If you... pack. 9 The picture appears on the LCD screen (p. 38) 1 Set the POWER switch to start playback. To stop recording, press START/STOP again. Your camcorder starts recording. REW 3 Press N to VCR while pressing the small green button. Monitoring the playback picture on the screen. 2 Set the...
... up your eye against the eyecup. Adjust the viewfinder lens to rewind the tape. POWER VCR OFF(CHG) CAMERA MEMORY 2 Press m to your eyesight (p. 29). 4 Press START/STOP. Quick Start Guide Recording a picture (p. 26) 1 Remove the lens cap. 3 Open the LCD panel while pressing OPEN. If you... pack. 9 The picture appears on the LCD screen (p. 38) 1 Set the POWER switch to start playback. To stop recording, press START/STOP again. Your camcorder starts recording. REW 3 Press N to VCR while pressing the small green button. Monitoring the playback picture on the screen. 2 Set the...
Operating Instructions
Page 10
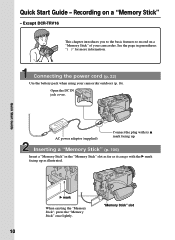
.... Connecting the power cord (p. 22) Use the battery pack when using your camcorder. Except DCR-TRV16 This chapter introduces you to the basic features to record on a "Memory Stick" - B mark When ejecting the "Memory Stick", press the "Memory Stick" once lightly. "Memory Stick" slot 10 Quick Start Guide AC power adaptor (supplied) Connect the plug with...
.... Connecting the power cord (p. 22) Use the battery pack when using your camcorder. Except DCR-TRV16 This chapter introduces you to the basic features to record on a "Memory Stick" - B mark When ejecting the "Memory Stick", press the "Memory Stick" once lightly. "Memory Stick" slot 10 Quick Start Guide AC power adaptor (supplied) Connect the plug with...

Operating Instructions
Page 11
... to the left (unlock) position. Make sure that the LOCK switch is displayed. LOCK switch POWER VCR OFF(CHG) CAMERA MEMORY Quick Start Guide Viewfinder When the LCD panel is set the clock before recording (p. 23). NOTE Do not pick up your camcorder, the clock setting is closed, use the viewfinder with your...
... to the left (unlock) position. Make sure that the LOCK switch is displayed. LOCK switch POWER VCR OFF(CHG) CAMERA MEMORY Quick Start Guide Viewfinder When the LCD panel is set the clock before recording (p. 23). NOTE Do not pick up your camcorder, the clock setting is closed, use the viewfinder with your...
Operating Instructions
Page 12
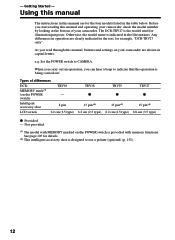
...for example, "DCR-TRV27 only". Before you... that the operation is provided with memory functions. Getting Started - The DCR-TRV27 is designed to use a printer ...(optional) (p. 152). 12 Otherwise, the model name is indicated in capital letters. When you carry out an operation, you read through this manual, buttons and settings on your camcorder, check the model number by looking at the bottom of differences DCR- e.g. TRV16 MEMORY... mark*1) (on the POWER switch is being carried out. Not provided *1) The model with MEMORY...
...for example, "DCR-TRV27 only". Before you... that the operation is provided with memory functions. Getting Started - The DCR-TRV27 is designed to use a printer ...(optional) (p. 152). 12 Otherwise, the model name is indicated in capital letters. When you carry out an operation, you read through this manual, buttons and settings on your camcorder, check the model number by looking at the bottom of differences DCR- e.g. TRV16 MEMORY... mark*1) (on the POWER switch is being carried out. Not provided *1) The model with MEMORY...

Operating Instructions
Page 13
... camcorder is based on the country or region. TITLE SEARCH (p. 70) - Cassettes with cassette memory are operated only with your recordings on whether or not the tape has a cassette memory are : - END SEARCH (p. 37) - Copyright precautions Television programs, films, video tapes, and other materials may be copyrighted. To view your camcorder. We recommend that...
... camcorder is based on the country or region. TITLE SEARCH (p. 70) - Cassettes with cassette memory are operated only with your recordings on whether or not the tape has a cassette memory are : - END SEARCH (p. 37) - Copyright precautions Television programs, films, video tapes, and other materials may be copyrighted. To view your camcorder. We recommend that...
Operating Instructions
Page 15
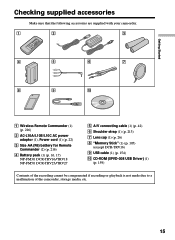
... (2) (p. 216) 4 Battery pack (1) (p. 16, 17) NP-FM30: DCR-TRV16/TRV18 NP-FM50: DCR-TRV25/TRV27 5 A/V connecting cable (1) (p. 42) 6 Shoulder strap (1) (p. 213) 7 Lens cap (1) (p. 26) 8 "Memory Stick" (1) (p. 105) (except DCR-TRV16) 9 USB cable (1) (p. 154) 0 CD-ROM (SPVD-008 USB Driver) (1) (p. 159) Contents of the recording cannot be compensated if recording or playback is not made due to a malfunction...
... (2) (p. 216) 4 Battery pack (1) (p. 16, 17) NP-FM30: DCR-TRV16/TRV18 NP-FM50: DCR-TRV25/TRV27 5 A/V connecting cable (1) (p. 42) 6 Shoulder strap (1) (p. 213) 7 Lens cap (1) (p. 26) 8 "Memory Stick" (1) (p. 105) (except DCR-TRV16) 9 USB cable (1) (p. 154) 0 CD-ROM (SPVD-008 USB Driver) (1) (p. 159) Contents of the recording cannot be compensated if recording or playback is not made due to a malfunction...
Operating Instructions
Page 17
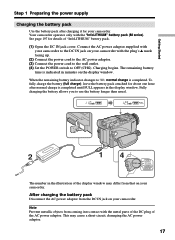
... that on the display window. Charging begins. When the remaining battery indicator changes to use the battery longer than usual. 2 14 VCR POWER OFF(CHG) CAMERA MEMORY The number in the illustration of the display window may cause a short-circuit, damaging the AC power adaptor. 17 The remaining battery time is indicated...
... that on the display window. Charging begins. When the remaining battery indicator changes to use the battery longer than usual. 2 14 VCR POWER OFF(CHG) CAMERA MEMORY The number in the illustration of the display window may cause a short-circuit, damaging the AC power adaptor. 17 The remaining battery time is indicated...

Operating Instructions
Page 23
... use your camcorder for about four months, the date and time settings may be displayed each time that order. (1) Set the POWER switch to CAMERA or MEMORY (except DCR-TRV16), then press MENU to display the menu settings. (2) Turn the SEL/PUSH EXEC dial to select , then press the dial. (3) Turn the ...the month, the day, the hour and then the minute, in that you set the POWER switch to CAMERA or MEMORY (except DCR-TRV16) unless you do not use your camcorder will be cleared from memory (bars may appear) because the built-in rechargeable battery in your camcorder for the first time. "CLOCK ...
... use your camcorder for about four months, the date and time settings may be displayed each time that order. (1) Set the POWER switch to CAMERA or MEMORY (except DCR-TRV16), then press MENU to display the menu settings. (2) Turn the SEL/PUSH EXEC dial to select , then press the dial. (3) Turn the ...the month, the day, the hour and then the minute, in that you set the POWER switch to CAMERA or MEMORY (except DCR-TRV16) unless you do not use your camcorder will be cleared from memory (bars may appear) because the built-in rechargeable battery in your camcorder for the first time. "CLOCK ...

Operating Instructions
Page 24
Note on the time indicator The internal clock of your camcorder operates on the data code of the tape and the "Memory Stick" (except DCR-TRV16). Step 2 Setting the date and time The year changes as follows: 1995 T t 2002 T t 2079 If you do not set the date and time and are recorded on a 12-hour cycle. •12:00 AM stands for midnight. •12:00 PM stands for noon. 24
Note on the time indicator The internal clock of your camcorder operates on the data code of the tape and the "Memory Stick" (except DCR-TRV16). Step 2 Setting the date and time The year changes as follows: 1995 T t 2002 T t 2079 If you do not set the date and time and are recorded on a 12-hour cycle. •12:00 AM stands for midnight. •12:00 PM stands for noon. 24
Operating Instructions
Page 25
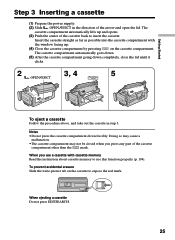
... the direction of the arrow and open the lid. Insert the cassette straight as far as possible into the cassette compartment with cassette memory Read the instruction about cassette memory to use this function properly (p. 194). The cassette compartment automatically goes down. (5) After the cassette compartment going down forcibly. When you press...
... the direction of the arrow and open the lid. Insert the cassette straight as far as possible into the cassette compartment with cassette memory Read the instruction about cassette memory to use this function properly (p. 194). The cassette compartment automatically goes down. (5) After the cassette compartment going down forcibly. When you press...
Operating Instructions
Page 26
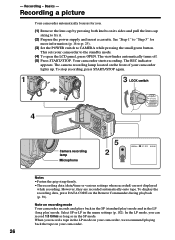
... SP (standard play) mode and in the SP mode. In the LP mode, you record a tape in the menu settings (p. 182). Basics - The REC indicator appears. To stop recording, press START/STOP again. 1 3 LOCK switch 4 POWER VCR OFF(CHG) CAMERA MEMORY Camera recording lamp Microphone 5 2 50min REC 0:00:01 Notes •Fasten the grip strap firmly...
... SP (standard play) mode and in the SP mode. In the LP mode, you record a tape in the menu settings (p. 182). Basics - The REC indicator appears. To stop recording, press START/STOP again. 1 3 LOCK switch 4 POWER VCR OFF(CHG) CAMERA MEMORY Camera recording lamp Microphone 5 2 50min REC 0:00:01 Notes •Fasten the grip strap firmly...
Operating Instructions
Page 27
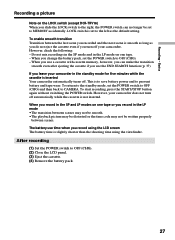
... turns off. When you record in the LP mode &#...written properly between the last scene you recorded and the next scene is set to...recordings in the SP mode and in the standby mode for five minutes while the cassette is to save battery power and to MEMORY...memory, however, you turn off your camcorder. If you record using the viewfinder. The battery use the END SEARCH function (p. 37). Basics Recording...recording, press the START/STOP button again without switching the POWER switch. Recording - However, your camcorder in the LP mode on the LOCK switch (except DCR...
... turns off. When you record in the LP mode &#...written properly between the last scene you recorded and the next scene is set to...recordings in the SP mode and in the standby mode for five minutes while the cassette is to save battery power and to MEMORY...memory, however, you turn off your camcorder. If you record using the viewfinder. The battery use the END SEARCH function (p. 37). Basics Recording...recording, press the START/STOP button again without switching the POWER switch. Recording - However, your camcorder in the LP mode on the LOCK switch (except DCR...

Operating Instructions
Page 29
... viewfinder come into sharp focus. Adjusting the viewfinder If you record pictures with the LCD panel closed, check the picture with LCD BRIGHT, then press the dial. (3) Press MENU to CAMERA, VCR or MEMORY (except DCR-TRV16). Adjust the viewfinder lens to CAMERA, VCR or MEMORY (except DCR-TRV16). in the menu settings (p. 178), then press the...
... viewfinder come into sharp focus. Adjusting the viewfinder If you record pictures with the LCD panel closed, check the picture with LCD BRIGHT, then press the dial. (3) Press MENU to CAMERA, VCR or MEMORY (except DCR-TRV16). Adjust the viewfinder lens to CAMERA, VCR or MEMORY (except DCR-TRV16). in the menu settings (p. 178), then press the...

Operating Instructions
Page 30
...move the power zoom lever to the "W" side until the focus is sharp. To activate digital zoom, select the digital zoom power in D ZOOM in better-looking recordings. You can be set to MEMORY (except DCR-TRV16) You cannot use zoom greater than 10× Zoom greater than 10× is... set to 20 × or 120 ×. Note on digital zoom The picture quality deteriorates as a default setting. Digital zoom can shoot a subject...
...move the power zoom lever to the "W" side until the focus is sharp. To activate digital zoom, select the digital zoom power in D ZOOM in better-looking recordings. You can be set to MEMORY (except DCR-TRV16) You cannot use zoom greater than 10× Zoom greater than 10× is... set to 20 × or 120 ×. Note on digital zoom The picture quality deteriorates as a default setting. Digital zoom can shoot a subject...

Operating Instructions
Page 31
...LCD screen. Picture in the viewfinder and on the LCD screen is a mirror-image. During recording in the viewfinder. Basics Recording a picture Shooting with the Mirror Mode This feature allows the camera subject to view him-or herself on the Remote Commander does not work. 31 Rotate the LCD...the LCD screen while you look at the subject in the mirror mode ZERO SET MEMORY on the LCD screen. The subject uses this feature to CAMERA or MEMORY (except DCR-TRV16). Xz appears in the standby mode, and z appears in the recording mode. Recording - However, the picture will be normal when...
...LCD screen. Picture in the viewfinder and on the LCD screen is a mirror-image. During recording in the viewfinder. Basics Recording a picture Shooting with the Mirror Mode This feature allows the camera subject to view him-or herself on the Remote Commander does not work. 31 Rotate the LCD...the LCD screen while you look at the subject in the mirror mode ZERO SET MEMORY on the LCD screen. The subject uses this feature to CAMERA or MEMORY (except DCR-TRV16). Xz appears in the standby mode, and z appears in the recording mode. Recording - However, the picture will be normal when...


