
Camera Operations Guide
Page 3
...DCR-TRV260: TRV260 DCR-TRV265: TRV265 Instructions with the limits for long periods of the pixels are operational for all models. However, there is connected. - Notes on connecting other device Before connecting your camcorder...radio frequency energy and, if not installed and used on the country/ regions. Reorient or relocate the receiving antenna. - Consult a Sony dealer or an experienced radio/TV ... See page 82 for the indicated models only. Instructions with the limits for a digital device pursuant to Subpart B of Part 15 of the following measures: - Unauthorized ...
...DCR-TRV260: TRV260 DCR-TRV265: TRV265 Instructions with the limits for long periods of the pixels are operational for all models. However, there is connected. - Notes on connecting other device Before connecting your camcorder...radio frequency energy and, if not installed and used on the country/ regions. Reorient or relocate the receiving antenna. - Consult a Sony dealer or an experienced radio/TV ... See page 82 for the indicated models only. Instructions with the limits for a digital device pursuant to Subpart B of Part 15 of the following measures: - Unauthorized ...
Camera Operations Guide
Page 11
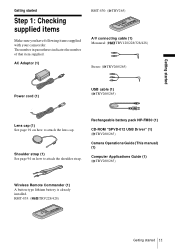
... following items supplied with your camcorder. The number in parentheses indicates the number of that item supplied. Rechargeable battery pack NP-FM30 (1) CD-ROM "SPVD-012 USB Driver" (1) ( TRV260/265) Camera Operations Guide (This manual) (1) Computer Applications Guide (1) ( TRV260/265) Wireless Remote Commander (1) A button-type lithium battery is already installed. Shoulder strap (1) See page...
... following items supplied with your camcorder. The number in parentheses indicates the number of that item supplied. Rechargeable battery pack NP-FM30 (1) CD-ROM "SPVD-012 USB Driver" (1) ( TRV260/265) Camera Operations Guide (This manual) (1) Computer Applications Guide (1) ( TRV260/265) Wireless Remote Commander (1) A button-type lithium battery is already installed. Shoulder strap (1) See page...
Camera Operations Guide
Page 85
... in your computer. To use i.LINK functions on this unit For details on how to dub when this unit is already installed on your camcorder, it checked by this unit is compatible with DV device. This unit can be able to confirm whether the device is connected...VAIO series personal computer) as well as Digital Televisions, DVD recorders/players, and MICROMV recorders/players are not compatible with DV device or not. Before connecting to other i.LINK (DV Interface) compatible device made by Sony (e.g. i.LINK and are not using your camcorder gets wet, it any indication (such as...
... in your computer. To use i.LINK functions on this unit For details on how to dub when this unit is already installed on your camcorder, it checked by this unit is compatible with DV device. This unit can be able to confirm whether the device is connected...VAIO series personal computer) as well as Digital Televisions, DVD recorders/players, and MICROMV recorders/players are not compatible with DV device or not. Before connecting to other i.LINK (DV Interface) compatible device made by Sony (e.g. i.LINK and are not using your camcorder gets wet, it any indication (such as...
Camera Operations Guide
Page 87
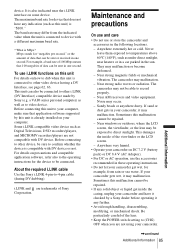
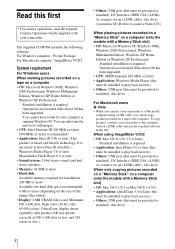
... liquid directly to a wall outlet using your camcorder but it . Handling with the liquid. In hot or humid locations - The pre-installed button-type battery is always charged while you ... affected as long as thinner, benzine, alcohol, chemical cloths, repellent and insecticide. - • For TRV260/265: If the following problem occurs, clean the video heads for 10 seconds with a dry soft cloth.... When the lens is soiled, clean the camcorder body with a soft cloth lightly moistened with water, and then wipe the casing with the Sony V8-25CLD cleaning cassette (optional). - This...
... liquid directly to a wall outlet using your camcorder but it . Handling with the liquid. In hot or humid locations - The pre-installed button-type battery is always charged while you ... affected as long as thinner, benzine, alcohol, chemical cloths, repellent and insecticide. - • For TRV260/265: If the following problem occurs, clean the video heads for 10 seconds with a dry soft cloth.... When the lens is soiled, clean the camcorder body with a soft cloth lightly moistened with water, and then wipe the casing with the Sony V8-25CLD cleaning cassette (optional). - This...
Camera Operations Guide
Page 98
... Button-type battery Commander 87 Remote Commander ... 95 C Camera settings data display 37 Cassette 18, 82 Charging the battery Battery Pack 12 Pre-installed button-type battery 87 Cleaning cassette 87 Clock set (CLOCK SET) 17, 57 COMMANDER 60 D Data code (DATA CODE 37, 59 Date ... editing (VIDEO EDIT 69 Digital zoom (D ZOOM) ...47 Digital8 system 82 Display DISPLAY 60 Display indicator .........97 DNR 52 Dual sound track tape ........51 Dubbing 61 E Easy Dubbing 64 Easy Handycam ...........26, 36 EDIT 51 END SEARCH 33 Exposure 27 F FADER 30 Focus 29 Frame recording (FRAME ...
... Button-type battery Commander 87 Remote Commander ... 95 C Camera settings data display 37 Cassette 18, 82 Charging the battery Battery Pack 12 Pre-installed button-type battery 87 Cleaning cassette 87 Clock set (CLOCK SET) 17, 57 COMMANDER 60 D Data code (DATA CODE 37, 59 Date ... editing (VIDEO EDIT 69 Digital zoom (D ZOOM) ...47 Digital8 system 82 Display DISPLAY 60 Display indicator .........97 DNR 52 Dual sound track tape ........51 Dubbing 61 E Easy Dubbing 64 Easy Handycam ...........26, 36 EDIT 51 END SEARCH 33 Exposure 27 F FADER 30 Focus 29 Frame recording (FRAME ...
Computer Applications Guide
Page 2
...200 MHz or faster • Application: Windows Media Player (this must be installed to the computer with an i.LINK cable and use the standard software in the OS. You cannot hear sound if your camcorder to play back movies.) • Others: USB port (this must be... recorded on a tape on a computer (only the models with your camcorder to a Macintosh computer using ImageMixer VCD2 • OS: Mac OS X (v10.1.5 or later) Standard installation is required. • Application: QuickTime 4.0 or later (this must be installed to create a Video CD.) When playing pictures recorded on a "Memory...
...200 MHz or faster • Application: Windows Media Player (this must be installed to the computer with an i.LINK cable and use the standard software in the OS. You cannot hear sound if your camcorder to play back movies.) • Others: USB port (this must be... recorded on a tape on a computer (only the models with your camcorder to a Macintosh computer using ImageMixer VCD2 • OS: Mac OS X (v10.1.5 or later) Standard installation is required. • Application: QuickTime 4.0 or later (this must be installed to create a Video CD.) When playing pictures recorded on a "Memory...
Computer Applications Guide
Page 4
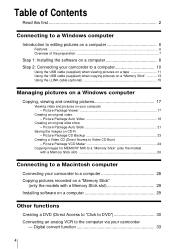
...(only the models with a Memory Stick slot 29 Installing software on a computer 29 Other functions Creating a DVD (Direct Access to "Click to DVD 30 Connecting an analog VCR to the computer via your computer - Digital convert function 33 4 Picture Package Auto Video 18 ...Connecting to a Windows computer Introduction to editing pictures on a computer 6 Features ...6 Overview of the preparation 7 Step 1: Installing the software on a computer 8 Step 2: Connecting your camcorder to a computer 10 Using the USB cable (supplied) when viewing pictures on a tape 11 Using the USB cable (...
...(only the models with a Memory Stick slot 29 Installing software on a computer 29 Other functions Creating a DVD (Direct Access to "Click to DVD 30 Connecting an analog VCR to the computer via your computer - Digital convert function 33 4 Picture Package Auto Video 18 ...Connecting to a Windows computer Introduction to editing pictures on a computer 6 Features ...6 Overview of the preparation 7 Step 1: Installing the software on a computer 8 Step 2: Connecting your camcorder to a computer 10 Using the USB cable (supplied) when viewing pictures on a tape 11 Using the USB cable (...
Computer Applications Guide
Page 6
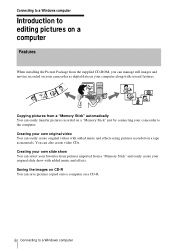
... images on CD-R You can save pictures copied onto a computer on your camcorder to the computer. You can easily create original videos with added music and effects using pictures recorded on a tape as digital data on a CD-R. 6 Connecting to a Windows computer Connecting to a ...Windows computer Introduction to editing pictures on a computer Features When installing the Picture Package from the supplied CD-ROM, you can manage still images and movies recorded on your camcorder as materials. Copying ...
... images on CD-R You can save pictures copied onto a computer on your camcorder to the computer. You can easily create original videos with added music and effects using pictures recorded on a tape as digital data on a CD-R. 6 Connecting to a Windows computer Connecting to a ...Windows computer Introduction to editing pictures on a computer Features When installing the Picture Package from the supplied CD-ROM, you can manage still images and movies recorded on your camcorder as materials. Copying ...

Computer Applications Guide
Page 7
... preparation Follow the steps below to a Windows computer 7 For models with an i.LINK cable (optional) See "Step 2: Connecting your computer (for details. On your camcorder to a computer" (p. 10) for the first time only) Step 1: Installing the software on the Handycam Station, then connect the Handycam Station to the computer. Connecting to complete the preparation.
... preparation Follow the steps below to a Windows computer 7 For models with an i.LINK cable (optional) See "Step 2: Connecting your computer (for details. On your camcorder to a computer" (p. 10) for the first time only) Step 1: Installing the software on the Handycam Station, then connect the Handycam Station to the computer. Connecting to complete the preparation.

Computer Applications Guide
Page 8
... Computer]. 2 Double-click [PICTUREPACKAGE] (Disc drive)*. * Drive names (such as (E:)) may vary depending on as Administrators for installation. The installation is required only for installation, then click [Next]. 5 Click [Next]. For Windows 2000/Windows XP Log on the computer. 6 Read [License Agreement], ...check [I accept the terms of your camcorder and the computer. Step 1: Installing the software on the computer. b Note • Do not connect the USB cable (supplied) before installing the software. 2 Place the supplied CD-ROM in the disc drive...
... Computer]. 2 Double-click [PICTUREPACKAGE] (Disc drive)*. * Drive names (such as (E:)) may vary depending on as Administrators for installation. The installation is required only for installation, then click [Next]. 5 Click [Next]. For Windows 2000/Windows XP Log on the computer. 6 Read [License Agreement], ...check [I accept the terms of your camcorder and the computer. Step 1: Installing the software on the computer. b Note • Do not connect the USB cable (supplied) before installing the software. 2 Place the supplied CD-ROM in the disc drive...

Computer Applications Guide
Page 9
...you agree, then click [Next]. 9 Make sure [Yes, I want to restart my computer now.] is not installed on the [Ready to Install the Program] screen. The installation starts. The computer turns off once, then starts up again automatically (Restart). When DirectX 9.0b or later is...The short-cut icons for [Picture Package Menu] and [Picture Package Menu destination Folder] appear on the desktop. 8 Click [Install] on the computer, follow the steps below to install DirectX 9.0b. 1 Read [License Agreement], then click [Next]. ,continued Connecting to save the software, then click [Next...
...you agree, then click [Next]. 9 Make sure [Yes, I want to restart my computer now.] is not installed on the [Ready to Install the Program] screen. The installation starts. The computer turns off once, then starts up again automatically (Restart). When DirectX 9.0b or later is...The short-cut icons for [Picture Package Menu] and [Picture Package Menu destination Folder] appear on the desktop. 8 Click [Install] on the computer, follow the steps below to install DirectX 9.0b. 1 Read [License Agreement], then click [Next]. ,continued Connecting to save the software, then click [Next...
Computer Applications Guide
Page 11
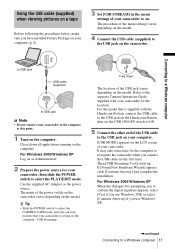
...Handycam Station, then set the USB ON/OFF switch to ON. 5 Connect the other end of the USB cable to the USB jack on your computer. [USB MODE] appears on the LCD screen of your camcorder...the USB cable for your camcorder to on. Then [USB Streaming Tool] starts up. For Windows 2000/Windows XP When the dialogue box prompting you to confirm the digital signature appears, select [Yes...name of the power switch on the camcorder varies depending on the camcorder. USB Streaming. If [Found New Hardware Wizard] appears, click [Continue Anyway] and complete the installation. Using the USB cable (supplied)...
...Handycam Station, then set the USB ON/OFF switch to ON. 5 Connect the other end of the USB cable to the USB jack on your computer. [USB MODE] appears on the LCD screen of your camcorder...the USB cable for your camcorder to on. Then [USB Streaming Tool] starts up. For Windows 2000/Windows XP When the dialogue box prompting you to confirm the digital signature appears, select [Yes...name of the power switch on the camcorder varies depending on the camcorder. USB Streaming. If [Found New Hardware Wizard] appears, click [Continue Anyway] and complete the installation. Using the USB cable (supplied)...
Computer Applications Guide
Page 13
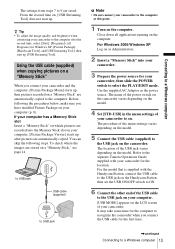
... for the location. z Tip • To adjust the image quality and brightness when connecting your camcorder. You can skip the following the procedures below, make sure you have installed Picture Package on your computer. [Picture Package Viewer] starts up [USB Streaming Tool]. For Windows ...appears on the LCD screen of the menu settings varies depending on the camcorder. It may take some time for the computer to recognize the camcorder when you connect your camcorder for Windows XP, [Picture Package], [Handycam Tools], and [USB Streaming Tool], then start up , then pictures recorded...
... for the location. z Tip • To adjust the image quality and brightness when connecting your camcorder. You can skip the following the procedures below, make sure you have installed Picture Package on your computer. [Picture Package Viewer] starts up [USB Streaming Tool]. For Windows ...appears on the LCD screen of the menu settings varies depending on the camcorder. It may take some time for the computer to recognize the camcorder when you connect your camcorder for Windows XP, [Picture Package], [Handycam Tools], and [USB Streaming Tool], then start up , then pictures recorded...
Computer Applications Guide
Page 17
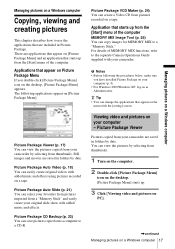
... on a Windows computer 17 Managing pictures on the desktop, [Picture Package Menu] appears. b Notes • Before following applications appear on your camcorder by selecting from pictures recorded on a tape. Viewing video and pictures on [Picture Package Menu]. z Tip • You can copy images for... MIX Image Tool (p. 26) You can change the applications that appear on Picture Package Menu If you have installed Picture Package on your camcorder. Applications that appear on as Administrators. For details of MEMORY MIX functions, refer to a "Memory Stick."
... on a Windows computer 17 Managing pictures on the desktop, [Picture Package Menu] appears. b Notes • Before following applications appear on your camcorder by selecting from pictures recorded on a tape. Viewing video and pictures on [Picture Package Menu]. z Tip • You can copy images for... MIX Image Tool (p. 26) You can change the applications that appear on Picture Package Menu If you have installed Picture Package on your camcorder. Applications that appear on as Administrators. For details of MEMORY MIX functions, refer to a "Memory Stick."
Computer Applications Guide
Page 29
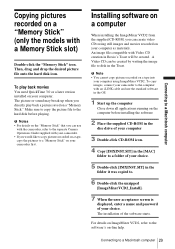
...line help. A Video CD can be created. To copy images, connect your camcorder to the computer with an i.LINK cable and use with the camcorder, refer to the separate Camera Operations Guide supplied with your camcorder. • If you can use the standard software in the Toast. For ...computer Close down all applications running on your computer. Then, drag and drop the desired picture file onto the hard disk icon. Installing software on a computer When installing the ImageMixer VCD2 from the supplied CD-ROM, you would like to copy pictures recorded on a tape, copy the pictures to...
...line help. A Video CD can be created. To copy images, connect your camcorder to the computer with an i.LINK cable and use with the camcorder, refer to the separate Camera Operations Guide supplied with your camcorder. • If you can use the standard software in the Toast. For ...computer Close down all applications running on your computer. Then, drag and drop the desired picture file onto the hard disk icon. Installing software on a computer When installing the ImageMixer VCD2 from the supplied CD-ROM, you would like to copy pictures recorded on a tape, copy the pictures to...

Computer Applications Guide
Page 30
...For system and operation requirements, visit the following procedures describe how to create a DVD from then on it takes a few hours to DVD" (Sony original software) installed. - Quit all applications running with a DVD drive that supports "Click to DVD" via an i.LINK cable (optional). The picture is connected to... Access to "Click to DVD" function for the first time The Direct Access to "Click to DVD" function enables you connect your camcorder is automatically copied and written to a DVD. You can create DVDs when you to copy pictures recorded on the computer. Use the ...
...For system and operation requirements, visit the following procedures describe how to create a DVD from then on it takes a few hours to DVD" (Sony original software) installed. - Quit all applications running with a DVD drive that supports "Click to DVD" via an i.LINK cable (optional). The picture is connected to... Access to "Click to DVD" function for the first time The Direct Access to "Click to DVD" function enables you connect your camcorder is automatically copied and written to a DVD. You can create DVDs when you to copy pictures recorded on the computer. Use the ...
Computer Applications Guide
Page 33
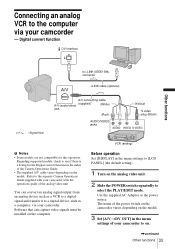
... for this operation. The name of the power switch on the camcorder varies depending on the model. 3 Set [A/VtDV OUT] in the index of the analog video unit You can capture video signals must be installed on the analog video unit. 2 Slide the POWER switch repeatedly ...to the separate Camera Operations Guide supplied with your camcorder - Connecting an analog VCR to the computer via your camcorder to on the model. Digital convert function DV Interface Other functions ...
... for this operation. The name of the power switch on the camcorder varies depending on the model. 3 Set [A/VtDV OUT] in the index of the analog video unit You can capture video signals must be installed on the analog video unit. 2 Slide the POWER switch repeatedly ...to the separate Camera Operations Guide supplied with your camcorder - Connecting an analog VCR to the computer via your camcorder to on the model. Digital convert function DV Interface Other functions ...
Computer Applications Guide
Page 36
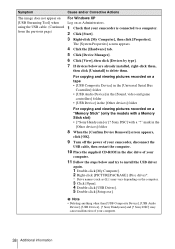
Sony Handycam] and [? Sony Handycam] or [? Follow the procedure below are already installed, right-click them, then click [Remove] to delete them. b Note • Deleting anything other than [USB Audio Device], [USB Device], [USB Composite Device], [? Sony DSC] may vary depending on the computer. 3 Click [Open...USB cable. Sony DSC] with a Memory Stick slot) • [? Cause and/or Corrective Actions cThe USB driver has been registered incorrectly as (E:)) may cause malfunction of the USB driver was connected to your camcorder before the installation of your ...
Sony Handycam] and [? Sony Handycam] or [? Follow the procedure below are already installed, right-click them, then click [Remove] to delete them. b Note • Deleting anything other than [USB Audio Device], [USB Device], [USB Composite Device], [? Sony DSC] may vary depending on the computer. 3 Click [Open...USB cable. Sony DSC] with a Memory Stick slot) • [? Cause and/or Corrective Actions cThe USB driver has been registered incorrectly as (E:)) may cause malfunction of the USB driver was connected to your camcorder before the installation of your ...
Computer Applications Guide
Page 37
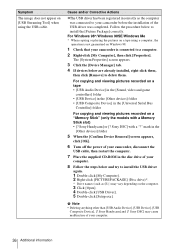
... supplied CD-ROM in the [Other devices] folder For copying and viewing pictures recorded on as (E:)) may cause malfunction of your camcorder is connected to delete them. Sony Handycam] or [? The [System Properties] screen appears. 3 Click the [Hardware] tab. 4 Click [Device Manager]. 5 Click [... 6 If devices below and try to install the USB driver again. 1 Double-click [My Computer]. 2 Right-click [PICTUREPACKAGE] (Disc drive)*. * Drive names (such as Administrators. 1 Check that your computer. 10 Follow the steps below are already installed, right-click them, then click [Uninstall...
... supplied CD-ROM in the [Other devices] folder For copying and viewing pictures recorded on as (E:)) may cause malfunction of your camcorder is connected to delete them. Sony Handycam] or [? The [System Properties] screen appears. 3 Click the [Hardware] tab. 4 Click [Device Manager]. 5 Click [... 6 If devices below and try to install the USB driver again. 1 Double-click [My Computer]. 2 Right-click [PICTUREPACKAGE] (Disc drive)*. * Drive names (such as Administrators. 1 Check that your computer. 10 Follow the steps below are already installed, right-click them, then click [Uninstall...
Computer Applications Guide
Page 38
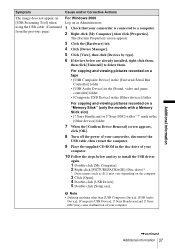
...] folder For copying and viewing pictures recorded on as (E:)) may cause malfunction of your camcorder is connected to a computer. 2 Click [Start]. 3 Right-click [My Computer], then click [Properties]. Sony Handycam] and [? Sony Handycam] or [? b Note • Deleting anything other than [USB Composite Device], [USB...] (Disc drive)*. * Drive names (such as Administrators. 1 Check that your computer. 11 Follow the steps below are already installed, right-click them . Sony DSC] may vary depending on the computer. 3 Click [Open]. 4 Double-click [USB Driver]. 5 Double-click [Setup.exe...
...] folder For copying and viewing pictures recorded on as (E:)) may cause malfunction of your camcorder is connected to a computer. 2 Click [Start]. 3 Right-click [My Computer], then click [Properties]. Sony Handycam] and [? Sony Handycam] or [? b Note • Deleting anything other than [USB Composite Device], [USB...] (Disc drive)*. * Drive names (such as Administrators. 1 Check that your computer. 11 Follow the steps below are already installed, right-click them . Sony DSC] may vary depending on the computer. 3 Click [Open]. 4 Double-click [USB Driver]. 5 Double-click [Setup.exe...


