Camera Operations Guide
Page 11
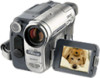
... following items supplied with your camcorder. The number in parentheses indicates the number of that item supplied. AC Adaptor (1) RMT-830: ( TRV265) A/V connecting cable (1) Monaural: ( TRV128/228/328/428) Stereo: ( TRV260/265) Power cord (1) USB cable (1) ( TRV260/265) Lens cap (1) See... lens cap. Rechargeable battery pack NP-FM30 (1) CD-ROM "SPVD-012 USB Driver" (1) ( TRV260/265) Camera Operations Guide (This manual) (1) Computer Applications Guide (1) ( TRV260/265) Wireless Remote Commander (1) A button-type lithium battery is already installed. Shoulder strap (1) See page 94 on ...
... following items supplied with your camcorder. The number in parentheses indicates the number of that item supplied. AC Adaptor (1) RMT-830: ( TRV265) A/V connecting cable (1) Monaural: ( TRV128/228/328/428) Stereo: ( TRV260/265) Power cord (1) USB cable (1) ( TRV260/265) Lens cap (1) See... lens cap. Rechargeable battery pack NP-FM30 (1) CD-ROM "SPVD-012 USB Driver" (1) ( TRV260/265) Camera Operations Guide (This manual) (1) Computer Applications Guide (1) ( TRV260/265) Wireless Remote Commander (1) A button-type lithium battery is already installed. Shoulder strap (1) See page 94 on ...

Camera Operations Guide
Page 34
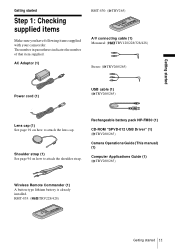
.... (rewind) in To review movies on the viewfinder Close the LCD panel. When you want to play back the recorded picture on your camcorder. To pause Press (pause) during playing back For TRV128/228/328/428: 60min 0:00:00 34 Playback For TRV228/428/ TRV265: You...2 Slide the POWER switch repeatedly to select the PLAY/EDIT mode. OPEN POWER switch z Tip • Performing Easy Handycam operation, even first time users can control playback using the Remote Commander. Playback Viewing pictures recorded on a tape Make sure you want to view. 4 Press (play) to start ...
.... (rewind) in To review movies on the viewfinder Close the LCD panel. When you want to play back the recorded picture on your camcorder. To pause Press (pause) during playing back For TRV128/228/328/428: 60min 0:00:00 34 Playback For TRV228/428/ TRV265: You...2 Slide the POWER switch repeatedly to select the PLAY/EDIT mode. OPEN POWER switch z Tip • Performing Easy Handycam operation, even first time users can control playback using the Remote Commander. Playback Viewing pictures recorded on a tape Make sure you want to view. 4 Press (play) to start ...
Camera Operations Guide
Page 35
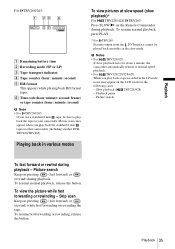
.... To resume fast forwarding or rewinding, release the button. Playback 35 Playback For TRV260/265: 60min 0:00:00:00 A Remaining battery time B Recording mode (SP or... counter (hour: minute: second) b Note • For TRV260/265: If you play back the tape on your camcorder. Mosaic noise may appear on the LCD screen in the LP...slow speed (slow playback)* For TRV228/428/ TRV265: Press SLOW y on other camcorders (including another DCRTRV260/TRV265). Picture search To fast forward or rewind during playback.... the camcorder automatically returns to play back the standard 8 mm tape on the...
.... To resume fast forwarding or rewinding, release the button. Playback 35 Playback For TRV260/265: 60min 0:00:00:00 A Remaining battery time B Recording mode (SP or... counter (hour: minute: second) b Note • For TRV260/265: If you play back the tape on your camcorder. Mosaic noise may appear on the LCD screen in the LP...slow speed (slow playback)* For TRV228/428/ TRV265: Press SLOW y on other camcorders (including another DCRTRV260/TRV265). Picture search To fast forward or rewind during playback.... the camcorder automatically returns to play back the standard 8 mm tape on the...

Camera Operations Guide
Page 36
...(pause)/ (fast forward)/ (rewind) For TRV228/428/ TRV265: You can operate those operations and SLOW y on your camcorder. • You cannot use Easy Handycam operation together with ease - Make sure you cannot connect the USB cable to select the PLAY/EDIT mode. 3 Press ... to your camcorder. b Notes For TRV260/265: • During Easy Handycam operation, you have a dot beside them on the Remote Commander. To cancel Easy Handycam operation Press EASY again. Easy Handycam operation ON 36 Playback EASY lights up in blue. Easy Handycam Easy Handycam operation allows easy...
...(pause)/ (fast forward)/ (rewind) For TRV228/428/ TRV265: You can operate those operations and SLOW y on your camcorder. • You cannot use Easy Handycam operation together with ease - Make sure you cannot connect the USB cable to select the PLAY/EDIT mode. 3 Press ... to your camcorder. b Notes For TRV260/265: • During Easy Handycam operation, you have a dot beside them on the Remote Commander. To cancel Easy Handycam operation Press EASY again. Easy Handycam operation ON 36 Playback EASY lights up in blue. Easy Handycam Easy Handycam operation allows easy...
Camera Operations Guide
Page 37
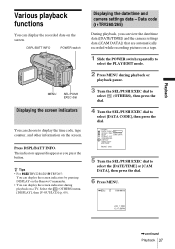
...PLAY/EDIT mode. 2 Press MENU during playback on a TV. OTHERS DATA CODE OFF WORLD TIME DATE/TIME BEEP CAM DATA A. Data code ( TRV260/265) During playback, you press the button. z Tips • For TRV228/428/ TRV265: You can display the screen indicators by pressing DISPLAY on the... Remote Commander. • You can display the recorded date on the screen. The indicators appear/disappear as you can choose to select the [DATE/TIME...
...PLAY/EDIT mode. 2 Press MENU during playback on a TV. OTHERS DATA CODE OFF WORLD TIME DATE/TIME BEEP CAM DATA A. Data code ( TRV260/265) During playback, you press the button. z Tips • For TRV228/428/ TRV265: You can display the screen indicators by pressing DISPLAY on the... Remote Commander. • You can display the recorded date on the screen. The indicators appear/disappear as you can choose to select the [DATE/TIME...
Camera Operations Guide
Page 40
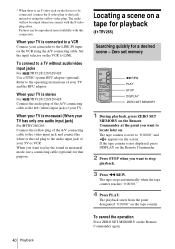
...ZERO SET MEMORY 1 During playback, press ZERO SET MEMORY on the Remote Commander at the point you want to the left (white) input jack of your camcorder to a TV without audio/video input jacks For TRV128/228/328/... DISPLAY on the VCR using the yellow video plug. To connect to the LINE IN input on the Remote Commander. 2 Press STOP when you want to stop playback. 3 Press m REW. Refer to the operating...SET MEMORY on the tape counter. When your TV has only one audio input jack) For TRV260/265: Connect the yellow plug of the A/V connecting cable to the video input jack and connect...
...ZERO SET MEMORY 1 During playback, press ZERO SET MEMORY on the Remote Commander at the point you want to the left (white) input jack of your camcorder to a TV without audio/video input jacks For TRV128/228/328/... DISPLAY on the VCR using the yellow video plug. To connect to the LINE IN input on the Remote Commander. 2 Press STOP when you want to stop playback. 3 Press m REW. Refer to the operating...SET MEMORY on the tape counter. When your TV has only one audio input jack) For TRV260/265: Connect the yellow plug of the A/V connecting cable to the video input jack and connect...

Camera Operations Guide
Page 41
... Playback starts automatically from the point where the date changes. b Notes • If one day's recording is less than 2 minutes, your camcorder may not accurately find the point where the recording date changes. • The Date search will not function correctly when there is a blank ...section between recorded sections on the Remote Commander to select the photo for and displayed. Photo search You can locate the point where the recording date changes. b Note • ...
... Playback starts automatically from the point where the date changes. b Notes • If one day's recording is less than 2 minutes, your camcorder may not accurately find the point where the recording date changes. • The Date search will not function correctly when there is a blank ...section between recorded sections on the Remote Commander to select the photo for and displayed. Photo search You can locate the point where the recording date changes. b Note • ...

Camera Operations Guide
Page 42
... locate still images one after another and display each image for about 5 seconds. To cancel the operation Press STOP on the Remote Commander. Playing back still images in sequence - on the Remote Commander repeatedly to select the PLAY/EDIT mode. 2 Press SEARCH M. b Note • If a tape has a blank section between recorded sections...
... locate still images one after another and display each image for about 5 seconds. To cancel the operation Press STOP on the Remote Commander. Playing back still images in sequence - on the Remote Commander repeatedly to select the PLAY/EDIT mode. 2 Press SEARCH M. b Note • If a tape has a blank section between recorded sections...

Camera Operations Guide
Page 55
... correctly. • The last scene will be longer than other scenes. ,continued Customizing Your Camcorder 55 FRAME REC For TRV260/265: You can record pictures with the cassette inserted, and your camcorder calculates the remaining amount of tape. • For about 8 seconds after (play) is pressed.... • For about 8 seconds after you turn on the tape. Select to record pictures using the Remote ...
... correctly. • The last scene will be longer than other scenes. ,continued Customizing Your Camcorder 55 FRAME REC For TRV260/265: You can record pictures with the cassette inserted, and your camcorder calculates the remaining amount of tape. • For about 8 seconds after (play) is pressed.... • For about 8 seconds after you turn on the tape. Select to record pictures using the Remote ...
Camera Operations Guide
Page 60
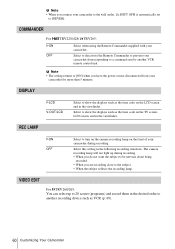
Select to deactivate the Remote Commander to prevent your camcorder from your camcorder for more than 5 minutes. VIDEO EDIT For TRV260/265: You can select up during recording. b Note • When you are recording close to the subject. • When the subject reflects the... recording lamp. DISPLAY GLCD V-OUT/LCD REC LAMP Select to another VCR remote control unit...
Select to deactivate the Remote Commander to prevent your camcorder from your camcorder for more than 5 minutes. VIDEO EDIT For TRV260/265: You can select up during recording. b Note • When you are recording close to the subject. • When the subject reflects the... recording lamp. DISPLAY GLCD V-OUT/LCD REC LAMP Select to another VCR remote control unit...

Camera Operations Guide
Page 65
Go on your camcorder by default. (It is finished. Wards) 89 Aiwa 47, 54, 80 Akai 49, 51 Audio Dynamic... 77 Minolta 8, 42 Mitsubishi/MGA 22, 23, 24, 28, 29 ,continued Dubbing/Editing 65 Dubbing/Editing Infrared ray emitter Remote sensor VCR 11Set the VCR to recording pause. 12Turn the SEL/PUSH EXEC dial to select [IR TEST], then press the ... your VCR, from about 30 cm (12 in.) away, with no obstructions. 10Point the infrared ray emitter of your camcorder towards the remote sensor on your VCR when the setting is correct. [COMPLETE] appears when the [IR SETUP] code test is set ...
Go on your camcorder by default. (It is finished. Wards) 89 Aiwa 47, 54, 80 Akai 49, 51 Audio Dynamic... 77 Minolta 8, 42 Mitsubishi/MGA 22, 23, 24, 28, 29 ,continued Dubbing/Editing 65 Dubbing/Editing Infrared ray emitter Remote sensor VCR 11Set the VCR to recording pause. 12Turn the SEL/PUSH EXEC dial to select [IR TEST], then press the ... your VCR, from about 30 cm (12 in.) away, with no obstructions. 10Point the infrared ray emitter of your camcorder towards the remote sensor on your VCR when the setting is correct. [COMPLETE] appears when the [IR SETUP] code test is set ...
Camera Operations Guide
Page 70
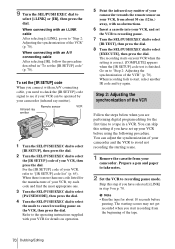
To set up your VCR, refer to "[IR SETUP] code list" (p. 65). You can be operated by your camcorder. Skip this setting if you are performing digital program editing for the manufacturer of your VCR when the setting is correct. [COMPLETE] appears when the [IR SETUP] code test is ... [IR SETUP], then press the dial. 2 Turn the SEL/PUSH EXEC dial to "Step 2: Adjusting the synchronization of your camcorder towards the remote sensor on your VCR, from your camcorder (infrared ray emitter). 9 Turn the SEL/PUSH EXEC dial to recording pause mode. For the [IR SETUP] code of your...
To set up your VCR, refer to "[IR SETUP] code list" (p. 65). You can be operated by your camcorder. Skip this setting if you are performing digital program editing for the manufacturer of your VCR when the setting is correct. [COMPLETE] appears when the [IR SETUP] code test is ... [IR SETUP], then press the dial. 2 Turn the SEL/PUSH EXEC dial to "Step 2: Adjusting the synchronization of your camcorder towards the remote sensor on your VCR, from your camcorder (infrared ray emitter). 9 Turn the SEL/PUSH EXEC dial to recording pause mode. For the [IR SETUP] code of your...

Camera Operations Guide
Page 74
...when the power is being charged. cSet [COMMANDER] in the (OTHERS) menu to the camcorder correctly. If the problem Overall operations persists, remove the power source and contact your Sony dealer. Batteries/Power sources Symptom Cause and/or Corrective Actions The CHG (charge) lamp ...Remote Commander does not function. cDisconnect the AC Adaptor from the wall outlet or remove the battery pack, then reconnect it indicates that no power is supplied from the wall outlet and contact your Sony dealer. If the functions still do not work, press the RESET button using your camcorder...
...when the power is being charged. cSet [COMMANDER] in the (OTHERS) menu to the camcorder correctly. If the problem Overall operations persists, remove the power source and contact your Sony dealer. Batteries/Power sources Symptom Cause and/or Corrective Actions The CHG (charge) lamp ...Remote Commander does not function. cDisconnect the AC Adaptor from the wall outlet or remove the battery pack, then reconnect it indicates that no power is supplied from the wall outlet and contact your Sony dealer. If the functions still do not work, press the RESET button using your camcorder...
Camera Operations Guide
Page 86
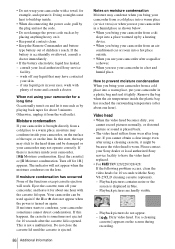
... state, the tape may stick to condense, your local authorized Sony service facility. - When not using a cleaning cassette, it . • Keep metal contacts clean. • Keep the Remote Commander and button- Your camcorder can be damaged or your camcorder may condense when you bring your camcorder from a cold place into a place warmed up inside your...
... state, the tape may stick to condense, your local authorized Sony service facility. - When not using a cleaning cassette, it . • Keep metal contacts clean. • Keep the Remote Commander and button- Your camcorder can be damaged or your camcorder may condense when you bring your camcorder from a cold place into a place warmed up inside your...
Camera Operations Guide
Page 90
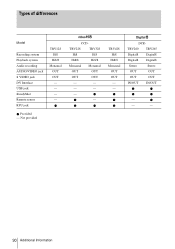
TRV228 TRV328 Hi8 Hi8 Hi8/8 Hi8/8 Monaural Monaural OUT OUT OUT OUT - - - - - z z TRV428 Hi8 Hi8/8 Monaural OUT OUT - - z z z DCR- z z - z - - 90 Additional Information TRV260 TRV265 Digital8 Digital8 Digital8 Digital8 Stereo Stereo OUT OUT OUT OUT IN/OUT IN/OUT z z z z - Not provided CCD- Types of differences Model Recording system Playback system Audio recording AUDIO/VIDEO jack S VIDEO jack DV Interface USB jack SteadyShot Remote sensor RFU jack TRV128 Hi8 Hi8/8 Monaural OUT OUT - - - - z z Provided -
TRV228 TRV328 Hi8 Hi8 Hi8/8 Hi8/8 Monaural Monaural OUT OUT OUT OUT - - - - - z z TRV428 Hi8 Hi8/8 Monaural OUT OUT - - z z z DCR- z z - z - - 90 Additional Information TRV260 TRV265 Digital8 Digital8 Digital8 Digital8 Stereo Stereo OUT OUT OUT OUT IN/OUT IN/OUT z z z z - Not provided CCD- Types of differences Model Recording system Playback system Audio recording AUDIO/VIDEO jack S VIDEO jack DV Interface USB jack SteadyShot Remote sensor RFU jack TRV128 Hi8 Hi8/8 Monaural OUT OUT - - - - z z Provided -
Camera Operations Guide
Page 92
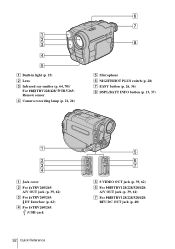
A Built-in light (p. 23) B Lens C Infrared ray emitter (p. 64, 70)/ For TRV228/428/ TRV265: Remote sensor D Camera recording lamp (p. 21, 26) E Microphone F NIGHTSHOT PLUS switch (p. 28) G EASY button (p. 26, 36) H DSPL/BATT INFO button (p. 13, 37) A Jack cover B For TRV260/265: A/V OUT jack (p. 39, 62) C For TRV260/265: DV Interface (p. 62) D For TRV260/265: (USB) jack 92 Quick Reference E S VIDEO OUT jack (p. 39, 62) F For TRV128/228/328/428: A/V OUT jack (p. 39, 61) G For TRV128/228/328/428: RFU DC OUT jack (p. 40)
A Built-in light (p. 23) B Lens C Infrared ray emitter (p. 64, 70)/ For TRV228/428/ TRV265: Remote sensor D Camera recording lamp (p. 21, 26) E Microphone F NIGHTSHOT PLUS switch (p. 28) G EASY button (p. 26, 36) H DSPL/BATT INFO button (p. 13, 37) A Jack cover B For TRV260/265: A/V OUT jack (p. 39, 62) C For TRV260/265: DV Interface (p. 62) D For TRV260/265: (USB) jack 92 Quick Reference E S VIDEO OUT jack (p. 39, 62) F For TRV128/228/328/428: A/V OUT jack (p. 39, 61) G For TRV128/228/328/428: RFU DC OUT jack (p. 40)

Camera Operations Guide
Page 95
...new button-type lithium battery with the + side facing up. 4 Insert the battery case back into the slit to control your camcorder, point towards the remote sensor to pull out the battery case. Tab 2 Remove the button-type lithium battery. Quick Reference A Transmitter After turning on the... tab, inset your fingernail into the Remote Commander until it clicks. ,continued Quick Reference 95 B REC START/STOP button (p. 21) C Power zoom button (p. 23) D Video control buttons...
...new button-type lithium battery with the + side facing up. 4 Insert the battery case back into the slit to control your camcorder, point towards the remote sensor to pull out the battery case. Tab 2 Remove the button-type lithium battery. Quick Reference A Transmitter After turning on the... tab, inset your fingernail into the Remote Commander until it clicks. ,continued Quick Reference 95 B REC START/STOP button (p. 21) C Power zoom button (p. 23) D Video control buttons...
Camera Operations Guide
Page 96
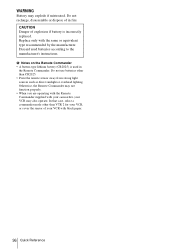
... same or equivalent type recommended by the manufacturer. b Notes on the Remote Commander • A button-type lithium battery (CR2025) is incorrectly replaced. Otherwise, the Remote Commander may not function properly. • When you are operating with the Remote Commander supplied with your camcorder, your VCR, or cover the sensor of explosion if battery is...
... same or equivalent type recommended by the manufacturer. b Notes on the Remote Commander • A button-type lithium battery (CR2025) is incorrectly replaced. Otherwise, the Remote Commander may not function properly. • When you are operating with the Remote Commander supplied with your camcorder, your VCR, or cover the sensor of explosion if battery is...
Camera Operations Guide
Page 98
... 12 Remaining battery time 22, 83 BEEP 59 BLACK FADER 30 Built-in light 23 BURN DVD/VCD 93 Button-type battery Commander 87 Remote Commander ... 95 C Camera settings data display 37 Cassette 18, 82 Charging the battery Battery Pack 12 Pre-installed button-type battery 87 ... editing (VIDEO EDIT 69 Digital zoom (D ZOOM) ...47 Digital8 system 82 Display DISPLAY 60 Display indicator .........97 DNR 52 Dual sound track tape ........51 Dubbing 61 E Easy Dubbing 64 Easy Handycam ...........26, 36 EDIT 51 END SEARCH 33 Exposure 27 F FADER 30 Focus 29 Frame recording (FRAME REC 55...
... 12 Remaining battery time 22, 83 BEEP 59 BLACK FADER 30 Built-in light 23 BURN DVD/VCD 93 Button-type battery Commander 87 Remote Commander ... 95 C Camera settings data display 37 Cassette 18, 82 Charging the battery Battery Pack 12 Pre-installed button-type battery 87 ... editing (VIDEO EDIT 69 Digital zoom (D ZOOM) ...47 Digital8 system 82 Display DISPLAY 60 Display indicator .........97 DNR 52 Dual sound track tape ........51 Dubbing 61 E Easy Dubbing 64 Easy Handycam ...........26, 36 EDIT 51 END SEARCH 33 Exposure 27 F FADER 30 Focus 29 Frame recording (FRAME REC 55...
Camera Operations Guide
Page 99
... 15 PROGRAM AE 44 R Recording capacity Display 22 REMAIN 55 Recording lamp (REC LAMP 60 Recording mode (REC MODE)........22, 54 Recording time 13 Remote Commander ..........95 Remote sensor 92 RESET 93 S S video 40, 62 Self-diagnosis display ........79 Setting the date and time....17 Skip scan 35 SP (Standard Play) See...
... 15 PROGRAM AE 44 R Recording capacity Display 22 REMAIN 55 Recording lamp (REC LAMP 60 Recording mode (REC MODE)........22, 54 Recording time 13 Remote Commander ..........95 Remote sensor 92 RESET 93 S S video 40, 62 Self-diagnosis display ........79 Setting the date and time....17 Skip scan 35 SP (Standard Play) See...


