PIXELA ImageMixer 1.0 Manual
Page 1
... PIXELA Corp. q The following page (or following item) can be referenced by clicking . All rights reserved. q Blue text indicates a link. This manual does not explain the basics of Windows or Macintosh operating systems. Basic operations, such as working with individual windows, are indicated in... of particular importance are based on left-hand side of PIXELA ImageMixer Ver.1.0 for Windows and Macintosh differ slightly. The screenshots for Sony (henceforth, 'ImageMixer'). q The beginning of the page can be referenced by clicking the menu (table of contents) displayed on general...
... PIXELA Corp. q The following page (or following item) can be referenced by clicking . All rights reserved. q Blue text indicates a link. This manual does not explain the basics of Windows or Macintosh operating systems. Basic operations, such as working with individual windows, are indicated in... of particular importance are based on left-hand side of PIXELA ImageMixer Ver.1.0 for Windows and Macintosh differ slightly. The screenshots for Sony (henceforth, 'ImageMixer'). q The beginning of the page can be referenced by clicking the menu (table of contents) displayed on general...
PIXELA ImageMixer 1.0 Manual
Page 19
...video camera connected directly to your computer, but is used primarily for DVDs and Digital Satellite Broadcasting. Other names for this format is used for still pictures taken with digital cameras. They are linked not only to the file on JPEG and TIFF file types, this interface include... i.LINK (in Windows), and FireWire (in Macintosh). 1-4 Basic Terms Basic terms used in ImageMixer IEEE1394 Also ...
...video camera connected directly to your computer, but is used primarily for DVDs and Digital Satellite Broadcasting. Other names for this format is used for still pictures taken with digital cameras. They are linked not only to the file on JPEG and TIFF file types, this interface include... i.LINK (in Windows), and FireWire (in Macintosh). 1-4 Basic Terms Basic terms used in ImageMixer IEEE1394 Also ...
PIXELA ImageMixer 1.0 Manual
Page 20
... be dragged to the media stored on your own layouts. Control points are called a transition. Object Figures, images, and text arranged in a particular layout is linked to getting rid of unnecessary portions of pre-designed pictures which one movie scene ends and another one begins is called templates, and they may...
... be dragged to the media stored on your own layouts. Control points are called a transition. Object Figures, images, and text arranged in a particular layout is linked to getting rid of unnecessary portions of pre-designed pictures which one movie scene ends and another one begins is called templates, and they may...
PIXELA ImageMixer 1.0 Manual
Page 71
... in Macintosh. In Windows, when a file added in an album cannot be found because it has been deleted or moved from the directory in which links it to add files, click [OK] in Windows, or click [Select] in the thumbnail list window. Clicking this is not displayed in ImageMixer. Thumbnails of...
... in Macintosh. In Windows, when a file added in an album cannot be found because it has been deleted or moved from the directory in which links it to add files, click [OK] in Windows, or click [Select] in the thumbnail list window. Clicking this is not displayed in ImageMixer. Thumbnails of...
Operating Instructions
Page 7
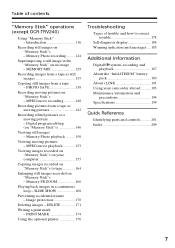
...(except DCR-TRV240) Using "Memory Stick" - PHOTO SAVE 138 Recording moving pictures on "Memory Stick"s - MPEG movie playback 153 Viewing images recorded on "Memory Stick"s on your camcorder abroad ... continuous loop - Memory Photo playback .......... 150 Viewing moving picture - DELETE 171 Writing a print mark - Digital program editing (on an image - Memory PB ZOOM 166 Playing back images in the "Memory Stick" on...and playback 187 About the "InfoLITHIUM" battery pack 189 About i.LINK 191 Using your computer 155 Copying images recorded on "Memory Stick"s to tape 164 ...
...(except DCR-TRV240) Using "Memory Stick" - PHOTO SAVE 138 Recording moving pictures on "Memory Stick"s - MPEG movie playback 153 Viewing images recorded on "Memory Stick"s on your camcorder abroad ... continuous loop - Memory Photo playback .......... 150 Viewing moving picture - DELETE 171 Writing a print mark - Digital program editing (on an image - Memory PB ZOOM 166 Playing back images in the "Memory Stick" on...and playback 187 About the "InfoLITHIUM" battery pack 189 About i.LINK 191 Using your computer 155 Copying images recorded on "Memory Stick"s to tape 164 ...

Operating Instructions
Page 59
...When you superimpose a title while you want to step 2. You can superimpose a title. When you select the title size LARGE, you dub a tape connecting your camcorder to change the language, select before step 2. When you select LARGE. •The title position changes as follows: SMALL y LARGE You cannot input 13 characters... return to use a custom title If you cannot record the title. 59 To use a custom title, select in LARGE size. If you use the i.LINK cable instead of a preset title If you are playing back You can record a title when you cannot choose position 9.
...When you superimpose a title while you want to step 2. You can superimpose a title. When you select the title size LARGE, you dub a tape connecting your camcorder to change the language, select before step 2. When you select LARGE. •The title position changes as follows: SMALL y LARGE You cannot input 13 characters... return to use a custom title If you cannot record the title. 59 To use a custom title, select in LARGE size. If you use the i.LINK cable instead of a preset title If you are playing back You can record a title when you cannot choose position 9.

Operating Instructions
Page 72
... VCR, and insert the recorded tape into your camcorder. (2) Set the input selector on the VCR to VCR on your camcorder. (4) Play back the recorded tape on your camcorder and to -digital connection, video and audio signals are transmitted in digital form for high-quality editing. You cannot dub ...can be reproduced more faithfully by using an S video cable (optional). If your camcorder and the VCR. With a digital-to DV IN/OUT on the VCR. Using the i.LINK cable (DV connecting cable) Simply connect the i.LINK cable (DV connecting cable) (optional) to DV IN/OUT on both your VCR....
... VCR, and insert the recorded tape into your camcorder. (2) Set the input selector on the VCR to VCR on your camcorder. (4) Play back the recorded tape on your camcorder and to -digital connection, video and audio signals are transmitted in digital form for high-quality editing. You cannot dub ...can be reproduced more faithfully by using an S video cable (optional). If your camcorder and the VCR. With a digital-to DV IN/OUT on the VCR. Using the i.LINK cable (DV connecting cable) Simply connect the i.LINK cable (DV connecting cable) (optional) to DV IN/OUT on both your VCR....

Operating Instructions
Page 73
... playback pause picture with the DV IN/OUT jack The recorded picture becomes rough. Pictures processed by picture effects, digital effects or the PB ZOOM function Pictures processed by picture effects, digital effects or the PB ZOOM function are output as the image signals from the DV IN/OUT jack. Editing Dubbing... a tape Note on tapes that are not recorded in the Hi8/standard 8 system Digital signals are not output through the DV IN/OUT jack. If you play back the picture using the...
... playback pause picture with the DV IN/OUT jack The recorded picture becomes rough. Pictures processed by picture effects, digital effects or the PB ZOOM function Pictures processed by picture effects, digital effects or the PB ZOOM function are output as the image signals from the DV IN/OUT jack. Editing Dubbing... a tape Note on tapes that are not recorded in the Hi8/standard 8 system Digital signals are not output through the DV IN/OUT jack. If you play back the picture using the...

Operating Instructions
Page 74
...on "Memory Stick"s (except DCR-TRV240). Operation 2 Performing the program (dubbing a tape) (p. 87). When you dub using the same VCR again, you may not be able to operate the dubbing function correctly, depending on the VCR. Notes •The Digital program editing works only for ...(p. 75). Step 3 Adjusting the synchronization of your camcorder. •When editing digital video, the operation signals cannot be selected by frame. Set CONTROL to 20 programs. Your camcorder can dub on tapes) You can be sent with an i.LINK cable (DV connecting cable), you can skip steps ...
...on "Memory Stick"s (except DCR-TRV240). Operation 2 Performing the program (dubbing a tape) (p. 87). When you dub using the same VCR again, you may not be able to operate the dubbing function correctly, depending on the VCR. Notes •The Digital program editing works only for ...(p. 75). Step 3 Adjusting the synchronization of your camcorder. •When editing digital video, the operation signals cannot be selected by frame. Set CONTROL to 20 programs. Your camcorder can dub on tapes) You can be sent with an i.LINK cable (DV connecting cable), you can skip steps ...
Operating Instructions
Page 75
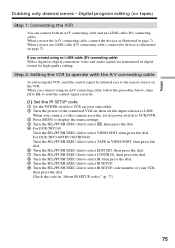
...the dial. 5 For DCR-TRV240: Turn the SEL/PUSH EXEC dial to LINE. When you use the A/V connecting cable, connect the devices as illustrated on tapes) Step 1: Connecting the VCR You can connect both an A/V connecting cable and an i.LINK cable (DV connecting cable). Digital program editing (on page ...72. When you connect using an i.LINK cable (DV connecting cable) With a digital-to VCR on your camcorder. 2 Turn the power of your VCR, then press the dial. ...
...the dial. 5 For DCR-TRV240: Turn the SEL/PUSH EXEC dial to LINE. When you use the A/V connecting cable, connect the devices as illustrated on tapes) Step 1: Connecting the VCR You can connect both an A/V connecting cable and an i.LINK cable (DV connecting cable). Digital program editing (on page ...72. When you connect using an i.LINK cable (DV connecting cable) With a digital-to VCR on your camcorder. 2 Turn the power of your VCR, then press the dial. ...

Operating Instructions
Page 76
Dubbing only desired scenes - Digital program editing (on tapes) MENU 5 For DCR-TRV240: OTHERS DATA CODE BEEP COMMANDER DISPLAY VIDEO EDIT READY INDICATOR RETURN [MENU] : END VIDEO EDIT MARK UNDO ERASE ALL START EDIT SET 0:08:55:06 1 IN TOTAL 0:00:00:00 SCENE 0 [MENU] : END For DCR-TRV340/TRV740/TRV840: OTHERS DATA CODE...EDIT SET IR TOTAL 0:00:00:00 SCENE 0 [MENU] : END 0:08:55:06 7 VIDEO EDIT 0:08:55:06 EDIT SET CONTROL IR ADJ TEST i. LINK "CUT-IN" "CUT-OUT" IR SETUP PAUSEMODE IR TEST RETURN [MENU] : END 10 VIDEO EDIT EDIT SET CONTROL ADJ TEST "CUT-IN" "CUT-OUT" IR...
Dubbing only desired scenes - Digital program editing (on tapes) MENU 5 For DCR-TRV240: OTHERS DATA CODE BEEP COMMANDER DISPLAY VIDEO EDIT READY INDICATOR RETURN [MENU] : END VIDEO EDIT MARK UNDO ERASE ALL START EDIT SET 0:08:55:06 1 IN TOTAL 0:00:00:00 SCENE 0 [MENU] : END For DCR-TRV340/TRV740/TRV840: OTHERS DATA CODE...EDIT SET IR TOTAL 0:00:00:00 SCENE 0 [MENU] : END 0:08:55:06 7 VIDEO EDIT 0:08:55:06 EDIT SET CONTROL IR ADJ TEST i. LINK "CUT-IN" "CUT-OUT" IR SETUP PAUSEMODE IR TEST RETURN [MENU] : END 10 VIDEO EDIT EDIT SET CONTROL ADJ TEST "CUT-IN" "CUT-OUT" IR...
Operating Instructions
Page 80
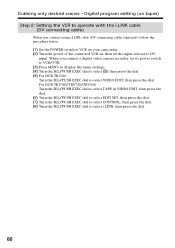
... to select , then press the dial. (5) For DCR-TRV240: Turn the SEL/PUSH EXEC dial to DV input. When you connect using i.LINK cable (DV connecting cable) (optional), follow the procedure below. (1) Set the POWER switch to VCR on your camcorder. (2) Turn the power of the connected VCR on tapes...) Step 2: Setting the VCR to operate with the i.LINK cable (DV connecting cable) When you connect a digital video camera recorder, set the input selector to select VIDEO EDIT, then...
... to select , then press the dial. (5) For DCR-TRV240: Turn the SEL/PUSH EXEC dial to DV input. When you connect using i.LINK cable (DV connecting cable) (optional), follow the procedure below. (1) Set the POWER switch to VCR on your camcorder. (2) Turn the power of the connected VCR on tapes...) Step 2: Setting the VCR to operate with the i.LINK cable (DV connecting cable) When you connect a digital video camera recorder, set the input selector to select VIDEO EDIT, then...

Operating Instructions
Page 81
...-IN" "CUT-OUT" IR SETUP PAUSEMODE IR TEST RETURN [MENU] : END When you connect using an i.LINK cable (DV connecting cable) You cannot dub the titles and display indicators. 81 LINK ADJ TEST "CUT-IN" "CUT-OUT" IR SETUP PAUSEMODE IR TEST RETURN [MENU] : END 6 VIDEO EDIT MARK UNDO...0:00:00:00 SCENE 0 [MENU] : END 0:08:55:06 7 VIDEO EDIT 0:08:55:06 EDIT SET CONTROL IR ADJ TEST i. Digital program editing (on tapes) MENU 5 For DCR-TRV240: OTHERS DATA CODE BEEP COMMANDER DISPLAY VIDEO EDIT READY INDICATOR RETURN [MENU] : END VIDEO EDIT MARK UNDO ERASE ALL START EDIT SET...
...-IN" "CUT-OUT" IR SETUP PAUSEMODE IR TEST RETURN [MENU] : END When you connect using an i.LINK cable (DV connecting cable) You cannot dub the titles and display indicators. 81 LINK ADJ TEST "CUT-IN" "CUT-OUT" IR SETUP PAUSEMODE IR TEST RETURN [MENU] : END 6 VIDEO EDIT MARK UNDO...0:00:00:00 SCENE 0 [MENU] : END 0:08:55:06 7 VIDEO EDIT 0:08:55:06 EDIT SET CONTROL IR ADJ TEST i. Digital program editing (on tapes) MENU 5 For DCR-TRV240: OTHERS DATA CODE BEEP COMMANDER DISPLAY VIDEO EDIT READY INDICATOR RETURN [MENU] : END VIDEO EDIT MARK UNDO ERASE ALL START EDIT SET...

Operating Instructions
Page 82
Digital program editing (on the screen. IN and OUT are recorded on your camcorder. (2) Insert a blank tape (or a tape you do not need to set . (11) Turn the SEL/PUSH EXEC dial to select RETURN, then press the dial. ... value of IN, then press the dial. Dubbing only desired scenes - Before operation, eject the cassette from your camcorder and the VCR. The calculated stop position for adjusting the synchronization. When you select i.LINK in the VCR, then start position for notes. The EXECUTING indicator flashes on tapes) Step 3: Adjusting the synchronization...
Digital program editing (on the screen. IN and OUT are recorded on your camcorder. (2) Insert a blank tape (or a tape you do not need to set . (11) Turn the SEL/PUSH EXEC dial to select RETURN, then press the dial. ... value of IN, then press the dial. Dubbing only desired scenes - Before operation, eject the cassette from your camcorder and the VCR. The calculated stop position for adjusting the synchronization. When you select i.LINK in the VCR, then start position for notes. The EXECUTING indicator flashes on tapes) Step 3: Adjusting the synchronization...

Operating Instructions
Page 83
Be sure to allow about 10 seconds' lead before starting recording. •When you connect with an i.LINK cable (DV connecting cable) you may not be able to operate the dubbing function correctly, depending on tapes) Editing 3 VIDEO EDIT 0:08:55:06 EDIT... : END Notes •When you complete step 3, the image used to IR in digital format. 83 Dubbing only desired scenes - Video and audio signals are transmitted in the menu settings. Digital program editing (on the VCR. Keep the i.LINK connection, and set CONTROL to adjust synchronization is recorded for about 50 seconds. •...
Be sure to allow about 10 seconds' lead before starting recording. •When you connect with an i.LINK cable (DV connecting cable) you may not be able to operate the dubbing function correctly, depending on tapes) Editing 3 VIDEO EDIT 0:08:55:06 EDIT... : END Notes •When you complete step 3, the image used to IR in digital format. 83 Dubbing only desired scenes - Video and audio signals are transmitted in the menu settings. Digital program editing (on the VCR. Keep the i.LINK connection, and set CONTROL to adjust synchronization is recorded for about 50 seconds. •...
Operating Instructions
Page 87
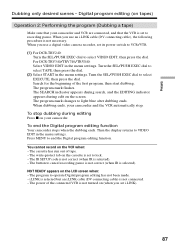
...DCR-TRV240: Turn the SEL/PUSH EXEC dial to select TAPE, then press the dial. (2) Select START in the menu settings. The SEARCH indicator appears during search, and the EDITING indicator appears during editing Press x on tapes) Operation 2: Performing the program (Dubbing a tape) Make sure that your camcorder...VCR is selected). i.LINK is selected but an i.LINK cable (DV connecting cable) is selected). - Editing Dubbing only desired scenes - Turn the SEL/PUSH EXEC dial to recording pause. When dubbing ends, your camcorder. Digital program editing (on your camcorder and the VCR ...
...DCR-TRV240: Turn the SEL/PUSH EXEC dial to select TAPE, then press the dial. (2) Select START in the menu settings. The SEARCH indicator appears during search, and the EDITING indicator appears during editing Press x on tapes) Operation 2: Performing the program (Dubbing a tape) Make sure that your camcorder...VCR is selected). i.LINK is selected but an i.LINK cable (DV connecting cable) is selected). - Editing Dubbing only desired scenes - Turn the SEL/PUSH EXEC dial to recording pause. When dubbing ends, your camcorder. Digital program editing (on your camcorder and the VCR ...

Operating Instructions
Page 88
...settings. (3) Turn the SEL/PUSH EXEC dial to set A/V t DV OUT in to your camcorder. S VIDEO AUDIO/VIDEO VCR OUT S VIDEO VIDEO AUDIO : Signal flow DV IN/OUT (optional) i.LINK After capturing images and sound Stop capturing procedures on your computer. If your computer has a USB... jack You can connect your camcorder to your computer and the software you convert analog video signals into digital video signals via your camcorder when the video tapes include...
...settings. (3) Turn the SEL/PUSH EXEC dial to set A/V t DV OUT in to your camcorder. S VIDEO AUDIO/VIDEO VCR OUT S VIDEO VIDEO AUDIO : Signal flow DV IN/OUT (optional) i.LINK After capturing images and sound Stop capturing procedures on your computer. If your computer has a USB... jack You can connect your camcorder to your computer and the software you convert analog video signals into digital video signals via your camcorder when the video tapes include...

Operating Instructions
Page 91
... equipment. 91 When you play back the picture using the i.LINK cable (DV connecting cable). The DV IN indicator may appear on your camcorder at the scene where you want to start playback. With a digital-to-digital connection, video and audio signals are transmitted in digital form for high-quality editing. (1) Insert a blank tape (or...
... equipment. 91 When you play back the picture using the i.LINK cable (DV connecting cable). The DV IN indicator may appear on your camcorder at the scene where you want to start playback. With a digital-to-digital connection, video and audio signals are transmitted in digital form for high-quality editing. (1) Insert a blank tape (or...

Operating Instructions
Page 112
... DCR-TRV240 112 ** To dub a tape to another VCR You cannot select AUDIO MODE for tapes recorded in the Hi8/standard 8 system to another VCR using a Sony cassette so that you can select AUDIO MODE when you dub tapes recorded in the Digital8 system. You, however, can get the most out of your camcorder...-bit mode (two stereo sounds) To record in the 16-bit mode (one tape or you record some scenes in the LP mode on your camcorder, we recommend using the i.LINK cable.
... DCR-TRV240 112 ** To dub a tape to another VCR You cannot select AUDIO MODE for tapes recorded in the Hi8/standard 8 system to another VCR using a Sony cassette so that you can select AUDIO MODE when you dub tapes recorded in the Digital8 system. You, however, can get the most out of your camcorder...-bit mode (two stereo sounds) To record in the 16-bit mode (one tape or you record some scenes in the LP mode on your camcorder, we recommend using the i.LINK cable.

Operating Instructions
Page 114
... MEMORY CAMERA VCR MEMORY Note If you press DISPLAY with DISPLAY set to V-OUT/LCD in memory even when the battery is connected with the i.LINK cable) In more than five minutes after removing the power source The AUDIO MIX, FLASH LVL, COMMANDER and HiFi SOUND settings are returned to set... clock changes by other VCR's remote control To show the display on the LCD screen and in the viewfinder To show the display on your camcorder To output the beep instead of the melody To cancel all sound including shutter sound To activate the Remote Commander supplied with your...
... MEMORY CAMERA VCR MEMORY Note If you press DISPLAY with DISPLAY set to V-OUT/LCD in memory even when the battery is connected with the i.LINK cable) In more than five minutes after removing the power source The AUDIO MIX, FLASH LVL, COMMANDER and HiFi SOUND settings are returned to set... clock changes by other VCR's remote control To show the display on the LCD screen and in the viewfinder To show the display on your camcorder To output the beep instead of the melody To cancel all sound including shutter sound To activate the Remote Commander supplied with your...


