
Operating Instructions
Page 2
... handle damaged or leaking lithium ion battery. This symbol is very easy to come. Declaration of the FCC Rules. Telephone No.: 201-930-6972 This device complies with Part 15 of Conformity Trade Name: SONY Model No.: DCR-TRV15, DCR-TRV17 Responsible Party:Sony Electronics Inc. Welcome! Congratulations on your nearest Sony Service Center or Factory Service...
... handle damaged or leaking lithium ion battery. This symbol is very easy to come. Declaration of the FCC Rules. Telephone No.: 201-930-6972 This device complies with Part 15 of Conformity Trade Name: SONY Model No.: DCR-TRV15, DCR-TRV17 Responsible Party:Sony Electronics Inc. Welcome! Congratulations on your nearest Sony Service Center or Factory Service...

Operating Instructions
Page 5
... Remote Commander (2) (p. 178) 4 NP-FM30 battery pack (1) (p. 12, 13) 5 A/V connecting cable (1) (p. 35, 66) 6 Shoulder strap (1) (p. 173) 7 Lens cap (1) (p. 21) 8 "Memory Stick" (1) (p. 103) DCR-TRV17 only 9 USB cable (1) (p. 135) DCR-TRV17 only 0 CD-ROM (SPVD-004, USB Driver) (1) (p. 135) DCR-TRV17 only Contents of the recording cannot be compensated if recording or playback is not made due...
... Remote Commander (2) (p. 178) 4 NP-FM30 battery pack (1) (p. 12, 13) 5 A/V connecting cable (1) (p. 35, 66) 6 Shoulder strap (1) (p. 173) 7 Lens cap (1) (p. 21) 8 "Memory Stick" (1) (p. 103) DCR-TRV17 only 9 USB cable (1) (p. 135) DCR-TRV17 only 0 CD-ROM (SPVD-004, USB Driver) (1) (p. 135) DCR-TRV17 only Contents of the recording cannot be compensated if recording or playback is not made due...
Operating Instructions
Page 6
...battery pack 13 Connecting to the wall outlet ....... 17 Step 2 Setting the date and time ......... 18 Step 3 Inserting a cassette 20 Recording - Photo search/Photo scan 64 Editing Dubbing a tape 66 Dubbing only desired scenes - Digital program editing 68 Using with digital effects 58 Enlarging images recorded on "Memory Stick"s - Signal convert function 79 Recording video... 96 "Memory Stick" Operations (DCR-TRV17 only) Using a "Memory Stick" - Picture effect .. 45 Using special effects - Table of recorded tape by date - Basics Recording a picture 21 Shooting backlit subjects...
...battery pack 13 Connecting to the wall outlet ....... 17 Step 2 Setting the date and time ......... 18 Step 3 Inserting a cassette 20 Recording - Photo search/Photo scan 64 Editing Dubbing a tape 66 Dubbing only desired scenes - Digital program editing 68 Using with digital effects 58 Enlarging images recorded on "Memory Stick"s - Signal convert function 79 Recording video... 96 "Memory Stick" Operations (DCR-TRV17 only) Using a "Memory Stick" - Picture effect .. 45 Using special effects - Table of recorded tape by date - Basics Recording a picture 21 Shooting backlit subjects...

Operating Instructions
Page 7
...Viewing a moving picture - MPEG movie playback 132 Viewing images using computer ...... 134 Copying the image recorded on "Memory Stick"s to tapes 138 Enlarging still images recorded on a moving picture - SLIDE SHOW 142 Preventing accidental erasure - Photo save 127 Viewing a ... solutions 149 Self-diagnosis display 155 Warning indicators and messages .... 156 Additional Information Usable cassettes 158 About "InfoLITHIUM" battery pack 160 About i.LINK 162 Using your camcorder abroad .......... 164 Maintenance information and precautions 165 Specifications 169 Quick Reference...
...Viewing a moving picture - MPEG movie playback 132 Viewing images using computer ...... 134 Copying the image recorded on "Memory Stick"s to tapes 138 Enlarging still images recorded on a moving picture - SLIDE SHOW 142 Preventing accidental erasure - Photo save 127 Viewing a ... solutions 149 Self-diagnosis display 155 Warning indicators and messages .... 156 Additional Information Usable cassettes 158 About "InfoLITHIUM" battery pack 160 About i.LINK 162 Using your camcorder abroad .......... 164 Maintenance information and precautions 165 Specifications 169 Quick Reference...

Operating Instructions
Page 8
... portion of the back of the cassette to the basic features of the arrow and open the lid. Connecting the power cord (p. 17) Use the battery pack when using your camcorder. Open the DC IN jack cover. Insert the cassette in parentheses "( )" for more information. Inserting a cassette (p. 20) 1 Slide OPEN/ EJECT...
... portion of the back of the cassette to the basic features of the arrow and open the lid. Connecting the power cord (p. 17) Use the battery pack when using your camcorder. Open the DC IN jack cover. Insert the cassette in parentheses "( )" for more information. Inserting a cassette (p. 20) 1 Slide OPEN/ EJECT...

Operating Instructions
Page 9
... against its eyecup. REW 3 Press N to off. When you want to CAMERA while pressing the small green button. Quick Start Guide Recording a picture (p. 21) 1 Remove the lens cap. 2 Set the POWER switch to record the date and time for a picture, set to start playback. Your camcorder ...panel, or the battery pack. 9 The picture appears on the LCD screen (p. 31) 1 Set the POWER switch to rewind the tape. Monitoring the playback picture on the screen. POWER VCR OFF(CHG) CAMERA MEMORY 2 Press m to VCR while pressing the small green button. To stop recording, press START/ STOP...
... against its eyecup. REW 3 Press N to off. When you want to CAMERA while pressing the small green button. Quick Start Guide Recording a picture (p. 21) 1 Remove the lens cap. 2 Set the POWER switch to record the date and time for a picture, set to start playback. Your camcorder ...panel, or the battery pack. 9 The picture appears on the LCD screen (p. 31) 1 Set the POWER switch to rewind the tape. Monitoring the playback picture on the screen. POWER VCR OFF(CHG) CAMERA MEMORY 2 Press m to VCR while pressing the small green button. To stop recording, press START/ STOP...

Operating Instructions
Page 12
Step 1 Preparing the power supply Installing the battery pack Install the battery pack to use your camcorder outdoors. (1) Lift up the viewfinder. (2) Slide the battery pack down until it clicks. 1 2 To remove the battery pack (1) Lift up the viewfinder. (2) Slide the battery pack out in the direction of the arrow while pressing BATT down. 1 2 2 BATT release button If you use the large capacity battery pack If you install the NP-FM70/FM90/FM91 battery pack on your camcorder, extend its viewfinder. 12
Step 1 Preparing the power supply Installing the battery pack Install the battery pack to use your camcorder outdoors. (1) Lift up the viewfinder. (2) Slide the battery pack down until it clicks. 1 2 To remove the battery pack (1) Lift up the viewfinder. (2) Slide the battery pack out in the direction of the arrow while pressing BATT down. 1 2 2 BATT release button If you use the large capacity battery pack If you install the NP-FM70/FM90/FM91 battery pack on your camcorder, extend its viewfinder. 12
Operating Instructions
Page 13
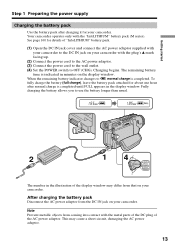
...to the wall outlet. (4) Set the POWER switch to , normal charge is completed. Fully charging the battery allows you to use the battery longer than usual. 2 1 4 POWER VCR OFF(CHG) CAMERA MEMORY The number in minutes on your camcorder to the DC IN jack on the display window. Charging ...begins. To fully charge the battery (full charge), leave the battery pack attached for about one hour after charging it for details of ...
...to the wall outlet. (4) Set the POWER switch to , normal charge is completed. Fully charging the battery allows you to use the battery longer than usual. 2 1 4 POWER VCR OFF(CHG) CAMERA MEMORY The number in minutes on your camcorder to the DC IN jack on the display window. Charging ...begins. To fully charge the battery (full charge), leave the battery pack attached for about one hour after charging it for details of ...

Operating Instructions
Page 14
... indicator The remaining battery time you record with the viewfinder. Until your camcorder calculates the actual remaining battery time "- - - The remaining battery time indicator in the display window. Charging time Battery pack NP-FM30 (supplied) NP-FM50 NP-FM70 NP-FM90 NP-FM91 Full charge (Normal charge) 145...90) 240 (180) 330 (270) 360 (300) Approximate minutes to charge an empty battery pack at 25 °C (77 °F). 14 min" appears in the display window indicates the approximate recording time with the viewfinder is charged fully "FULL" appears in the display window. Step ...
... indicator The remaining battery time you record with the viewfinder. Until your camcorder calculates the actual remaining battery time "- - - The remaining battery time indicator in the display window. Charging time Battery pack NP-FM30 (supplied) NP-FM50 NP-FM70 NP-FM90 NP-FM91 Full charge (Normal charge) 145...90) 240 (180) 330 (270) 360 (300) Approximate minutes to charge an empty battery pack at 25 °C (77 °F). 14 min" appears in the display window indicates the approximate recording time with the viewfinder is charged fully "FULL" appears in the display window. Step ...
Operating Instructions
Page 15
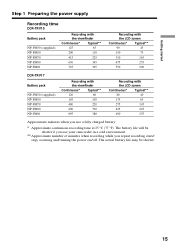
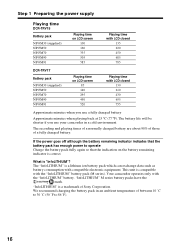
Getting started Step 1 Preparing the power supply Recording time DCR-TRV15 Battery pack NP-FM30 (supplied) NP-FM50 NP-FM70 NP-FM90 NP-FM91 Recording with the viewfinder Continuous* Typical** 125 65 200 110 415 225 630 345 725 395 Recording with the LCD screen Continuous* Typical** 90 45 150 75 310 165 475 255 550 290...
Getting started Step 1 Preparing the power supply Recording time DCR-TRV15 Battery pack NP-FM30 (supplied) NP-FM50 NP-FM70 NP-FM90 NP-FM91 Recording with the viewfinder Continuous* Typical** 125 65 200 110 415 225 630 345 725 395 Recording with the LCD screen Continuous* Typical** 90 45 150 75 310 165 475 255 550 290...
Operating Instructions
Page 16
... Playing time on the battery remaining indicator is "InfoLITHIUM"? The recording and playing times of a normally charged battery are about 90% of those of a fully charged battery. The battery life will be shorter if you use your camcorder in an ambient temperature of Sony Corporation. Step 1 Preparing the power supply Playing time DCR-TRV15 Battery pack NP-FM30 (supplied...
... Playing time on the battery remaining indicator is "InfoLITHIUM"? The recording and playing times of a normally charged battery are about 90% of those of a fully charged battery. The battery life will be shorter if you use your camcorder in an ambient temperature of Sony Corporation. Step 1 Preparing the power supply Playing time DCR-TRV15 Battery pack NP-FM30 (supplied...
Operating Instructions
Page 17
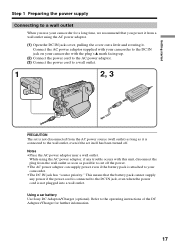
... to the DC IN jack, even when the power cord is attached to your camcorder. •The DC IN jack has "source priority." Using a car battery Use Sony DC Adaptor/Charger (optional). While using the AC power adaptor. (1) Open the DC IN jack cover, pulling the cover out a little and rotating it... from the wall outlet as soon as it . Refer to the operating instractions of the DC Adaptor/Charger for a long time, we recommend that the battery pack cannot supply any trouble occurs with the plug's v mark facing up. (2) Connect the power cord to the AC power adaptor. (3) Connect the power ...
... to the DC IN jack, even when the power cord is attached to your camcorder. •The DC IN jack has "source priority." Using a car battery Use Sony DC Adaptor/Charger (optional). While using the AC power adaptor. (1) Open the DC IN jack cover, pulling the cover out a little and rotating it... from the wall outlet as soon as it . Refer to the operating instractions of the DC Adaptor/Charger for a long time, we recommend that the battery pack cannot supply any trouble occurs with the plug's v mark facing up. (2) Connect the power cord to the AC power adaptor. (3) Connect the power ...

Operating Instructions
Page 18
If you set the year, then the month, the day, the hour and then the minute. (1) Set the POWER switch to CAMERA or MEMORY (DCR-TRV17 only), and then press MENU to display the menu settings. (2) Turn the SEL/PUSH EXEC dial to select , then press the dial. (3) Turn the ... months, the date and time settings may be released (bars may appear) because the built-in rechargeable battery in your camcorder will be displayed each time that you set the POWER switch to CAMERA/ MEMORY (DCR-TRV17 only) unless you do not use your camcorder for the first time. "CLOCK SET" will have...
If you set the year, then the month, the day, the hour and then the minute. (1) Set the POWER switch to CAMERA or MEMORY (DCR-TRV17 only), and then press MENU to display the menu settings. (2) Turn the SEL/PUSH EXEC dial to select , then press the dial. (3) Turn the ... months, the date and time settings may be released (bars may appear) because the built-in rechargeable battery in your camcorder will be displayed each time that you set the POWER switch to CAMERA/ MEMORY (DCR-TRV17 only) unless you do not use your camcorder for the first time. "CLOCK SET" will have...
Operating Instructions
Page 22
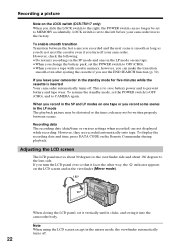
...; Do not mix recordings in the SP mode and ones in the mirror mode, the viewfinder automatically turns off . If you leave your camcorder in the SP and LP modes on one tape. • When you change the battery pack, set the POWER switch to OFF (CHG), and to CAMERA again. If you... turn off your camcorder leaves the factory. Recording a picture Note on the LOCK switch (DCR-TRV17 only) When you slide the LOCK switch to the right, the...
...; Do not mix recordings in the SP mode and ones in the mirror mode, the viewfinder automatically turns off . If you leave your camcorder in the SP and LP modes on one tape. • When you change the battery pack, set the POWER switch to OFF (CHG), and to CAMERA again. If you... turn off your camcorder leaves the factory. Recording a picture Note on the LOCK switch (DCR-TRV17 only) When you slide the LOCK switch to the right, the...
Operating Instructions
Page 25
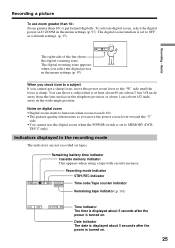
...set to MEMORY (DCR- You can shoot a subject that is sharp. Indicators displayed in the recording mode The indicators are not recorded on digital zoom •Digital zoom starts to OFF as you select the digital power in the wide-angle position. Recording mode indicator STBY/REC... as a default settings. (p. 97) W T The right side of the bar shows the digital zooming zone. The digital zoom function is performed digitally. Notes on tapes. Remaining battery time indicator Cassette memory indicator This appears when using a tape with cassette memory. Date indicator The...
...set to MEMORY (DCR- You can shoot a subject that is sharp. Indicators displayed in the recording mode The indicators are not recorded on digital zoom •Digital zoom starts to OFF as you select the digital power in the wide-angle position. Recording mode indicator STBY/REC... as a default settings. (p. 97) W T The right side of the bar shows the digital zooming zone. The digital zoom function is performed digitally. Notes on tapes. Remaining battery time indicator Cassette memory indicator This appears when using a tape with cassette memory. Date indicator The...
Operating Instructions
Page 26
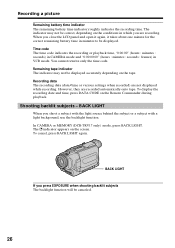
...be canceled. 26 You cannot rewrite only the time code. To display the recording date and time, press DATA CODE on the screen. Shooting backlit subjects - In CAMERA or MEMORY (DCR-TRV17 only) mode, press BACK LIGHT. indicator appears on the Remote Commander ...the correct remaining battery time in minutes to be correct, depending on the tape. The . However, they are not displayed while recording. To cancel, press BACK LIGHT again. Recording a picture Remaining battery time indicator The remaining battery time indicator roughly indicates the recording time. Remaining ...
...be canceled. 26 You cannot rewrite only the time code. To display the recording date and time, press DATA CODE on the screen. Shooting backlit subjects - In CAMERA or MEMORY (DCR-TRV17 only) mode, press BACK LIGHT. indicator appears on the Remote Commander ...the correct remaining battery time in minutes to be correct, depending on the tape. The . However, they are not displayed while recording. To cancel, press BACK LIGHT again. Recording a picture Remaining battery time indicator The remaining battery time indicator roughly indicates the recording time. Remaining ...
Operating Instructions
Page 33
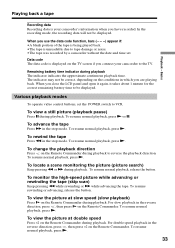
... unreadable due to tape damage or noise. •The tape was recorded by a camcorder without the date and time set the POWER switch to be displayed. When you are playing back. Various playback modes To operate video control buttons, set . To resume normal playback, press N. To ... the TV. Data code The data code is displayed on the Remote Commander during playback. To resume normal playback, release the button. Remaining battery time indicator during playback. To resume normal playback, press N. 33 To rewind the tape Press m in the stop mode. To advance the...
... unreadable due to tape damage or noise. •The tape was recorded by a camcorder without the date and time set the POWER switch to be displayed. When you are playing back. Various playback modes To operate video control buttons, set . To resume normal playback, press N. To ... the TV. Data code The data code is displayed on the Remote Commander during playback. To resume normal playback, release the button. Remaining battery time indicator during playback. To resume normal playback, press N. 33 To rewind the tape Press m in the stop mode. To advance the...
Operating Instructions
Page 41
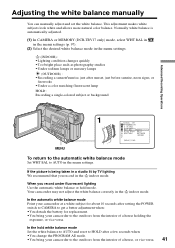
...by TV lighting We recommend that you record under fluorescent lighting Use the automatic white...Recording a sunset/sunrise, just after setting the POWER switch to CAMERA to get a better adjustment when: •You detach the battery... for about 10 seconds after sunset, just before sunrise, neon signs, or fireworks •Under a color matching fluorescent lamp HOLD : Recording a single-colored subject or background Advanced Recording...the exposure, or vice versa. When you record in the menu settings. Adjusting the white ...
...by TV lighting We recommend that you record under fluorescent lighting Use the automatic white...Recording a sunset/sunrise, just after setting the POWER switch to CAMERA to get a better adjustment when: •You detach the battery... for about 10 seconds after sunset, just before sunrise, neon signs, or fireworks •Under a color matching fluorescent lamp HOLD : Recording a single-colored subject or background Advanced Recording...the exposure, or vice versa. When you record in the menu settings. Adjusting the white ...
Operating Instructions
Page 87
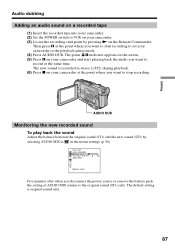
... dubbing Adding an audio sound on a recorded tape (1) Insert the recorded tape into your camcorder. (2) Set the POWER switch to VCR on your camcorder to the playback pause mode. (4) Press AUDIO DUB. Then press X at the point where you disconnect the power source or remove the battery pack, the setting of AUDIO MIX...
... dubbing Adding an audio sound on a recorded tape (1) Insert the recorded tape into your camcorder. (2) Set the POWER switch to VCR on your camcorder to the playback pause mode. (4) Press AUDIO DUB. Then press X at the point where you disconnect the power source or remove the battery pack, the setting of AUDIO MIX...

Operating Instructions
Page 98
... and recording time for Interval recording function (p. 54). VCR CAMERA MEMORY Notes on LCD B.L. and VF B.L. •When you select "BRIGHT", battery life is reduced by about 10 percent during recording. •When you use power sources other than the battery pack, "BRIGHT" is automatically selected. 98 To deactivate Interval recording function. ST1 ST2 To output digital images...
... and recording time for Interval recording function (p. 54). VCR CAMERA MEMORY Notes on LCD B.L. and VF B.L. •When you select "BRIGHT", battery life is reduced by about 10 percent during recording. •When you use power sources other than the battery pack, "BRIGHT" is automatically selected. 98 To deactivate Interval recording function. ST1 ST2 To output digital images...


