
Handycam® Handbook
Page 11
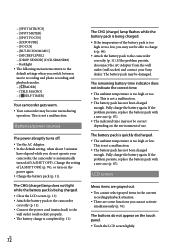
Getting started Step 1: Charging the battery pack DCR-SR68/SR88 Battery pack CHG (charge) lamp DCR-SX43/SX44/SX63 DC IN jack DC plug AC Adaptor Power cord (Mains lead) To the wall outlet (wall socket) CHG (charge) lamp Getting started Battery pack DC IN jack DC plug AC Adaptor Power cord (Mains lead) To the wall outlet (wall socket) US 11
Getting started Step 1: Charging the battery pack DCR-SR68/SR88 Battery pack CHG (charge) lamp DCR-SX43/SX44/SX63 DC IN jack DC plug AC Adaptor Power cord (Mains lead) To the wall outlet (wall socket) CHG (charge) lamp Getting started Battery pack DC IN jack DC plug AC Adaptor Power cord (Mains lead) To the wall outlet (wall socket) US 11

Handycam® Handbook
Page 12
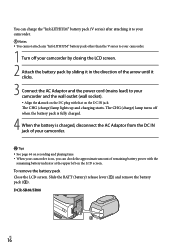
...of the arrow until it clicks. 3 Connect the AC Adaptor and the power cord (mains lead) to your camcorder. 1 Turn off your camcorder by closing the LCD screen. 2 Attach the battery pack by sliding it to your camcorder. Notes You cannot attach any "InfoLITHIUM" battery pack ...°F). 10 C to 30 C (50 °F to 86 °F) is on the DC IN jack. Charging time Approximate time (min.) required when you can charge the "InfoLITHIUM" battery pack (V series) after attaching it in the direction of remaining battery power with that on , you ...
...of the arrow until it clicks. 3 Connect the AC Adaptor and the power cord (mains lead) to your camcorder. 1 Turn off your camcorder by closing the LCD screen. 2 Attach the battery pack by sliding it to your camcorder. Notes You cannot attach any "InfoLITHIUM" battery pack ...°F). 10 C to 30 C (50 °F to 86 °F) is on the DC IN jack. Charging time Approximate time (min.) required when you can charge the "InfoLITHIUM" battery pack (V series) after attaching it in the direction of remaining battery power with that on , you ...
Handycam® Handbook
Page 72
... (p. 87). The indicated time may be able to charge it (p. 86). Attach the battery pack to the camcorder correctly (p. 11). This is too high or too low. The buttons do not operate your Sony dealer. If the problem persists, disconnect the AC Adaptor from the... lightly. This is completed (p. 11). US 72 The CHG (charge) lamp flashes while the battery pack is being charged. Close the LCD screen (p. 11). Attach the battery pack to the camcorder correctly (p. 11). Connect the power cord (mains lead) to the wall outlet (wall socket) properly. ...
... (p. 87). The indicated time may be able to charge it (p. 86). Attach the battery pack to the camcorder correctly (p. 11). This is too high or too low. The buttons do not operate your Sony dealer. If the problem persists, disconnect the AC Adaptor from the... lightly. This is completed (p. 11). US 72 The CHG (charge) lamp flashes while the battery pack is being charged. Close the LCD screen (p. 11). Attach the battery pack to the camcorder correctly (p. 11). Connect the power cord (mains lead) to the wall outlet (wall socket) properly. ...
Operating Guide
Page 15
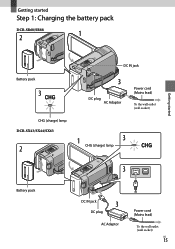
Getting started Step 1: Charging the battery pack DCR-SR68/SR88 Battery pack CHG (charge) lamp DCR-SX43/SX44/SX63 DC IN jack DC plug AC Adaptor Power cord (Mains lead) To the wall outlet (wall socket) CHG (charge) lamp Getting started Battery pack DC IN jack DC plug AC Adaptor Power cord (Mains lead) To the wall outlet (wall socket) US 15
Getting started Step 1: Charging the battery pack DCR-SR68/SR88 Battery pack CHG (charge) lamp DCR-SX43/SX44/SX63 DC IN jack DC plug AC Adaptor Power cord (Mains lead) To the wall outlet (wall socket) CHG (charge) lamp Getting started Battery pack DC IN jack DC plug AC Adaptor Power cord (Mains lead) To the wall outlet (wall socket) US 15
Operating Guide
Page 16
...DCR-SR68/SR88 US 16 The CHG (charge) lamp lights up and charging starts. Slide the BATT (battery) release lever () and remove the battery pack (). You can charge the "InfoLITHIUM" battery pack (V series) after attaching it clicks. 3 Connect the AC Adaptor and the power cord (mains lead) to your camcorder.... 1 Turn off when the battery pack is fully charged. 4 When the battery is on, you can check the approximate amount of your camcorder. Tips See page 64 on ...
...DCR-SR68/SR88 US 16 The CHG (charge) lamp lights up and charging starts. Slide the BATT (battery) release lever () and remove the battery pack (). You can charge the "InfoLITHIUM" battery pack (V series) after attaching it clicks. 3 Connect the AC Adaptor and the power cord (mains lead) to your camcorder.... 1 Turn off when the battery pack is fully charged. 4 When the battery is on, you can check the approximate amount of your camcorder. Tips See page 64 on ...
Operating Guide
Page 63
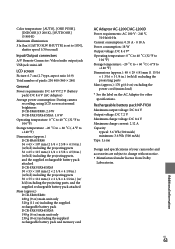
... DC 7.2 V Maximum charge voltage: DC 8.4 V Maximum charge current: 2.12 A ...SX63 50 × 55 × 103 mm (2 × 2 1/4 × 4 1/8 in.) (w/h/d) including the projecting parts 50 × 55 × 112 mm (2 × 2 1/4 × 4 1/2 in .) (w/h/d) excluding the projecting parts Mass (approx.): 170 g (6.0 oz) excluding the power cord...: 6.7 cm (2.7 type, aspect ratio 16:9) Total number of your camcorder and accessories are subject to +140 °F) Dimensions (approx.): 48 ...DCR-SX43/SX44/SX63: 190 g (6 oz) main unit only 230 g (8 oz) including the supplied rechargeable battery pack and memory...
... DC 7.2 V Maximum charge voltage: DC 8.4 V Maximum charge current: 2.12 A ...SX63 50 × 55 × 103 mm (2 × 2 1/4 × 4 1/8 in.) (w/h/d) including the projecting parts 50 × 55 × 112 mm (2 × 2 1/4 × 4 1/2 in .) (w/h/d) excluding the projecting parts Mass (approx.): 170 g (6.0 oz) excluding the power cord...: 6.7 cm (2.7 type, aspect ratio 16:9) Total number of your camcorder and accessories are subject to +140 °F) Dimensions (approx.): 48 ...DCR-SX43/SX44/SX63: 190 g (6 oz) main unit only 230 g (8 oz) including the supplied rechargeable battery pack and memory...


