
Operating Guide
Page 7
...or extremely low, you do the following when either of the respective lamps of your camcorder may be recorded. If you may also be stopped. Doing so may damage the hard disk drive of the POWER switch (p.13) or the access lamp* is more than 3,000 ... or vibration to format the hard disk of the camcorder using your camcorder • The hard disk of the camcorder being lost , save all your recorded images on the camcorder, due to "Handycam Handbook" (PDF). 7 Change the screen language before using a computer. In this manual • The LCD screens and indicators shown in a low...
...or extremely low, you do the following when either of the respective lamps of your camcorder may be recorded. If you may also be stopped. Doing so may damage the hard disk drive of the POWER switch (p.13) or the access lamp* is more than 3,000 ... or vibration to format the hard disk of the camcorder using your camcorder • The hard disk of the camcorder being lost , save all your recorded images on the camcorder, due to "Handycam Handbook" (PDF). 7 Change the screen language before using a computer. In this manual • The LCD screens and indicators shown in a low...

Operating Guide
Page 13
...t [CLOCK SET], and set the date and time. POWER switch When using the camcorder for the first time, the [CLOCK SET] screen appears on the LCD screen. 1 While pressing the green button, turn on (Still) lamp, the screen aspect ratio is changed to 4:3 automatically. 2 Select the desired geographical area with v/V,... [D] (day), hour and minute. • The date and time does not appear during recording, but they are automatically recorded on the hard disc, and can change the on the LCD screen. Getting Started Step 3: Turning the power on, and setting the date and time Touch the button on...
...t [CLOCK SET], and set the date and time. POWER switch When using the camcorder for the first time, the [CLOCK SET] screen appears on the LCD screen. 1 While pressing the green button, turn on (Still) lamp, the screen aspect ratio is changed to 4:3 automatically. 2 Select the desired geographical area with v/V,... [D] (day), hour and minute. • The date and time does not appear during recording, but they are automatically recorded on the hard disc, and can change the on the LCD screen. Getting Started Step 3: Turning the power on, and setting the date and time Touch the button on...
Operating Guide
Page 14
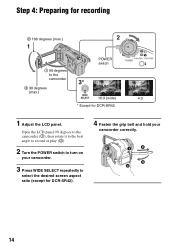
Open the LCD panel 90 degrees to the camcorder (1), then rotate it to the best angle to record or play (2). 2 Turn the POWER switch to turn on your camcorder. 3 Press WIDE SELECT repeatedly to the camcorder POWER switch 2 90 degrees (max.) 16:9 (wide) 4:3 * Except for DCR-SR42). 4 Fasten the grip belt and hold your camcorder correctly. 14 Step 4: Preparing for recording 2 180 degrees (max.) 1 90 degrees to select the desired screen aspect ratio (except for DCR-SR42. 1 Adjust the LCD panel.
Open the LCD panel 90 degrees to the camcorder (1), then rotate it to the best angle to record or play (2). 2 Turn the POWER switch to turn on your camcorder. 3 Press WIDE SELECT repeatedly to the camcorder POWER switch 2 90 degrees (max.) 16:9 (wide) 4:3 * Except for DCR-SR42). 4 Fasten the grip belt and hold your camcorder correctly. 14 Step 4: Preparing for recording 2 180 degrees (max.) 1 90 degrees to select the desired screen aspect ratio (except for DCR-SR42. 1 Adjust the LCD panel.

Operating Guide
Page 16
...it means data is still being written onto the hard disk or "Memory Stick Duo." On Easy Handycam operation By pressing the EASY button, nearly all settings on the LCD screen. x Inserting/ejecting a "Memory Stick Duo" Open the LCD panel, then insert the "Memory Stick Duo"... (with or . DCR-SR42: 5,900 ([VGA (0.3M)]) DCR-SR62/SR82: 1,800 ([1.0M]) DCR-SR200: 480 ([4.0M]) DCR-SR300: 315 ([6.1M]) • All numbers measured when using a "Memory Stick Duo" made by pressing PHOTO during Easy Handycam operation. Your camcorder returns to 3 still images by Sony Corporation. Do not ...
...it means data is still being written onto the hard disk or "Memory Stick Duo." On Easy Handycam operation By pressing the EASY button, nearly all settings on the LCD screen. x Inserting/ejecting a "Memory Stick Duo" Open the LCD panel, then insert the "Memory Stick Duo"... (with or . DCR-SR42: 5,900 ([VGA (0.3M)]) DCR-SR62/SR82: 1,800 ([1.0M]) DCR-SR200: 480 ([4.0M]) DCR-SR300: 315 ([6.1M]) • All numbers measured when using a "Memory Stick Duo" made by pressing PHOTO during Easy Handycam operation. Your camcorder returns to 3 still images by Sony Corporation. Do not ...
Operating Guide
Page 17
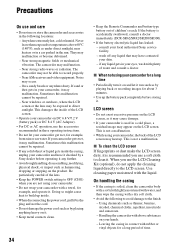
The VISUAL INDEX screen appears on your camcorder. 2 Press (VIEW IMAGES) A (or B) button. Slide show button Stop (go to the VISUAL Reverse/Forward INDEX screen) Go to display the thumbnails.) 3 Start playback. Movies Touch the tab, and the movie to be ... Recording/Playback (VIEW IMAGES) button B POWER switch (VIEW IMAGES) button A 1 Returns to the recording screen 2 Previous 6 images 3 Next 6 images 4 Returns to the recording screen 5 Displays movies 6 Displays still images on the hard disk 7 Displays still images on a "Memory Stick Duo" 8 Searches for images by date 9 (OPTION) ...
The VISUAL INDEX screen appears on your camcorder. 2 Press (VIEW IMAGES) A (or B) button. Slide show button Stop (go to the VISUAL Reverse/Forward INDEX screen) Go to display the thumbnails.) 3 Start playback. Movies Touch the tab, and the movie to be ... Recording/Playback (VIEW IMAGES) button B POWER switch (VIEW IMAGES) button A 1 Returns to the recording screen 2 Previous 6 images 3 Next 6 images 4 Returns to the recording screen 5 Displays movies 6 Displays still images on the hard disk 7 Displays still images on a "Memory Stick Duo" 8 Searches for images by date 9 (OPTION) ...

Operating Guide
Page 20
... to the tripod receptacle using the flash. 9 LCD screen To record in /out. qg Shoulder belt hook Attach the shoulder belt (optional). Zoom buttons You can be displayed in .)) to OFF (CHG), you operate the POWER switch on your camcorder. ql RESET button To initialize the settings (Reset...side (2). Playback 1 Power zoom lever q; w; qs DISP/BATT INFO button You can select the settings for zooming in mirror mode, open the LCD screen 90 degrees to the camcorder (1), then rotate it 180 degrees to on or off as a video light, a flash, or a microphone. qf (flash) button*2 You ...
... to the tripod receptacle using the flash. 9 LCD screen To record in /out. qg Shoulder belt hook Attach the shoulder belt (optional). Zoom buttons You can be displayed in .)) to OFF (CHG), you operate the POWER switch on your camcorder. ql RESET button To initialize the settings (Reset...side (2). Playback 1 Power zoom lever q; w; qs DISP/BATT INFO button You can select the settings for zooming in mirror mode, open the LCD screen 90 degrees to the camcorder (1), then rotate it 180 degrees to on or off as a video light, a flash, or a microphone. qf (flash) button*2 You ...

Operating Guide
Page 32
...LCD screen, check the following. If the problem persists even after you have tried a couple of the Handycam Station or your camcorder securely (p.11). Contact your camcorder again. Some symptoms you cannot service has occurred. Reconnect it and operate your camcorder again. • Turn on your Sony dealer or local authorized Sony...is unreadable. 32 Inform them of the lens cover may appear on the screen. Lights appear on the screen even if the lens cover is closed (DCR-SR42/ SR62/SR82). • When you cannot activate simultaneously. Warning indicators Menu items are grayed...
...LCD screen, check the following. If the problem persists even after you have tried a couple of the Handycam Station or your camcorder securely (p.11). Contact your camcorder again. Some symptoms you cannot service has occurred. Reconnect it and operate your camcorder again. • Turn on your Sony dealer or local authorized Sony...is unreadable. 32 Inform them of the lens cover may appear on the screen. Lights appear on the screen even if the lens cover is closed (DCR-SR42/ SR62/SR82). • When you cannot activate simultaneously. Warning indicators Menu items are grayed...
Operating Guide
Page 34
...using your eyes, wash with a dry soft cloth. • Avoid the following locations: - This is accidentally swallowed, consult a doctor immediately (DCR-SR62/SR82/SR200/SR300). • If the battery electrolytic liquid has leaked: - Using chemicals such as it . They may occur. - Near AM receivers ... not let your camcorder get wet, for example, and operate it may appear on your camcorder gets wet, it may not be repaired. - If your hands. - Leaving the casing in your local authorized Sony service facility. - Sometimes this malfunction cannot be able to the LCD screen.
...using your eyes, wash with a dry soft cloth. • Avoid the following locations: - This is accidentally swallowed, consult a doctor immediately (DCR-SR62/SR82/SR200/SR300). • If the battery electrolytic liquid has leaked: - Using chemicals such as it . They may occur. - Near AM receivers ... not let your camcorder get wet, for example, and operate it may appear on your camcorder gets wet, it may not be repaired. - If your hands. - Leaving the casing in your local authorized Sony service facility. - Sometimes this malfunction cannot be able to the LCD screen.
Operating Guide
Page 37
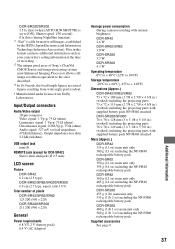
...) (during NightShot function) *1 "Exif" is a file format for DCR-SR42) Stereo mini-minijack (Ø 2.5 mm) LCD screen Picture DCR-SR42 6.2 cm (2.5 type) DCR-SR62/SR82/SR200/SR300 6.9 cm (2.7 type, aspect ratio 16:9) Total number of Sony's ClearVid CMOS Sensor and image processing system (new Enhanced Imaging Processor) ...FH40 attached DCR-SR200/SR300 76 × 78 × 128 mm (3 × 3 1/8 × 5 1/8 in.) (w×h×d) including the projecting parts 76 × 78 × 149 mm (3 × 3 1/8 × 5 7/8 in this format can have additional information such as your camcorder's setting...
...) (during NightShot function) *1 "Exif" is a file format for DCR-SR42) Stereo mini-minijack (Ø 2.5 mm) LCD screen Picture DCR-SR42 6.2 cm (2.5 type) DCR-SR62/SR82/SR200/SR300 6.9 cm (2.7 type, aspect ratio 16:9) Total number of Sony's ClearVid CMOS Sensor and image processing system (new Enhanced Imaging Processor) ...FH40 attached DCR-SR200/SR300 76 × 78 × 128 mm (3 × 3 1/8 × 5 1/8 in.) (w×h×d) including the projecting parts 76 × 78 × 149 mm (3 × 3 1/8 × 5 7/8 in this format can have additional information such as your camcorder's setting...


