Operating Guide
Page 5
Declaration of FCC Rules. However, there is subject to Part 15 of Conformity Trade Name: SONY Model No.: DCR-SR82 Responsible Party: Sony Electronics Inc. The supplied interface cable must accept any interference received, including interference that interference will not occur in a particular installation. ...to the following measures: - Address: 16530 Via Esprillo, San Diego, CA 92127 U.S.A Telephone number: 858-942-2230 This device complies with the Handycam Station Model DCRA-C171 and AC Adaptor Model AC-L200/L200B. For the State of the FCC Rules.
Declaration of FCC Rules. However, there is subject to Part 15 of Conformity Trade Name: SONY Model No.: DCR-SR82 Responsible Party: Sony Electronics Inc. The supplied interface cable must accept any interference received, including interference that interference will not occur in a particular installation. ...to the following measures: - Address: 16530 Via Esprillo, San Diego, CA 92127 U.S.A Telephone number: 858-942-2230 This device complies with the Handycam Station Model DCRA-C171 and AC Adaptor Model AC-L200/L200B. For the State of the FCC Rules.

Operating Guide
Page 9
.../SR62/ SR82) NP-FH60 (1) (p.11) (DCR-SR200/SR300) Handycam Station (1) (p.11) A/V connecting cable (1) (p.25) USB cable (1) (p.27) CD-ROM "Handycam Application Software" (1) (p.26) - Picture Motion Browser (Software) - Handycam Handbook (PDF) "Operating Guide" (This manual) (1) 9 The number in the parentheses indicates the number of that you have the following items supplied with your camcorder. Getting Started Step 1: Checking...
.../SR62/ SR82) NP-FH60 (1) (p.11) (DCR-SR200/SR300) Handycam Station (1) (p.11) A/V connecting cable (1) (p.25) USB cable (1) (p.27) CD-ROM "Handycam Application Software" (1) (p.26) - Picture Motion Browser (Software) - Handycam Handbook (PDF) "Operating Guide" (This manual) (1) 9 The number in the parentheses indicates the number of that you have the following items supplied with your camcorder. Getting Started Step 1: Checking...
Operating Guide
Page 11
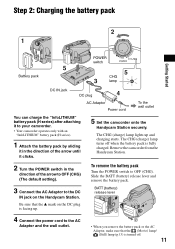
... an "InfoLITHIUM" battery pack (H series). 1 Attach the battery pack by sliding it in the direction of the arrow until it clicks. 5 Set the camcorder onto the Handycam Station securely. The CHG (charge) lamp turns off when the battery pack is turned off. 11 Be sure that the (Movie) lamp/ (Still) lamp ...switch to the DC IN jack on the DC plug is facing up and charging starts. The CHG (charge) lamp lights up . Remove the camcorder from the Handycam Station. 2 Turn the POWER switch in the direction of the arrow to OFF (CHG) (The default setting). 3 Connect the AC Adaptor to OFF ...
... an "InfoLITHIUM" battery pack (H series). 1 Attach the battery pack by sliding it in the direction of the arrow until it clicks. 5 Set the camcorder onto the Handycam Station securely. The CHG (charge) lamp turns off when the battery pack is turned off. 11 Be sure that the (Movie) lamp/ (Still) lamp ...switch to the DC IN jack on the DC plug is facing up and charging starts. The CHG (charge) lamp lights up . Remove the camcorder from the Handycam Station. 2 Turn the POWER switch in the direction of the arrow to OFF (CHG) (The default setting). 3 Connect the AC Adaptor to OFF ...

Operating Guide
Page 12
...Adaptor from the battery as long as between a wall and furniture. • Do not short-circuit the DC plug of your camcorder or the Handycam Station, even when the power cord is disconnected from the wall outlet. On the battery pack • Before changing the battery pack... Charging time 125 Recording time*1 Continuous 105 recording time Typical recording time*4 50 Playback time 120 DCR-SR62/ SR82 125 90*2 100*3 45*2 50*3 110*2 12 NP-FH60: (Unit:min.) DCR-SR200 DCR-SR300 Charging time 135 135 Recording time*1 Continuous recording time 115*2 120*3 95*2 100*3 Typical 55...
...Adaptor from the battery as long as between a wall and furniture. • Do not short-circuit the DC plug of your camcorder or the Handycam Station, even when the power cord is disconnected from the wall outlet. On the battery pack • Before changing the battery pack... Charging time 125 Recording time*1 Continuous 105 recording time Typical recording time*4 50 Playback time 120 DCR-SR62/ SR82 125 90*2 100*3 45*2 50*3 110*2 12 NP-FH60: (Unit:min.) DCR-SR200 DCR-SR300 Charging time 135 135 Recording time*1 Continuous recording time 115*2 120*3 95*2 100*3 Typical 55...
Operating Guide
Page 19
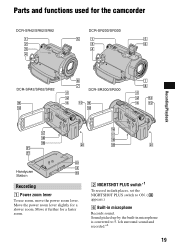
Move it further for a faster zoom. 2 NIGHTSHOT PLUS switch*1 To record in dark places, set the NIGHTSHOT PLUS switch to ON. ( appears.) 6 Built-in microphone is converted to 5.1ch surround sound and recorded.*2 19 Sound picked up by the built-in microphone Records sound. Parts and functions used for a slower zoom. Move the power zoom lever slightly for the camcorder DCR-SR42/SR62/SR82 DCR-SR200/SR300 DCR-SR42/SR62/SR82 DCR-SR200/SR300 Recording/Playback Handycam Station Recording 1 Power zoom lever To use zoom, move the power zoom lever.
Move it further for a faster zoom. 2 NIGHTSHOT PLUS switch*1 To record in dark places, set the NIGHTSHOT PLUS switch to ON. ( appears.) 6 Built-in microphone is converted to 5.1ch surround sound and recorded.*2 19 Sound picked up by the built-in microphone Records sound. Parts and functions used for a slower zoom. Move the power zoom lever slightly for the camcorder DCR-SR42/SR62/SR82 DCR-SR200/SR300 DCR-SR42/SR62/SR82 DCR-SR200/SR300 Recording/Playback Handycam Station Recording 1 Power zoom lever To use zoom, move the power zoom lever.

Operating Guide
Page 27
...computer before installing the software. 3 Place the supplied CD-ROM in the disc drive of the computer. Provide the camcorder and the Handycam Station, and a USB cable beforehand. Recording/Playback Hard disk: Available free hard disk space for installation required: Approximately 600 MB (for creating a DVD, 5 GB... you to restart your computer appears, you agree, then click [Next]. 8 Set the camcorder onto the Handycam Station, then turn the POWER switch to turn on. 9 Connect the Handycam Station to the power saving function of your computer using the supplied USB cable, then click [...
...computer before installing the software. 3 Place the supplied CD-ROM in the disc drive of the computer. Provide the camcorder and the Handycam Station, and a USB cable beforehand. Recording/Playback Hard disk: Available free hard disk space for installation required: Approximately 600 MB (for creating a DVD, 5 GB... you to restart your computer appears, you agree, then click [Next]. 8 Set the camcorder onto the Handycam Station, then turn the POWER switch to turn on. 9 Connect the Handycam Station to the power saving function of your computer using the supplied USB cable, then click [...

Operating Guide
Page 31
...AC Adaptor to the wall outlet (p.11). • Set the camcorder onto the Handycam Station securely (p.11). You cannot make new recording during this , the data stored on . The power does not turn on the hard disk. Cancel Easy Handycam operation. The power abruptly turns off. • When approximately ... Sony dealer will be ready to a warm place. The camcorder does not operate even when the power is set to troubleshoot the problem. If the problem persists, disconnect the power source and contact your camcorder. In the event of your camcorder is turned on the hard disk ...
...AC Adaptor to the wall outlet (p.11). • Set the camcorder onto the Handycam Station securely (p.11). You cannot make new recording during this , the data stored on . The power does not turn on the hard disk. Cancel Easy Handycam operation. The power abruptly turns off. • When approximately ... Sony dealer will be ready to a warm place. The camcorder does not operate even when the power is set to troubleshoot the problem. If the problem persists, disconnect the power source and contact your camcorder. In the event of your camcorder is turned on the hard disk ...

Operating Guide
Page 32
...(PDF). Some symptoms you cannot service has occurred. If the problem persists even after you have tried a couple of the Handycam Station or your camcorder while the lens cover is closed , lights through gaps of the 5-digit code, which starts from "E." 101-0001 (Warning...the lens cover may appear on your camcorder securely (p.11). Lights appear on the screen even if the lens cover is closed (DCR-SR42/ SR62/SR82). • When you cannot activate simultaneously. Reconnect it and operate your Sony dealer or local authorized Sony service facility. Self-diagnosis display/Warning...
...(PDF). Some symptoms you cannot service has occurred. If the problem persists even after you have tried a couple of the Handycam Station or your camcorder while the lens cover is closed , lights through gaps of the 5-digit code, which starts from "E." 101-0001 (Warning...the lens cover may appear on your camcorder securely (p.11). Lights appear on the screen even if the lens cover is closed (DCR-SR42/ SR62/SR82). • When you cannot activate simultaneously. Reconnect it and operate your Sony dealer or local authorized Sony service facility. Self-diagnosis display/Warning...

Operating Guide
Page 38
...DCR-SR42/SR62/SR82) Maximum output voltage DC 8.4 V Output voltage DC 7.2 V Capacity 4.9 wh (680 mAh) Dimensions (Approx.) 31.8 × 18.5 × 45.0 mm (1 5/16 × 3/4 × 1 13/16 in.)(w×h×d) Mass (Approx.) 45 g (1.6 oz) Operating temperature 0°C to + 40°C (32°F to change without notice. Handycam Station...40°C (32°F to 104°F) Type Li-ion Design and specifications are subject to 104°F) 38 Type Li-ion NP-FH60 (DCR-SR200/SR300) Maximum output voltage DC 8.4 V Output voltage DC 7.2 V Capacity 7.2 wh (1 000 mAh) Dimensions (Approx.) 31.8 ×...
...DCR-SR42/SR62/SR82) Maximum output voltage DC 8.4 V Output voltage DC 7.2 V Capacity 4.9 wh (680 mAh) Dimensions (Approx.) 31.8 × 18.5 × 45.0 mm (1 5/16 × 3/4 × 1 13/16 in.)(w×h×d) Mass (Approx.) 45 g (1.6 oz) Operating temperature 0°C to + 40°C (32°F to change without notice. Handycam Station...40°C (32°F to 104°F) Type Li-ion Design and specifications are subject to 104°F) 38 Type Li-ion NP-FH60 (DCR-SR200/SR300) Maximum output voltage DC 8.4 V Output voltage DC 7.2 V Capacity 7.2 wh (1 000 mAh) Dimensions (Approx.) 31.8 ×...


