Operating Guide
Page 8
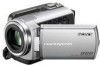
...If the drop sensor catches a drop repeatedly, recording/playback may not be stopped. When the temperature of the camcorder. Supplied items The numbers in such situations. See "Precautions" (p. 49). Do not do any of the following...58181; USB cable (1) Rechargeable battery pack Only for DCR-SR47/SR48/SR67: NP-FH30 (1) Only for DCR-SR87: NP-FH50 (1) CD-ROM "Handycam Application Software" (1) (p. 25) "PMB" (software) including "PMB Guide" "Handycam Handbook" (PDF) "Operating Guide" (This manual) (1) ...
...If the drop sensor catches a drop repeatedly, recording/playback may not be stopped. When the temperature of the camcorder. Supplied items The numbers in such situations. See "Precautions" (p. 49). Do not do any of the following...58181; USB cable (1) Rechargeable battery pack Only for DCR-SR47/SR48/SR67: NP-FH30 (1) Only for DCR-SR87: NP-FH50 (1) CD-ROM "Handycam Application Software" (1) (p. 25) "PMB" (software) including "PMB Guide" "Handycam Handbook" (PDF) "Operating Guide" (This manual) (1) ...

Operating Guide
Page 26
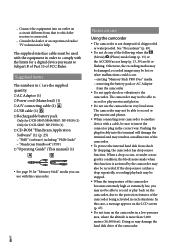
...Install]. Follow the on-screen instructions to install the software. Depending on the computer, you may not work correctly. See page 45 on the "Handycam Handbook". Confirm that your camcorder is not connected to complete the installation. US 26 The [USB...]. Select the language for the application to be installed, then click [Next]. Turn on your camcorder, then connect the camcorder to install third party software. higher version of "PMB" first, some functions may need to the computer using the supplied USB cable.
...Install]. Follow the on-screen instructions to install the software. Depending on the computer, you may not work correctly. See page 45 on the "Handycam Handbook". Confirm that your camcorder is not connected to complete the installation. US 26 The [USB...]. Select the language for the application to be installed, then click [Next]. Turn on your camcorder, then connect the camcorder to install third party software. higher version of "PMB" first, some functions may need to the computer using the supplied USB cable.

Operating Guide
Page 27
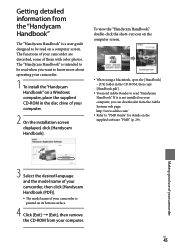
When the installation is not installed in this operation (p. 14). With the One Touch Disc Burn function, you can use. If any software starts automatically, shut it down. 2 Turn on your computer, and place an empty disc on the DVD drive. See page 25 for this... depending on the installation procedure. The "Handycam Handbook" is completed, following icons will appear. Remove the CD-ROM from the computer Click the icon at the bottom right of the desktop of discs you can be saved on your camcorder, and connect it to the wall outlet (wall...
When the installation is not installed in this operation (p. 14). With the One Touch Disc Burn function, you can use. If any software starts automatically, shut it down. 2 Turn on your computer, and place an empty disc on the DVD drive. See page 25 for this... depending on the installation procedure. The "Handycam Handbook" is completed, following icons will appear. Remove the CD-ROM from the computer Click the icon at the bottom right of the desktop of discs you can be saved on your camcorder, and connect it to the wall outlet (wall...
Operating Guide
Page 45
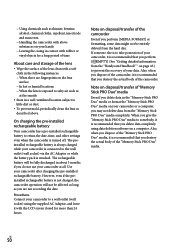
...com/ Refer to read on a computer screen. Getting detailed information from the "Handycam Handbook" The "Handycam Handbook" is a user guide designed to know more about operating your camcorder. 1 To install the "Handycam Handbook" on a Windows computer, place the supplied CD-ROM in the CD-ROM, then... copy [Handbook.pdf ]. You need Adobe Reader to "PMB Guide" for details on the supplied software "PMB" (p. 29). If it...
...com/ Refer to read on a computer screen. Getting detailed information from the "Handycam Handbook" The "Handycam Handbook" is a user guide designed to know more about operating your camcorder. 1 To install the "Handycam Handbook" on a Windows computer, place the supplied CD-ROM in the CD-ROM, then... copy [Handbook.pdf ]. You need Adobe Reader to "PMB Guide" for details on the supplied software "PMB" (p. 29). If it...
Operating Guide
Page 50
... AC Adaptor or while the battery pack is connected to a wall outlet (wall socket) using data deletion software on a computer. US 50 On charging the pre-installed rechargeable battery Your camcorder has a pre-installed rechargeable battery to somebody, it is recommended that you destroy the actual body of "... Duo" media to retain the date, time, and other settings even when the camcorder is exposed to prevent the recovery of the "Memory Stick PRO Duo" media. When you may not delete data from the "Handycam Handbook" " on the lens surface In hot or humid locations ...
... AC Adaptor or while the battery pack is connected to a wall outlet (wall socket) using data deletion software on a computer. US 50 On charging the pre-installed rechargeable battery Your camcorder has a pre-installed rechargeable battery to somebody, it is recommended that you destroy the actual body of "... Duo" media to retain the date, time, and other settings even when the camcorder is exposed to prevent the recovery of the "Memory Stick PRO Duo" media. When you may not delete data from the "Handycam Handbook" " on the lens surface In hot or humid locations ...
Operating Guide
Page 58
...or folder........29 Disc recorder 35 DST SET 15 Dubbing 40 DVDirect Express 31 DVD writer 31 E Easy Handycam operation.........20 Easy PC Back-up 28 Editing movies 30 F Format 37 H Handycam Handbook 45 HELP function 41 HOME MENU 41, 42 I Install 25 L Language 16 US 58 M Macintosh...Recording and playback time....52 Recording media 38 Repair 46 RESET 57 S Screen indicators 55 Self-diagnosis display 47 Setting the date and time...........15 Software 25 Specifications 51 Supplied items 8 T Tripod 38 Troubleshooting 46 Turning the power on 15 TV 24 TV Type 24 U USB 25, 31...
...or folder........29 Disc recorder 35 DST SET 15 Dubbing 40 DVDirect Express 31 DVD writer 31 E Easy Handycam operation.........20 Easy PC Back-up 28 Editing movies 30 F Format 37 H Handycam Handbook 45 HELP function 41 HOME MENU 41, 42 I Install 25 L Language 16 US 58 M Macintosh...Recording and playback time....52 Recording media 38 Repair 46 RESET 57 S Screen indicators 55 Self-diagnosis display 47 Setting the date and time...........15 Software 25 Specifications 51 Supplied items 8 T Tripod 38 Troubleshooting 46 Turning the power on 15 TV 24 TV Type 24 U USB 25, 31...


