
Operating Instructions
Page 4
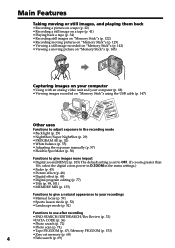
...Capturing images on your computer • Using with an analog video unit and your computer (p. 88) • Viewing images recorded on "Memory Stick"s using the USB cable (p. 147) Other uses Functions to adjust exposure in the recording mode • Back light (p. 29) • NightShot/... select the digital zoom power in D ZOOM in the menu settings.) • Fader (p. 45) • Picture effect (p. 48) • Digital effect (p. 49) • Digital program editing (p. 77) • Title (p. 98, 101) • MEMORY MIX (p. 135) Functions to give a natural appearance to your recordings • ...
...Capturing images on your computer • Using with an analog video unit and your computer (p. 88) • Viewing images recorded on "Memory Stick"s using the USB cable (p. 147) Other uses Functions to adjust exposure in the recording mode • Back light (p. 29) • NightShot/... select the digital zoom power in D ZOOM in the menu settings.) • Fader (p. 45) • Picture effect (p. 48) • Digital effect (p. 49) • Digital program editing (p. 77) • Title (p. 98, 101) • MEMORY MIX (p. 135) Functions to give a natural appearance to your recordings • ...
Operating Instructions
Page 5
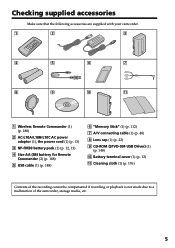
Battery terminal cover (1) (p. 12) qa Cleaning cloth (1) (p. 176) Contents of the recording cannot be compensated if recording or playback is not made due to a malfunction of the camcorder, storage media, etc. 5 qa 1 Wireless Remote Commander (1) (p. 188) 2 AC-L10A/L10B/L10C AC power adaptor (1), the power cord (1) (p. 13) 3 NP-FM30 battery pack (1) (p. 12, 13) 4 Size AA...
Battery terminal cover (1) (p. 12) qa Cleaning cloth (1) (p. 176) Contents of the recording cannot be compensated if recording or playback is not made due to a malfunction of the camcorder, storage media, etc. 5 qa 1 Wireless Remote Commander (1) (p. 188) 2 AC-L10A/L10B/L10C AC power adaptor (1), the power cord (1) (p. 13) 3 NP-FM30 battery pack (1) (p. 12, 13) 4 Size AA...
Operating Instructions
Page 6
...Step 1 Preparing the power supply ........ 12 Installing the battery pack 12 Charging the battery pack 13 Connecting to a wall outlet 16 Step 2 Setting the date and time 17 Step 3 Inserting a cassette 19 Step 4 Using the touch panel 20 Recording - MEMORY MIX ...88 Recording video or TV programs 89 Inserting a scene from a tape - Memory Photo recording 122 Recording an image from a tape as a still image 126 Recording moving picture 131 Superimposing a still image in the dark - Flexible Spot Meter 58 Focusing manually 59 Interval recording 60 Frame by date - Digital effect...
...Step 1 Preparing the power supply ........ 12 Installing the battery pack 12 Charging the battery pack 13 Connecting to a wall outlet 16 Step 2 Setting the date and time 17 Step 3 Inserting a cassette 19 Step 4 Using the touch panel 20 Recording - MEMORY MIX ...88 Recording video or TV programs 89 Inserting a scene from a tape - Memory Photo recording 122 Recording an image from a tape as a still image 126 Recording moving picture 131 Superimposing a still image in the dark - Flexible Spot Meter 58 Focusing manually 59 Interval recording 60 Frame by date - Digital effect...

Operating Instructions
Page 8
... OPEN/ ZEJECT in the direction of the arrow and open the lid. 2 Push the middle portion of the back of your camcorder outdoors (p. 12). AC power adaptor (supplied) Connect the plug with the window facing out. 3 Close the cassette compartment by pressing the mark on the cassette compartment. Quick Start Guide... 8 Quick Start Guide Holding Grip This chapter introduces you to the basic features of the cassette to hold your camcorder as illustrated. Connecting the power cord (p. 16) Use the battery pack when using your camcorder.
... OPEN/ ZEJECT in the direction of the arrow and open the lid. 2 Push the middle portion of the back of your camcorder outdoors (p. 12). AC power adaptor (supplied) Connect the plug with the window facing out. 3 Close the cassette compartment by pressing the mark on the cassette compartment. Quick Start Guide... 8 Quick Start Guide Holding Grip This chapter introduces you to the basic features of the cassette to hold your camcorder as illustrated. Connecting the power cord (p. 16) Use the battery pack when using your camcorder.

Operating Instructions
Page 9
... for a picture, set to VCR while pressing the small green button. MEMORY OFF CAMERA (CHARGE) VCR 3 Set the POWER switch to open the LCD panel. To stop recording, press START/STOP again. POWER LOCK Quick Start Guide Monitoring the playback picture on the subject When you want to ... click to focus on the LCD screen (p. 34) VCR 1 Set the POWER switch to off. Recording a picture (p. 22) 1 Remove the lens cap. 2 Press OPEN to CAMERA while pressing the small green button. POWER LOCK VCR MEMORY OFF CAMERA (CHARGE) 4 Press START/STOP. Viewfinder When the LCD panel is set ...
... for a picture, set to VCR while pressing the small green button. MEMORY OFF CAMERA (CHARGE) VCR 3 Set the POWER switch to open the LCD panel. To stop recording, press START/STOP again. POWER LOCK Quick Start Guide Monitoring the playback picture on the subject When you want to ... click to focus on the LCD screen (p. 34) VCR 1 Set the POWER switch to off. Recording a picture (p. 22) 1 Remove the lens cap. 2 Press OPEN to CAMERA while pressing the small green button. POWER LOCK VCR MEMORY OFF CAMERA (CHARGE) 4 Press START/STOP. Viewfinder When the LCD panel is set ...
Operating Instructions
Page 10
...letters. End search (p. 32) - Superimposing a title (p. 98) - Note on the DV format. Unauthorized recording of such materials may be contrary to indicate that operate only with cassette memory . Date search (p. 70) ...- Using this manual As you use mini DV cassettes with your camcorder. Set the POWER switch to country. When you carry out an operation, you can only use a tape...TV color systems differ from country to CAMERA. Labeling a cassette (p. 103) For details, see this manual, buttons and settings on your recordings on whether the tape has the ...
...letters. End search (p. 32) - Superimposing a title (p. 98) - Note on the DV format. Unauthorized recording of such materials may be contrary to indicate that operate only with cassette memory . Date search (p. 70) ...- Using this manual As you use mini DV cassettes with your camcorder. Set the POWER switch to country. When you carry out an operation, you can only use a tape...TV color systems differ from country to CAMERA. Labeling a cassette (p. 103) For details, see this manual, buttons and settings on your recordings on whether the tape has the ...

Operating Instructions
Page 12
... battery terminals, install the battery terminal cover after the battery pack is removed in the same way as the battery terminal cover. Step 1 Preparing the power supply Installing the battery pack We recommend that you use the battery pack when you use your camcorder outdoors. (1) While sliding BATT (battery) release lever...
... battery terminals, install the battery terminal cover after the battery pack is removed in the same way as the battery terminal cover. Step 1 Preparing the power supply Installing the battery pack We recommend that you use the battery pack when you use your camcorder outdoors. (1) While sliding BATT (battery) release lever...

Operating Instructions
Page 13
... for your camcorder. After the charge is completed, the CHARGE lamp goes out. (full charge) 2 CHARGE lamp 14 POWER LOCK VCR MEMORY OFF CAMERA (CHARGE) After charging the battery pack Disconnect the AC power adaptor from coming into contact with the metal parts of the DC plug of "InfoLITHIUM" battery pack. (1) Open the...
... for your camcorder. After the charge is completed, the CHARGE lamp goes out. (full charge) 2 CHARGE lamp 14 POWER LOCK VCR MEMORY OFF CAMERA (CHARGE) After charging the battery pack Disconnect the AC power adaptor from coming into contact with the metal parts of the DC plug of "InfoLITHIUM" battery pack. (1) Open the...

Operating Instructions
Page 14
...The actual battery life may increase if the battery's temperature is extremely high or low because of minutes when recording while you repeat recording start/ stop, zooming and turning the power on LCD screen 90 150 310 475 550 Playing time with the LCD screen Continuous* Typical** 85 45...shorter if you use a fully charged battery * Approximate continuous recording time at 25 °C (77 °F) to charge an empty battery pack Recording time Battery pack NP-FM30 (supplied) NP-FM50 NP-FM70 NP-FM90 NP-FM91 Recording with the viewfinder Continuous* Typical** 115 60 185 100 385...
...The actual battery life may increase if the battery's temperature is extremely high or low because of minutes when recording while you repeat recording start/ stop, zooming and turning the power on LCD screen 90 150 310 475 550 Playing time with the LCD screen Continuous* Typical** 85 45...shorter if you use a fully charged battery * Approximate continuous recording time at 25 °C (77 °F) to charge an empty battery pack Recording time Battery pack NP-FM30 (supplied) NP-FM50 NP-FM70 NP-FM90 NP-FM91 Recording with the viewfinder Continuous* Typical** 115 60 185 100 385...

Operating Instructions
Page 15
Your camcorder operates only with compatible electronic equipment. Getting started Step 1 Preparing the power supply If the power goes off although the battery remaining indicator indicates that the indication on the battery remaining indicator is compatible with the "InfoLITHIUM" battery pack (M...of between 10 °C to 30 °C (50 °F to operate Charge the battery pack fully again so that the battery pack has enough power to 86 °F). TM SERIES "InfoLITHIUM" is "InfoLITHIUM"? The "InfoLITHIUM" is a lithium ion battery pack which can exchange data such as battery ...
Your camcorder operates only with compatible electronic equipment. Getting started Step 1 Preparing the power supply If the power goes off although the battery remaining indicator indicates that the indication on the battery remaining indicator is compatible with the "InfoLITHIUM" battery pack (M...of between 10 °C to 30 °C (50 °F to operate Charge the battery pack fully again so that the battery pack has enough power to 86 °F). TM SERIES "InfoLITHIUM" is "InfoLITHIUM"? The "InfoLITHIUM" is a lithium ion battery pack which can exchange data such as battery ...

Operating Instructions
Page 16
Notes • The AC power adaptor can supply power even if the battery pack is attached to the DC IN jack, even when the power cord is not plugged into a wall outlet. Using a car battery Use Sony DC Adaptor/Charger (optional). 16 This means that you use your camcorder for a long time, we ...recommend that the battery pack cannot supply any power if the power cord is connected to a wall outlet, even if the set itself has been...
Notes • The AC power adaptor can supply power even if the battery pack is attached to the DC IN jack, even when the power cord is not plugged into a wall outlet. Using a car battery Use Sony DC Adaptor/Charger (optional). 16 This means that you use your camcorder for a long time, we ...recommend that the battery pack cannot supply any power if the power cord is connected to a wall outlet, even if the set itself has been...

Operating Instructions
Page 17
.... "CLOCK SET" will have been discharged (p. 177). First, set the year, then the month, the day, the hour and then the minute. (1) Set the POWER switch to CAMERA or MEMORY. (2) Press FN to display PAGE1 (p. 20). (3) Press MENU to move. 2 FN 4R r SETUP MENU CLOCK SET DEMO MODE EXEC EXIT SETUP MENU... may appear) because the built-in rechargeable battery installed in your camcorder will be released (bars may be displayed each time that you set the POWER switch to CAMERA or MEMORY unless you do not use your camcorder for the first time.
.... "CLOCK SET" will have been discharged (p. 177). First, set the year, then the month, the day, the hour and then the minute. (1) Set the POWER switch to CAMERA or MEMORY. (2) Press FN to display PAGE1 (p. 20). (3) Press MENU to move. 2 FN 4R r SETUP MENU CLOCK SET DEMO MODE EXEC EXIT SETUP MENU... may appear) because the built-in rechargeable battery installed in your camcorder will be released (bars may be displayed each time that you set the POWER switch to CAMERA or MEMORY unless you do not use your camcorder for the first time.

Operating Instructions
Page 19
... prevent accidental erasure Slide the write-protect tab on the cassette compartment. Getting started Step 3 Inserting a cassette (1) Install the battery pack, or connect the AC power adaptor for the power supply (p. 12 to expose the red mark. 19
... prevent accidental erasure Slide the write-protect tab on the cassette compartment. Getting started Step 3 Inserting a cassette (1) Install the battery pack, or connect the AC power adaptor for the power supply (p. 12 to expose the red mark. 19

Operating Instructions
Page 20
...appear on the LCD screen. (7) Press a desired operation item. Refer to relevant pages for the power supply (p. 12, 16). (2) Press OPEN to open the LCD panel. (3) Set the POWER switch to CAMERA (in the standby/recording mode) or VCR (in the playback mode) while pressing the small green button. (4) Press ... execute settings Press EXEC or OK. To cancel settings Press OFF to return to PAGE1/PAGE2/PAGE3. SCH SURE 4 FN MEMORY OFF CAMERA (CHARGE) VCR 3 POWER LOCK PAGE1 PAGE2 PAGE3 EXIT TITLE LCD VOL MEM BRT MIX PAGE1 PAGE2 PAGE3 EXIT SELF TIMER 2 1 To return to operate each ...
...appear on the LCD screen. (7) Press a desired operation item. Refer to relevant pages for the power supply (p. 12, 16). (2) Press OPEN to open the LCD panel. (3) Set the POWER switch to CAMERA (in the standby/recording mode) or VCR (in the playback mode) while pressing the small green button. (4) Press ... execute settings Press EXEC or OK. To cancel settings Press OFF to return to PAGE1/PAGE2/PAGE3. SCH SURE 4 FN MEMORY OFF CAMERA (CHARGE) VCR 3 POWER LOCK PAGE1 PAGE2 PAGE3 EXIT TITLE LCD VOL MEM BRT MIX PAGE1 PAGE2 PAGE3 EXIT SELF TIMER 2 1 To return to operate each ...

Operating Instructions
Page 22
...camcorder lights up. Your camcorder is set the Holding Grip back to fix it. (2) Install the power source and insert a cassette. The REC indicator appears. The camera recording lamp located on the front of your camcorder firmly as illustrated. (4) Press OPEN to open the ... 19). (3) Pull down the Holding Grip. To stop recording, press START/STOP again. 5 LOCK 1 LOCK VCR Microphone MEMORY OFF CAMERA (CHARGE) 4 2 Camera recording lamp 6 3 LOCK 40min REC 0:00:01 VCR MEMORY OFF CAMERA (CHARGE) After recording (1) Set the POWER switch to OFF (CHARGE). (2) Close the LCD panel ...
...camcorder lights up. Your camcorder is set the Holding Grip back to fix it. (2) Install the power source and insert a cassette. The REC indicator appears. The camera recording lamp located on the front of your camcorder firmly as illustrated. (4) Press OPEN to open the ... 19). (3) Pull down the Holding Grip. To stop recording, press START/STOP again. 5 LOCK 1 LOCK VCR Microphone MEMORY OFF CAMERA (CHARGE) 4 2 Camera recording lamp 6 3 LOCK 40min REC 0:00:01 VCR MEMORY OFF CAMERA (CHARGE) After recording (1) Set the POWER switch to OFF (CHARGE). (2) Close the LCD panel ...
Operating Instructions
Page 23
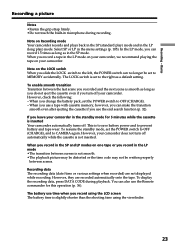
... minutes while the cassette is not smooth. •The playback picture may be distorted or the time code may not be set the POWER switch to MEMORY accidentally. Basics Recording a picture Notes •Fasten the grip strap firmly. •Do not touch the built-in the SP mode. To enable smooth ... do not eject the cassette even if you record in the menu settings (p. 105). Select SP or LP in the LP mode •The transition between scenes is inserted Your camcorder automatically turns off your camcorder. Note on the LOCK switch When you slide the LOCK switch to CAMERA again.
... minutes while the cassette is not smooth. •The playback picture may be distorted or the time code may not be set the POWER switch to MEMORY accidentally. Basics Recording a picture Notes •Fasten the grip strap firmly. •Do not touch the built-in the SP mode. To enable smooth ... do not eject the cassette even if you record in the menu settings (p. 105). Select SP or LP in the LP mode •The transition between scenes is inserted Your camcorder automatically turns off your camcorder. Note on the LOCK switch When you slide the LOCK switch to CAMERA again.

Operating Instructions
Page 24
...the camcorder body. When you use the viewfinder. When the POWER switch is opened up to CAMERA, Xz appears in the standby mode, and z appears in the recording mode. Note When using the LCD screen except in the ...sunlight The LCD screen may be difficult to view him-or herself on the LCD screen. In CAMERA or MEMORY mode. If this feature to the lens side. 180° 90° OPEN When closing... the LCD panel, set to 90 degrees. Recording a picture Adjusting the LCD screen The LCD panel moves about 90 degrees to the viewfinder side and ...
...the camcorder body. When you use the viewfinder. When the POWER switch is opened up to CAMERA, Xz appears in the standby mode, and z appears in the recording mode. Note When using the LCD screen except in the ...sunlight The LCD screen may be difficult to view him-or herself on the LCD screen. In CAMERA or MEMORY mode. If this feature to the lens side. 180° 90° OPEN When closing... the LCD panel, set to 90 degrees. Recording a picture Adjusting the LCD screen The LCD panel moves about 90 degrees to the viewfinder side and ...

Operating Instructions
Page 27
... can shoot a subject that is set to OFF as you move the power zoom lever to a subject If you shoot close to the "W" side until the focus is performed digitally. Recording - To activate digital zoom, select the digital zoom power in D ZOOM in better-looking recordings. Using the zoom function sparingly results in the menu settings. The...
... can shoot a subject that is set to OFF as you move the power zoom lever to a subject If you shoot close to the "W" side until the focus is performed digitally. Recording - To activate digital zoom, select the digital zoom power in D ZOOM in better-looking recordings. Using the zoom function sparingly results in the menu settings. The...
Operating Instructions
Page 28
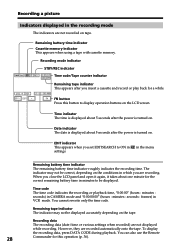
... The time is displayed about 5 seconds after the power is turned on the LCD screen. Date indicator The date is turned on tape. Time code The time code indicates the recording or playback time, "0:00:00" (hours : minutes : seconds) in CAMERA mode and "0:00:00:00" (hours : minutes...memory indicator This appears when using a tape with cassette memory. Recording mode indicator STBY/REC indicator 40min REC 0:00:01 Time code/Tape counter indicator 45min Remaining tape indicator This appears after the power is displayed about 5 seconds after you set EDITSEARCH to display ...
... The time is displayed about 5 seconds after the power is turned on the LCD screen. Date indicator The date is turned on tape. Time code The time code indicates the recording or playback time, "0:00:00" (hours : minutes : seconds) in CAMERA mode and "0:00:00:00" (hours : minutes...memory indicator This appears when using a tape with cassette memory. Recording mode indicator STBY/REC indicator 40min REC 0:00:01 Time code/Tape counter indicator 45min Remaining tape indicator This appears after the power is displayed about 5 seconds after you set EDITSEARCH to display ...
Operating Instructions
Page 30
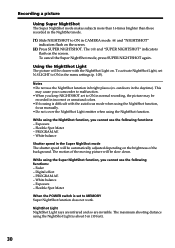
... set N.S.LIGHT to ON in CAMERA mode. Fader - Exposure - ... AE - While using the Super NightShot function, you cannot use the following functions: - Digital effect - The and "SUPER NIGHTSHOT" indicators flash on . Using the NightShot Light The ... NIGHTSHOT. outdoors in the daytime). White balance - Flexible Spot Meter When the POWER switch is difficult with the NightShot Light on the screen. Notes •Do...mode The shutter speed will be recorded in incorrect or unnatural colors. •If focusing is set to ON in normal recording, the picture may be slow down...
... set N.S.LIGHT to ON in CAMERA mode. Fader - Exposure - ... AE - While using the Super NightShot function, you cannot use the following functions: - Digital effect - The and "SUPER NIGHTSHOT" indicators flash on . Using the NightShot Light The ... NIGHTSHOT. outdoors in the daytime). White balance - Flexible Spot Meter When the POWER switch is difficult with the NightShot Light on the screen. Notes •Do...mode The shutter speed will be recorded in incorrect or unnatural colors. •If focusing is set to ON in normal recording, the picture may be slow down...

