
Operating Instructions
Page 16
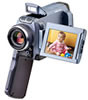
...(p. 213) 6 Lens cap (1) (p. 29), String (1) (p. 211) 7 "Memory Stick" (1) (p. 103) 8 USB cable (1) (p. 155) 9 CD-ROM (SPVD-008 USB Driver) (1) (p. 153) q; Checking supplied accessories Make sure that the following accessories are supplied with your camcorder. 1 2 3 4 5 6 7 8 9 0 qa qs qd 1 AC...R6) batteries for MICROMV) (1) (p. 152) qa Battery terminal cover (1) (p. 17) qs Cleaning cloth (1) (p. 202) qd Stylus (1) (DCR-IP55 only) Contents of the recording cannot be compensated if recording or playback is not made due to a malfunction of the camcorder, storage media, etc. 16
...(p. 213) 6 Lens cap (1) (p. 29), String (1) (p. 211) 7 "Memory Stick" (1) (p. 103) 8 USB cable (1) (p. 155) 9 CD-ROM (SPVD-008 USB Driver) (1) (p. 153) q; Checking supplied accessories Make sure that the following accessories are supplied with your camcorder. 1 2 3 4 5 6 7 8 9 0 qa qs qd 1 AC...R6) batteries for MICROMV) (1) (p. 152) qa Battery terminal cover (1) (p. 17) qs Cleaning cloth (1) (p. 202) qd Stylus (1) (DCR-IP55 only) Contents of the recording cannot be compensated if recording or playback is not made due to a malfunction of the camcorder, storage media, etc. 16
Operating Instructions
Page 157
...is not in your camcorder. For Windows users Viewing images recorded on a "Memory Stick" (1) Insert a "Memory Stick" into your camcorder before installing the USB driver. 157 The Add Hardware Wizard starts two times because two different USB drivers are installed. Your computer recognises the camcorder, and the ... and set the POWER switch to MEMORY/ NETWORK (DCR-IP55 only). (3) Connect the (USB) jack on your camcorder to the USB connector on -screen messages so that the Add Hardware Wizard recognises that the USB drivers have been installed. Viewing Images Using your Computer Connecting...
...is not in your camcorder. For Windows users Viewing images recorded on a "Memory Stick" (1) Insert a "Memory Stick" into your camcorder before installing the USB driver. 157 The Add Hardware Wizard starts two times because two different USB drivers are installed. Your computer recognises the camcorder, and the ... and set the POWER switch to MEMORY/ NETWORK (DCR-IP55 only). (3) Connect the (USB) jack on your camcorder to the USB connector on -screen messages so that the Add Hardware Wizard recognises that the USB drivers have been installed. Viewing Images Using your Computer Connecting...

Operating Instructions
Page 160
... the entire procedure described in "Installing the USB driver" on your camcorder, and then disconnect the USB cable. 8 Restart your computer using the USB cable supplied with the "?" Connecting your camcorder to your computer. Ex: (?)Sony Handycam 7 Turn the POWER switch to the (USB...Windows users Viewing images recorded on a "Memory Stick" Step1: Uninstall the incorrect USB driver 1 Turn on your computer and allow Windows to load. 2 Insert a "Memory Stick" into your camcorder. 3 Connect the AC power adaptor, and set the POWER switch to MEMORY/ NETWORK (DCR-IP55 only). 4 Connect the...
... the entire procedure described in "Installing the USB driver" on your camcorder, and then disconnect the USB cable. 8 Restart your computer using the USB cable supplied with the "?" Connecting your camcorder to your computer. Ex: (?)Sony Handycam 7 Turn the POWER switch to the (USB...Windows users Viewing images recorded on a "Memory Stick" Step1: Uninstall the incorrect USB driver 1 Turn on your computer and allow Windows to load. 2 Insert a "Memory Stick" into your camcorder. 3 Connect the AC power adaptor, and set the POWER switch to MEMORY/ NETWORK (DCR-IP55 only). 4 Connect the...

Operating Instructions
Page 166
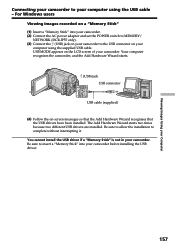
... switch to MEMORY/NETWORK (DCR-IP55 only). (3) When the CD-ROM is inserted on your computer, connect the (USB) jack on your camcorder to your computer using the supplied USB cable. For Windows users Viewing images Before operation •You need to install the USB driver to view "Memory Stick"..., and connect the AC power adaptor to the USB connector on your camcorder. USB MODE appears on the LCD screen of your computer - Viewing images recorded on a "Memory Stick" on your camcorder. (USB) jack USB connector USB cable (supplied) (4) Open "My Computer" on Windows and double-click the...
... switch to MEMORY/NETWORK (DCR-IP55 only). (3) When the CD-ROM is inserted on your computer, connect the (USB) jack on your camcorder to your computer using the supplied USB cable. For Windows users Viewing images Before operation •You need to install the USB driver to view "Memory Stick"..., and connect the AC power adaptor to the USB connector on your camcorder. USB MODE appears on the LCD screen of your computer - Viewing images recorded on a "Memory Stick" on your camcorder. (USB) jack USB connector USB cable (supplied) (4) Open "My Computer" on Windows and double-click the...
Operating Instructions
Page 171
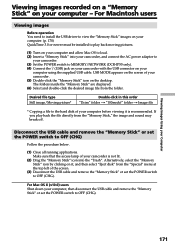
...the image and sound may break off. Viewing Images Using your Computer Viewing images recorded on a "Memory Stick" on your computer using the supplied USB cable. For Macintosh users Viewing... images Before operation You need to install the USB driver to view the "Memory Stick" images on your computer. (p. 170) QuickTime 3.0 or newer must be... Disconnect the USB cable and remove the "Memory Stick" or set the POWER switch to MEMORY/NETWORK (DCR-IP55 only). (4) Connect the (USB) jack on your camcorder with the USB connector on it is not...
...the image and sound may break off. Viewing Images Using your Computer Viewing images recorded on a "Memory Stick" on your computer using the supplied USB cable. For Macintosh users Viewing... images Before operation You need to install the USB driver to view the "Memory Stick" images on your computer. (p. 170) QuickTime 3.0 or newer must be... Disconnect the USB cable and remove the "Memory Stick" or set the POWER switch to MEMORY/NETWORK (DCR-IP55 only). (4) Connect the (USB) jack on your camcorder with the USB connector on it is not...


