
Operating Guide
Page 7
... used only with "Memory Stick" compatible equipment Be sure to insert the "Memory Stick Duo" into the Handycam Station or remove the camcorder from the Handycam Station holding both the Handycam Station and the DC plug. • For DCR-HC46/HC96: Be sure to slide the POWER switch to OFF (CHG) when you can use in your...
... used only with "Memory Stick" compatible equipment Be sure to insert the "Memory Stick Duo" into the Handycam Station or remove the camcorder from the Handycam Station holding both the Handycam Station and the DC plug. • For DCR-HC46/HC96: Be sure to slide the POWER switch to OFF (CHG) when you can use in your...
Operating Guide
Page 9
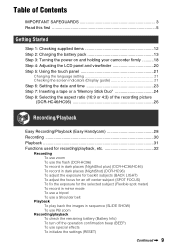
...Getting Started Step 1: Checking supplied items 12 Step 2: Charging the battery pack 13 Step 3: Turning the power on and holding your camcorder firmly ..........18 Step 4: Adjusting the LCD panel and viewfinder 20 Step 5: Using the touch panel 21 Changing the language setting 21... (DCR-HC46/HC96 26 Recording/Playback Easy Recording/Playback (Easy Handycam 28 Recording 30 Playback 31 Functions used for recording/playback, etc 32 Recording To use zoom To use the flash (DCR-HC96) To record in dark places (NightShot plus) (DCR-HC36/HC46) To record in dark places (NightShot) (DCR-HC96) To...
...Getting Started Step 1: Checking supplied items 12 Step 2: Charging the battery pack 13 Step 3: Turning the power on and holding your camcorder firmly ..........18 Step 4: Adjusting the LCD panel and viewfinder 20 Step 5: Using the touch panel 21 Changing the language setting 21... (DCR-HC46/HC96 26 Recording/Playback Easy Recording/Playback (Easy Handycam 28 Recording 30 Playback 31 Functions used for recording/playback, etc 32 Recording To use zoom To use the flash (DCR-HC96) To record in dark places (NightShot plus) (DCR-HC36/HC46) To record in dark places (NightShot) (DCR-HC96) To...

Operating Guide
Page 12
...tape and "Memory Stick Duo" are not supplied. Handycam Station (1) (DCR-HC46/HC96) (p. 13) Rechargeable battery pack (1) (p. 13, 126) NP-FP30 (DCR-HC36) NP-FP50 (DCR-HC46/HC96) Wireless Remote Commander (1) (p. 40) A button-type... lithium battery is already installed. AC Adaptor (1) (p. 13) USB cable (1) (p. 82, 86) Lens cap (1) (DCR-HC36/HC46) (p. 18, 28, 30) Power cord (1) (p. 13) • To attach the lens cap Attach the lens cap to the metal fittings of that you have following items supplied with your camcorder...
...tape and "Memory Stick Duo" are not supplied. Handycam Station (1) (DCR-HC46/HC96) (p. 13) Rechargeable battery pack (1) (p. 13, 126) NP-FP30 (DCR-HC36) NP-FP50 (DCR-HC46/HC96) Wireless Remote Commander (1) (p. 40) A button-type... lithium battery is already installed. AC Adaptor (1) (p. 13) USB cable (1) (p. 82, 86) Lens cap (1) (DCR-HC36/HC46) (p. 18, 28, 30) Power cord (1) (p. 13) • To attach the lens cap Attach the lens cap to the metal fittings of that you have following items supplied with your camcorder...
Operating Guide
Page 13
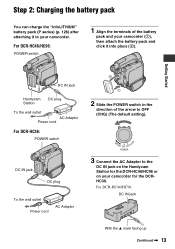
... setting). For DCR-HC46/HC96: DC IN jack With the v mark facing up Continued , 13 Getting Started DC IN jack Handycam Station DC plug To the wall outlet AC Adaptor Power cord For DCR-HC36: POWER switch 2 1 2 Slide the POWER switch in the direction of the battery pack and your camcorder (1), then attach...and click it to the DC IN jack on the Handycam Station for the DCRHC36. DC IN jack DC plug To the wall outlet Power cord AC Adaptor 3 Connect the AC Adaptor to your camcorder for the DCR-HC46/HC96 or on your camcorder. Step 2: Charging the battery pack You can charge ...
... setting). For DCR-HC46/HC96: DC IN jack With the v mark facing up Continued , 13 Getting Started DC IN jack Handycam Station DC plug To the wall outlet AC Adaptor Power cord For DCR-HC36: POWER switch 2 1 2 Slide the POWER switch in the direction of the battery pack and your camcorder (1), then attach...and click it to the DC IN jack on the Handycam Station for the DCRHC36. DC IN jack DC plug To the wall outlet Power cord AC Adaptor 3 Connect the AC Adaptor to your camcorder for the DCR-HC46/HC96 or on your camcorder. Step 2: Charging the battery pack You can charge ...
Operating Guide
Page 14
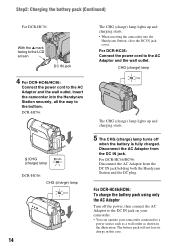
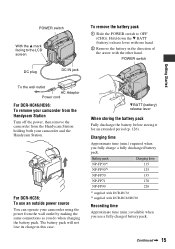
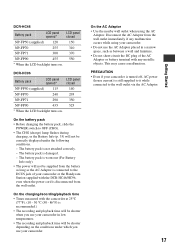
For DCR-HC36: Connect the power cord to the AC Adaptor and the wall outlet. For DCR-HC46/HC96: Disconnect the AC Adaptor from the DC IN jack. CHG (charge) lamp The CHG (charge) lamp lights up and charging starts. • When inserting the camcorder into the Handycam Station securely, all the way to a power... source such as a wall outlet as shown in this case. Insert the camcorder into the Handycam Station, close the DC IN jack cover. For DCR-HC46/HC96: To charge the battery pack using only the AC Adaptor Turn off when the battery is fully charged. The ...
For DCR-HC36: Connect the power cord to the AC Adaptor and the wall outlet. For DCR-HC46/HC96: Disconnect the AC Adaptor from the DC IN jack. CHG (charge) lamp The CHG (charge) lamp lights up and charging starts. • When inserting the camcorder into the Handycam Station securely, all the way to a power... source such as a wall outlet as shown in this case. Insert the camcorder into the Handycam Station, close the DC IN jack cover. For DCR-HC46/HC96: To charge the battery pack using only the AC Adaptor Turn off when the battery is fully charged. The ...
Operating Guide
Page 15
... Getting Started To the wall outlet AC Adaptor Power cord For DCR-HC46/HC96: To remove your camcorder from the Handycam Station Turn off the power, then remove the camcorder from the Handycam Station holding both your camcorder using the power from the wall outlet by making the same ...supplied with DCR-HC36 *2 supplied with one hand. 2 Remove the battery in this case. 2 V BATT (battery) release lever When storing the battery pack Fully discharge the battery before storing it for an extended period (p. 126). Hold down the V BATT (battery) release lever with DCR-HC46/HC96 Recording ...
... Getting Started To the wall outlet AC Adaptor Power cord For DCR-HC46/HC96: To remove your camcorder from the Handycam Station Turn off the power, then remove the camcorder from the Handycam Station holding both your camcorder using the power from the wall outlet by making the same ...supplied with DCR-HC36 *2 supplied with one hand. 2 Remove the battery in this case. 2 V BATT (battery) release lever When storing the battery pack Fully discharge the battery before storing it for an extended period (p. 126). Hold down the V BATT (battery) release lever with DCR-HC46/HC96 Recording ...
Operating Guide
Page 17
... camcorder. • Do not use your camcorder or the Handycam Station supplied with any malfunction occurs while using the AC Adaptor. On the battery pack • Before changing the battery pack, slide the POWER switch to the DC IN jack of the AC Adaptor or battery terminal with the DCR-HC46/HC96,... even when the power cord is disconnected from the battery as long as the AC Adaptor is recommended.) • The recording and playback time will be shorter when you use your camcorder in a narrow space, such as between a...
... camcorder. • Do not use your camcorder or the Handycam Station supplied with any malfunction occurs while using the AC Adaptor. On the battery pack • Before changing the battery pack, slide the POWER switch to the DC IN jack of the AC Adaptor or battery terminal with the DCR-HC46/HC96,... even when the power cord is disconnected from the battery as long as the AC Adaptor is recommended.) • The recording and playback time will be shorter when you use your camcorder in a narrow space, such as between a...
Operating Guide
Page 20
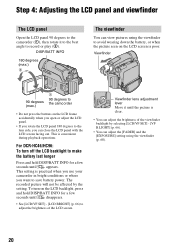
...4: Adjusting the LCD panel and viewfinder The LCD panel Open the LCD panel 90 degrees to the camcorder (1), then rotate it until the picture is practical when you use your camcorder in bright conditions or where you can close the LCD panel with the LCD screen facing out. Viewfinder...(max.) 1 90 degrees to the camcorder • Do not press the buttons on the LCD screen is convenient during playback operations. This is poor. DISP/BATT INFO 180 degrees (max.) 2 The viewfinder You can view pictures using the viewfinder (p. 60). 20 For DCR-HC46/HC96: To turn on the LCD backlight...
...4: Adjusting the LCD panel and viewfinder The LCD panel Open the LCD panel 90 degrees to the camcorder (1), then rotate it until the picture is practical when you use your camcorder in bright conditions or where you can close the LCD panel with the LCD screen facing out. Viewfinder...(max.) 1 90 degrees to the camcorder • Do not press the buttons on the LCD screen is convenient during playback operations. This is poor. DISP/BATT INFO 180 degrees (max.) 2 The viewfinder You can view pictures using the viewfinder (p. 60). 20 For DCR-HC46/HC96: To turn on the LCD backlight...
Operating Guide
Page 24
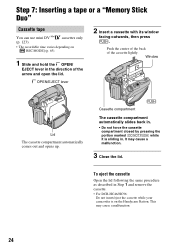
...Handycam Station. OPEN/EJECT lever 2 Insert a cassette with its window facing outwards, then press . Push the center of the back of the arrow and open the lid. To eject the cassette Open the lid following the same procedure as described in Step 1 and remove the cassette. • For DCR-HC46/HC96...: Do not insert/eject the cassette while your camcorder is sliding in the direction of the cassette lightly. Window Lid The cassette compartment automatically comes out and opens...
...Handycam Station. OPEN/EJECT lever 2 Insert a cassette with its window facing outwards, then press . Push the center of the back of the arrow and open the lid. To eject the cassette Open the lid following the same procedure as described in Step 1 and remove the cassette. • For DCR-HC46/HC96...: Do not insert/eject the cassette while your camcorder is sliding in the direction of the cassette lightly. Window Lid The cassette compartment automatically comes out and opens...
Operating Guide
Page 26
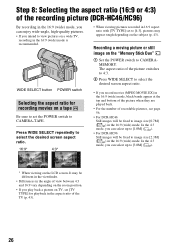
...on the zoom position. • If you play back a picture on TV, set [TV TYPE] for playback in the aspect ratio of the recording picture (DCR-HC46/HC96) By recording in the 16:9 (wide) mode is recommended. It may appear rough depending on a wide TV, recording in the 16:9 (wide) mode, ...you can enjoy wide-angle, high-quality pictures. • If you can select up to [1.0M] ( ). • For DCR-HC96: Still images will be fixed to view pictures on the subject (p. 43). In the 4:3 mode, you intend to image size [2.3M] ( ) in 16:9 aspect ratio...
...on the zoom position. • If you play back a picture on TV, set [TV TYPE] for playback in the aspect ratio of the recording picture (DCR-HC46/HC96) By recording in the 16:9 (wide) mode is recommended. It may appear rough depending on a wide TV, recording in the 16:9 (wide) mode, ...you can enjoy wide-angle, high-quality pictures. • If you can select up to [1.0M] ( ). • For DCR-HC96: Still images will be fixed to view pictures on the subject (p. 43). In the 4:3 mode, you intend to image size [2.3M] ( ) in 16:9 aspect ratio...

Operating Guide
Page 29
... mode) (p. 30). • For DCR-HC46/HC96: Pressing and holding DISP/BATT INFO button (p. 20) • For DCR-HC46/HC96: WIDE SELECT button (in the CAMERA-MEMORY mode) (p. 26) 29 disappears from the screen. A C AB C B A Stop B Play/Pause toggles C Rewind/Fast forward MENU A Tape playback B Previous/Next C Delete (p. 80) x To cancel Easy Handycam operation Press EASY A again...
... mode) (p. 30). • For DCR-HC46/HC96: Pressing and holding DISP/BATT INFO button (p. 20) • For DCR-HC46/HC96: WIDE SELECT button (in the CAMERA-MEMORY mode) (p. 26) 29 disappears from the screen. A C AB C B A Stop B Play/Pause toggles C Rewind/Fast forward MENU A Tape playback B Previous/Next C Delete (p. 80) x To cancel Easy Handycam operation Press EASY A again...

Operating Guide
Page 30
...; While recording movies on a "Memory Stick Duo," while pressing the light up the switch is heard. When disappears, the image has been recorded. PHOTO DCR-HC36: POWER switch REC START/STOP B REC START/STOP A 1 Slide the POWER switch in 4:3 screen. 30 Flashing t Lit A shutter sound is set ...) to select a recording medium. To delete the picture, touch t [YES]. Still images will be fixed to image size [0.2M] in 16:9 screen (DCR-HC46/HC96), or [VGA (0.3M)] in the direction of the arrow repeatedly to turn on the respective lamp to [REC]. • The sound of the cap. ...
...; While recording movies on a "Memory Stick Duo," while pressing the light up the switch is heard. When disappears, the image has been recorded. PHOTO DCR-HC36: POWER switch REC START/STOP B REC START/STOP A 1 Slide the POWER switch in 4:3 screen. 30 Flashing t Lit A shutter sound is set ...) to select a recording medium. To delete the picture, touch t [YES]. Still images will be fixed to image size [0.2M] in 16:9 screen (DCR-HC46/HC96), or [VGA (0.3M)] in the direction of the arrow repeatedly to turn on the respective lamp to [REC]. • The sound of the cap. ...

Operating Guide
Page 34
...; A mirror-image of the subject appears on page 60. qs qa For DCR-HC36: qd qh 2 5 4 qg qf For DCR-HC46/HC96: qd qh 2 5 4 qg qf qj 34 To record in mirror mode qh Open the LCD panel qh 90 degrees to the camcorder (1), then rotate it 180 degrees to the tripod receptacle qj using a tripod...
...; A mirror-image of the subject appears on page 60. qs qa For DCR-HC36: qd qh 2 5 4 qg qf For DCR-HC46/HC96: qd qh 2 5 4 qg qf qj 34 To record in mirror mode qh Open the LCD panel qh 90 degrees to the camcorder (1), then rotate it 180 degrees to the tripod receptacle qj using a tripod...

Operating Guide
Page 36
... SEARCH/Rec review display switch button (39) G Personal Menu button (44) In the CAMERA-MEMORY mode A B C D E P-MENU qs 7 H Recording folder (59) I Image size (26, 56) (DCR-HC46/HC96) J Quality ( or ) (56) K "Memory Stick Duo" indicator and the number of images that can check them as [DATA CODE] during recording and the camera setting...
... SEARCH/Rec review display switch button (39) G Personal Menu button (44) In the CAMERA-MEMORY mode A B C D E P-MENU qs 7 H Recording folder (59) I Image size (26, 56) (DCR-HC46/HC96) J Quality ( or ) (56) K "Memory Stick Duo" indicator and the number of images that can check them as [DATA CODE] during recording and the camera setting...
Operating Guide
Page 42
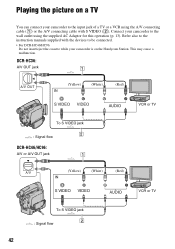
DCR-HC36: A/V OUT jack 1 A/V OUT (Yellow) (White) (Red) VCR or TV To S VIDEO jack 2 : Signal flow DCR-HC46/HC96: A/V or A/V OUT jack 1 A/V (Yellow) (White) (Red) VCR or TV To S VIDEO jack 2 : Signal flow 42 Connect your camcorder to the wall outlet using the A/V connecting cable (1) or the A/V ... DCR-HC46/HC96: Do not insert/eject the cassette while your camcorder is on a TV You can connect your camcorder to the input jack of a TV or a VCR using the supplied AC Adaptor for this operation (p. 13). This may cause a malfunction. Playing the picture on the Handycam ...
DCR-HC36: A/V OUT jack 1 A/V OUT (Yellow) (White) (Red) VCR or TV To S VIDEO jack 2 : Signal flow DCR-HC46/HC96: A/V or A/V OUT jack 1 A/V (Yellow) (White) (Red) VCR or TV To S VIDEO jack 2 : Signal flow 42 Connect your camcorder to the wall outlet using the A/V connecting cable (1) or the A/V ... DCR-HC46/HC96: Do not insert/eject the cassette while your camcorder is on a TV You can connect your camcorder to the input jack of a TV or a VCR using the supplied AC Adaptor for this operation (p. 13). This may cause a malfunction. Playing the picture on the Handycam ...
Operating Guide
Page 43
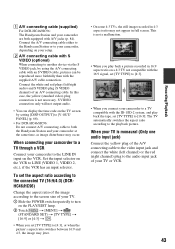
...(optional) When connecting to another device via the S VIDEO jack, by setting [DISP OUTPUT] to [V-OUT/ PANEL] (p. 68). • For DCR-HC46/HC96: Do not connect A/V connecting cable to [16:9]. B A/V connecting cable with the supplied A/V cable connection. S VIDEO connection only will not output ...TYPE] to the screen size of an A/V connecting cable. A A/V connecting cable (supplied) For DCR-HC46/HC96: The Handycam Station and your camcorder are both the Handycam Station and your camcorder at the same time, as image disturbance may not appear in full screen. The TV automatically ...
...(optional) When connecting to another device via the S VIDEO jack, by setting [DISP OUTPUT] to [V-OUT/ PANEL] (p. 68). • For DCR-HC46/HC96: Do not connect A/V connecting cable to [16:9]. B A/V connecting cable with the supplied A/V cable connection. S VIDEO connection only will not output ...TYPE] to the screen size of an A/V connecting cable. A A/V connecting cable (supplied) For DCR-HC46/HC96: The Handycam Station and your camcorder are both the Handycam Station and your camcorder at the same time, as image disturbance may not appear in full screen. The TV automatically ...
Operating Guide
Page 47
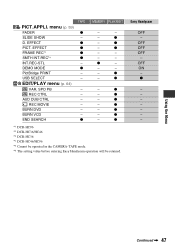
... z PICT. SPD PB - z - z - Easy Handycam OFF - USB SELECT - AUD DUB CTRL - BURN DVD - z - z - OFF OFF OFF - EFFECT z FRAME REC*1 z SMTH INT.REC*4 z INT.REC-STL - z - BURN VCD - OFF ON - menu (p. 59) FADER z SLIDE SHOW - z Using the Menu Continued , 47 DEMO MODE z PictBridge PRINT - REC CTRL - REC MOVIE - z - - - - z - z - z *1 DCR-HC96 *2 DCR-HC36/HC46 *3 DCR-HC36 *4 DCR-HC46/HC96 *5 Cannot be operated in...
... z PICT. SPD PB - z - z - Easy Handycam OFF - USB SELECT - AUD DUB CTRL - BURN DVD - z - z - OFF OFF OFF - EFFECT z FRAME REC*1 z SMTH INT.REC*4 z INT.REC-STL - z - BURN VCD - OFF ON - menu (p. 59) FADER z SLIDE SHOW - z Using the Menu Continued , 47 DEMO MODE z PictBridge PRINT - REC CTRL - REC MOVIE - z - - - - z - z - z *1 DCR-HC96 *2 DCR-HC36/HC46 *3 DCR-HC36 *4 DCR-HC46/HC96 *5 Cannot be operated in...

Operating Guide
Page 48
z - z - DISP GUIDE z z z GUIDEFRAME*1 z z - DATA CODE - - menu (p. 69) CLOCK SET z z z WORLD TIME z z z LANGUAGE z z z *1 DCR-HC96 *2 DCR-HC36/HC46 *3 DCR-HC36 *4 DCR-HC46/HC96 *5 Cannot be operated in the CAMERA-TAPE mode. *6 The setting value before entering Easy Handycam operation will be retained. AUDIO MIX - z LCD/VF SET z z z A/V t DV OUT*1 VIDEO INPUT*1 - - BEEP z z z DISP OUTPUT z z z MENU ROTATE z z z A.SHUT OFF z z z CALIBRATION - - Menu items (Continued) TAPE...
z - z - DISP GUIDE z z z GUIDEFRAME*1 z z - DATA CODE - - menu (p. 69) CLOCK SET z z z WORLD TIME z z z LANGUAGE z z z *1 DCR-HC96 *2 DCR-HC36/HC46 *3 DCR-HC36 *4 DCR-HC46/HC96 *5 Cannot be operated in the CAMERA-TAPE mode. *6 The setting value before entering Easy Handycam operation will be retained. AUDIO MIX - z LCD/VF SET z z z A/V t DV OUT*1 VIDEO INPUT*1 - - BEEP z z z DISP OUTPUT z z z MENU ROTATE z z z A.SHUT OFF z z z CALIBRATION - - Menu items (Continued) TAPE...

Operating Guide
Page 55
In 4:3 aspect ratio DCRHC46 DCRHC96 3.0M 1.9M 1.0M VGA - - 4 13 3 4 - 21 In 16:9 aspect ratio DCR-HC46 DCR-HC96 2.3M 0.7M - 4 3 - EXP. The maximum number of images are selected. You can compensate for camera shake (the default setting is especially... recorded in turn, every 1/60 of the apparent picture area. MEMORY SET menu Settings for details on selecting menu items. STILL SET x BURST (DCR-HC46/HC96) You can reduce image blur when recording moving subject may appear awkward. • When recording under fluorescent light or a light bulb, the screen may...
In 4:3 aspect ratio DCRHC46 DCRHC96 3.0M 1.9M 1.0M VGA - - 4 13 3 4 - 21 In 16:9 aspect ratio DCR-HC46 DCR-HC96 2.3M 0.7M - 4 3 - EXP. The maximum number of images are selected. You can compensate for camera shake (the default setting is especially... recorded in turn, every 1/60 of the apparent picture area. MEMORY SET menu Settings for details on selecting menu items. STILL SET x BURST (DCR-HC46/HC96) You can reduce image blur when recording moving subject may appear awkward. • When recording under fluorescent light or a light bulb, the screen may...

Operating Guide
Page 56
.... 56 • If you set to CAMERA-MEMORY. For DCR-HC96: B 3.0M ( ) Records still images clearly. 1.9M ( ) Allows you select [HIGH SPEED]. FRAME ( ) To record stationary subjects in relatively clear quality. x FLD/FRAME (DCR-HC36) B FIELD To record moving subjects correcting jitter (p. 30). BRKTG... (wide), [IMAGE SIZE] is fixed to [0.7M] (DCR-HC46)/[2.3M] (DCR-HC96) automatically (p. 26). • [IMAGE SIZE] can be set only when the POWER switch is set to CAMERA-MEMORY. • [BURST] cannot be set during Easy Handycam operation. • The maximum number of images will not...
.... 56 • If you set to CAMERA-MEMORY. For DCR-HC96: B 3.0M ( ) Records still images clearly. 1.9M ( ) Allows you select [HIGH SPEED]. FRAME ( ) To record stationary subjects in relatively clear quality. x FLD/FRAME (DCR-HC36) B FIELD To record moving subjects correcting jitter (p. 30). BRKTG... (wide), [IMAGE SIZE] is fixed to [0.7M] (DCR-HC46)/[2.3M] (DCR-HC96) automatically (p. 26). • [IMAGE SIZE] can be set only when the POWER switch is set to CAMERA-MEMORY. • [BURST] cannot be set during Easy Handycam operation. • The maximum number of images will not...


