Operating Guide
Page 5
Address: 16450 W. Telephone Number: 858-942-2230 This device complies with Part 15 of Conformity Trade Name: SONY Model No.: DCR-HC36 Responsible Party: Sony Electronics Inc. Otherwise, fire or injury may call toll free 1-800-8228837, or visit http://www.rbrc.org/... No.: DCR-HC46 Responsible Party: Sony Electronics Inc. Bernardo Dr, San Diego, CA 92127 U.S.A. CAUTION Replace the battery with Canadian ICES-003. Bernardo Dr, San Diego, CA 92127 U.S.A. This Class B digital apparatus complies with the specified type only. Read this first Before operating the unit, please ...
Address: 16450 W. Telephone Number: 858-942-2230 This device complies with Part 15 of Conformity Trade Name: SONY Model No.: DCR-HC36 Responsible Party: Sony Electronics Inc. Otherwise, fire or injury may call toll free 1-800-8228837, or visit http://www.rbrc.org/... No.: DCR-HC46 Responsible Party: Sony Electronics Inc. Bernardo Dr, San Diego, CA 92127 U.S.A. CAUTION Replace the battery with Canadian ICES-003. Bernardo Dr, San Diego, CA 92127 U.S.A. This Class B digital apparatus complies with the specified type only. Read this first Before operating the unit, please ...
Operating Guide
Page 6
.... - Bernardo Dr, San Diego, CA 92127 U.S.A. Notes • DCR-HC46 is subject to the following measures: - Refer to comply with the... of cassette you call upon your camcorder You can use in your Sony dealer regarding this equipment. DCR-HC Serial No. Model No. ...- Model No. Consult the dealer or an experienced radio/TV technician for a digital device pursuant to operate this product. Notes on the bottom. "Operating Guide" (...radio or television reception, which the receiver is supplied with the Handycam Station Model DCRA-C152 and AC Adaptor Model AC-L25A/L25B...
.... - Bernardo Dr, San Diego, CA 92127 U.S.A. Notes • DCR-HC46 is subject to the following measures: - Refer to comply with the... of cassette you call upon your camcorder You can use in your Sony dealer regarding this equipment. DCR-HC Serial No. Model No. ...- Model No. Consult the dealer or an experienced radio/TV technician for a digital device pursuant to operate this product. Notes on the bottom. "Operating Guide" (...radio or television reception, which the receiver is supplied with the Handycam Station Model DCRA-C152 and AC Adaptor Model AC-L25A/L25B...

Operating Guide
Page 7
...compatible equipment Be sure to OFF (CHG) when you can use in your camcorder. • For DCR-HC46/HC96: Disconnect the AC Adaptor from the Handycam Station holding both the Handycam Station and the DC plug. • For DCR-HC46/HC96: Be sure to slide the POWER switch to insert the "Memory Stick... Duo" into the Handycam Station or remove the camcorder from it in your camcorder.) • You cannot use...
...compatible equipment Be sure to OFF (CHG) when you can use in your camcorder. • For DCR-HC46/HC96: Disconnect the AC Adaptor from the Handycam Station holding both the Handycam Station and the DC plug. • For DCR-HC46/HC96: Be sure to slide the POWER switch to insert the "Memory Stick... Duo" into the Handycam Station or remove the camcorder from it in your camcorder.) • You cannot use...
Operating Guide
Page 9
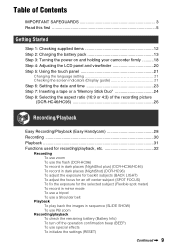
...Getting Started Step 1: Checking supplied items 12 Step 2: Charging the battery pack 13 Step 3: Turning the power on and holding your camcorder firmly ..........18 Step 4: Adjusting the LCD panel and viewfinder 20 Step 5: Using the touch panel 21 Changing the language setting 21 Checking...(DCR-HC46/HC96 26 Recording/Playback Easy Recording/Playback (Easy Handycam 28 Recording 30 Playback 31 Functions used for recording/playback, etc 32 Recording To use zoom To use the flash (DCR-HC96) To record in dark places (NightShot plus) (DCR-HC36/HC46) To record in dark places (NightShot) (DCR-...
...Getting Started Step 1: Checking supplied items 12 Step 2: Charging the battery pack 13 Step 3: Turning the power on and holding your camcorder firmly ..........18 Step 4: Adjusting the LCD panel and viewfinder 20 Step 5: Using the touch panel 21 Changing the language setting 21 Checking...(DCR-HC46/HC96 26 Recording/Playback Easy Recording/Playback (Easy Handycam 28 Recording 30 Playback 31 Functions used for recording/playback, etc 32 Recording To use zoom To use the flash (DCR-HC96) To record in dark places (NightShot plus) (DCR-HC36/HC46) To record in dark places (NightShot) (DCR-...

Operating Guide
Page 12
Handycam Station (1) (DCR-HC46/HC96) (p. 13) Rechargeable battery pack (1) (p. 13, 126) NP-FP30 (DCR-HC36) NP-FP50 (DCR-HC46/HC96) Wireless Remote Commander (1) (p. 40) A button-type lithium battery is already installed. AC Adaptor (1) (p. 13) USB cable (1) (p. 82, 86) Lens cap (1) (DCR-HC36/HC46) (p. 18, 28, 30) Power cord (1)...Grip belt, as illustrated below, using the strap. See page 6, 123, 124, for compatible cassettes and "Memory Stick Duo" for your camcorder. A/V connecting cable (1) (p. 42, 74, 97) CD-ROM "Picture Package Ver.1.5.1" (1) (p. 86) Operating Guide (This manual) ...
Handycam Station (1) (DCR-HC46/HC96) (p. 13) Rechargeable battery pack (1) (p. 13, 126) NP-FP30 (DCR-HC36) NP-FP50 (DCR-HC46/HC96) Wireless Remote Commander (1) (p. 40) A button-type lithium battery is already installed. AC Adaptor (1) (p. 13) USB cable (1) (p. 82, 86) Lens cap (1) (DCR-HC36/HC46) (p. 18, 28, 30) Power cord (1)...Grip belt, as illustrated below, using the strap. See page 6, 123, 124, for compatible cassettes and "Memory Stick Duo" for your camcorder. A/V connecting cable (1) (p. 42, 74, 97) CD-ROM "Picture Package Ver.1.5.1" (1) (p. 86) Operating Guide (This manual) ...
Operating Guide
Page 13
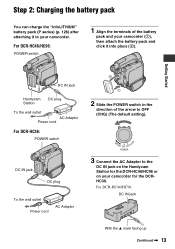
...wall outlet AC Adaptor Power cord For DCR-HC36: POWER switch 2 1 2 Slide the POWER switch in the direction of the battery pack and your camcorder (1), then attach the battery pack and click it to the DC IN jack on the Handycam Station for the DCRHC36. For DCR-HC46/HC96: POWER switch 1 Align the... terminals of the arrow to OFF (CHG) (The default setting). For DCR-HC46/HC96: DC IN jack With ...
...wall outlet AC Adaptor Power cord For DCR-HC36: POWER switch 2 1 2 Slide the POWER switch in the direction of the battery pack and your camcorder (1), then attach the battery pack and click it to the DC IN jack on the Handycam Station for the DCRHC36. For DCR-HC46/HC96: POWER switch 1 Align the... terminals of the arrow to OFF (CHG) (The default setting). For DCR-HC46/HC96: DC IN jack With ...
Operating Guide
Page 14
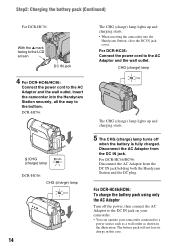
... in the illustration. Insert the camcorder into the Handycam Station, close the DC IN jack cover. For DCR-HC36: Connect the power cord to the AC Adaptor and the wall outlet. For DCR-HC46/HC96: Disconnect the AC Adaptor from the DC IN jack. For DCR-HC46/HC96: To charge the battery ...8226; When inserting the camcorder into the Handycam Station securely, all the way to a power source such as a wall outlet as shown in this case. Step2: Charging the battery pack (Continued) For DCR-HC36: With the v mark facing to the LCD screen DC IN jack 4 For DCR-HC46/HC96: Connect the power...
... in the illustration. Insert the camcorder into the Handycam Station, close the DC IN jack cover. For DCR-HC36: Connect the power cord to the AC Adaptor and the wall outlet. For DCR-HC46/HC96: Disconnect the AC Adaptor from the DC IN jack. For DCR-HC46/HC96: To charge the battery ...8226; When inserting the camcorder into the Handycam Station securely, all the way to a power source such as a wall outlet as shown in this case. Step2: Charging the battery pack (Continued) For DCR-HC36: With the v mark facing to the LCD screen DC IN jack 4 For DCR-HC46/HC96: Connect the power...
Operating Guide
Page 15
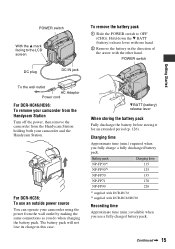
...Charging time 115 125 155 170 220 *1 supplied with DCR-HC36 *2 supplied with the other hand. POWER switch 1 Getting Started To the wall outlet AC Adaptor Power cord For DCR-HC46/HC96: To remove your camcorder and the Handycam Station. Charging time Approximate time (min.) required when ...you do when charging the battery pack. For DCR-HC36: To use a fully charged battery pack. Hold down the V BATT...
...Charging time 115 125 155 170 220 *1 supplied with DCR-HC36 *2 supplied with the other hand. POWER switch 1 Getting Started To the wall outlet AC Adaptor Power cord For DCR-HC46/HC96: To remove your camcorder and the Handycam Station. Charging time Approximate time (min.) required when ...you do when charging the battery pack. For DCR-HC36: To use a fully charged battery pack. Hold down the V BATT...

Operating Guide
Page 16
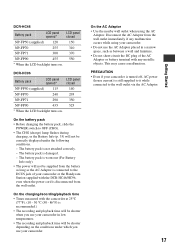
...LCD backlight turns off . Bottom: Recording with LCD screen. DCR-HC46 Battery pack Continuous recording time Typical recording time* NP-FP50 (...time (min.) available when you repeat recording start /stop , turning the power on /off and zooming. DCR-HC36 Battery pack LCD panel opened NP-FP30 (supplied) 90 NP-FP50 125 NP-FP70 265 NP-FP71 315... LCD screen. Middle: When the LCD backlight turns off . Step2: Charging the battery pack (Continued) DCR-HC36 Battery pack Continuous recording time Typical recording time* NP-FP30 (supplied) 85 40 105 50 NP-FP50 ...
...LCD backlight turns off . Bottom: Recording with LCD screen. DCR-HC46 Battery pack Continuous recording time Typical recording time* NP-FP50 (...time (min.) available when you repeat recording start /stop , turning the power on /off and zooming. DCR-HC36 Battery pack LCD panel opened NP-FP30 (supplied) 90 NP-FP50 125 NP-FP70 265 NP-FP71 315... LCD screen. Middle: When the LCD backlight turns off . Step2: Charging the battery pack (Continued) DCR-HC36 Battery pack Continuous recording time Typical recording time* NP-FP30 (supplied) 85 40 105 50 NP-FP50 ...
Operating Guide
Page 17
... - 30 °C (50 - 86°F) is recommended.) • The recording and playback time will be shorter when you use your camcorder or the Handycam Station supplied with any malfunction occurs while using the AC Adaptor. The battery pack is worn-out (For Battery Info only). • The ...435 525 * When the LCD backlight turns on . PRECAUTION • Even if your camcorder is turned off, AC power (house current) is disconnected from the wall outlet immediately if any metallic objects. DCR-HC46 Battery pack LCD panel opened * LCD panel closed NP-FP50 (supplied) 120 150 ...
... - 30 °C (50 - 86°F) is recommended.) • The recording and playback time will be shorter when you use your camcorder or the Handycam Station supplied with any malfunction occurs while using the AC Adaptor. The battery pack is worn-out (For Battery Info only). • The ...435 525 * When the LCD backlight turns on . PRECAUTION • Even if your camcorder is turned off, AC power (house current) is disconnected from the wall outlet immediately if any metallic objects. DCR-HC46 Battery pack LCD panel opened * LCD panel closed NP-FP50 (supplied) 120 150 ...

Operating Guide
Page 18
...SET], p. 23), the next time you have set to OFF (CHG), slide it for a few seconds. 2 Hold the camcorder correctly. 1 Slide the POWER switch repeatedly in the direction of the arrow to turn on the respective lamp. For DCR-HC36/HC46: Remove the lens cap by pressing both knobs on the sides of your... camcorder firmly To record or play or edit pictures. • After you turn on the power of the cap. 3 ...
...SET], p. 23), the next time you have set to OFF (CHG), slide it for a few seconds. 2 Hold the camcorder correctly. 1 Slide the POWER switch repeatedly in the direction of the arrow to turn on the respective lamp. For DCR-HC36/HC46: Remove the lens cap by pressing both knobs on the sides of your... camcorder firmly To record or play or edit pictures. • After you turn on the power of the cap. 3 ...
Operating Guide
Page 19
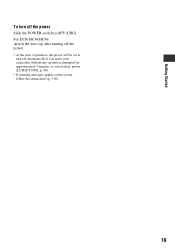
For DCR-HC36/HC46: Attach the lens cap after turning off the power. • At the time of purchase, the power will be set to turn off automatically if you leave your camcorder without any operation attempted for approximately 5 minutes, to OFF (CHG). Getting Started To turn off the power Slide the POWER switch to save battery power ([A.SHUT OFF], p. 68). • If warning messages appear on the screen, follow the instructions (p. 118). 19
For DCR-HC36/HC46: Attach the lens cap after turning off the power. • At the time of purchase, the power will be set to turn off automatically if you leave your camcorder without any operation attempted for approximately 5 minutes, to OFF (CHG). Getting Started To turn off the power Slide the POWER switch to save battery power ([A.SHUT OFF], p. 68). • If warning messages appear on the screen, follow the instructions (p. 118). 19
Operating Guide
Page 20
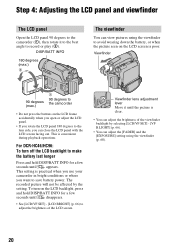
... of the viewfinder backlight by the setting. Step 4: Adjusting the LCD panel and viewfinder The LCD panel Open the LCD panel 90 degrees to the camcorder (1), then rotate it until the picture is convenient during playback operations. DISP/BATT INFO 180 degrees (max.) 2 The viewfinder You can adjust the [... make the battery last longer Press and hold DISP/BATT INFO for a few seconds until appears. For DCR-HC46/HC96: To turn on the LCD screen is practical when you use your camcorder in bright conditions or where you want to the lens side, you rotate the LCD panel 180 degrees ...
... of the viewfinder backlight by the setting. Step 4: Adjusting the LCD panel and viewfinder The LCD panel Open the LCD panel 90 degrees to the camcorder (1), then rotate it until the picture is convenient during playback operations. DISP/BATT INFO 180 degrees (max.) 2 The viewfinder You can adjust the [... make the battery last longer Press and hold DISP/BATT INFO for a few seconds until appears. For DCR-HC46/HC96: To turn on the LCD screen is practical when you use your camcorder in bright conditions or where you want to the lens side, you rotate the LCD panel 180 degrees ...

Operating Guide
Page 21
...displayed on the settings. Select the screen language in lines may appear on the LCD screen, but this is not a malfunction. DISP/BATT INFO DCR-HC36/ HC46 DCR-HC96 Touch the button on the LCD screen. • Perform the same actions as time code) on or off. Select area for guide. DISP... of the LCD panel to press buttons on the LCD frame accidentally while using the touch panel. DISP GUIDE EXPOSURE FADER Touch [MENU] during Easy Handycam operation (p. 28). 2 Touch [DISP GUIDE]. Changing the language setting You can change the settings (p. 44) using the touch panel. • If the...
...displayed on the settings. Select the screen language in lines may appear on the LCD screen, but this is not a malfunction. DISP/BATT INFO DCR-HC36/ HC46 DCR-HC96 Touch the button on the LCD screen. • Perform the same actions as time code) on or off. Select area for guide. DISP... of the LCD panel to press buttons on the LCD frame accidentally while using the touch panel. DISP GUIDE EXPOSURE FADER Touch [MENU] during Easy Handycam operation (p. 28). 2 Touch [DISP GUIDE]. Changing the language setting You can change the settings (p. 44) using the touch panel. • If the...
Operating Guide
Page 24
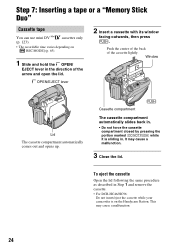
... the cassette Open the lid following the same procedure as described in Step 1 and remove the cassette. • For DCR-HC46/HC96: Do not insert/eject the cassette while your camcorder is sliding in. OPEN/EJECT lever 2 Insert a cassette with its window facing outwards, then press . Push the center...in . • Do not force the cassette compartment closed by pressing the portion marked {DO NOT PUSH} while it is on the Handycam Station. This may cause a malfunction. 3 Close the lid. Cassette compartment The cassette compartment automatically slides back in the direction of the cassette lightly....
... the cassette Open the lid following the same procedure as described in Step 1 and remove the cassette. • For DCR-HC46/HC96: Do not insert/eject the cassette while your camcorder is sliding in. OPEN/EJECT lever 2 Insert a cassette with its window facing outwards, then press . Push the center...in . • Do not force the cassette compartment closed by pressing the portion marked {DO NOT PUSH} while it is on the Handycam Station. This may cause a malfunction. 3 Close the lid. Cassette compartment The cassette compartment automatically slides back in the direction of the cassette lightly....

Operating Guide
Page 25
... in the right direction until it may be careful that the "Memory Stick Duo" does not pop out and drop. DCR-HC36/HC46: Access lamp With the v mark facing to the LCD screen 25 DCR-HC96: Access lamp To eject a "Memory Stick Duo" Lightly push in the wrong direction, the "Memory Stick Duo," the... the LCD screen • If you force the "Memory Stick Duo" into the slot in once and slide out the "Memory Stick Duo" alongside the camcorder body. • Do not remove the "Memory Stick Duo" forcibly with or (p. 124). • The number and time of recordable pictures varies depending on the...
... in the right direction until it may be careful that the "Memory Stick Duo" does not pop out and drop. DCR-HC36/HC46: Access lamp With the v mark facing to the LCD screen 25 DCR-HC96: Access lamp To eject a "Memory Stick Duo" Lightly push in the wrong direction, the "Memory Stick Duo," the... the LCD screen • If you force the "Memory Stick Duo" into the slot in once and slide out the "Memory Stick Duo" alongside the camcorder body. • Do not remove the "Memory Stick Duo" forcibly with or (p. 124). • The number and time of recordable pictures varies depending on the...
Operating Guide
Page 26
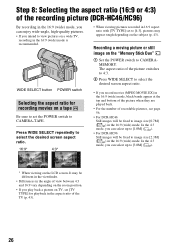
... at the top and bottom of the picture when they are played back. • For the number of recordable pictures, see page 56. • For DCR-HC46: Still images will be fixed to image size [0.7M] ( ) in the 16:9 (wide) mode. Step 8: Selecting the aspect ratio (16:9 or 4:3) of the recording ...picture (DCR-HC46/HC96) By recording in the 16:9 (wide) mode, you can enjoy wide-angle, high-quality pictures. • If you intend to view pictures on the ...
... at the top and bottom of the picture when they are played back. • For the number of recordable pictures, see page 56. • For DCR-HC46: Still images will be fixed to image size [0.7M] ( ) in the 16:9 (wide) mode. Step 8: Selecting the aspect ratio (16:9 or 4:3) of the recording ...picture (DCR-HC46/HC96) By recording in the 16:9 (wide) mode, you can enjoy wide-angle, high-quality pictures. • If you intend to view pictures on the ...

Operating Guide
Page 28
...Still images (4:3) 1 Slide the POWER switch E to turn on the CAMERA-TAPE lamp. To stop recording, press F again. 2 Press EASY A. DCR-HC36: B A DCR-HC36/ HC46 DCR-HC96 D E If the POWER switch is set to record. When disappears, the image has been recorded. *1 Movies are recorded in SP (Standard...and hold lightly Press fully to OFF (CHG), slide it while pressing the green button. Recording/Playback Easy Recording/Playback (Easy Handycam) With this Easy Handycam operation, most of the camera settings are recorded in [FINE] quality on the screen B. 3 Press REC START/STOP F...
...Still images (4:3) 1 Slide the POWER switch E to turn on the CAMERA-TAPE lamp. To stop recording, press F again. 2 Press EASY A. DCR-HC36: B A DCR-HC36/ HC46 DCR-HC96 D E If the POWER switch is set to record. When disappears, the image has been recorded. *1 Movies are recorded in SP (Standard...and hold lightly Press fully to OFF (CHG), slide it while pressing the green button. Recording/Playback Easy Recording/Playback (Easy Handycam) With this Easy Handycam operation, most of the camera settings are recorded in [FINE] quality on the screen B. 3 Press REC START/STOP F...

Operating Guide
Page 29
... mode) (p. 30) • REC START/STOP button (in the CAMERA-MEMORY mode) (p. 30). • For DCR-HC46/HC96: Pressing and holding DISP/BATT INFO button (p. 20) • For DCR-HC46/HC96: WIDE SELECT button (in the CAMERA-MEMORY mode) (p. 26) 29 A C AB C B A Stop B... Play/Pause toggles C Rewind/Fast forward MENU A Tape playback B Previous/Next C Delete (p. 80) x To cancel Easy Handycam operation Press EASY A again. x Adjustable menu settings during Easy Handycam are ...
... mode) (p. 30) • REC START/STOP button (in the CAMERA-MEMORY mode) (p. 30). • For DCR-HC46/HC96: Pressing and holding DISP/BATT INFO button (p. 20) • For DCR-HC46/HC96: WIDE SELECT button (in the CAMERA-MEMORY mode) (p. 26) 29 A C AB C B A Stop B... Play/Pause toggles C Rewind/Fast forward MENU A Tape playback B Previous/Next C Delete (p. 80) x To cancel Easy Handycam operation Press EASY A again. x Adjustable menu settings during Easy Handycam are ...

Operating Guide
Page 30
Recording Lens cap (DCR-HC36/HC46) Remove the lens cap by pressing PHOTO fully. green button. 2 Start recording. Movies ... with the setting of the arrow repeatedly to turn on the respective lamp to image size [0.2M] in 16:9 screen (DCR-HC46/HC96), or [VGA (0.3M)] in 4:3 screen. 30 Flashing t Lit A shutter sound is set to OFF CAMERA-TAPE... (tape only) to adjust the focus (A), then press it To record on a tape, light up the switch is heard. PHOTO DCR-HC36: POWER switch REC START/STOP B REC START/STOP A 1 Slide the POWER switch in standby mode, you can record a still image...
Recording Lens cap (DCR-HC36/HC46) Remove the lens cap by pressing PHOTO fully. green button. 2 Start recording. Movies ... with the setting of the arrow repeatedly to turn on the respective lamp to image size [0.2M] in 16:9 screen (DCR-HC46/HC96), or [VGA (0.3M)] in 4:3 screen. 30 Flashing t Lit A shutter sound is set to OFF CAMERA-TAPE... (tape only) to adjust the focus (A), then press it To record on a tape, light up the switch is heard. PHOTO DCR-HC36: POWER switch REC START/STOP B REC START/STOP A 1 Slide the POWER switch in standby mode, you can record a still image...


