2008 Water Housing Cross Reference
Page 1
Reproduction in whole or in and out of the water. Sony, the Sony logo, Cyber-shot, and Handycam are trademarks of Sports pack, re-designed Marine pack, and new Aqty pack, now you capture amazing underwater photos and videos with Sony. All rights reserved. In fact, selected 2008 Cyber-shot cameras ...DCR-HC36/38 DCR-HC46/48, DCR-HC52/54 DCR-HC62/96 DCR-DVD103/108 DCR-DVD203/308 DCR-DVD403/408 DCR-DVD508/610 DCR-DVD710/810 DCR-DVD910/92 DCR-SR200/220/220D DCR-SR300/42/45/46 DCR-SR62/65/82/85 HDR-CX7/CX12 HDR-HC3/5/7/9, HDR-SR5/7 HDR-SR10/10D/11/12 HDR-UX5/7/10/20 N/A © 2008 Sony...
Reproduction in whole or in and out of the water. Sony, the Sony logo, Cyber-shot, and Handycam are trademarks of Sports pack, re-designed Marine pack, and new Aqty pack, now you capture amazing underwater photos and videos with Sony. All rights reserved. In fact, selected 2008 Cyber-shot cameras ...DCR-HC36/38 DCR-HC46/48, DCR-HC52/54 DCR-HC62/96 DCR-DVD103/108 DCR-DVD203/308 DCR-DVD403/408 DCR-DVD508/610 DCR-DVD710/810 DCR-DVD910/92 DCR-SR200/220/220D DCR-SR300/42/45/46 DCR-SR62/65/82/85 HDR-CX7/CX12 HDR-HC3/5/7/9, HDR-SR5/7 HDR-SR10/10D/11/12 HDR-UX5/7/10/20 N/A © 2008 Sony...

2008 Water Housing Cross Reference
Page 2
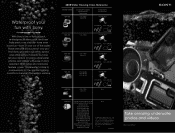
...still cameras • Protects against dust, rain and spray • Lets users take photos at depths up to 5 feet • Fits selected Sony® Handycam® camcorders • Guards against dust, dirt, and more • Allows videos to be taken up to 17 feet below the water's surface •... Fits selected Sony® Cyber-shot® digital still cameras • Allows underwater photography up to 132 feet deep • Works with the ...
...still cameras • Protects against dust, rain and spray • Lets users take photos at depths up to 5 feet • Fits selected Sony® Handycam® camcorders • Guards against dust, dirt, and more • Allows videos to be taken up to 17 feet below the water's surface •... Fits selected Sony® Cyber-shot® digital still cameras • Allows underwater photography up to 132 feet deep • Works with the ...
How to shoot a great birthday video.
Page 1
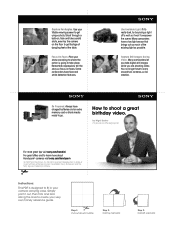
... light as possible. Many camcorders have charged batteries and an extra memory card or blank media ready to create your shots according to where the action is designed to get footage of dangling feet at the table. Be Prepared. Sony, Handycam and the Sony logo are shooting video.... Plan your very own handy reference guide. Always have a low light sensor that brings out as much of Sony. Simply print it won't overpower the scene. Some camcorders have to shoot a great birthday video....
... light as possible. Many camcorders have charged batteries and an extra memory card or blank media ready to create your shots according to where the action is designed to get footage of dangling feet at the table. Be Prepared. Sony, Handycam and the Sony logo are shooting video.... Plan your very own handy reference guide. Always have a low light sensor that brings out as much of Sony. Simply print it won't overpower the scene. Some camcorders have to shoot a great birthday video....
How to shoot a great wedding video.
Page 1
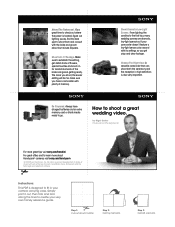
...-light sensor, play around outline Step 2: Fold top half back Step 3: Fold left side back Always have a camcorder with plenty of flowers, special touches and zoom in high definition is also very important. Sony, Handycam and the Sony logo are dramatic, low-light scenarios. Step 1: Cut out around with the bride and groom about...
...-light sensor, play around outline Step 2: Fold top half back Step 3: Fold left side back Always have a camcorder with plenty of flowers, special touches and zoom in high definition is also very important. Sony, Handycam and the Sony logo are dramatic, low-light scenarios. Step 1: Cut out around with the bride and groom about...

How to take great vacation video.
Page 1
... case. Simply print it out, then trim and fold along the lines to learn more about Handycam® cameras visit sony.com/handycam © 2009 Sony Electronics Inc. Some camcorders feature a built-in your video. Hearing instructions or parts of Sony. Always have a stabilizing feature that automatically tags your current location and date while you can...
... case. Simply print it out, then trim and fold along the lines to learn more about Handycam® cameras visit sony.com/handycam © 2009 Sony Electronics Inc. Some camcorders feature a built-in your video. Hearing instructions or parts of Sony. Always have a stabilizing feature that automatically tags your current location and date while you can...
Operating Instructions
Page 9
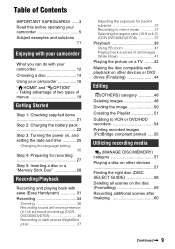
...Handycam 31 Recording 34 Zooming 36 Recording sound with more presence (5.1ch surround recording) (DCRDVD308/DVD708 36 Recording in dark places (NightShot plus 37 Adjusting the exposure for backlit subjects 37 Recording in mirror mode 37 Selecting the aspect ratio (16:9 or 4:3) (DCR-DVD308/...DVD708 37 Playback 39 Using PB zoom 41 Playing back a series of Contents IMPORTANT SAFEGUARDS ......3 Read this before operating your camcorder 5 Subject examples and solutions 11 Enjoying with your...
...Handycam 31 Recording 34 Zooming 36 Recording sound with more presence (5.1ch surround recording) (DCRDVD308/DVD708 36 Recording in dark places (NightShot plus 37 Adjusting the exposure for backlit subjects 37 Recording in mirror mode 37 Selecting the aspect ratio (16:9 or 4:3) (DCR-DVD308/...DVD708 37 Playback 39 Using PB zoom 41 Playing back a series of Contents IMPORTANT SAFEGUARDS ......3 Read this before operating your camcorder 5 Subject examples and solutions 11 Enjoying with your...
Operating Instructions
Page 18
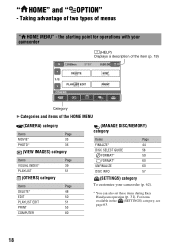
... GUIDE 58 FORMAT* 59 FORMAT* 60 UNFINALIZE 60 DISC INFO 57 (SETTINGS) category To customize your camcorder (p. 62). * You can also set these items during Easy Handycam operation (p. 31). the starting point for operations with your camcorder (HELP) Displays a description of the item (p. 19) Category B Categories and items of menus " HOME MENU" - For...
... GUIDE 58 FORMAT* 59 FORMAT* 60 UNFINALIZE 60 DISC INFO 57 (SETTINGS) category To customize your camcorder (p. 62). * You can also set these items during Easy Handycam operation (p. 31). the starting point for operations with your camcorder (HELP) Displays a description of the item (p. 19) Category B Categories and items of menus " HOME MENU" - For...
Operating Instructions
Page 21
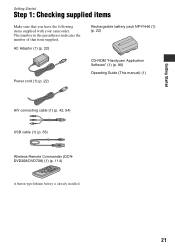
Getting Started Getting Started Step 1: Checking supplied items Make sure that item supplied. AC Adaptor (1) (p. 22) Rechargeable battery pack NP-FH40 (1) (p. 22) Power cord (1) (p. 22) CD-ROM "Handycam Application Software" (1) (p. 80) Operating Guide (This manual) (1) A/V connecting cable (1) (p. 42, 54) USB cable (1) (p. 55) Wireless Remote Commander (DCRDVD308/DVD708) (1) (p. 114) A button-type lithium battery is already installed. 21 The number in the parentheses indicates the number of that you have the following items supplied with your camcorder.
Getting Started Getting Started Step 1: Checking supplied items Make sure that item supplied. AC Adaptor (1) (p. 22) Rechargeable battery pack NP-FH40 (1) (p. 22) Power cord (1) (p. 22) CD-ROM "Handycam Application Software" (1) (p. 80) Operating Guide (This manual) (1) A/V connecting cable (1) (p. 42, 54) USB cable (1) (p. 55) Wireless Remote Commander (DCRDVD308/DVD708) (1) (p. 114) A button-type lithium battery is already installed. 21 The number in the parentheses indicates the number of that you have the following items supplied with your camcorder.
Operating Instructions
Page 29
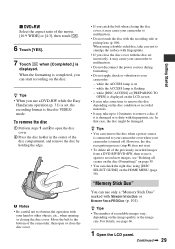
z Tips • When you use a DVD-RW while the Easy Handycam operation (p. 31) is set incorrectly, it is damaged or is displayed. ...disc condition or recorded materials. • It may take some time to VIDEO mode. For details, see "Deleting all of the camcorder, then open the disc cover. 2 Press the disc holder in the center of the movie, [16:9 WIDE] or [4:3], ... damaged. "Memory Stick Duo" You can remove the disc when a power source is connected to your camcorder even when your camcorder is fixed to remove the disc depending on the image quality or the image size. To remove the ...
z Tips • When you use a DVD-RW while the Easy Handycam operation (p. 31) is set incorrectly, it is damaged or is displayed. ...disc condition or recorded materials. • It may take some time to VIDEO mode. For details, see "Deleting all of the camcorder, then open the disc cover. 2 Press the disc holder in the center of the movie, [16:9 WIDE] or [4:3], ... damaged. "Memory Stick Duo" You can remove the disc when a power source is connected to your camcorder even when your camcorder is fixed to remove the disc depending on the image quality or the image size. To remove the ...
Operating Instructions
Page 31
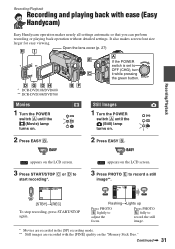
Continued , 31 Open the lens cover (p. 27) * DCR-DVD108/DVD608 ** DCR-DVD308/DVD708 R Movies 1 Turn the POWER switch A until the (Still) lamp turns on . 2 Press EASY B. FlashingtLights up Press PHOTO E lightly to record a still image**. 6 [STBY]t[REC.... Press PHOTO E fully to record the still image. * Movies are recorded in the [SP] recording mode. ** Still images are recorded with ease (Easy Handycam) Easy Handycam operation makes nearly all settings automatic so that you can perform recording or playing back operation without detailed settings. appears on the LCD screen. 3 Press...
Continued , 31 Open the lens cover (p. 27) * DCR-DVD108/DVD608 ** DCR-DVD308/DVD708 R Movies 1 Turn the POWER switch A until the (Still) lamp turns on . 2 Press EASY B. FlashingtLights up Press PHOTO E lightly to record a still image**. 6 [STBY]t[REC.... Press PHOTO E fully to record the still image. * Movies are recorded in the [SP] recording mode. ** Still images are recorded with ease (Easy Handycam) Easy Handycam operation makes nearly all settings automatic so that you can perform recording or playing back operation without detailed settings. appears on the LCD screen. 3 Press...
Operating Instructions
Page 32
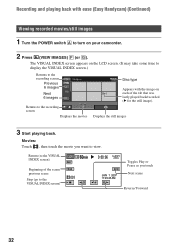
... the VISUAL INDEX screen) Beginning of the tab that was lastly played back/recorded (B for the still image). The VISUAL INDEX screen appears on your camcorder. 2 Press (VIEW IMAGES) F (or G). Movies: Touch , then touch the movie you want to turn on the LCD screen. (It may take some time to ...with the image on each of the scene/ previous scene Stop (go to the recording screen Displays the movies Disc type Appears with ease (Easy Handycam) (Continued) Viewing recorded movies/still images 1 Turn the POWER switch A to view. Displays the still images 3 Start playing back.
... the VISUAL INDEX screen) Beginning of the tab that was lastly played back/recorded (B for the still image). The VISUAL INDEX screen appears on your camcorder. 2 Press (VIEW IMAGES) F (or G). Movies: Touch , then touch the movie you want to turn on the LCD screen. (It may take some time to ...with the image on each of the scene/ previous scene Stop (go to the recording screen Displays the movies Disc type Appears with ease (Easy Handycam) (Continued) Viewing recorded movies/still images 1 Turn the POWER switch A to view. Displays the still images 3 Start playing back.
Operating Instructions
Page 33
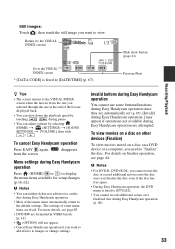
...Go to the VISUAL INDEX screen * [DATA CODE] is fixed to [STYLE1]. • You cannot record additional scenes on a finalized disc during Easy Handycam operation. • Most of the menu items automatically return to [DATE/TIME] (p. 67). To view movies on a disc on other devices (Finalize...you want to display the menu items available for setup changes (p.18, 62). For more details, see page 44. Invalid buttons during Easy Handycam operation You cannot use some menu items are attempted. Slide show button (page 41) Previous/Next Recording/Playback z Tips • The screen ...
...Go to the VISUAL INDEX screen * [DATA CODE] is fixed to [STYLE1]. • You cannot record additional scenes on a finalized disc during Easy Handycam operation. • Most of the menu items automatically return to [DATE/TIME] (p. 67). To view movies on a disc on other devices (Finalize...you want to display the menu items available for setup changes (p.18, 62). For more details, see page 44. Invalid buttons during Easy Handycam operation You cannot use some menu items are attempted. Slide show button (page 41) Previous/Next Recording/Playback z Tips • The screen ...
Operating Instructions
Page 45
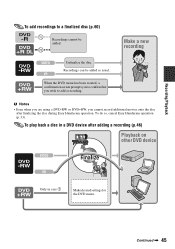
... a recording (p.46) Playback on other DVD device Finalize Only in case 1 Make desired settings for the DVD menu. Continued , 45 To do so, cancel Easy Handycam operation (p. 33). b Notes • Even when you are using a DVD-RW or DVD+RW, you wish to add a recording. Recordings can be added. To play... back a disc in a DVD device after finalizing the disc during Easy Handycam operation. Recording/Playback To add recordings to a finalized disc (p.60) Recordings cannot be added as usual.
... a recording (p.46) Playback on other DVD device Finalize Only in case 1 Make desired settings for the DVD menu. Continued , 45 To do so, cancel Easy Handycam operation (p. 33). b Notes • Even when you are using a DVD-RW or DVD+RW, you wish to add a recording. Recordings can be added. To play... back a disc in a DVD device after finalizing the disc during Easy Handycam operation. Recording/Playback To add recordings to a finalized disc (p.60) Recordings cannot be added as usual.
Operating Instructions
Page 47
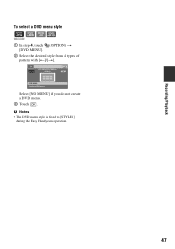
b Notes • The DVD menu style is fixed to [STYLE1] during the Easy Handycam operation. 47 Recording/Playback To select a DVD menu style DVD +RW 1 In step 4, touch (OPTION) t [DVD MENU]. 2 Select the desired style from 4 types of pattern with [T]/[t]. Select [NO MENU] if you do not create a DVD menu. 3 Touch .
b Notes • The DVD menu style is fixed to [STYLE1] during the Easy Handycam operation. 47 Recording/Playback To select a DVD menu style DVD +RW 1 In step 4, touch (OPTION) t [DVD MENU]. 2 Select the desired style from 4 types of pattern with [T]/[t]. Select [NO MENU] if you do not create a DVD menu. 3 Touch .
Operating Instructions
Page 48
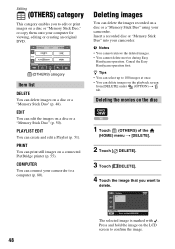
... COMPUTER You can edit the images on a connected PictBridge printer (p. 55). The selected image is marked with . EDIT You can connect your camcorder. Insert a recorded disc or "Memory Stick Duo" into your computer for viewing, editing or creating an original DVD. (OTHERS) category Item...• You cannot retrieve the deleted images. • You cannot delete movies during Easy Handycam operation. Deleting images You can delete the images recorded on a disc or a "Memory Stick Duo" using your camcorder to 100 images at once. • You can create and edit a Playlist (p. 51...
... COMPUTER You can edit the images on a connected PictBridge printer (p. 55). The selected image is marked with . EDIT You can connect your camcorder. Insert a recorded disc or "Memory Stick Duo" into your computer for viewing, editing or creating an original DVD. (OTHERS) category Item...• You cannot retrieve the deleted images. • You cannot delete movies during Easy Handycam operation. Deleting images You can delete the images recorded on a disc or a "Memory Stick Duo" using your camcorder to 100 images at once. • You can create and edit a Playlist (p. 51...

Operating Instructions
Page 50
...]. 2 Touch [DIVIDE]. 3 Touch the movie that you press . 5 Touch t [YES] t . 50 b Notes • You cannot divide movies during Easy Handycam operation. The movie pauses. Play and pause toggles as you want to divide. z Tips • To delete all images recorded on the "Memory Stick Duo...," format the "Memory Stick Duo" (p. 60). Cancel the Easy Handycam operation first. 1 Touch (OTHERS) of the selected movie. Adjusts the dividing point more precisely after the dividing point has been selected with . ...
...]. 2 Touch [DIVIDE]. 3 Touch the movie that you press . 5 Touch t [YES] t . 50 b Notes • You cannot divide movies during Easy Handycam operation. The movie pauses. Play and pause toggles as you want to divide. z Tips • To delete all images recorded on the "Memory Stick Duo...," format the "Memory Stick Duo" (p. 60). Cancel the Easy Handycam operation first. 1 Touch (OTHERS) of the selected movie. Adjusts the dividing point more precisely after the dividing point has been selected with . ...
Operating Instructions
Page 51
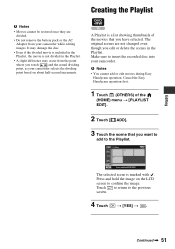
... scene is a list showing thumbnails of the (HOME) menu t [PLAYLIST EDIT]. 2 Touch [ ADD]. 3 Touch the scene that you have selected. Continued , 51 Cancel the Easy Handycam operation first. 1 Touch (OTHERS) of the movies that you want to add to the previous screen. 4 Touch t [YES] t . Touch to return to the Playlist. . A Playlist... disc. • Even if the divided movie is included in the Playlist, the movie is not divided in the Playlist. It may occur from your camcorder. b Notes • You cannot add or edit movies during Easy Handycam operation.
... scene is a list showing thumbnails of the (HOME) menu t [PLAYLIST EDIT]. 2 Touch [ ADD]. 3 Touch the scene that you have selected. Continued , 51 Cancel the Easy Handycam operation first. 1 Touch (OTHERS) of the movies that you want to add to the previous screen. 4 Touch t [YES] t . Touch to return to the Playlist. . A Playlist... disc. • Even if the divided movie is included in the Playlist, the movie is not divided in the Playlist. It may occur from your camcorder. b Notes • You cannot add or edit movies during Easy Handycam operation.
Operating Instructions
Page 60
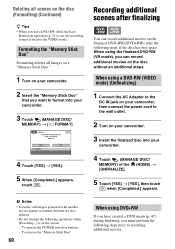
... the following steps, if the disc has free space. Deleting all images on a "Memory Stick Duo." 1 Turn on your camcorder. 2 Insert the "Memory Stick Duo" that you want to format into your camcorder. 3 Touch (MANAGE DISC/ MEMORY) t [ FORMAT] 4 Touch [YES] t [YES]. 5 When [Completed.] appears, touch . Formatting .... To remove the "Memory Stick Duo" 60 When using the finalized DVD-RW (VR mode), you use a DVD-RW while the Easy Handycam operation (p. 31) is set, the recording format is on the screen: - Recording additional scenes after finalizing You can record additional movies on...
... the following steps, if the disc has free space. Deleting all images on a "Memory Stick Duo." 1 Turn on your camcorder. 2 Insert the "Memory Stick Duo" that you want to format into your camcorder. 3 Touch (MANAGE DISC/ MEMORY) t [ FORMAT] 4 Touch [YES] t [YES]. 5 When [Completed.] appears, touch . Formatting .... To remove the "Memory Stick Duo" 60 When using the finalized DVD-RW (VR mode), you use a DVD-RW while the Easy Handycam operation (p. 31) is set, the recording format is on the screen: - Recording additional scenes after finalizing You can record additional movies on...
Operating Instructions
Page 61
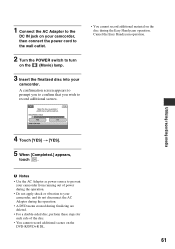
... running out of power during the operation. • Do not apply shock or vibration to your camcorder. Utilizing recording media 4 Touch [YES] t [YES]. 5 When [Completed.] appears, touch . A ... turn on the DVD-R/DVD+R DL. 61 1 Connect the AC Adaptor to the DC IN jack on your camcorder, then connect the power cord to the wall outlet. 2 Turn the POWER switch to record additional scenes. •... additional scenes on the (Movie) lamp. 3 Insert the finalized disc into your camcorder, and do not disconnect the AC Adaptor during the operation. • A DVD menu created during the Easy...
... running out of power during the operation. • Do not apply shock or vibration to your camcorder. Utilizing recording media 4 Touch [YES] t [YES]. 5 When [Completed.] appears, touch . A ... turn on the DVD-R/DVD+R DL. 61 1 Connect the AC Adaptor to the DC IN jack on your camcorder, then connect the power cord to the wall outlet. 2 Turn the POWER switch to record additional scenes. •... additional scenes on the (Movie) lamp. 3 Insert the finalized disc into your camcorder, and do not disconnect the AC Adaptor during the operation. • A DVD menu created during the Easy...
Operating Instructions
Page 63
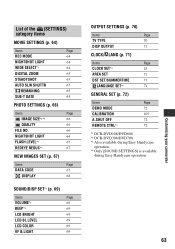
... SET 71 DST SET/SUMMERTIME 71 LANGUAGE SET*3 71 GENERAL SET (p. 72) Items Page DEMO MODE 72 CALIBRATION 105 A.SHUT OFF 72 REMOTE CTRL*2 72 *1 DCR-DVD108/DVD608 *2 DCR-DVD308/DVD708 *3 Also available during Easy Handycam operation. *4 Only [SOUND SETTINGS] is available during Easy Handycam operation. 63 Customizing your camcorder
... SET 71 DST SET/SUMMERTIME 71 LANGUAGE SET*3 71 GENERAL SET (p. 72) Items Page DEMO MODE 72 CALIBRATION 105 A.SHUT OFF 72 REMOTE CTRL*2 72 *1 DCR-DVD108/DVD608 *2 DCR-DVD308/DVD708 *3 Also available during Easy Handycam operation. *4 Only [SOUND SETTINGS] is available during Easy Handycam operation. 63 Customizing your camcorder


