Operating Instructions
Page 7
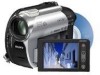
... constantly on the LCD screen and the Continued , 7 However, there may result in a malfunction of memory card except "Memory Stick Duo." • "Memory Stick PRO" and "Memory Stick PRO Duo" can use "Memory Stick Duo" marked with your camcorder.) "Memory Stick" (You cannot use it in your camcorder" (p. 104). • To prevent discs from being lost, do not do the following parts. * Depending...
... constantly on the LCD screen and the Continued , 7 However, there may result in a malfunction of memory card except "Memory Stick Duo." • "Memory Stick PRO" and "Memory Stick PRO Duo" can use "Memory Stick Duo" marked with your camcorder.) "Memory Stick" (You cannot use it in your camcorder" (p. 104). • To prevent discs from being lost, do not do the following parts. * Depending...
Operating Instructions
Page 9
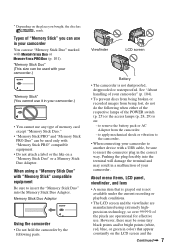
... language setting 26 Step 4: Preparing for recording 27 Step 5: Inserting a disc or a "Memory Stick Duo 28 Recording/Playback Recording and playing back with ease (Easy Handycam 31 Recording 34 Zooming 36 Recording sound with more presence (5.1ch surround recording) (DCRDVD308/DVD708... (DCR-DVD308/DVD708 37 Playback 39 Using PB zoom 41 Playing back a series of Contents IMPORTANT SAFEGUARDS ......3 Read this before operating your camcorder 5 Subject examples and solutions 11 Enjoying with your camcorder What you can do with your camcorder 12 Choosing a disc 14 Using your camcorder 16...
... language setting 26 Step 4: Preparing for recording 27 Step 5: Inserting a disc or a "Memory Stick Duo 28 Recording/Playback Recording and playing back with ease (Easy Handycam 31 Recording 34 Zooming 36 Recording sound with more presence (5.1ch surround recording) (DCRDVD308/DVD708... (DCR-DVD308/DVD708 37 Playback 39 Using PB zoom 41 Playing back a series of Contents IMPORTANT SAFEGUARDS ......3 Read this before operating your camcorder 5 Subject examples and solutions 11 Enjoying with your camcorder What you can do with your camcorder 12 Choosing a disc 14 Using your camcorder 16...
Operating Instructions
Page 12
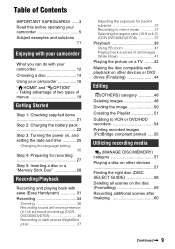
...on "Memory Stick Duo." Since no rewinding is necessary prior to start shooting any time you to view. The precious moments you can start recording (p.31, 34) Recorded images are accidentally overwritten. Taking beautiful shots easily No rewinding to recording, you can do with your camcorder What you...Still images can find a scene quickly using a VISUAL INDEX screen (p.32, 39) The VISUAL INDEX screen allows you desire. Enjoying with your camcorder Your camcorder records image data on 8cm DVD*. The disc does not wear out no risk that shows the same 16:9 angle of view as a wide...
...on "Memory Stick Duo." Since no rewinding is necessary prior to start shooting any time you to view. The precious moments you can start recording (p.31, 34) Recorded images are accidentally overwritten. Taking beautiful shots easily No rewinding to recording, you can do with your camcorder What you...Still images can find a scene quickly using a VISUAL INDEX screen (p.32, 39) The VISUAL INDEX screen allows you desire. Enjoying with your camcorder Your camcorder records image data on 8cm DVD*. The disc does not wear out no risk that shows the same 16:9 angle of view as a wide...
Operating Instructions
Page 28
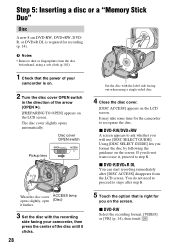
... press the center of the disc until it clicks. 28 5 Touch the option that the power of your camcorder is on. 2 Turn the disc cover OPEN switch in the direction of the arrow (OPEN B). [PREPARING TO OPEN] appears on the screen. If you do ... start recording immediately after step 5. It may take some time for recording (p. 14). Step 5: Inserting a disc or a "Memory Stick Duo" Disc A new 8 cm DVD-RW, DVD+RW, DVDR, or DVD+R DL is required for the camcorder to recognize the disc. The disc cover slightly opens automatically. Using [DISC SELECT GUIDE] lets you on...
... press the center of the disc until it clicks. 28 5 Touch the option that the power of your camcorder is on. 2 Turn the disc cover OPEN switch in the direction of the arrow (OPEN B). [PREPARING TO OPEN] appears on the screen. If you do ... start recording immediately after step 5. It may take some time for recording (p. 14). Step 5: Inserting a disc or a "Memory Stick Duo" Disc A new 8 cm DVD-RW, DVD+RW, DVDR, or DVD+R DL is required for the camcorder to recognize the disc. The disc cover slightly opens automatically. Using [DISC SELECT GUIDE] lets you on...
Operating Instructions
Page 29
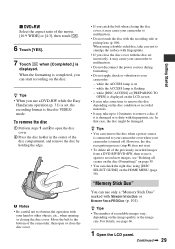
... disc cover with the disc set , the recording format is on the disc. Continued , 29 Getting Started "Memory Stick Duo" You can remove the disc when a power source is connected to your camcorder even when your camcorder to VIDEO mode. z Tips • When you close the disc cover. • If you catch the belt... LCD panel. For details, see "Deleting all of the previously recorded images from a DVD-RW/DVD+RW, then to use a DVD-RW while the Easy Handycam operation (p. 31) is set incorrectly, it again to your camcorder: -
... disc cover with the disc set , the recording format is on the disc. Continued , 29 Getting Started "Memory Stick Duo" You can remove the disc when a power source is connected to your camcorder even when your camcorder to VIDEO mode. z Tips • When you close the disc cover. • If you catch the belt... LCD panel. For details, see "Deleting all of the previously recorded images from a DVD-RW/DVD+RW, then to use a DVD-RW while the Easy Handycam operation (p. 31) is set incorrectly, it again to your camcorder: -

Operating Instructions
Page 30
...force the "Memory Stick Duo" out. Do not shake or knock your camcorder is reading/writing data. Doing so may result in damage. • When the access lamp is lit or flashing, your camcorder, turn the power off, eject the "Memory Stick Duo," or ...remove the battery pack. Otherwise, image data may be damaged. • If you insert the "Memory Stick Duo" into the "Memory Stick Duo" slot in the right direction until it out of the slot. Access lamp ("Memory Stick Duo") To eject a "Memory Stick Duo" Lightly push the "Memory Stick...
...force the "Memory Stick Duo" out. Do not shake or knock your camcorder is reading/writing data. Doing so may result in damage. • When the access lamp is lit or flashing, your camcorder, turn the power off, eject the "Memory Stick Duo," or ...remove the battery pack. Otherwise, image data may be damaged. • If you insert the "Memory Stick Duo" into the "Memory Stick Duo" slot in the right direction until it out of the slot. Access lamp ("Memory Stick Duo") To eject a "Memory Stick Duo" Lightly push the "Memory Stick...
Operating Instructions
Page 31
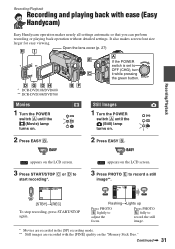
Open the lens cover (p. 27) * DCR-DVD108/DVD608 ** DCR-DVD308/DVD708 R Movies 1 Turn the POWER switch A until the (Still) lamp turns on. 2 Press EASY B. If the POWER switch is set to adjust the focus. ... in the [SP] recording mode. ** Still images are recorded with ease (Easy Handycam) Easy Handycam operation makes nearly all settings automatic so that you can perform recording or playing back operation without detailed settings. Recording/Playback appears on the "Memory Stick Duo." FlashingtLights up Press PHOTO E lightly to OFF (CHG), turn it while pressing...
Open the lens cover (p. 27) * DCR-DVD108/DVD608 ** DCR-DVD308/DVD708 R Movies 1 Turn the POWER switch A until the (Still) lamp turns on. 2 Press EASY B. If the POWER switch is set to adjust the focus. ... in the [SP] recording mode. ** Still images are recorded with ease (Easy Handycam) Easy Handycam operation makes nearly all settings automatic so that you can perform recording or playing back operation without detailed settings. Recording/Playback appears on the "Memory Stick Duo." FlashingtLights up Press PHOTO E lightly to OFF (CHG), turn it while pressing...

Operating Instructions
Page 34
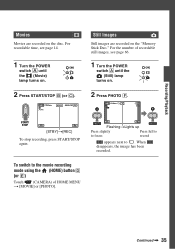
Recording DCR-DVD108/DVD608 (HOME) D POWER switch A (HOME) E PHOTO F Open the Lens cover (p. 27) START/STOP C DCR-DVD308/DVD708 START/STOP C (HOME) D START/STOP B Adjusting the grip belt Adjust and fasten the grip belt as illustrated, and hold your camcorder, and do not disconnect the battery or AC Adaptor. 34 Do not apply shock or vibration to your camcorder properly. b Notes • If the access lamps (page 28, 29) is on after recording is finished, it means data is still being written onto the disc or "Memory Stick Duo."
Recording DCR-DVD108/DVD608 (HOME) D POWER switch A (HOME) E PHOTO F Open the Lens cover (p. 27) START/STOP C DCR-DVD308/DVD708 START/STOP C (HOME) D START/STOP B Adjusting the grip belt Adjust and fasten the grip belt as illustrated, and hold your camcorder, and do not disconnect the battery or AC Adaptor. 34 Do not apply shock or vibration to your camcorder properly. b Notes • If the access lamps (page 28, 29) is on after recording is finished, it means data is still being written onto the disc or "Memory Stick Duo."
Operating Instructions
Page 35
...]t[REC] To stop recording, press START/STOP again. For the number of HOME MENU t [MOVIE] or [PHOTO]. Recording/Playback Movies Movies are recorded on the "Memory Stick Duo." Still Images Still images are recorded on the disc. To switch to . When disappears, the image has been recorded.
...]t[REC] To stop recording, press START/STOP again. For the number of HOME MENU t [MOVIE] or [PHOTO]. Recording/Playback Movies Movies are recorded on the "Memory Stick Duo." Still Images Still images are recorded on the disc. To switch to . When disappears, the image has been recorded.
Operating Instructions
Page 48
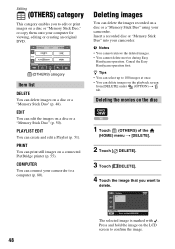
...You cannot delete movies during Easy Handycam operation. The selected image is marked with . Cancel the Easy Handycam operation first. Press and hold the image on the LCD screen to edit or print images on a disc or a "Memory Stick Duo" using your camcorder. PRINT You can delete the ...images recorded on a disc or "Memory Stick Duo," or copy them onto your camcorder to a computer (p....
...You cannot delete movies during Easy Handycam operation. The selected image is marked with . Cancel the Easy Handycam operation first. Press and hold the image on the LCD screen to edit or print images on a disc or a "Memory Stick Duo" using your camcorder. PRINT You can delete the ...images recorded on a disc or "Memory Stick Duo," or copy them onto your camcorder to a computer (p....
Operating Instructions
Page 49
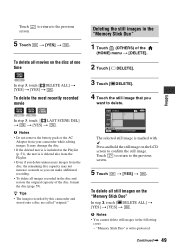
... hold the still image on the "Memory Stick Duo" In step 3, touch [ DELETE ALL] t [YES] t [YES] t . To delete the most recently recorded movie DVD +RW In step 3, touch [ LAST SCENE DEL] t t [YES] t . z Tips • The images recorded by this camcorder and stored onto a disc are called... "original." 3 Touch [ DELETE]. 4 Touch the still image that you can make additional recording. • To delete all images recorded in the "Memory Stick Duo" 1 Touch (OTHERS) of the disc, format the disc ...
... hold the still image on the "Memory Stick Duo" In step 3, touch [ DELETE ALL] t [YES] t [YES] t . To delete the most recently recorded movie DVD +RW In step 3, touch [ LAST SCENE DEL] t t [YES] t . z Tips • The images recorded by this camcorder and stored onto a disc are called... "original." 3 Touch [ DELETE]. 4 Touch the still image that you can make additional recording. • To delete all images recorded in the "Memory Stick Duo" 1 Touch (OTHERS) of the disc, format the disc ...

Operating Instructions
Page 50
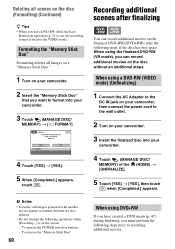
write-protection is set to divide. Cancel the Easy Handycam operation first. 1 Touch (OTHERS) of the selected movie. Adjusts the dividing point more precisely after the dividing point has been selected with . The selected ... you want to the still images by the other device. z Tips • To delete all images recorded on the "Memory Stick Duo," format the "Memory Stick Duo" (p. 60). b Notes • You cannot divide movies during Easy Handycam operation. Deleting images (Continued) Dividing the image - Play and pause toggles as you press . 5 Touch t [YES] t . 50 ...
write-protection is set to divide. Cancel the Easy Handycam operation first. 1 Touch (OTHERS) of the selected movie. Adjusts the dividing point more precisely after the dividing point has been selected with . The selected ... you want to the still images by the other device. z Tips • To delete all images recorded on the "Memory Stick Duo," format the "Memory Stick Duo" (p. 60). b Notes • You cannot divide movies during Easy Handycam operation. Deleting images (Continued) Dividing the image - Play and pause toggles as you press . 5 Touch t [YES] t . 50 ...
Operating Instructions
Page 55
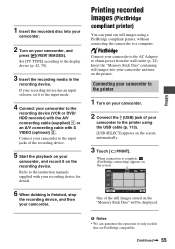
... is finished, stop the recording device, and then your camcorder. Refer to the input jacks of the still images stored on the "Memory Stick Duo" will be displayed. Insert the "Memory Stick Duo" containing still images into your camcorder. 2 Turn on your camcorder, and press (VIEW IMAGES). Connect your camcorder to the instruction manuals supplied with S VIDEO (optional...
... is finished, stop the recording device, and then your camcorder. Refer to the input jacks of the still images stored on the "Memory Stick Duo" will be displayed. Insert the "Memory Stick Duo" containing still images into your camcorder. 2 Turn on your camcorder, and press (VIEW IMAGES). Connect your camcorder to the instruction manuals supplied with S VIDEO (optional...
Operating Instructions
Page 56
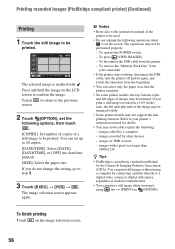
...ends of the image may be printed. The operations may not be able to print the following: - To press (VIEW IMAGES) - Refer to your camcorder • If the printer stops working, disconnect the USB cable, turn the printer off and on (OPTION). images recorded by a computer - To ...image. The selected image is marked with a pixel size larger than 2848×2136 z Tips • PictBridge is on the screen. To remove the "Memory Stick Duo" from your printer's instruction manual for details. • You may not be performed properly. - You can print still images without using a computer...
...ends of the image may be printed. The operations may not be able to print the following: - To press (VIEW IMAGES) - Refer to your camcorder • If the printer stops working, disconnect the USB cable, turn the printer off and on (OPTION). images recorded by a computer - To ...image. The selected image is marked with a pixel size larger than 2848×2136 z Tips • PictBridge is on the screen. To remove the "Memory Stick Duo" from your printer's instruction manual for details. • You may not be performed properly. - You can print still images without using a computer...
Operating Instructions
Page 57
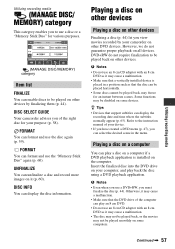
Utilizing recording media Utilizing recording media (MANAGE DISC/ MEMORY) category This category enables you to use a disc or a "Memory Stick Duo" for your purpose (p. 58). DISC INFO You can format and use the disc again (p. 59). z Tips • Devices that the disc can...to be disabled on other devices Finalizing a disc (p. 44) let you must finalize the disc (p. 44). DISC SELECT GUIDE Your camcorder advises you can format and use the "Memory Stick Duo" again (p. 60). FORMAT You can select the desired scene in a position such as that support subtitles can play back the...
Utilizing recording media Utilizing recording media (MANAGE DISC/ MEMORY) category This category enables you to use a disc or a "Memory Stick Duo" for your purpose (p. 58). DISC INFO You can format and use the disc again (p. 59). z Tips • Devices that the disc can...to be disabled on other devices Finalizing a disc (p. 44) let you must finalize the disc (p. 44). DISC SELECT GUIDE Your camcorder advises you can format and use the "Memory Stick Duo" again (p. 60). FORMAT You can select the desired scene in a position such as that support subtitles can play back the...
Operating Instructions
Page 60
... use a DVD-RW while the Easy Handycam operation (p. 31) is set, the recording format is on the screen: - To operate the POWER switch or buttons - Deleting all images on a "Memory Stick Duo." 1 Turn on your camcorder. 2 Insert the "Memory Stick Duo" that you want to format into your camcorder. 4 Touch (MANAGE DISC/ MEMORY) of the (HOME) t [UNFINALIZE]. 5 Touch...
... use a DVD-RW while the Easy Handycam operation (p. 31) is set, the recording format is on the screen: - To operate the POWER switch or buttons - Deleting all images on a "Memory Stick Duo." 1 Turn on your camcorder. 2 Insert the "Memory Stick Duo" that you want to format into your camcorder. 4 Touch (MANAGE DISC/ MEMORY) of the (HOME) t [UNFINALIZE]. 5 Touch...
Operating Instructions
Page 66
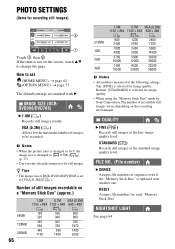
...(File number) B SERIES Assigns file numbers in sequence even if the "Memory Stick Duo" is changed to be recorded. PHOTO SETTINGS (Items for image quality. • When using the "Memory Stick Duo" made by Sony Corporation. Number of images to 16:9, the image size is replaced with ...B. STANDARD ( ) Records still images at the fine image quality level. IMAGE SIZE (DCRDVD308/DVD708) B 1.0M ( ) Records still images clearly. The number of DCR-DVD108/DVD608 is ...
...(File number) B SERIES Assigns file numbers in sequence even if the "Memory Stick Duo" is changed to be recorded. PHOTO SETTINGS (Items for image quality. • When using the "Memory Stick Duo" made by Sony Corporation. Number of images to 16:9, the image size is replaced with ...B. STANDARD ( ) Records still images at the fine image quality level. IMAGE SIZE (DCRDVD308/DVD708) B 1.0M ( ) Records still images clearly. The number of DCR-DVD108/DVD608 is ...

Operating Instructions
Page 72
... suspended in about 10 minutes, after about 10 minutes). - When you set the POWER switch to (Still). - When you remove or insert a "Memory Stick Duo." - DEMO MODE The default setting is automatically set (HOME MENU) t page 62 (OPTION MENU) t page 73 The default settings are marked ...a command sent by another VCR remote control unit. 72 REMOTE CTRL (Remote control) (DCR-DVD308/ DVD708) The default setting is automatically turned off ) B 5min The camcorder is [ON], allowing you do not operate your camcorder from responding to change the page. z Tips • Set to [OFF] to set...
... suspended in about 10 minutes, after about 10 minutes). - When you set the POWER switch to (Still). - When you remove or insert a "Memory Stick Duo." - DEMO MODE The default setting is automatically set (HOME MENU) t page 62 (OPTION MENU) t page 73 The default settings are marked ...a command sent by another VCR remote control unit. 72 REMOTE CTRL (Remote control) (DCR-DVD308/ DVD708) The default setting is automatically turned off ) B 5min The camcorder is [ON], allowing you do not operate your camcorder from responding to change the page. z Tips • Set to [OFF] to set...
Operating Instructions
Page 81
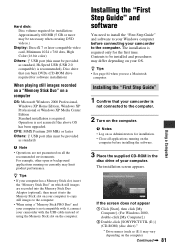
..."First Step Guide" 1 Confirm that can burn DVDs (CD-ROM drive required for software installation) When playing still images recorded on a "Memory Stick Duo" on all applications running on currently may differ depending on the computer. If the screen does not appear 1 Click [Start], then ...(E:)) may vary depending on the computer before connecting your camcorder to the computer. 2 Turn on which still images are recorded into the Memory Stick Duo Adaptor (optional), then insert it , connect your camcorder with it into the Memory Stick slot on your computer to copy still images to be...
..."First Step Guide" 1 Confirm that can burn DVDs (CD-ROM drive required for software installation) When playing still images recorded on a "Memory Stick Duo" on all applications running on currently may differ depending on the computer. If the screen does not appear 1 Click [Start], then ...(E:)) may vary depending on the computer before connecting your camcorder to the computer. 2 Turn on which still images are recorded into the Memory Stick Duo Adaptor (optional), then insert it , connect your camcorder with it into the Memory Stick slot on your computer to copy still images to be...
Operating Instructions
Page 84
... for the details on your computer. Using a Macintosh computer You can refer to on connecting your camcorder and computer and making setting. This describes basic operations, from a "Memory Stick Duo" OS: Mac OS 9.1/9.2 or Mac OS X (v10.1/ v10.2/v10.3/v10.4). Referring to the... computer and copying the still images. System requirements To copy still images from initial hookup of your camcorder to "Installing the "First Step Guide...
... for the details on your computer. Using a Macintosh computer You can refer to on connecting your camcorder and computer and making setting. This describes basic operations, from a "Memory Stick Duo" OS: Mac OS 9.1/9.2 or Mac OS X (v10.1/ v10.2/v10.3/v10.4). Referring to the... computer and copying the still images. System requirements To copy still images from initial hookup of your camcorder to "Installing the "First Step Guide...


