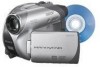
Operating Guide
Page 10
Table of the recording picture (DCR-DVD205/DVD305/DVD705/DVD755 32 Easy Handycam - using your camcorder 25 Step 4: Adjusting the LCD screen and viewfinder 26 Step 5: Using the touch panel 27 Step 6: Setting the date and time 28 Step 7: Inserting... the battery pack 21 Step 3: Turning the power on, and holding your camcorder with automatic settings Using Easy Handycam operation 34 Recording with ease 36 Playing back with ease 38 Preparation for playing back on a DVD player (Finalizing 40 Recording/Playback Recording 42 Playback 44 Functions used for recording/playback, etc ...
Table of the recording picture (DCR-DVD205/DVD305/DVD705/DVD755 32 Easy Handycam - using your camcorder 25 Step 4: Adjusting the LCD screen and viewfinder 26 Step 5: Using the touch panel 27 Step 6: Setting the date and time 28 Step 7: Inserting... the battery pack 21 Step 3: Turning the power on, and holding your camcorder with automatic settings Using Easy Handycam operation 34 Recording with ease 36 Playing back with ease 38 Preparation for playing back on a DVD player (Finalizing 40 Recording/Playback Recording 42 Playback 44 Functions used for recording/playback, etc ...
Operating Guide
Page 11
...Deleting the last scene (Review/Review deleting 50 Indicators displayed during recording/playback 51 Remote Commander (DCR-DVD305/DVD755 53 Playing the picture on a TV 54 Playback on DVD devices Making the disc...a DVD drive installed 61 Using the Recorded disc (DVD-RW/DVD+RW) Recording additional scenes after finalizing 63 Deleting all of the scenes on the disc (Formatting 64 Using the Setup items Using the ...Setup items 66 Setup items 68 CAMERA SET 70 Settings to adjust your camcorder to the recording conditions (EXPOSURE/WHITE BAL./STEADYSHOT, etc.) STILL SET 75 Settings for still images...
...Deleting the last scene (Review/Review deleting 50 Indicators displayed during recording/playback 51 Remote Commander (DCR-DVD305/DVD755 53 Playing the picture on a TV 54 Playback on DVD devices Making the disc...a DVD drive installed 61 Using the Recorded disc (DVD-RW/DVD+RW) Recording additional scenes after finalizing 63 Deleting all of the scenes on the disc (Formatting 64 Using the Setup items Using the ...Setup items 66 Setup items 68 CAMERA SET 70 Settings to adjust your camcorder to the recording conditions (EXPOSURE/WHITE BAL./STEADYSHOT, etc.) STILL SET 75 Settings for still images...
Operating Guide
Page 12
... pictures or additional functions on recording/playback (PICT.EFFECT/D.EFFECT, etc.) DISC SET (DCR-DVD105/DVD205/DVD605/DVD705) / MEDIA SET (DCR-DVD305/DVD755 79 Settings for discs and "Memory Stick Duo" (FORMAT/FINALIZE/UNFINALIZE, etc.) STANDARD SET 80 Settings while recording on a disc or other basic ...84 (CLOCK SET/AREA SET/LANGUAGE, etc.) Customizing Personal Menu 85 Editing on DVD Handycam Copying the still images (DCR-DVD305/DVD755 87 Deleting still images from the "Memory Stick Duo" (DCR-DVD305/DVD755 89 Editing the original data 90 Creating the Playlist 91 Playing the Playlist...
... pictures or additional functions on recording/playback (PICT.EFFECT/D.EFFECT, etc.) DISC SET (DCR-DVD105/DVD205/DVD605/DVD705) / MEDIA SET (DCR-DVD305/DVD755 79 Settings for discs and "Memory Stick Duo" (FORMAT/FINALIZE/UNFINALIZE, etc.) STANDARD SET 80 Settings while recording on a disc or other basic ...84 (CLOCK SET/AREA SET/LANGUAGE, etc.) Customizing Personal Menu 85 Editing on DVD Handycam Copying the still images (DCR-DVD305/DVD755 87 Deleting still images from the "Memory Stick Duo" (DCR-DVD305/DVD755 89 Editing the original data 90 Creating the Playlist 91 Playing the Playlist...
Operating Guide
Page 15
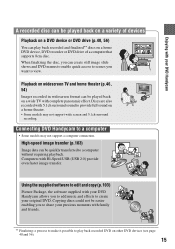
...Using the supplied software to edit and copy (p.103) Picture Package, the software supplied with family and friends. ** Finalizing: a process to make it possible to create your DVD Handycam allows you want to provide full sound on other DVD devices (see page 40 and 56). 15 Copying discs ... menus to enable quick access to scenes you to add music and effects to play back recorded and finalized** discs on a wide TV with 5.1ch surround sound to view. Connecting DVD Handycam to a computer without requiring playback. Enjoying with Hi-Speed USB (USB 2.0) provide even faster image ...
...Using the supplied software to edit and copy (p.103) Picture Package, the software supplied with family and friends. ** Finalizing: a process to make it possible to create your DVD Handycam allows you want to provide full sound on other DVD devices (see page 40 and 56). 15 Copying discs ... menus to enable quick access to scenes you to add music and effects to play back recorded and finalized** discs on a wide TV with 5.1ch surround sound to view. Connecting DVD Handycam to a computer without requiring playback. Enjoying with Hi-Speed USB (USB 2.0) provide even faster image ...
Operating Guide
Page 16
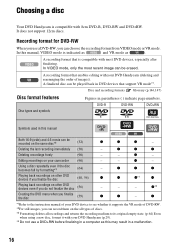
...to the instruction manual of discs. *3 Formatting deletes all types of your DVD Handycam (p.29). *4 Do not use a DVD-RW, you finalize the disc (40, 56) z - In VIDEO mode, only the most DVD devices, especially after finalizing. z z z z *1z*1 z Playing back recordings on other DVD ...devices if you can be recorded on the all recordings and returns the recording medium to see whether it with your camcorder (90) - In this manual, VIDEO mode...
...to the instruction manual of discs. *3 Formatting deletes all types of your DVD Handycam (p.29). *4 Do not use a DVD-RW, you finalize the disc (40, 56) z - In VIDEO mode, only the most DVD devices, especially after finalizing. z z z z *1z*1 z Playing back recordings on other DVD ...devices if you can be recorded on the all recordings and returns the recording medium to see whether it with your camcorder (90) - In this manual, VIDEO mode...
Operating Guide
Page 17
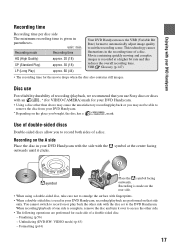
... LP (Long Play) approx. 60 (44) Your DVD Handycam uses the VBR (Variable Bit Rate) format to automatically adjust...remove the disc from your DVD Handycam. * Depending on or play back the other... disc in your DVD Handycam with the side with your DVD Handycam Recording time Recording time per... for your DVD Handycam, recording/playback are performed for each side of a disc. Disc use Sony discs or discs...playback of one side is given in your DVD Handycam. • Using a disc other than above ... other side with the disc set to the DVD Handycam. symbol at a higher bit rate and this reduces...
... LP (Long Play) approx. 60 (44) Your DVD Handycam uses the VBR (Variable Bit Rate) format to automatically adjust...remove the disc from your DVD Handycam. * Depending on or play back the other... disc in your DVD Handycam with the side with your DVD Handycam Recording time Recording time per... for your DVD Handycam, recording/playback are performed for each side of a disc. Disc use Sony discs or discs...playback of one side is given in your DVD Handycam. • Using a disc other than above ... other side with the disc set to the DVD Handycam. symbol at a higher bit rate and this reduces...

Operating Guide
Page 18
... page 20 to 32.) Select the disc that best suits your DVD Handycam (See pages 38 and 44) You can also connect it to do after recording? You can delete or edit You can be played back even without finalizing 2Shooting, deleting and editing You cannot (See pages 36, 42, 50 delete... a and 90.) recorded image. The disc can be played back on various DVD devices * Select the mode on your DVD Handycam Playing back disc on a various DVD devices The disc...
... page 20 to 32.) Select the disc that best suits your DVD Handycam (See pages 38 and 44) You can also connect it to do after recording? You can delete or edit You can be played back even without finalizing 2Shooting, deleting and editing You cannot (See pages 36, 42, 50 delete... a and 90.) recorded image. The disc can be played back on various DVD devices * Select the mode on your DVD Handycam Playing back disc on a various DVD devices The disc...
Operating Guide
Page 19
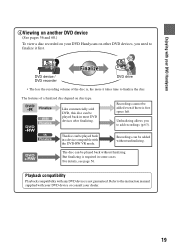
...with the DVD-RW VR mode. Recordings cannot be played back in some cases. Recordings can be added without finalizing. For details, see page 56. Enjoying with your DVD Handycam 4Viewing on another DVD device (See pages 56 and 60.) To view a disc recorded on your dealer....not guaranteed. Playback compatibility Playback compatibility with your DVD device or consult your DVD Handycam on disc type. DVD device / DVD recorder Finalize DVD drive • The less the recording volume of a finalized disc depend on other DVD devices, you to the instruction manual supplied with ...
...with the DVD-RW VR mode. Recordings cannot be played back in some cases. Recordings can be added without finalizing. For details, see page 56. Enjoying with your DVD Handycam 4Viewing on another DVD device (See pages 56 and 60.) To view a disc recorded on your dealer....not guaranteed. Playback compatibility Playback compatibility with your DVD device or consult your DVD Handycam on disc type. DVD device / DVD recorder Finalize DVD drive • The less the recording volume of a finalized disc depend on other DVD devices, you to the instruction manual supplied with ...
Operating Guide
Page 30
...disc can record wide-angle highresolution pictures. xDVD+RW Select the aspect ratio of movie to step 6. • During Easy Handycam operation (p.34), [Format the disc? If you finalize it . 30 6 Select the aspect ratio of DVD devices if you intend to view pictures on the disc condition or...depending on a wide TV, selecting [16:9 WIDE] is displayed on the LCD screen. • It may take some time to your camcorder (p.90). Cannot edit in Camcorder VIDEO VR OK xVIDEO mode You can start recording on various DVD devices. If not, remove the disc.] appears. FORMAT : 16:9 ...
...disc can record wide-angle highresolution pictures. xDVD+RW Select the aspect ratio of movie to step 6. • During Easy Handycam operation (p.34), [Format the disc? If you finalize it . 30 6 Select the aspect ratio of DVD devices if you intend to view pictures on the disc condition or...depending on a wide TV, selecting [16:9 WIDE] is displayed on the LCD screen. • It may take some time to your camcorder (p.90). Cannot edit in Camcorder VIDEO VR OK xVIDEO mode You can start recording on various DVD devices. If not, remove the disc.] appears. FORMAT : 16:9 ...

Operating Guide
Page 36
you turn off the power, then turn it again. 36 Recording with ease DCR-DVD105/ DVD605: Slide the POWER switch in the direction of the arrow to record on again. - you have not finalized the disc (p.56) and there is in the direction of the arrow while pressing the green button only ..., press START/STOP again. [REC] To record the next images Perform step 2. • You can continue recording if you remove a disc from your camcorder, then insert it on the disc when: - To record movies To record still images Movies 1 Slide the POWER switch A in the OFF (CHG) position.
you turn off the power, then turn it again. 36 Recording with ease DCR-DVD105/ DVD605: Slide the POWER switch in the direction of the arrow to record on again. - you have not finalized the disc (p.56) and there is in the direction of the arrow while pressing the green button only ..., press START/STOP again. [REC] To record the next images Perform step 2. • You can continue recording if you remove a disc from your camcorder, then insert it on the disc when: - To record movies To record still images Movies 1 Slide the POWER switch A in the OFF (CHG) position.
Operating Guide
Page 40
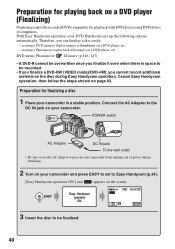
... disc during finalizing. 2 Turn on your camcorder and press EASY to set to be recorded. • If you finalize a DVD-RW (VIDEO mode)/DVD+RW, you can finalize a disc easily. - creating a Photomovie to be finalized. 40 Preparation for playing back on a DVD player (Finalizing) Finalizing makes the recorded DVD compatible for finalizing a disc 1 Place your DVD Handycam sets up...
... disc during finalizing. 2 Turn on your camcorder and press EASY to set to be recorded. • If you finalize a DVD-RW (VIDEO mode)/DVD+RW, you can finalize a disc easily. - creating a Photomovie to be finalized. 40 Preparation for playing back on a DVD player (Finalizing) Finalizing makes the recorded DVD compatible for finalizing a disc 1 Place your DVD Handycam sets up...
Operating Guide
Page 41
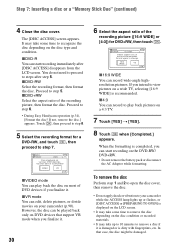
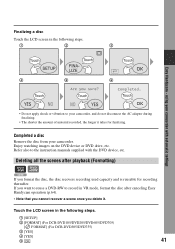
Finalizing a disc Touch the LCD screen in the following steps. 1 [SETUP] 2 [FORMAT] (For DCR-DVD105/DVD205/DVD605/DVD705) [ FORMAT] (For DCR-DVD305/DVD755) 3 [YES] 4 [YES] 5 41 using your camcorder with automatic settings 4 5 6 • Do not apply shock or ...vibration to the instruction manuals supplied with the DVD device, etc. Deleting all the scenes after canceling Easy Handycam operation...
Finalizing a disc Touch the LCD screen in the following steps. 1 [SETUP] 2 [FORMAT] (For DCR-DVD105/DVD205/DVD605/DVD705) [ FORMAT] (For DCR-DVD305/DVD755) 3 [YES] 4 [YES] 5 41 using your camcorder with automatic settings 4 5 6 • Do not apply shock or ...vibration to the instruction manuals supplied with the DVD device, etc. Deleting all the scenes after canceling Easy Handycam operation...

Operating Guide
Page 56
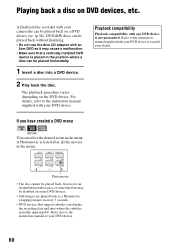
...Operation flow To play back a disc in a DVD device for the first time (p.58) Playback on DVD devices or DVD drives (Finalizing) Finalizing makes the recorded DVD compatible for playback with DVD devices and DVD drives of computers. • Playback compatibility with any DVD device is ... desired settings. Select the type of computers. 3 When only little material is not guaranteed. Discs that must be finalized in the following settings are available before finalizing. - Change the disc titles (see page 59)* - BDVD menu* BPhotomovie* BDisc title 56 The following cases: 1 To ...
...Operation flow To play back a disc in a DVD device for the first time (p.58) Playback on DVD devices or DVD drives (Finalizing) Finalizing makes the recorded DVD compatible for playback with DVD devices and DVD drives of computers. • Playback compatibility with any DVD device is ... desired settings. Select the type of computers. 3 When only little material is not guaranteed. Discs that must be finalized in the following settings are available before finalizing. - Change the disc titles (see page 59)* - BDVD menu* BPhotomovie* BDisc title 56 The following cases: 1 To ...

Operating Guide
Page 57
When the DVD menu or Photomovie has been created, a confirmation screen prompts you to confirm that you wish to a finalized disc (p.63) Recordings cannot be added as usual. Make a new recording To play back a disc in a DVD device after adding a recording (p.58) Playback on DVD devices To add recordings to add a recording. Unfinalize the disc. Recordings can be added. BDVD menu* BPhotomovie* BDisc title * Not possible for (p.59). 57 Playback on other DVD device Finalize Only in case 1 Make desired settings.
When the DVD menu or Photomovie has been created, a confirmation screen prompts you to confirm that you wish to a finalized disc (p.63) Recordings cannot be added as usual. Make a new recording To play back a disc in a DVD device after adding a recording (p.58) Playback on DVD devices To add recordings to add a recording. Unfinalize the disc. Recordings can be added. BDVD menu* BPhotomovie* BDisc title * Not possible for (p.59). 57 Playback on other DVD device Finalize Only in case 1 Make desired settings.
Operating Guide
Page 58
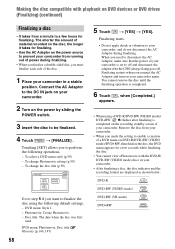
...shorter the amount of your camcorder. • After finalizing a disc, the disc indicator and the recording format are displayed as the power source to prevent your camcorder from running out of the disc. 1 Place your camcorder in your camcorder. Remove the disc from your camcorder. • When you ... the DVD-R/ DVD-RW (VIDEO mode) discs in a stable position. Finalizing starts. • Do not apply shock or vibration to your camcorder, and do not disconnect the AC Adaptor during finalizing. • When you finalize a double-sided disc, you connect the AC Adaptor and turn on your...
...shorter the amount of your camcorder. • After finalizing a disc, the disc indicator and the recording format are displayed as the power source to prevent your camcorder from running out of the disc. 1 Place your camcorder in your camcorder. Remove the disc from your camcorder. • When you ... the DVD-R/ DVD-RW (VIDEO mode) discs in a stable position. Finalizing starts. • Do not apply shock or vibration to your camcorder, and do not disconnect the AC Adaptor during finalizing. • When you finalize a double-sided disc, you connect the AC Adaptor and turn on your...

Operating Guide
Page 59
... the desired character. To erase a character: Touch [T]. Select [NO MENU] if you do not create a Photomovie. 3 Touch t [END]. • It may take more time for finalizing when you do not create a DVD menu. 3 Touch t [END]. Select [NO] if you create a Photomovie since the more still images recorded on the disc, the...
... the desired character. To erase a character: Touch [T]. Select [NO MENU] if you do not create a Photomovie. 3 Touch t [END]. • It may take more time for finalizing when you do not create a DVD menu. 3 Touch t [END]. Select [NO] if you create a Photomovie since the more still images recorded on the disc, the...
Operating Guide
Page 60
... to the instruction manual supplied with your DVD device. 60 DVD+RW discs can be played back without finalizing. • Do not use the 8cm CD adaptor with your DVD device or consult your camcorder can be played back on some functions may cause a malfunction. • Make sure that support subtitles can... in the position where a disc can be placed horizontally. 1 Insert a disc into a DVD device. 2 Play back the disc. Playing back a disc on the DVD device. A finalized disc recorded with any DVD device is not guaranteed.
... to the instruction manual supplied with your DVD device. 60 DVD+RW discs can be played back without finalizing. • Do not use the 8cm CD adaptor with your DVD device or consult your camcorder can be played back on some functions may cause a malfunction. • Make sure that support subtitles can... in the position where a disc can be placed horizontally. 1 Insert a disc into a DVD device. 2 Play back the disc. Playing back a disc on the DVD device. A finalized disc recorded with any DVD device is not guaranteed.

Operating Guide
Page 61
...disc to the instruction manuals of your computer. • You cannot play back or edit movies that supports 8cm discs, and a DVD playback application must finalize the disc (p.56). The selected still image appears on the disc are displayed in the JPEG format. Otherwise, it may cause a malfunction. • Even...the disc inserted, then click [Open]. 4 Double-click [DCIM] t [100MSDCF]. 5 Double-click the file to the "First Step Guide" in the supplied CDROM (For DCR-DVD305/DVD755). 2 Click [Start] t [My Computer]. Note that erasing or changing the original data may cause a malfunction.
...disc to the instruction manuals of your computer. • You cannot play back or edit movies that supports 8cm discs, and a DVD playback application must finalize the disc (p.56). The selected still image appears on the disc are displayed in the JPEG format. Otherwise, it may cause a malfunction. • Even...the disc inserted, then click [Open]. 4 Double-click [DCIM] t [100MSDCF]. 5 Double-click the file to the "First Step Guide" in the supplied CDROM (For DCR-DVD305/DVD755). 2 Click [Start] t [My Computer]. Note that erasing or changing the original data may cause a malfunction.
Operating Guide
Page 63
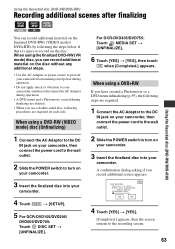
...the AC Adaptor to the DC IN jack on your camcorder, then connect the power cord to the wall outlet. 2 Slide the POWER switch to turn on your camcorder. 3 Insert the finalized disc into your camcorder. 4 Touch t [SETUP]. 5 For DCR-DVD105/DVD205/ DVD605/DVD705: Touch DISC SET t [UNFINALIZE].... When using a DVD+RW If you can record additional material on the finalized DVD-RWs (VIDEO mode)/ DVD+RWs...
...the AC Adaptor to the DC IN jack on your camcorder, then connect the power cord to the wall outlet. 2 Slide the POWER switch to turn on your camcorder. 3 Insert the finalized disc into your camcorder. 4 Touch t [SETUP]. 5 For DCR-DVD105/DVD205/ DVD605/DVD705: Touch DISC SET t [UNFINALIZE].... When using a DVD+RW If you can record additional material on the finalized DVD-RWs (VIDEO mode)/ DVD+RWs...
Operating Guide
Page 64
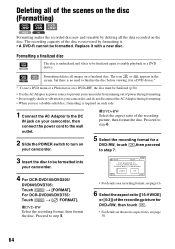
... not disconnect the AC Adaptor during formatting. • When you use a double-sided disc, formatting is no need to finalize the disc before viewing it has to be formatted into your camcorder. 4 For DCR-DVD105/DVD205/ DVD605/DVD705: Touch t [FORMAT]. xDVD-RW Select the recording format, then format the disc. The icon or appears...
... not disconnect the AC Adaptor during formatting. • When you use a double-sided disc, formatting is no need to finalize the disc before viewing it has to be formatted into your camcorder. 4 For DCR-DVD105/DVD205/ DVD605/DVD705: Touch t [FORMAT]. xDVD-RW Select the recording format, then format the disc. The icon or appears...

