

Operating Instructions
Page 33
Getting Started Tip • When you purchase the system new, or if the system is at its factory default settings (ex., after performing "COLD RESET" (page 87)), you can turn off the demonstration simply by pressing [/1 on the remote (except for U.S. models). 33US
Getting Started Tip • When you purchase the system new, or if the system is at its factory default settings (ex., after performing "COLD RESET" (page 87)), you can turn off the demonstration simply by pressing [/1 on the remote (except for U.S. models). 33US

Operating Instructions
Page 48
.... - you played before with some discs. To activate this function, set [MULTI-DISC RESUME] in memory for up to stop the disc, the system may not work during Program Play and Shuffle Play. • This function may not resume playback from that you change the parental control level. - ...you change or reset the settings on where you stop playback. you eject the disc. - you disconnect the AC power cord (mains lead). • For a DVD-VR,...
.... - you played before with some discs. To activate this function, set [MULTI-DISC RESUME] in memory for up to stop the disc, the system may not work during Program Play and Shuffle Play. • This function may not resume playback from that you change the parental control level. - ...you change or reset the settings on where you stop playback. you eject the disc. - you disconnect the AC power cord (mains lead). • For a DVD-VR,...

Operating Instructions
Page 60
...8226; [LANGUAGE SETUP] (page 60) • [VIDEO SETUP] (page 61) • [HDMI SETUP] (page 62) • [AUDIO SETUP] (page 64) • [SYSTEM SETUP] (page 64) • [SPEAKER SETUP] (page 65) Example: [VIDEO SETUP] Selected item VIDEO SETUP TV TYPE: PROGRESSIVE (COMPONENT OUT): 4:3 OUTPUT: BLACK LEVEL: BLACK ...The setting is selected and setup is in the disc take priority over the Setup Display settings and not all of the [SETUP] settings To reset all the functions described may work. 1 Press FUNCTION +/- The options for [SETUP] appear. 4 Press X/x to items such as picture and...
...8226; [LANGUAGE SETUP] (page 60) • [VIDEO SETUP] (page 61) • [HDMI SETUP] (page 62) • [AUDIO SETUP] (page 64) • [SYSTEM SETUP] (page 64) • [SPEAKER SETUP] (page 65) Example: [VIDEO SETUP] Selected item VIDEO SETUP TV TYPE: PROGRESSIVE (COMPONENT OUT): 4:3 OUTPUT: BLACK LEVEL: BLACK ...The setting is selected and setup is in the disc take priority over the Setup Display settings and not all of the [SETUP] settings To reset all the functions described may work. 1 Press FUNCTION +/- The options for [SETUP] appear. 4 Press X/x to items such as picture and...
Operating Instructions
Page 64
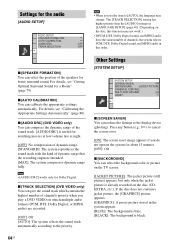
...ON]: The screen saver image appears if you set the item to the priority. Other Settings [SYSTEM SETUP] SYSTEM SETUP SCREEN SAVER: ON BACKGROUND: JACKET PICTURE PARENTAL CONTROL: MULTI-DISC RESUME: ON RESET: x [SCREEN SAVER] You can calibrate the appropriate settings automatically. x [SPEAKER FORMATION] You ...60). (Depending on which multiple audio formats (PCM, DTS, Dolby Digital, or MPEG audio) are recorded. [OFF]: Off. [AUTO]: The system selects the sound track automatically according to [AUTO], the language may not work.) • If PCM, DTS, Dolby Digital sound, and MPEG ...
...ON]: The screen saver image appears if you set the item to the priority. Other Settings [SYSTEM SETUP] SYSTEM SETUP SCREEN SAVER: ON BACKGROUND: JACKET PICTURE PARENTAL CONTROL: MULTI-DISC RESUME: ON RESET: x [SCREEN SAVER] You can calibrate the appropriate settings automatically. x [SPEAKER FORMATION] You ...60). (Depending on which multiple audio formats (PCM, DTS, Dolby Digital, or MPEG audio) are recorded. [OFF]: Off. [AUTO]: The system selects the sound track automatically according to [AUTO], the language may not work.) • If PCM, DTS, Dolby Digital sound, and MPEG ...
Operating Instructions
Page 65
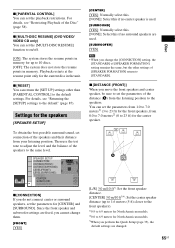
... level and the balance of the speakers to the default" (page 87). Playback restarts at the resume point only for the current disc in memory. x [RESET] You can set the parameters from 1.0 to 7.0 meters1) (3 to 23 ft) for the front speakers, from 0.0 to 7.0 meters2) (0 to 23 ft...[SURROUND]. A [L/R] 3.0 m/10 ft3): Set the front speaker distance. [CENTER] 3.0 m/10 ft3)4): Set the center speaker distance (up to 10 discs. [OFF]: The system does not store the resume points in the unit. Settings for the speakers [SPEAKER SETUP] To obtain the best possible surround sound, set the playback...
... level and the balance of the speakers to the default" (page 87). Playback restarts at the resume point only for the current disc in memory. x [RESET] You can set the parameters from 1.0 to 7.0 meters1) (3 to 23 ft) for the front speakers, from 0.0 to 7.0 meters2) (0 to 23 ft...[SURROUND]. A [L/R] 3.0 m/10 ft3): Set the front speaker distance. [CENTER] 3.0 m/10 ft3)4): Set the center speaker distance (up to 10 discs. [OFF]: The system does not store the resume points in the unit. Settings for the speakers [SPEAKER SETUP] To obtain the best possible surround sound, set the playback...

Operating Instructions
Page 67
... be set to either 10 kHz or 9 kHz. If you want. Current station Current band and preset number FM FM 10 : 88.00 MHz SONY RADIO Station name 1 Press FUNCTION +/- repeatedly until the auto scanning starts. To change the AM tuning interval (except for CIS and Middle Eastern models)... the desired preset number by pressing PRESET +/- (page 68), then perform the procedure from Step 3. To reset the interval, repeat the same procedure. 6 Press X/x to minimum. Scanning stops when the system tunes in any AM station, then turn down the volume to select the preset number you change the AM...
... be set to either 10 kHz or 9 kHz. If you want. Current station Current band and preset number FM FM 10 : 88.00 MHz SONY RADIO Station name 1 Press FUNCTION +/- repeatedly until the auto scanning starts. To change the AM tuning interval (except for CIS and Middle Eastern models)... the desired preset number by pressing PRESET +/- (page 68), then perform the procedure from Step 3. To reset the interval, repeat the same procedure. 6 Press X/x to minimum. Scanning stops when the system tunes in any AM station, then turn down the volume to select the preset number you change the AM...

Operating Instructions
Page 87
...time. Returning the system parameters, such as preset stations, to the default settings "/1 Nx 1 Press "/1 to turn on the system. 2 Press x,... 2 Press DISPLAY while the system is in the front panel display and the system returns to select [CUSTOM], then...If an MP3 file has the ID3 tag, the system will display an album name or title name from...Press X/x to default settings. The Setup Display appears. 87US The system can return the [SETUP] settings (page 60) other than [PARENTAL...name** * The bit rate appears when the system is playing an MP3 file on the TV screen. 3 Press...
...time. Returning the system parameters, such as preset stations, to the default settings "/1 Nx 1 Press "/1 to turn on the system. 2 Press x,... 2 Press DISPLAY while the system is in the front panel display and the system returns to select [CUSTOM], then...If an MP3 file has the ID3 tag, the system will display an album name or title name from...Press X/x to default settings. The Setup Display appears. 87US The system can return the [SETUP] settings (page 60) other than [PARENTAL...name** * The bit rate appears when the system is playing an MP3 file on the TV screen. 3 Press...

Operating Instructions
Page 88
Do not press [/1 while resetting the system as it takes a few seconds to the Control Menu display by selecting [NO] here. 8 Press . You can also quit the process and return to complete. 5 Press X/x to the default settings. 88US Note • The [MEDIA], [INTERVAL], [EFFECT], and [MULTI/2CH] settings also return to select [SYSTEM SETUP], then press . The options for [SYSTEM SETUP] appear. 6 Press X/x to select [RESET] and press c. 7 Press C/c to select [YES].
Do not press [/1 while resetting the system as it takes a few seconds to the Control Menu display by selecting [NO] here. 8 Press . You can also quit the process and return to complete. 5 Press X/x to the default settings. 88US Note • The [MEDIA], [INTERVAL], [EFFECT], and [MULTI/2CH] settings also return to select [SYSTEM SETUP], then press . The options for [SYSTEM SETUP] appear. 6 Press X/x to select [RESET] and press c. 7 Press C/c to select [YES].
Operating Instructions
Page 114
...COMPONENT OUT) 61 Progressive format 38, 102 Q Quick Setup 35 R Rear panel 107 Region Code 9 Remote 12 Repeat Play 50 RESET 65, 88 Resume Play 47 RF CHANGE 77 RF POWER 78 S S-AIR 102 S-AIR ID 74 S-AIR MODE 75 S-AIR ...LEVEL 66 SUBTITLE 45, 61 Super Audio CD 46, 102 Surround amplifier 73, 109 SYSTEM MENU 32, 40, 45, 68, 74, 75, 77, 78, 84, 85 SYSTEM SETUP 64 T TEST TONE 66 TIME 52 TRACK SELECTION 64 TV TYPE 61 V VIDEO...64, 80, 101 B BACKGROUND 64 BLACK LEVEL 62 BLACK LEVEL (COMPONENT OUT) 62 C COLD RESET 87 CONTROL FOR HDMI 63 Control for HDMI 70 Control Menu Display 111 CUSTOM 60, 87 D D. A. C.
...COMPONENT OUT) 61 Progressive format 38, 102 Q Quick Setup 35 R Rear panel 107 Region Code 9 Remote 12 Repeat Play 50 RESET 65, 88 Resume Play 47 RF CHANGE 77 RF POWER 78 S S-AIR 102 S-AIR ID 74 S-AIR MODE 75 S-AIR ...LEVEL 66 SUBTITLE 45, 61 Super Audio CD 46, 102 Surround amplifier 73, 109 SYSTEM MENU 32, 40, 45, 68, 74, 75, 77, 78, 84, 85 SYSTEM SETUP 64 T TEST TONE 66 TIME 52 TRACK SELECTION 64 TV TYPE 61 V VIDEO...64, 80, 101 B BACKGROUND 64 BLACK LEVEL 62 BLACK LEVEL (COMPONENT OUT) 62 C COLD RESET 87 CONTROL FOR HDMI 63 Control for HDMI 70 Control Menu Display 111 CUSTOM 60, 87 D D. A. C.


