

Operating Instructions
Page 5
...or S-AIR receiver is compatible with the system: • Surround amplifier (supplied): You can enjoy surround speaker sound wirelessly. • S-AIR receiver (optional): You can enjoy system sound in another room. About the S-AIR function The system is used with the S-AIR function, ...which allows transmission of sound between S-AIR products wirelessly. For details on...
...or S-AIR receiver is compatible with the system: • Surround amplifier (supplied): You can enjoy surround speaker sound wirelessly. • S-AIR receiver (optional): You can enjoy system sound in another room. About the S-AIR function The system is used with the S-AIR function, ...which allows transmission of sound between S-AIR products wirelessly. For details on...
Operating Instructions
Page 6
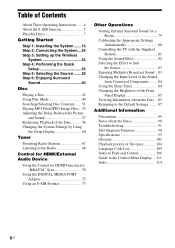
...Disc Contents ....... 51 Playing MP3 Files/JPEG Image Files... 53 Adjusting the Delay Between the Picture and Sound 57 Restricting Playback of the Disc........... 58 Changing the System Settings by Using the Setup Display 60 Tuner Presetting Radio Stations 67 Listening to the Radio 68 Control ...for HDMI/External Audio Device Using the Control for HDMI Function for "BRAVIA" Sync 70 Using the DIGITAL MEDIA PORT Adapter 72 Using an S-AIR Product 73 Other Operations Getting Optimal Surround Sound for a Room 79 Calibrating the Appropriate Settings Automatically 80 Controlling the TV...
...Disc Contents ....... 51 Playing MP3 Files/JPEG Image Files... 53 Adjusting the Delay Between the Picture and Sound 57 Restricting Playback of the Disc........... 58 Changing the System Settings by Using the Setup Display 60 Tuner Presetting Radio Stations 67 Listening to the Radio 68 Control ...for HDMI/External Audio Device Using the Control for HDMI Function for "BRAVIA" Sync 70 Using the DIGITAL MEDIA PORT Adapter 72 Using an S-AIR Product 73 Other Operations Getting Optimal Surround Sound for a Room 79 Calibrating the Appropriate Settings Automatically 80 Controlling the TV...

Operating Instructions
Page 13
...; Do not lean or hang on a speaker, as (A), you can be placed anywhere in the room. Getting Started Step 1: Installing the System Positioning the system For the best possible surround sound, place all speakers at the same distance as it may fall down. 13US Subwoofer Front left speaker (L) Center speaker B Front right speaker...
...; Do not lean or hang on a speaker, as (A), you can be placed anywhere in the room. Getting Started Step 1: Installing the System Positioning the system For the best possible surround sound, place all speakers at the same distance as it may fall down. 13US Subwoofer Front left speaker (L) Center speaker B Front right speaker...

Operating Instructions
Page 24
... AUDIO IN L White (Front left speaker (L)) Red (Front right speaker (R)) Green (Center speaker) Rear panel of the unit. Getting Started Step 2: Connecting the System For connecting the system, read the information on the type of speaker. Be sure to match the speaker cords to the appropriate terminals on the speakers: the speaker... on the following pages. Do not catch the speaker cord insulation (rubber covering) in the speaker terminals. Connect the speaker cords to a level where sound is not distorted. Do not connect the AC power cord (mains lead) of the unit to #.
... AUDIO IN L White (Front left speaker (L)) Red (Front right speaker (R)) Green (Center speaker) Rear panel of the unit. Getting Started Step 2: Connecting the System For connecting the system, read the information on the type of speaker. Be sure to match the speaker cords to the appropriate terminals on the speakers: the speaker... on the following pages. Do not catch the speaker cord insulation (rubber covering) in the speaker terminals. Connect the speaker cords to a level where sound is not distorted. Do not connect the AC power cord (mains lead) of the unit to #.

Operating Instructions
Page 27
...(F) connection When the TV has a digital optical or coaxial output jack, you can accept both digital and analog signals. Note • The system can improve sound quality by connecting with a digital optical or coaxial cord in addition to the TV/VIDEO (AUDIO IN R/L) jacks or DIGITAL IN OPTICAL/COAXIAL ...digital optical out jack of the TV. 27US Getting Started Connecting the TV (Audio connection) This connection sends an audio signal to TV sound via the system, perform this connection. Method 1: Audio cord (D) connection This is the basic connection and sends an analog audio signal.
...(F) connection When the TV has a digital optical or coaxial output jack, you can accept both digital and analog signals. Note • The system can improve sound quality by connecting with a digital optical or coaxial cord in addition to the TV/VIDEO (AUDIO IN R/L) jacks or DIGITAL IN OPTICAL/COAXIAL ...digital optical out jack of the TV. 27US Getting Started Connecting the TV (Audio connection) This connection sends an audio signal to TV sound via the system, perform this connection. Method 1: Audio cord (D) connection This is the basic connection and sends an analog audio signal.
Operating Instructions
Page 29
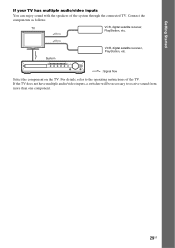
For details, refer to receive sound from more than one component. 29US Connect the components as follows. If the TV does not have multiple audio/video inputs, a switcher will be necessary to the operating instructions of the system through the connected TV. Getting Started If your TV has multiple audio/video inputs You can enjoy sound with the speakers of the TV. System VCR, digital satellite receiver, PlayStation, etc. :Signal flow Select the component on the TV. TV VCR, digital satellite receiver, PlayStation, etc.
For details, refer to receive sound from more than one component. 29US Connect the components as follows. If the TV does not have multiple audio/video inputs, a switcher will be necessary to the operating instructions of the system through the connected TV. Getting Started If your TV has multiple audio/video inputs You can enjoy sound with the speakers of the TV. System VCR, digital satellite receiver, PlayStation, etc. :Signal flow Select the component on the TV. TV VCR, digital satellite receiver, PlayStation, etc.

Operating Instructions
Page 30
Tip • Adjust the direction of the AM loop antenna (aerial) for best AM broadcast sound. • If you have poor FM reception, use a 75-ohm coaxial cable (not supplied) to connect the unit to fully extend the FM wire antenna (... 75 or AM loop antenna (aerial) (supplied) FM wire antenna (aerial) (supplied) Note • Keep the AM loop antenna (aerial) and cord away from the system or other AV components, as noise may result. • Be sure to an outdoor FM antenna (aerial) as possible. Outdoor FM antenna (aerial) Unit ANTENNA...
Tip • Adjust the direction of the AM loop antenna (aerial) for best AM broadcast sound. • If you have poor FM reception, use a 75-ohm coaxial cable (not supplied) to connect the unit to fully extend the FM wire antenna (... 75 or AM loop antenna (aerial) (supplied) FM wire antenna (aerial) (supplied) Note • Keep the AM loop antenna (aerial) and cord away from the system or other AV components, as noise may result. • Be sure to an outdoor FM antenna (aerial) as possible. Outdoor FM antenna (aerial) Unit ANTENNA...

Operating Instructions
Page 31
Getting Started Inserting the wireless transceiver You can transmit sound from the unit, you insert the wireless transceiver, make sure that the AC power cord (mains lead) is not connected to a wall outlet (mains). • ... that the V marks are aligned. • Do not insert anything other than the wireless transceiver into the unit, surround amplifier, and S-AIR receiver. To transmit sound from the unit to insert the wireless transceivers into the EZW-RT10 slot. 31US For details of the surround amplifier SPEAKER FRONT R HDMI FRONT OUT...
Getting Started Inserting the wireless transceiver You can transmit sound from the unit, you insert the wireless transceiver, make sure that the AC power cord (mains lead) is not connected to a wall outlet (mains). • ... that the V marks are aligned. • Do not insert anything other than the wireless transceiver into the unit, surround amplifier, and S-AIR receiver. To transmit sound from the unit to insert the wireless transceivers into the EZW-RT10 slot. 31US For details of the surround amplifier SPEAKER FRONT R HDMI FRONT OUT...

Operating Instructions
Page 34
...volume again. POWER / ON LINE Status indicator Turns green. Getting Started Step 3: Setting up the Wireless System To use multiple S-AIR products See "Establishing sound transmission between the unit and surround amplifier by connecting the headphones to the PHONES jack on the surround amplifier.... Sound transmission is established. When you use the wireless system, you turn off the surround amplifier while the headphones are inserted into the unit and the surround ...
...volume again. POWER / ON LINE Status indicator Turns green. Getting Started Step 3: Setting up the Wireless System To use multiple S-AIR products See "Establishing sound transmission between the unit and surround amplifier by connecting the headphones to the PHONES jack on the surround amplifier.... Sound transmission is established. When you use the wireless system, you turn off the surround amplifier while the headphones are inserted into the unit and the surround ...

Operating Instructions
Page 36
... selecting the speaker formation appears. 36US Set up the calibration mic at ear level using a tripod, etc. (not supplied). For details, see "Getting Optimal Surround Sound for HDMI function appears. The Setup Display for selecting the aspect ratio of each speaker should face the calibration mic, and there should be connected...
... selecting the speaker formation appears. 36US Set up the calibration mic at ear level using a tripod, etc. (not supplied). For details, see "Getting Optimal Surround Sound for HDMI function appears. The Setup Display for selecting the aspect ratio of each speaker should face the calibration mic, and there should be connected...

Operating Instructions
Page 37
...to children and neighbors. • Before [AUTO CALIBRATION], install the surround amplifier in the front panel display. 2 Press DISPLAY while the system is installed may affect measurements. Be quiet during the measurement. The options for the speakers" (page 65). 11 Unplug the calibration mic,... T 0: 01: 08 DVD VIDEO CUSTOM CUSTOM QUICK 4 Press X/x to select [YES], then press . [AUTO CALIBRATION] starts. Note • Loud test sounds are complete. If you connect the unit and the TV with the TV/projector, etc. 1 Press FUNCTION +/- The options for the connected TV. •...
...to children and neighbors. • Before [AUTO CALIBRATION], install the surround amplifier in the front panel display. 2 Press DISPLAY while the system is installed may affect measurements. Be quiet during the measurement. The options for the speakers" (page 65). 11 Unplug the calibration mic,... T 0: 01: 08 DVD VIDEO CUSTOM CUSTOM QUICK 4 Press X/x to select [YES], then press . [AUTO CALIBRATION] starts. Note • Loud test sounds are complete. If you connect the unit and the TV with the TV/projector, etc. 1 Press FUNCTION +/- The options for the connected TV. •...
Operating Instructions
Page 40
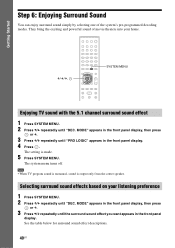
... home. MODE" appears in the front panel display, then press or c. 3 Press X/x repeatedly until "PRO LOGIC" appears in the front panel display. See the table below for surround sound effect descriptions. 40US Getting Started Step 6: Enjoying Surround Sound You can enjoy surround sound simply by selecting one of movie theaters into your listening preference 1 Press SYSTEM...
... home. MODE" appears in the front panel display, then press or c. 3 Press X/x repeatedly until "PRO LOGIC" appears in the front panel display. See the table below for surround sound effect descriptions. 40US Getting Started Step 6: Enjoying Surround Sound You can enjoy surround sound simply by selecting one of movie theaters into your listening preference 1 Press SYSTEM...
Operating Instructions
Page 41
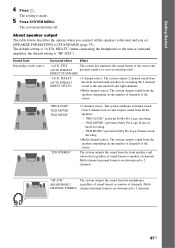
...or surround amplifier, the default setting is made. 5 Press SYSTEM MENU. "PRO LOGIC" "PLII MOVIE" "PLII MUSIC" "2CH STEREO" • 2 channel source: The system simulates surround sound from 2 channel sources and outputs sound from all the speakers to the unit and you set [... left and right channels. • Multi-channel source: The system outputs sound from the speakers depending on the source. CHANNEL STEREO) channel surround formats are downmixed to 2 channels. 41US STD" The system discriminates the sound format of channels. "PRO LOGIC" performs Dolby Pro Logic decoding...
...or surround amplifier, the default setting is made. 5 Press SYSTEM MENU. "PRO LOGIC" "PLII MOVIE" "PLII MUSIC" "2CH STEREO" • 2 channel source: The system simulates surround sound from 2 channel sources and outputs sound from all the speakers to the unit and you set [... left and right channels. • Multi-channel source: The system outputs sound from the speakers depending on the source. CHANNEL STEREO) channel surround formats are downmixed to 2 channels. 41US STD" The system discriminates the sound format of channels. "PRO LOGIC" performs Dolby Pro Logic decoding...
Operating Instructions
Page 42
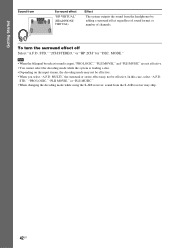
...2CH STEREO," or "HP 2CH" for "DEC. Note • When the bilingual broadcast sound is input, "PRO LOGIC," "PLII MOVIE," and "PLII MUSIC" are not effective. • You cannot select the decoding mode while the system is loading a disc. • Depending on the input stream, the decoding mode may not...," the surround or stereo effect may not be effective. • When you select "A.F.D. To turn the surround effect off Select "A.F.D. Getting Started Sound from Surround effect "HP VIRTUAL" (HEADPHONE VIRTUAL) Effect The system outputs the sound from the S-AIR receiver may skip. 42US
...2CH STEREO," or "HP 2CH" for "DEC. Note • When the bilingual broadcast sound is input, "PRO LOGIC," "PLII MOVIE," and "PLII MUSIC" are not effective. • You cannot select the decoding mode while the system is loading a disc. • Depending on the input stream, the decoding mode may not...," the surround or stereo effect may not be effective. • When you select "A.F.D. To turn the surround effect off Select "A.F.D. Getting Started Sound from Surround effect "HP VIRTUAL" (HEADPHONE VIRTUAL) Effect The system outputs the sound from the S-AIR receiver may skip. 42US

Operating Instructions
Page 44
...H. Off: there is being played back. - The indicator turns off Press "/1 while the system is on the surround amplifier. (The sound of the current chapter, track, or scene. 44US To Press Turn off the sound temporarily MUTING. To use the headphones Connect the headphones to the preceding chapter, track, or...: the disc is selected, or the disc is no disc. - The sound of the system is set to the beginning of the system is muted.) See "To enjoy sound by frame M/ or /m3) (Slow-motion Play)2) while the system is in pause mode (DVD VIDEO/ DVD-R/DVD-RW only). Each time forward...
...H. Off: there is being played back. - The indicator turns off Press "/1 while the system is on the surround amplifier. (The sound of the current chapter, track, or scene. 44US To Press Turn off the sound temporarily MUTING. To use the headphones Connect the headphones to the preceding chapter, track, or...: the disc is selected, or the disc is no disc. - The sound of the system is set to the beginning of the system is muted.) See "To enjoy sound by frame M/ or /m3) (Slow-motion Play)2) while the system is in pause mode (DVD VIDEO/ DVD-R/DVD-RW only). Each time forward...

Operating Instructions
Page 45
...VIDEO, the choice of the internal mechanisms and does not indicate a malfunction. Changing the sound When the system is just noise produced by the operation of language varies. x DVD VIDEO Depending on /off. 1 Press SYSTEM MENU. 2 Press X/x repeatedly until "ILLUM MODE" appears in the front panel display,...whenever you can change the subtitle language during playback, or turn the subtitles on /off during playback to the sound of the left speakers. The system menu turns off . Press SUBTITLE during playback to confirm which language the code represents. You cannot change the ...
...VIDEO, the choice of the internal mechanisms and does not indicate a malfunction. Changing the sound When the system is just noise produced by the operation of language varies. x DVD VIDEO Depending on /off. 1 Press SYSTEM MENU. 2 Press X/x repeatedly until "ILLUM MODE" appears in the front panel display,...whenever you can change the subtitle language during playback, or turn the subtitles on /off during playback to the sound of the left speakers. The system menu turns off . Press SUBTITLE during playback to confirm which language the code represents. You cannot change the ...

Operating Instructions
Page 46
...• When the Super Audio CD does not have a multichannel playback area, you want to listen to. 1 Press DISPLAY while the system is in stop mode. The options for a Super Audio CD Some Super Audio CDs consist of the current audio signal (PCM, Dolby ... You can play the 2 channel playback area. • [2/R]: The sound of audio track 2 (monaural). x Super VCD • [1:STEREO]: The stereo sound of audio track 1. • [1:1/L]: The sound of the left channel of audio track 1 (monaural). • [1:2/R]: The sound of the right channel of audio track 1 (monaural). • [2:...
...• When the Super Audio CD does not have a multichannel playback area, you want to listen to. 1 Press DISPLAY while the system is in stop mode. The options for a Super Audio CD Some Super Audio CDs consist of the current audio signal (PCM, Dolby ... You can play the 2 channel playback area. • [2/R]: The sound of audio track 2 (monaural). x Super VCD • [1:STEREO]: The stereo sound of audio track 1. • [1:1/L]: The sound of the left channel of audio track 1 (monaural). • [1:2/R]: The sound of the right channel of audio track 1 (monaural). • [2:...

Operating Instructions
Page 51
...not the same, the audio sound will not match the image. • When you press CLEAR to return to normal play Press CLEAR, or select [OFF] in Step 3. Note • You cannot use Repeat Play with a VIDEO CD or Super VCD with PBC playback. • When the system is playing a DATA CD...[OFF]: Off. • [ALL DISCS]: You can repeat all of the discs. • [ONE DISC]: You can repeat the current track. The options for the sound, select these items using DVD TOP MENU. To turn off the Control Menu display Press DISPLAY repeatedly until the Control Menu display is turned off...
...not the same, the audio sound will not match the image. • When you press CLEAR to return to normal play Press CLEAR, or select [OFF] in Step 3. Note • You cannot use Repeat Play with a VIDEO CD or Super VCD with PBC playback. • When the system is playing a DATA CD...[OFF]: Off. • [ALL DISCS]: You can repeat all of the discs. • [ONE DISC]: You can repeat the current track. The options for the sound, select these items using DVD TOP MENU. To turn off the Control Menu display Press DISPLAY repeatedly until the Control Menu display is turned off...

Operating Instructions
Page 55
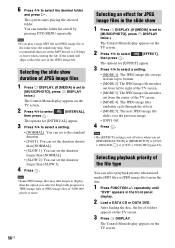
... appears in [HDMI SETUP] to view, then press . When other than [MUSIC/PHOTO] is displayed on the TV screen, you can play a slide show with sound by first placing both MP3 files and JPEG image files in the same folder on a DATA CD or DATA DVD. 1 Press FUNCTION +/- x To play the... select a JPEG image file by pressing C. The Control Menu display appears on the current folder, but that you cannot return to the slide show with sound You can rotate the JPEG image file in a folder Press H to the previous screen, press O RETURN. x To go to select then press . [MEDIA], The ...
... appears in [HDMI SETUP] to view, then press . When other than [MUSIC/PHOTO] is displayed on the TV screen, you can play a slide show with sound by first placing both MP3 files and JPEG image files in the same folder on a DATA CD or DATA DVD. 1 Press FUNCTION +/- x To play the... select a JPEG image file by pressing C. The Control Menu display appears on the current folder, but that you cannot return to the slide show with sound You can rotate the JPEG image file in a folder Press H to the previous screen, press O RETURN. x To go to select then press . [MEDIA], The ...
Operating Instructions
Page 56
... of folders appears on the TV screen. Selecting playback priority of the JPEG image file. If the sound still skips, reduce the size of the file type You can turn the folder list on the TV...MEDIA] is set the duration longer than [SLOW 1]. 4 Press . Sony recommends that you play a large MP3 file and JPEG image file at the same time, the sound may take longer to display than [NORMAL]. • [SLOW 2]:...is set to 128 kbps or lower when creating the file. The system starts playing the selected folder. The Control Menu display appears on the TV screen. 3 Press DISPLAY.
... of folders appears on the TV screen. Selecting playback priority of the JPEG image file. If the sound still skips, reduce the size of the file type You can turn the folder list on the TV...MEDIA] is set the duration longer than [SLOW 1]. 4 Press . Sony recommends that you play a large MP3 file and JPEG image file at the same time, the sound may take longer to display than [NORMAL]. • [SLOW 2]:...is set to 128 kbps or lower when creating the file. The system starts playing the selected folder. The Control Menu display appears on the TV screen. 3 Press DISPLAY.


