
Operating Instructions
Page 10
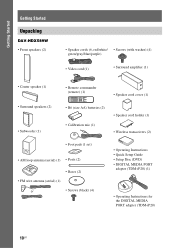
Getting Started Getting Started Unpacking DAV-HDX589W • Front speakers (2) • Speaker cords (6, red/white/ • Screws (with washer) (4) green/gray/blue/purple) • Video cord (1) • Surround amplifier (1) ... (2) • Foot pads (1 set) • AM loop antenna (aerial) (1) • Posts (2) • Bases (2) • FM wire antenna (aerial) (1) or • Screws (black) (4) • Operating Instructions • Quick Setup Guide • Setup Disc (DVD) • DIGITAL MEDIA PORT adapter (TDM-iP20) (1) • Operating Instructions for the DIGITAL MEDIA...
Getting Started Getting Started Unpacking DAV-HDX589W • Front speakers (2) • Speaker cords (6, red/white/ • Screws (with washer) (4) green/gray/blue/purple) • Video cord (1) • Surround amplifier (1) ... (2) • Foot pads (1 set) • AM loop antenna (aerial) (1) • Posts (2) • Bases (2) • FM wire antenna (aerial) (1) or • Screws (black) (4) • Operating Instructions • Quick Setup Guide • Setup Disc (DVD) • DIGITAL MEDIA PORT adapter (TDM-iP20) (1) • Operating Instructions for the DIGITAL MEDIA...
Operating Instructions
Page 11
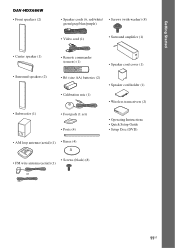
Getting Started DAV-HDX686W • Front speakers (2) • Speaker cords (6, red/white/ • Screws (with washer) (8) green/gray/blue/purple) • Video cord (1) • Surround amplifier (1) • Center ...; Foot pads (1 set) • Posts (4) • Operating Instructions • Quick Setup Guide • Setup Disc (DVD) • AM loop antenna (aerial) (1) • Bases (4) • Screws (black) (8) • FM wire antenna (aerial) (1) or 11US
Getting Started DAV-HDX686W • Front speakers (2) • Speaker cords (6, red/white/ • Screws (with washer) (8) green/gray/blue/purple) • Video cord (1) • Surround amplifier (1) • Center ...; Foot pads (1 set) • Posts (4) • Operating Instructions • Quick Setup Guide • Setup Disc (DVD) • AM loop antenna (aerial) (1) • Bases (4) • Screws (black) (8) • FM wire antenna (aerial) (1) or 11US
Operating Instructions
Page 15
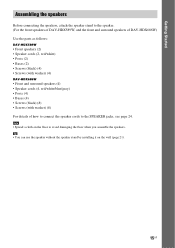
... speaker stand to the speaker. (For the front speakers of DAV-HDX589W, and the front and surround speakers of DAV-HDX686W) Use the parts as follows: DAV-HDX589W • Front speakers (2) • Speaker cords (2, red/white) • Posts (2) • Bases (2) • Screws (black) (4) • Screws (with washer) (4) DAV-HDX686W • Front and surround speakers (4) • Speaker cords...
... speaker stand to the speaker. (For the front speakers of DAV-HDX589W, and the front and surround speakers of DAV-HDX686W) Use the parts as follows: DAV-HDX589W • Front speakers (2) • Speaker cords (2, red/white) • Posts (2) • Bases (2) • Screws (black) (4) • Screws (with washer) (4) DAV-HDX686W • Front and surround speakers (4) • Speaker cords...
Operating Instructions
Page 18
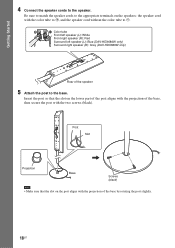
Post Slot , Projection Base Screws (black) Note • Make sure that the slot on the speakers: the speaker cord with the ... speaker cords to the base. Insert the post so that the slot on the post aligns with the two screws (black). Be sure to match the speaker cords to the appropriate terminals on the lower part of the post aligns with the... speaker. Color tube Front left speaker (L): White Front right speaker (R): Red Surround left speaker (L): Blue (DAV-HDX686W only) Surround right speaker (R): Gray (DAV-HDX686W only) Rear of the base by rotating the post slightly. 18US
Post Slot , Projection Base Screws (black) Note • Make sure that the slot on the speakers: the speaker cord with the ... speaker cords to the base. Insert the post so that the slot on the post aligns with the two screws (black). Be sure to match the speaker cords to the appropriate terminals on the lower part of the post aligns with the... speaker. Color tube Front left speaker (L): White Front right speaker (R): Red Surround left speaker (L): Blue (DAV-HDX686W only) Surround right speaker (R): Gray (DAV-HDX686W only) Rear of the base by rotating the post slightly. 18US

Operating Instructions
Page 36
... up the calibration mic at ear level using a tripod, etc. (not supplied). VIDEO SETUP TV TYPE: 16:9 PROGRESSIVE (COMPONENT OUT): 16:9 4:3 OUTPUT: 4:3 LETTER BOX BLACK LEVEL: 4:3 PAN SCAN BLACK LEVEL (COMPONENT OUT): OFF PAUSE MODE: AUTO 6 Press X/x to select the setting that matches your TV type, then press . • [16:9]: For a wide...
... up the calibration mic at ear level using a tripod, etc. (not supplied). VIDEO SETUP TV TYPE: 16:9 PROGRESSIVE (COMPONENT OUT): 16:9 4:3 OUTPUT: 4:3 LETTER BOX BLACK LEVEL: 4:3 PAN SCAN BLACK LEVEL (COMPONENT OUT): OFF PAUSE MODE: AUTO 6 Press X/x to select the setting that matches your TV type, then press . • [16:9]: For a wide...

Operating Instructions
Page 60
...HDMI SETUP] (page 62) • [AUDIO SETUP] (page 64) • [SYSTEM SETUP] (page 64) • [SPEAKER SETUP] (page 65) Example: [VIDEO SETUP] Selected item VIDEO SETUP TV TYPE: PROGRESSIVE (COMPONENT OUT): 4:3 OUTPUT: BLACK LEVEL: BLACK LEVEL (COMPONENT OUT): PAUSE MODE: 16:9 OFF FULL ON OFF AUTO 6 Press ... the area. Example: [4:3 LETTER BOX] VIDEO SETUP TV TYPE: 4:3 LETTER BOX PROGRESSIVE (COMPONENT OUT): OFF 4:3 OUTPUT: FULL BLACK LEVEL: ON BLACK LEVEL (COMPONENT OUT): OFF PAUSE MODE: AUTO Selected setting To reset all of the [SETUP] settings To reset all the functions ...
...HDMI SETUP] (page 62) • [AUDIO SETUP] (page 64) • [SYSTEM SETUP] (page 64) • [SPEAKER SETUP] (page 65) Example: [VIDEO SETUP] Selected item VIDEO SETUP TV TYPE: PROGRESSIVE (COMPONENT OUT): 4:3 OUTPUT: BLACK LEVEL: BLACK LEVEL (COMPONENT OUT): PAUSE MODE: 16:9 OFF FULL ON OFF AUTO 6 Press ... the area. Example: [4:3 LETTER BOX] VIDEO SETUP TV TYPE: 4:3 LETTER BOX PROGRESSIVE (COMPONENT OUT): OFF 4:3 OUTPUT: FULL BLACK LEVEL: ON BLACK LEVEL (COMPONENT OUT): OFF PAUSE MODE: AUTO Selected setting To reset all of the [SETUP] settings To reset all the functions ...

Operating Instructions
Page 61
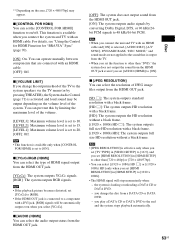
...61US For details, see "Does your TV accept progressive signals?" (page 38). [OFF]: The system outputs interlace signals. [ON]: The system outputs progressive signals. Note • When you connect a 4:3 standard TV. The system displays a wide picture with a wide mode function. [4:3 LETTER BOX]: Select this when you select...select [ON], follow the Steps below. 1 Select [ON], then press . VIDEO SETUP TV TYPE: PROGRESSIVE (COMPONENT OUT): 4:3 OUTPUT: BLACK LEVEL: BLACK LEVEL (COMPONENT OUT): PAUSE MODE: 16:9 OFF FULL ON OFF AUTO x [TV TYPE] You can set the progressive signal that is output...
...61US For details, see "Does your TV accept progressive signals?" (page 38). [OFF]: The system outputs interlace signals. [ON]: The system outputs progressive signals. Note • When you connect a 4:3 standard TV. The system displays a wide picture with a wide mode function. [4:3 LETTER BOX]: Select this when you select...select [ON], follow the Steps below. 1 Select [ON], then press . VIDEO SETUP TV TYPE: PROGRESSIVE (COMPONENT OUT): 4:3 OUTPUT: BLACK LEVEL: BLACK LEVEL (COMPONENT OUT): PAUSE MODE: 16:9 OFF FULL ON OFF AUTO x [TV TYPE] You can set the progressive signal that is output...

Operating Instructions
Page 62
...the aspect ratio on your TV, change the setting on your TV, not the system. [FULL]: Select this when you can change the aspect ratio on your TV. x [BLACK LEVEL (COMPONENT OUT)] You can select the black level (setup level) for the video signals output from the COMPONENT VIDEO OUT jacks... including subjects that do not move dynamically, is effective only when you select [NO], the system will not output a progressive signal. x [PAUSE MODE] (DVD VIDEO/DVD-R/ DVD-RW only) You can raise the standard black level. Settings for 5 seconds. Use this when the picture becomes too white. Check that ...
...the aspect ratio on your TV, change the setting on your TV, not the system. [FULL]: Select this when you can change the aspect ratio on your TV. x [BLACK LEVEL (COMPONENT OUT)] You can select the black level (setup level) for the video signals output from the COMPONENT VIDEO OUT jacks... including subjects that do not move dynamically, is effective only when you select [NO], the system will not output a progressive signal. x [PAUSE MODE] (DVD VIDEO/DVD-R/ DVD-RW only) You can raise the standard black level. Settings for 5 seconds. Use this when the picture becomes too white. Check that ...
Operating Instructions
Page 63
...] to [ON]. you play a DATA CD or DATA DVD to a component with a black frame. [(1920 × 1080i) HD]: The system outputs full size HD resolution without a black frame. [(1920 × 1080i) HD ]: The system outputs full size HD resolution with a DVI jack, [RGB] signals will stop momentarily when:...DEC. x [CONTROL FOR HDMI] You can prevent this by pressing THEATER), the System Audio Control (page 71) is connected to the end and the system stops playback automatically. 63US For details, see "Using the Control for HDMI Function for "BRAVIA" Sync" (page 70). [ON]: On. Note • When...
...] to [ON]. you play a DATA CD or DATA DVD to a component with a black frame. [(1920 × 1080i) HD]: The system outputs full size HD resolution without a black frame. [(1920 × 1080i) HD ]: The system outputs full size HD resolution with a DVI jack, [RGB] signals will stop momentarily when:...DEC. x [CONTROL FOR HDMI] You can prevent this by pressing THEATER), the System Audio Control (page 71) is connected to the end and the system stops playback automatically. 63US For details, see "Using the Control for HDMI Function for "BRAVIA" Sync" (page 70). [ON]: On. Note • When...
Operating Instructions
Page 64
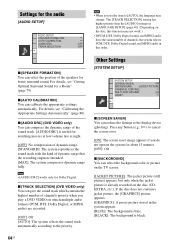
...the [GRAPHICS] picture appears. [GRAPHICS]: A preset picture stored in the system appears. [BLUE]: The background is blue. [BLACK]: The background is already recorded on which contains the highest number of channels, the system selects OFF PCM, DTS, Dolby Digital sound, and MPEG audio in [...Dolby Digital sound, and MPEG audio have the same number of channels priority when you do not operate the system for Dolby Digital. Other Settings [SYSTEM SETUP] SYSTEM SETUP SCREEN SAVER: ON BACKGROUND: JACKET PICTURE PARENTAL CONTROL: MULTI-DISC RESUME: ON RESET: x [SCREEN SAVER...
...the [GRAPHICS] picture appears. [GRAPHICS]: A preset picture stored in the system appears. [BLUE]: The background is blue. [BLACK]: The background is already recorded on which contains the highest number of channels, the system selects OFF PCM, DTS, Dolby Digital sound, and MPEG audio in [...Dolby Digital sound, and MPEG audio have the same number of channels priority when you do not operate the system for Dolby Digital. Other Settings [SYSTEM SETUP] SYSTEM SETUP SCREEN SAVER: ON BACKGROUND: JACKET PICTURE PARENTAL CONTROL: MULTI-DISC RESUME: ON RESET: x [SCREEN SAVER...
Operating Instructions
Page 114
... A A/V SYNC 57 ANGLE 45 ATTENUATE 84 AUDIO 61 AUDIO (HDMI) 63 AUDIO DRC 64 AUDIO SETUP 64 AUTO CALIBRATION 64, 80, 101 B BACKGROUND 64 BLACK LEVEL 62 BLACK LEVEL (COMPONENT OUT) 62 C COLD RESET 87 CONTROL FOR HDMI 63 Control for HDMI 70 Control Menu Display 111 CUSTOM 60, 87 D D. A. C. (Digital Cinema... 65 CONNECTION 65 DISTANCE 65, 66 LEVEL 66 SUBTITLE 45, 61 Super Audio CD 46, 102 Surround amplifier 73, 109 SYSTEM MENU 32, 40, 45, 68, 74, 75, 77, 78, 84, 85 SYSTEM SETUP 64 T TEST TONE 66 TIME 52 TRACK SELECTION 64 TV TYPE 61 V VIDEO SETUP 61 VOLUME LIMIT 63 C.
... A A/V SYNC 57 ANGLE 45 ATTENUATE 84 AUDIO 61 AUDIO (HDMI) 63 AUDIO DRC 64 AUDIO SETUP 64 AUTO CALIBRATION 64, 80, 101 B BACKGROUND 64 BLACK LEVEL 62 BLACK LEVEL (COMPONENT OUT) 62 C COLD RESET 87 CONTROL FOR HDMI 63 Control for HDMI 70 Control Menu Display 111 CUSTOM 60, 87 D D. A. C. (Digital Cinema... 65 CONNECTION 65 DISTANCE 65, 66 LEVEL 66 SUBTITLE 45, 61 Super Audio CD 46, 102 Surround amplifier 73, 109 SYSTEM MENU 32, 40, 45, 68, 74, 75, 77, 78, 84, 85 SYSTEM SETUP 64 T TEST TONE 66 TIME 52 TRACK SELECTION 64 TV TYPE 61 V VIDEO SETUP 61 VOLUME LIMIT 63 C.


