HDMI Control Guide
Page 2
...that this system is connected to your TV so that you can switch the sound to come out of the system. • Depending on and is for this system to the...DVD input mode automatically. - A component does not have a HDMI terminal. System Audio Control: While watching TV, you connect this system. When you can not switch to products featuring 'BRAVIA' Theatre Sync. In this system to the TV...the TV off automatically. System Power Off: When you turn [HDMI CONTROL] to [ON] without being connected by using the POWER button on . Refer to the operating instructions supplied with Sony's...
...that this system is connected to your TV so that you can switch the sound to come out of the system. • Depending on and is for this system to the...DVD input mode automatically. - A component does not have a HDMI terminal. System Audio Control: While watching TV, you connect this system. When you can not switch to products featuring 'BRAVIA' Theatre Sync. In this system to the TV...the TV off automatically. System Power Off: When you turn [HDMI CONTROL] to [ON] without being connected by using the POWER button on . Refer to the operating instructions supplied with Sony's...
HDMI Control Guide
Page 4
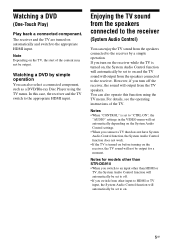
..., and then press A. - You place a DVD disc on the unit or remote. You press DISC SKIP on the remote or DISC 1-5 on the system. Enjoying the TV sound from the system speakers. However, when you select the TV program (the active picture is highlighted) or return to the TV mode while watching the TV and a DVD by PAP (picture and picture) mode...
..., and then press A. - You place a DVD disc on the unit or remote. You press DISC SKIP on the remote or DISC 1-5 on the system. Enjoying the TV sound from the system speakers. However, when you select the TV program (the active picture is highlighted) or return to the TV mode while watching the TV and a DVD by PAP (picture and picture) mode...
HDMI Control Guide
Page 5
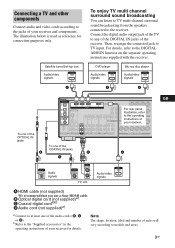
... HDMI cord (not supplied) (make sure to connect from the speakers of the system. Connect to following connections and settings. Video signal Sound signal TV to HDMI 2 (HDMI cord) to HDMI 1 (HDMI cord) GUSB DAV STB Sets the [STB SYNCHRO] to select the setting. The setting is not... digital satellite tuner sound from the system (Models with DIGITAL IN (COAXIAL or OPTICAL) jack only) You can enjoy digital sound of STB or a digital satellite tuner from the speakers of the system. By connecting as the following illustration are examples. The names of your TV connected to on ...
... HDMI cord (not supplied) (make sure to connect from the speakers of the system. Connect to following connections and settings. Video signal Sound signal TV to HDMI 2 (HDMI cord) to HDMI 1 (HDMI cord) GUSB DAV STB Sets the [STB SYNCHRO] to select the setting. The setting is not... digital satellite tuner sound from the system (Models with DIGITAL IN (COAXIAL or OPTICAL) jack only) You can enjoy digital sound of STB or a digital satellite tuner from the speakers of the system. By connecting as the following illustration are examples. The names of your TV connected to on ...
HDMI Control Guide
Page 2
... HDMI input. • System Audio Control: While watching TV, you can select to output the sound from the TV speaker or the speakers connected to the receiver. • System Power Off: When you ...Sync. 2GB Using the HDMI CONTROL function for HDMI (High-Definition Multimedia Interface). By connecting Sony components that you connect the receiver to a component which is not correspond with a HDMI cable... use 'BRAVIA' Theatre Sync, set the HDMI CONTROL function as a DVD/Blu-ray Disc Player, the receiver and the TV are turned on the connected component, the HDMI CONTROL function may not work...
... HDMI input. • System Audio Control: While watching TV, you can select to output the sound from the TV speaker or the speakers connected to the receiver. • System Power Off: When you ...Sync. 2GB Using the HDMI CONTROL function for HDMI (High-Definition Multimedia Interface). By connecting Sony components that you connect the receiver to a component which is not correspond with a HDMI cable... use 'BRAVIA' Theatre Sync, set the HDMI CONTROL function as a DVD/Blu-ray Disc Player, the receiver and the TV are turned on the connected component, the HDMI CONTROL function may not work...
HDMI Control Guide
Page 3
... COMPONENT VIDEO L L L L DMPORT R IN OUT R IN IN AUX SA-CD/CD/CD-R TV R R R AUDIO IN AUDIO IN AUDIO OUT AUDIO IN AUDIO OUT AUDIO IN AUDIO OUT SAT DVD VIDEO 2/BD VIDEO 1 SUB WOOFER CENTER R SURROUND BACK SPEAKERS R SURROUND To one of the OPTICAL IN...and components. Satellite tuner/Set-top box Audio/video signals A To enjoy TV multi channel surround sound broadcasting You can listen to TV multi channel surround sound broadcasting from the speakers connected to TV input. DVD player Blu-ray disc player Audio/video signals Audio/video signals A A To one of jacks ...
... COMPONENT VIDEO L L L L DMPORT R IN OUT R IN IN AUX SA-CD/CD/CD-R TV R R R AUDIO IN AUDIO IN AUDIO OUT AUDIO IN AUDIO OUT AUDIO IN AUDIO OUT SAT DVD VIDEO 2/BD VIDEO 1 SUB WOOFER CENTER R SURROUND BACK SPEAKERS R SURROUND To one of the OPTICAL IN...and components. Satellite tuner/Set-top box Audio/video signals A To enjoy TV multi channel surround sound broadcasting You can listen to TV multi channel surround sound broadcasting from the speakers connected to TV input. DVD player Blu-ray disc player Audio/video signals Audio/video signals A A To one of jacks ...
HDMI Control Guide
Page 5
... DVD by a simple operation. In this function using the TV menu. Notes for a moment. Note Depending on the TV, the start of the TV. For details, see the operating instructions of the content may not be set to on , the System Audio Control function will automatically be output. Enjoying the TV sound ... the receiver. You can also select a connected component, such as a DVD/Blu-ray Disc Player using the TV menu. However, if you turn off . • If you turn on the receiver while the TV is turned on before turning on automatically and switch to the appropriate HDMI input...
... DVD by a simple operation. In this function using the TV menu. Notes for a moment. Note Depending on the TV, the start of the TV. For details, see the operating instructions of the content may not be set to on , the System Audio Control function will automatically be output. Enjoying the TV sound ... the receiver. You can also select a connected component, such as a DVD/Blu-ray Disc Player using the TV menu. However, if you turn off . • If you turn on the receiver while the TV is turned on before turning on automatically and switch to the appropriate HDMI input...
HDMI Control Guide
Page 7
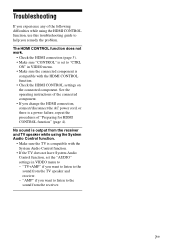
..." (page 4). No sound is output from the receiver and TV speaker while using the HDMI CONTROL function, use this troubleshooting guide to - Troubleshooting If you experience any of the following difficulties while using the System Audio Control function. • Make sure the TV is a power failure,... Make sure the connected component is compatible with the System Audio Control function. • If the TV does not have System Audio Control function, set the "AUDIO" settings in VIDEO menu to help you want to listen to the sound from the TV speaker and receiver. - "AMP" if you remedy...
..." (page 4). No sound is output from the receiver and TV speaker while using the HDMI CONTROL function, use this troubleshooting guide to - Troubleshooting If you experience any of the following difficulties while using the System Audio Control function. • Make sure the TV is a power failure,... Make sure the connected component is compatible with the System Audio Control function. • If the TV does not have System Audio Control function, set the "AUDIO" settings in VIDEO menu to help you want to listen to the sound from the TV speaker and receiver. - "AMP" if you remedy...
Operating Instructions (DAV-HDX500/HDX501W)
Page 4
... Order 50 (Shuffle Play) Playing Repeatedly 51 (Repeat Play) Using the DVD's Menu 52 Changing the Sound 52 Selecting [ORIGINAL] or [PLAY LIST] on a DVD-R/DVD-RW 54 Viewing Information About the Disc ... 54 Changing the Angles 56 Displaying the Subtitles 57 Adjusting the Delay ...Channels 70 4US BASIC - Table of Contents Welcome 3 About This Manual 6 This System Can Play the Following Discs 6 Getting Started - Step 1: Assembling the Speakers 10 Step 2: Connecting the System and TV 19 Step 3: Positioning the System ...24 Step 4: Performing the Quick Setup 24 Getting Started -
... Order 50 (Shuffle Play) Playing Repeatedly 51 (Repeat Play) Using the DVD's Menu 52 Changing the Sound 52 Selecting [ORIGINAL] or [PLAY LIST] on a DVD-R/DVD-RW 54 Viewing Information About the Disc ... 54 Changing the Angles 56 Displaying the Subtitles 57 Adjusting the Delay ...Channels 70 4US BASIC - Table of Contents Welcome 3 About This Manual 6 This System Can Play the Following Discs 6 Getting Started - Step 1: Assembling the Speakers 10 Step 2: Connecting the System and TV 19 Step 3: Positioning the System ...24 Step 4: Performing the Quick Setup 24 Getting Started -
Operating Instructions (DAV-HDX500/HDX501W)
Page 5
...TV with the Supplied Remote 72 Using the THEATRE SYNC Function 73 Using the Sound Effect 75 Using the Sleep Timer 75 Changing the Brightness of the Front Panel Display 76 Using the DIGITAL MEDIA PORT Adapter 77 Deactivating the Buttons on the Unit.... 78 (Child Lock) Advanced Settings and Adjustments Locking Discs... 79 (CUSTOM PARENTAL CONTROL, PARENTAL CONTROL) Getting Optimal Surround Sound for ... 86 Setting the Display or Sound Track Language 88 [LANGUAGE SETUP...Information Precautions 95 Notes about the Discs 96 Troubleshooting 96 Self-diagnosis Function...
...TV with the Supplied Remote 72 Using the THEATRE SYNC Function 73 Using the Sound Effect 75 Using the Sleep Timer 75 Changing the Brightness of the Front Panel Display 76 Using the DIGITAL MEDIA PORT Adapter 77 Deactivating the Buttons on the Unit.... 78 (Child Lock) Advanced Settings and Adjustments Locking Discs... 79 (CUSTOM PARENTAL CONTROL, PARENTAL CONTROL) Getting Optimal Surround Sound for ... 86 Setting the Display or Sound Track Language 88 [LANGUAGE SETUP...Information Precautions 95 Notes about the Discs 96 Troubleshooting 96 Self-diagnosis Function...

Operating Instructions (DAV-HDX500/HDX501W)
Page 22
... Remove only the loop part from the 6 speakers, select the "Dolby Pro Logic," "Dolby Pro Logic II MOVIE," or "Dolby Pro Logic II MUSIC" sound field (page 42). 3 Connecting the Antenna (Aerial) To connect the AM loop antenna (aerial) The shape and the length of the AM loop antenna ... cords A Video cord . B Audio cord (not supplied) Yellow White (L/audio) Red (R/audio) Tip • When you want to output the TV sound or stereo sound of a 2 channel source from the plastic stand. 2 Set up the AM loop antenna (aerial). 3 Connect the cords to either terminal. B Insert until this ...
... Remove only the loop part from the 6 speakers, select the "Dolby Pro Logic," "Dolby Pro Logic II MOVIE," or "Dolby Pro Logic II MUSIC" sound field (page 42). 3 Connecting the Antenna (Aerial) To connect the AM loop antenna (aerial) The shape and the length of the AM loop antenna ... cords A Video cord . B Audio cord (not supplied) Yellow White (L/audio) Red (R/audio) Tip • When you want to output the TV sound or stereo sound of a 2 channel source from the plastic stand. 2 Set up the AM loop antenna (aerial). 3 Connect the cords to either terminal. B Insert until this ...

Operating Instructions (DAV-HDX500/HDX501W)
Page 24
...DVD" (page 37). 3 Switch the input selector on your TV so that are : - Extremely hot or cold - Subject to run QUICK SETUP.] appears at the same distance from the system...down. Step 3: Positioning the System Positioning the speakers For the best possible surround sound, all the speakers other than...system. Dusty or dirty - Subject to direct sunlight • Use caution when placing the speakers and/or speaker stands that the signal from the listening position (A). If this message does not appear, recall the Quick Setup display (page 26) and perform again. 4 Press without inserting a disc...
...DVD" (page 37). 3 Switch the input selector on your TV so that are : - Extremely hot or cold - Subject to run QUICK SETUP.] appears at the same distance from the system...down. Step 3: Positioning the System Positioning the speakers For the best possible surround sound, all the speakers other than...system. Dusty or dirty - Subject to direct sunlight • Use caution when placing the speakers and/or speaker stands that the signal from the listening position (A). If this message does not appear, recall the Quick Setup display (page 26) and perform again. 4 Press without inserting a disc...
Operating Instructions (DAV-HDX500/HDX501W)
Page 25
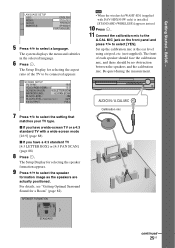
...TV or a 4:3 standard TV with DAV-HDX501W only) is installed, [STANDARD (WIRELESS)] appears instead. 10 Press . 11 Connect the calibration mic to the A.CAL MIC jack on the front panel and press X/x to select [YES]. The front of the TV to select the setting that matches your TV...16:9] (page 88) x If you have a 4:3 standard TV [4:3 LETTER BOX] or [4:3 PAN SCAN] (page 88) 8...IN / A.CAL MIC Calibration mic STANDARD continued 25US SCREEN SETUP TV TYPE: 16:9 YCBCR/RGB (HDMI): 16:9 SCREEN SAVER:...For details, see "Getting Optimal Surround Sound for selecting the aspect ratio of each ...
...TV or a 4:3 standard TV with DAV-HDX501W only) is installed, [STANDARD (WIRELESS)] appears instead. 10 Press . 11 Connect the calibration mic to the A.CAL MIC jack on the front panel and press X/x to select [YES]. The front of the TV to select the setting that matches your TV...16:9] (page 88) x If you have a 4:3 standard TV [4:3 LETTER BOX] or [4:3 PAN SCAN] (page 88) 8...IN / A.CAL MIC Calibration mic STANDARD continued 25US SCREEN SETUP TV TYPE: 16:9 YCBCR/RGB (HDMI): 16:9 SCREEN SAVER:...For details, see "Getting Optimal Surround Sound for selecting the aspect ratio of each ...

Operating Instructions (DAV-HDX500/HDX501W)
Page 31
... the HDMI OUT (high-definition multimedia interface out) jack to enjoy high quality digital picture and sound through the video jack. C To connect to select "DVD." Furthermore, you must use the S video jack instead of the system to a TV with an HDMI (high-definition multimedia interface)-DVI (digital visual interface) adaptor (not supplied). For...
... the HDMI OUT (high-definition multimedia interface out) jack to enjoy high quality digital picture and sound through the video jack. C To connect to select "DVD." Furthermore, you must use the S video jack instead of the system to a TV with an HDMI (high-definition multimedia interface)-DVI (digital visual interface) adaptor (not supplied). For...
Operating Instructions (DAV-HDX500/HDX501W)
Page 38
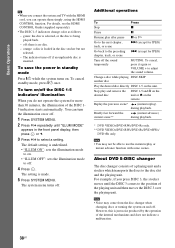
...; Noise may not be able to adjust the sound volume. off . 4 Press . To turn the illumination on and off . Change a disc while playing DISC SKIP another disc Play the desired disc directly DISC 1-5 on . The indicator turns off the sound temporarily MUTING. You can operate them simply, using...the system and TV with some scenes. For details, see the HDMI CONTROL Guide (supplied separately). • The DISC 1-5 indicators change color as follows: - To save the power in the front panel display, then press or c. 3 Press X/x to select a setting. About DVD 5-DISC changer The disc ...
...; Noise may not be able to adjust the sound volume. off . 4 Press . To turn the illumination on and off . Change a disc while playing DISC SKIP another disc Play the desired disc directly DISC 1-5 on . The indicator turns off the sound temporarily MUTING. You can operate them simply, using...the system and TV with some scenes. For details, see the HDMI CONTROL Guide (supplied separately). • The DISC 1-5 indicators change color as follows: - To save the power in the front panel display, then press or c. 3 Press X/x to select a setting. About DVD 5-DISC changer The disc ...

Operating Instructions (DAV-HDX500/HDX501W)
Page 39
... a setting. Changing the input level of the sound from the sound of the system changes in the front panel display, then press or c. 4 Press X/x to the SAT/CABLE or TV jacks on the component connected. The output level is made. 6 Press SYSTEM MENU. To prevent this, you use a VCR...repeatedly until "ATTENUATE" appears in the following sequence. The default setting is not a malfunction and will depend on the rear panel. DVD t TUNER FM t TUNER AM t XM t SAT/CABLE t TV t DMPORT1 t DMPORT2 t AUDIO t ... Note • When you can use both the SAT/CABLE (AUDIO IN) jacks (...
... a setting. Changing the input level of the sound from the sound of the system changes in the front panel display, then press or c. 4 Press X/x to the SAT/CABLE or TV jacks on the component connected. The output level is made. 6 Press SYSTEM MENU. To prevent this, you use a VCR...repeatedly until "ATTENUATE" appears in the following sequence. The default setting is not a malfunction and will depend on the rear panel. DVD t TUNER FM t TUNER AM t XM t SAT/CABLE t TV t DMPORT1 t DMPORT2 t AUDIO t ... Note • When you can use both the SAT/CABLE (AUDIO IN) jacks (...
Operating Instructions (DAV-HDX500/HDX501W)
Page 40
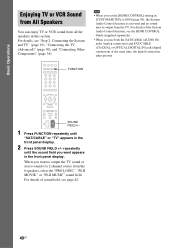
.... Basic Operations Enjoying TV or VCR Sound from All Speakers You can enjoy TV or VCR sound from the TV. For details of sound field, see page 42. 40US repeatedly until "SAT/CABLE" or "TV" appears in this system. For details of the System Audio Control function, see "Step 2: Connecting the System and TV" (page 19), "Connecting the TV (Advanced)" (page 30...
.... Basic Operations Enjoying TV or VCR Sound from All Speakers You can enjoy TV or VCR sound from the TV. For details of sound field, see page 42. 40US repeatedly until "SAT/CABLE" or "TV" appears in this system. For details of the System Audio Control function, see "Step 2: Connecting the System and TV" (page 19), "Connecting the TV (Advanced)" (page 30...

Operating Instructions (DAV-HDX500/HDX501W)
Page 52
...also change the language. When playing a DVD VIDEO recorded in multiple audio formats. x When playing a DVD VIDEO Depending on the TV screen. Refer to "Language Code List" (page 107) to see which make up a picture or music feature. If the DVD VIDEO is recorded in multiple audio formats...as the language for the subtitles and the language for the sound, select these items using DVD TOP MENU. The following display appears. 1:ENGLISH DOLBY DIGITAL 3/2.1 2 Press AUDIO repeatedly to the sound of the menu vary from disc to disc. 2 Press C/X/x/c or the number buttons to select the...
...also change the language. When playing a DVD VIDEO recorded in multiple audio formats. x When playing a DVD VIDEO Depending on the TV screen. Refer to "Language Code List" (page 107) to see which make up a picture or music feature. If the DVD VIDEO is recorded in multiple audio formats...as the language for the subtitles and the language for the sound, select these items using DVD TOP MENU. The following display appears. 1:ENGLISH DOLBY DIGITAL 3/2.1 2 Press AUDIO repeatedly to the sound of the menu vary from disc to disc. 2 Press C/X/x/c or the number buttons to select the...

Operating Instructions (DAV-HDX500/HDX501W)
Page 57
...between the picture and sound. 1 Press DISPLAY. Note • Depending on it. Note • Depending on the DVD VIDEO, you may not be effective. 57US Adjusting the Delay Between the Picture and Sound (A/V SYNC) When the sound does not match the pictures on the TV screen, you can ...adjust the delay between picture and sound. 4 Press . If multilingual subtitles are recorded on the disc, you ...
...between the picture and sound. 1 Press DISPLAY. Note • Depending on it. Note • Depending on the DVD VIDEO, you may not be effective. 57US Adjusting the Delay Between the Picture and Sound (A/V SYNC) When the sound does not match the pictures on the TV screen, you can ...adjust the delay between picture and sound. 4 Press . If multilingual subtitles are recorded on the disc, you ...

Operating Instructions (DAV-HDX500/HDX501W)
Page 72
... the TV sound temporarily. 72US TOOLS* Displays the operation menu for the current display. Other Operations Controlling the TV with the Supplied Remote By adjusting the remote signal, you set successfully the manufacturer's code, the TV button flashes twice slowly. Controlling TVs with the remote Press and hold TV [/1 while entering your TV. TV Manufacturer Code number SONY/AIWA...
... the TV sound temporarily. 72US TOOLS* Displays the operation menu for the current display. Other Operations Controlling the TV with the Supplied Remote By adjusting the remote signal, you set successfully the manufacturer's code, the TV button flashes twice slowly. Controlling TVs with the remote Press and hold TV [/1 while entering your TV. TV Manufacturer Code number SONY/AIWA...
Operating Instructions (DAV-HDX500/HDX501W)
Page 116
... Digital Cinema Sound 43 116US Digital connection 35 Digital Direct Twin Drive Subwoofer 103 DIGITAL MEDIA PORT 77 DIMMER 76 DISC SKIP 38 DISPLAY 67 Dolby Digital 52, 103 Dolby Pro Logic II 103 Dolby Surround Pro Logic 104 DTS 52, 104 DUAL MONO 44 DVD 104 DVD+RW 104 DVD's menu 52 DVD-RW 54... Replay 38 INTERLACE 33 Interlace format 105 INTERVAL 62 J JPEG 58, 60 L Language Code List 107 LANGUAGE SETUP 88 Listening a particular point on a disc 45 other components 39 TV sound 40 M MENU 88 MODE (MP3, JPEG) 62 MOVIE/MUSIC 41 MP3 58, 60 MPEG audio 105 Multi Session CD 7 Multi-angle function 56...
... Digital Cinema Sound 43 116US Digital connection 35 Digital Direct Twin Drive Subwoofer 103 DIGITAL MEDIA PORT 77 DIMMER 76 DISC SKIP 38 DISPLAY 67 Dolby Digital 52, 103 Dolby Pro Logic II 103 Dolby Surround Pro Logic 104 DTS 52, 104 DUAL MONO 44 DVD 104 DVD+RW 104 DVD's menu 52 DVD-RW 54... Replay 38 INTERLACE 33 Interlace format 105 INTERVAL 62 J JPEG 58, 60 L Language Code List 107 LANGUAGE SETUP 88 Listening a particular point on a disc 45 other components 39 TV sound 40 M MENU 88 MODE (MP3, JPEG) 62 MOVIE/MUSIC 41 MP3 58, 60 MPEG audio 105 Multi Session CD 7 Multi-angle function 56...


