
Limited Warranty (US Only)
Page 1
... parts for a period of protection, to any accessories) against defects in material or workmanship as fuses or batteries). This warranty does not cover customer instruction, installation, set up adjustments or signal reception problems. This warranty does not cover cosmetic damage or damage due to acts of God, accident, misuse, abuse, negligence, commercial use, or modification of, or to any part of a service problem...
... parts for a period of protection, to any accessories) against defects in material or workmanship as fuses or batteries). This warranty does not cover customer instruction, installation, set up adjustments or signal reception problems. This warranty does not cover cosmetic damage or damage due to acts of God, accident, misuse, abuse, negligence, commercial use, or modification of, or to any part of a service problem...

DAVFX100W Instructions (entire component system)
Page 2
... important operating and maintenance (servicing) instructions in a particular installation. Caution - Reorient or relocate the receiving antenna (aerial). - For the customers in the space provided below. To disconnect the cord, pull it for help. Record the serial number in Canada CAUTION TO PREVENT ELECTRIC SHOCK, MATCH WIDE BLADE OF PLUG TO WIDE SLOT, FULLY INSERT. This equipment generates, uses, and can be connected...
... important operating and maintenance (servicing) instructions in a particular installation. Caution - Reorient or relocate the receiving antenna (aerial). - For the customers in the space provided below. To disconnect the cord, pull it for help. Record the serial number in Canada CAUTION TO PREVENT ELECTRIC SHOCK, MATCH WIDE BLADE OF PLUG TO WIDE SLOT, FULLY INSERT. This equipment generates, uses, and can be connected...

DAVFX100W Instructions (entire component system)
Page 4
... Manual 6 This System Can Play the Following Discs 6 Guide to the Control Menu Display...... 10 Getting Started Unpacking 13 Inserting Batteries into the Remote....... 13 Hookup Overview 14 Step 1: Speaker System Hookup........... 15 Step 2: Antenna (Aerial) Hookup ......... 25 Step 3: TV Hookup 26 Step 4: Other Component Hookup........ 31 Step 5: Connecting the AC Power Cord (Mains Lead 33 Step 6: Turning off the Demonstration 33 Step 7: Adjusting the Wireless System 34 Step 8: Performing the Quick Setup ..... 36 Speaker Setup 38 Playing Discs Playing Discs 40 Using the DVD's Menu...
... Manual 6 This System Can Play the Following Discs 6 Guide to the Control Menu Display...... 10 Getting Started Unpacking 13 Inserting Batteries into the Remote....... 13 Hookup Overview 14 Step 1: Speaker System Hookup........... 15 Step 2: Antenna (Aerial) Hookup ......... 25 Step 3: TV Hookup 26 Step 4: Other Component Hookup........ 31 Step 5: Connecting the AC Power Cord (Mains Lead 33 Step 6: Turning off the Demonstration 33 Step 7: Adjusting the Wireless System 34 Step 8: Performing the Quick Setup ..... 36 Speaker Setup 38 Playing Discs Playing Discs 40 Using the DVD's Menu...
DAVFX100W Instructions (entire component system)
Page 5
Settings and Adjustments Using the Setup Display 81 Setting the Display or Sound Track Language 82 [LANGUAGE SETUP] Settings for the Display 83 [SCREEN SETUP] Custom Settings 85 [CUSTOM SETUP] Settings for the Speakers 86 [SPEAKER SETUP] Additional Information Precautions 89 Notes about the Discs 90 Troubleshooting 90 Self-diagnosis Function 94 (When letters/numbers appear in the display) Specifications 94 Glossary 96 Language Code List 99 Index to Parts and Controls 100 DVD Setup Display List 106 AMP Menu List 108 Index 109 5US
Settings and Adjustments Using the Setup Display 81 Setting the Display or Sound Track Language 82 [LANGUAGE SETUP] Settings for the Display 83 [SCREEN SETUP] Custom Settings 85 [CUSTOM SETUP] Settings for the Speakers 86 [SPEAKER SETUP] Additional Information Precautions 89 Notes about the Discs 90 Troubleshooting 90 Self-diagnosis Function 94 (When letters/numbers appear in the display) Specifications 94 Glossary 96 Language Code List 99 Index to Parts and Controls 100 DVD Setup Display List 106 AMP Menu List 108 Index 109 5US

DAVFX100W Instructions (entire component system)
Page 11
... Control Menu 2 for DATA CDs. *4 Displays the date for picture and music searching. Displays the DVD/CD text or the MP3 track name. [MULTI/2CH] (page 46) Selects the playback area on Super Audio CDs when available. [PROGRAM] (page 42) Selects the track to play in the order you can adjust various other settings. [RESET] Returns the settings in [SETUP] to the default setting. To turn off the display Press DISPLAY. Input the time code...
... Control Menu 2 for DATA CDs. *4 Displays the date for picture and music searching. Displays the DVD/CD text or the MP3 track name. [MULTI/2CH] (page 46) Selects the playback area on Super Audio CDs when available. [PROGRAM] (page 42) Selects the track to play in the order you can adjust various other settings. [RESET] Returns the settings in [SETUP] to the default setting. To turn off the display Press DISPLAY. Input the time code...
DAVFX100W Instructions (entire component system)
Page 57
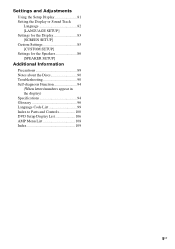
... selected. 2 Press ENTER. [T **:**:**] changes to search for a chapter (DVD VIDEO/DVD-RW) or track (Super Audio CD/CD) by pressing CLEAR, then select another number. 5 Press ENTER. If you can search for . Tip • When the Control Menu display is turned off, you make a mistake Cancel the number by pressing the number buttons and ENTER. Playing Discs [INDEX] x When playing a VIDEO CD/Super VCD with PBC Playback [SCENE] x When playing a Super Audio...
... selected. 2 Press ENTER. [T **:**:**] changes to search for a chapter (DVD VIDEO/DVD-RW) or track (Super Audio CD/CD) by pressing CLEAR, then select another number. 5 Press ENTER. If you can search for . Tip • When the Control Menu display is turned off, you make a mistake Cancel the number by pressing the number buttons and ENTER. Playing Discs [INDEX] x When playing a VIDEO CD/Super VCD with PBC Playback [SCENE] x When playing a Super Audio...
DAVFX100W Instructions (entire component system)
Page 66
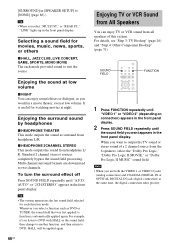
... the front panel display. 2 Press SOUND FIELD repeatedly until "A.F.D. Enjoying the sound at low volume. Multi channel surround formats are downmixed to two channels. It is automatically applied again. x HEADPHONE 2CHANNEL STEREO This mode outputs the sound from headphone L/R. Standard 2 channel (stereo) sources completely bypass the sound field processing. Note • When you select a function such as you want to output the TV sound or stereo sound of a 2 channel source from all speakers of this system. AUTO" or "2CH STEREO" appears...
... the front panel display. 2 Press SOUND FIELD repeatedly until "A.F.D. Enjoying the sound at low volume. Multi channel surround formats are downmixed to two channels. It is automatically applied again. x HEADPHONE 2CHANNEL STEREO This mode outputs the sound from headphone L/R. Standard 2 channel (stereo) sources completely bypass the sound field processing. Note • When you select a function such as you want to output the TV sound or stereo sound of a 2 channel source from all speakers of this system. AUTO" or "2CH STEREO" appears...
DAVFX100W Instructions (entire component system)
Page 71
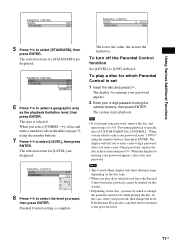
... you to change the level. The lower the value, the stricter the limitation. Note • The Control Menu display will ask you select [OTHERS t], select and enter a standard code in the system and press H. The area is complete. Tip • If you want, then press ENTER. To play discs which Parental Control is canceled, the level returns to enter your 4-digit password using the number buttons, then press...
... you to change the level. The lower the value, the stricter the limitation. Note • The Control Menu display will ask you select [OTHERS t], select and enter a standard code in the system and press H. The area is complete. Tip • If you want, then press ENTER. To play discs which Parental Control is canceled, the level returns to enter your 4-digit password using the number buttons, then press...

DAVFX100W Instructions (entire component system)
Page 74
... CH + THEATRE SYNC TV/VIDEO ALBUM -/+ Number buttons CLEAR With cover opened. Preparing for the THEATRE SYNC function Register the TV's input source connected to "DVD," and then switches the TV's input source you set the TV's input source code, the TV button flashes twice slowly. * To use some of your TV. 74US Note • Depending on your SONY TV and this system, changes the system mode to this system (see the instructions of the buttons above. • The TV mode turns off...
... CH + THEATRE SYNC TV/VIDEO ALBUM -/+ Number buttons CLEAR With cover opened. Preparing for the THEATRE SYNC function Register the TV's input source connected to "DVD," and then switches the TV's input source you set the TV's input source code, the TV button flashes twice slowly. * To use some of your TV. 74US Note • Depending on your SONY TV and this system, changes the system mode to this system (see the instructions of the buttons above. • The TV mode turns off...

DAVFX100W Instructions (entire component system)
Page 77
Enjoying the Radio PRESET -/+ C/X/x/c ENTER FUNCTION TUNING -/+ VOLUME +/- until "Memory?" appears in the front panel display. • MAIN/SUB: main sound is output from the left speaker and Sub sound is output from the right speaker. 4 Press ENTER or AMP MENU. A preset number appears in the front panel display. 5 Press ENTER. The AMP menu turns off. Other Operations CLEAR With cover opened. "TUNED" and "ST" (for stereo program) appear in the front panel display. 3 Press TUNER MENU. 4 Press C/X/x/c repeatedly until the auto scanning starts. continued...
Enjoying the Radio PRESET -/+ C/X/x/c ENTER FUNCTION TUNING -/+ VOLUME +/- until "Memory?" appears in the front panel display. • MAIN/SUB: main sound is output from the left speaker and Sub sound is output from the right speaker. 4 Press ENTER or AMP MENU. A preset number appears in the front panel display. 5 Press ENTER. The AMP menu turns off. Other Operations CLEAR With cover opened. "TUNED" and "ST" (for stereo program) appear in the front panel display. 3 Press TUNER MENU. 4 Press C/X/x/c repeatedly until the auto scanning starts. continued...
DAVFX100W Instructions (entire component system)
Page 82
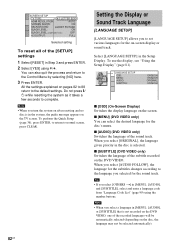
... "Using the Setup Display" (page 81). Do not press [/ 1 while resetting the system as it takes a few seconds to set various languages for the disc's menu. Setting the Display or Sound Track Language [LANGUAGE SETUP] [LANGUAGE SETUP] allows you selected for the subtitles changes according to the Control Menu by selecting [NO] here. 3 Press ENTER. x [AUDIO] (DVD VIDEO only) Switches the language of the subtitle recorded on the screen. Select [LANGUAGE SETUP] in the disc is selected. x [MENU] (DVD VIDEO...
... "Using the Setup Display" (page 81). Do not press [/ 1 while resetting the system as it takes a few seconds to set various languages for the disc's menu. Setting the Display or Sound Track Language [LANGUAGE SETUP] [LANGUAGE SETUP] allows you selected for the subtitles changes according to the Control Menu by selecting [NO] here. 3 Press ENTER. x [AUDIO] (DVD VIDEO only) Switches the language of the subtitle recorded on the screen. Select [LANGUAGE SETUP] in the disc is selected. x [MENU] (DVD VIDEO...
DAVFX100W Instructions (entire component system)
Page 85
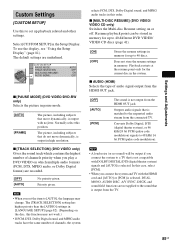
... 40 discs. Settings and Adjustments Custom Settings [CUSTOM SETUP] Use this to set the item to [AUTO], the language may not work.) • If PCM, DTS, Dolby Digital sound, and MPEG audio tracks have the same number of channels, the system selects PCM, DTS, Dolby Digital sound, and MPEG audio tracks in high resolution. x [MULTI-DISC RESUME] (DVD VIDEO/ VIDEO CD only) Switches the Multi-disc Resume setting on which contains the highest number of audio signal output from the HDMI OUT jack. [OFF] [AUTO] [PCM] The sound is selected. The default settings are...
... 40 discs. Settings and Adjustments Custom Settings [CUSTOM SETUP] Use this to set the item to [AUTO], the language may not work.) • If PCM, DTS, Dolby Digital sound, and MPEG audio tracks have the same number of channels, the system selects PCM, DTS, Dolby Digital sound, and MPEG audio tracks in high resolution. x [MULTI-DISC RESUME] (DVD VIDEO/ VIDEO CD only) Switches the Multi-disc Resume setting on which contains the highest number of audio signal output from the HDMI OUT jack. [OFF] [AUTO] [PCM] The sound is selected. The default settings are...
DAVFX100W Instructions (entire component system)
Page 86
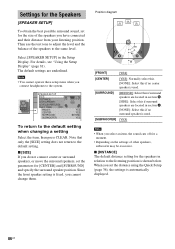
... surround speaker position. Note that only the [SIZE] setting does not return to the default setting when changing a setting Select the item, then press CLEAR. Since the front speaker setting is automatically displayed. 86US SPEAKER SETUP SIZE: DISTANCE: LEVEL(FRONT): LEVEL(SURROUND): TEST TONE: OFF FRONT: CENTER: SURROUND: SUBWOOFER: YES YES BEHIND YES To return to the default setting. Position diagram A B 90 A 45 B 20 [FRONT] [YES] [CENTER] [YES]: Normally select this. [NONE]: Select this if no center speaker is used . [SUBWOOFER...
... surround speaker position. Note that only the [SIZE] setting does not return to the default setting when changing a setting Select the item, then press CLEAR. Since the front speaker setting is automatically displayed. 86US SPEAKER SETUP SIZE: DISTANCE: LEVEL(FRONT): LEVEL(SURROUND): TEST TONE: OFF FRONT: CENTER: SURROUND: SUBWOOFER: YES YES BEHIND YES To return to the default setting. Position diagram A B 90 A 45 B 20 [FRONT] [YES] [CENTER] [YES]: Normally select this. [NONE]: Select this if no center speaker is used . [SUBWOOFER...

DAVFX100W Instructions (entire component system)
Page 90
... system is not connected to help remedy the problem before requesting repairs. Wipe the disc from the wall outlet (mains), reconnect, and then turn the surround amplifier on the TV is connected securely. Using neither standard nor circular discs (e.g., card, heart, or star shape) may rise considerably inside the car. • After playing, store the disc in the front panel display. Troubleshooting If you using the system, use a disc that the AC power cord...
... system is not connected to help remedy the problem before requesting repairs. Wipe the disc from the wall outlet (mains), reconnect, and then turn the surround amplifier on the TV is connected securely. Using neither standard nor circular discs (e.g., card, heart, or star shape) may rise considerably inside the car. • After playing, store the disc in the front panel display. Troubleshooting If you using the system, use a disc that the AC power cord...

DAVFX100W Instructions (entire component system)
Page 91
... system using a video jack other options. Sound There is no sound from the subwoofer. • Check the speaker connections and settings (page 15, 86). • Set the sound field to "AUTO FORMAT DIRECT AUTO" (page 64). The sound loses stereo effect when you can see the on-screen displays. See page 101. • If the HDMI OUT jack is used for video output, changing the [HDMI RESOLUTION] setting in Slow-motion Play mode. There is no sound. • The speaker cord is not connected...
... system using a video jack other options. Sound There is no sound from the subwoofer. • Check the speaker connections and settings (page 15, 86). • Set the sound field to "AUTO FORMAT DIRECT AUTO" (page 64). The sound loses stereo effect when you can see the on-screen displays. See page 101. • If the HDMI OUT jack is used for video output, changing the [HDMI RESOLUTION] setting in Slow-motion Play mode. There is no sound. • The speaker cord is not connected...

DAVFX100W Instructions (entire component system)
Page 92
... turns red. • The indicator momentarily turns red. The POWER/ON LINE indicator flashes in red. • Move the wireless system away from the surround speakers. • Check the speaker connections and settings. • Make sure the sound field function is not a malfunction. Preset the stations (page 77). • Press DISPLAY so that the frequency appears in [MODE (MP3, JPEG)] (page 52). • Depending on the source, the effect of the center speaker may be played...
... turns red. • The indicator momentarily turns red. The POWER/ON LINE indicator flashes in red. • Move the wireless system away from the surround speakers. • Check the speaker connections and settings. • Make sure the sound field function is not a malfunction. Preset the stations (page 77). • Press DISPLAY so that the frequency appears in [MODE (MP3, JPEG)] (page 52). • Depending on the source, the effect of the center speaker may be played...

DAVFX100W Instructions (entire component system)
Page 97
... Video mode. DVD+RWs use a recording format that processes allocated data according to the status of the picture. The HDMI connection carries standard to high definition video signals and multi-channel audio signals to AV components such as a CD. Since the video signals are skipped or replaced with the current DVI (digital visual interface) format, HDMI jacks can be connected to DVI (digital visual interface) jacks by the age of the users according to the limitation level...
... Video mode. DVD+RWs use a recording format that processes allocated data according to the status of the picture. The HDMI connection carries standard to high definition video signals and multi-channel audio signals to AV components such as a CD. Since the video signals are skipped or replaced with the current DVI (digital visual interface) format, HDMI jacks can be connected to DVI (digital visual interface) jacks by the age of the users according to the limitation level...

DAVFX100W Instructions (entire component system)
Page 109
... 7 Multi-angle function 68, 97 MULTI-DISC RESUME 85 Multilingual function 97 Multiplex broadcast sound 76 Muting 41 N Naming preset stations 78 O On-screen display Control Menu display 10 Setup Display 81 ORIGINAL 46 OSD 82 Other Component Hookup 31 P PARENTAL CONTROL 70, 97 PAUSE MODE 85 PBC Playback 7, 47, 97 PICTURE NAVI 51, 58 PLAY LIST 46 Preset Station 77 Program Play 42 PROGRESSIVE AUTO 28 Progressive format 28, 98 PROGRESSIVE VIDEO 28 Q Quick Setup 36 R Radio 78 Rear Panel 102 Region Code 8, 98 Remote...
... 7 Multi-angle function 68, 97 MULTI-DISC RESUME 85 Multilingual function 97 Multiplex broadcast sound 76 Muting 41 N Naming preset stations 78 O On-screen display Control Menu display 10 Setup Display 81 ORIGINAL 46 OSD 82 Other Component Hookup 31 P PARENTAL CONTROL 70, 97 PAUSE MODE 85 PBC Playback 7, 47, 97 PICTURE NAVI 51, 58 PLAY LIST 46 Preset Station 77 Program Play 42 PROGRESSIVE AUTO 28 Progressive format 28, 98 PROGRESSIVE VIDEO 28 Q Quick Setup 36 R Radio 78 Rear Panel 102 Region Code 8, 98 Remote...

Marketing Specifications
Page 1
Key Features s DIAT™ wireless technology2 s HDMI™ connector w/ 720p 1080i video upscale3 s 5 Disc Slot Loading DVD/CD/SA-CD s 1000W Total System Power (143Watts x 55 and 285Watts to the Sub) s Dolby® Digital, dts®, Dolby® Pro Logic® II Decoding s Aluminum Top Finish s Precision Cinema Progressive™ (PCP) technology s A/V Sync (Lip Sync) s "Digital Direct Twin Drive" Subwoofer s S-Master® Digital Amplifier s Four Floor or Shelf Standing Speakers s Digital Coax/Optical Input for D-Cable/SAT DAV-FX100W Wireless DVD Dream® System2
Key Features s DIAT™ wireless technology2 s HDMI™ connector w/ 720p 1080i video upscale3 s 5 Disc Slot Loading DVD/CD/SA-CD s 1000W Total System Power (143Watts x 55 and 285Watts to the Sub) s Dolby® Digital, dts®, Dolby® Pro Logic® II Decoding s Aluminum Top Finish s Precision Cinema Progressive™ (PCP) technology s A/V Sync (Lip Sync) s "Digital Direct Twin Drive" Subwoofer s S-Master® Digital Amplifier s Four Floor or Shelf Standing Speakers s Digital Coax/Optical Input for D-Cable/SAT DAV-FX100W Wireless DVD Dream® System2

Marketing Specifications
Page 2
... Audio Input(s): 2 (Rear) Optical Audio Input(s): 1 (Rear) Coaxial Audio Digital Input(s): 1 (Rear) Composite Video Input(s): 2 (Rear) Composite Video Output(s): 1 (Rear) S-Video Output(s): 1 (Rear) Component Video (Y/Pb/Pr) Output(s): 1 (Rear) HDMI Connection Output(s): 1 (Rear) Headphone Input(s): Headphone Jack (3.5mm) Speaker Terminal Type: Front, Center, Surround, Subwoofer (DAV Modular Connector) Audio Digital Amplifier: S-Master® Digital Amplifier Sound Mode: Bass Boost function-DSGX, Dolby® Digital, dts®, Dolby® Pro Logic® II Decoding, Digital Cinema Sound...
... Audio Input(s): 2 (Rear) Optical Audio Input(s): 1 (Rear) Coaxial Audio Digital Input(s): 1 (Rear) Composite Video Input(s): 2 (Rear) Composite Video Output(s): 1 (Rear) S-Video Output(s): 1 (Rear) Component Video (Y/Pb/Pr) Output(s): 1 (Rear) HDMI Connection Output(s): 1 (Rear) Headphone Input(s): Headphone Jack (3.5mm) Speaker Terminal Type: Front, Center, Surround, Subwoofer (DAV Modular Connector) Audio Digital Amplifier: S-Master® Digital Amplifier Sound Mode: Bass Boost function-DSGX, Dolby® Digital, dts®, Dolby® Pro Logic® II Decoding, Digital Cinema Sound...


