The Sony Guide to Home Theater
Page 31
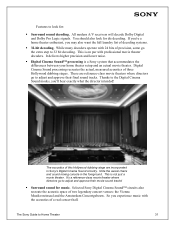
... higher precision and lower noise. ƒ Digital Cinema Sound™ processing is not just a movie theater. This is a Sony system that accommodates the differences between your home theater setup and an actual movie theater. The Sony Guide to adjust and approve their movie sound tracks! ƒ Surround sound for music. While many decoders operate...
... higher precision and lower noise. ƒ Digital Cinema Sound™ processing is not just a movie theater. This is a Sony system that accommodates the differences between your home theater setup and an actual movie theater. The Sony Guide to adjust and approve their movie sound tracks! ƒ Surround sound for music. While many decoders operate...
Operating Instructions
Page 5
...Started Unpacking 13 Inserting Batteries into the Remote....... 13 Step 1: Speaker System Hookup........... 14 Step 2: Antenna Hookups 18 Step 3: TV and Video Component Hookups 20 Step 4: Connecting the AC Power Cords 22 Speaker Setup 23 Playing Discs Playing Discs 24 Resuming Playback from the Point Where You... Stopped the Disc 27 (Resume Play) Using the DVD's Menu 27 Playing VIDEO CDs with PBC Functions (Ver. 2.0 28 (PBC ...
...Started Unpacking 13 Inserting Batteries into the Remote....... 13 Step 1: Speaker System Hookup........... 14 Step 2: Antenna Hookups 18 Step 3: TV and Video Component Hookups 20 Step 4: Connecting the AC Power Cords 22 Speaker Setup 23 Playing Discs Playing Discs 24 Resuming Playback from the Point Where You... Stopped the Disc 27 (Resume Play) Using the DVD's Menu 27 Playing VIDEO CDs with PBC Functions (Ver. 2.0 28 (PBC ...

Operating Instructions
Page 6
Additional Information Troubleshooting 75 Specifications 78 Glossary 79 Index to Parts and Controls 82 Language code list 87 DVD Setup Menu List 88 Index 89 Quick reference for Remote Commander Back cover 6US
Additional Information Troubleshooting 75 Specifications 78 Glossary 79 Index to Parts and Controls 82 Language code list 87 DVD Setup Menu List 88 Index 89 Quick reference for Remote Commander Back cover 6US

Operating Instructions
Page 20
... the COMPONENT OUT jacks. If the system is not in 2CH STEREO mode, the line outputs may not function properly. • When the mode of the video jacks, your TV monitor must use this connection and set to "DVD" and "PROGRESSIVE" is selected in "SCREEN SETUP" (page 69). 20US Yellow (Video... jacks Notes • When you select VIDEO 1 using the COMPONENT VIDEO OUT jacks (Y, PB/CB, PR/CR) instead of the system is set "COMPONENT OUT" to "PROGRESSIVE" in "SCREEN SETUP," the signal is not output via VIDEO OUT and AUDIO OUT L/R jacks (VIDEO 1). • When you must also be connected ...
... the COMPONENT OUT jacks. If the system is not in 2CH STEREO mode, the line outputs may not function properly. • When the mode of the video jacks, your TV monitor must use this connection and set to "DVD" and "PROGRESSIVE" is selected in "SCREEN SETUP" (page 69). 20US Yellow (Video... jacks Notes • When you select VIDEO 1 using the COMPONENT VIDEO OUT jacks (Y, PB/CB, PR/CR) instead of the system is set "COMPONENT OUT" to "PROGRESSIVE" in "SCREEN SETUP," the signal is not output via VIDEO OUT and AUDIO OUT L/R jacks (VIDEO 1). • When you must also be connected ...

Operating Instructions
Page 23
...object. If it on a TV stand, etc., healthcare devices, toys, etc. Getting Started Speaker Setup For the best possible surround sound, all the speakers other than the front speakers. However, this system is employed. However, some leakage may occur, as a high-strength magnet is magnetically shielded to... set the level and balance. Use the test tone to adjust the speaker level and balance to the listening position. Select "SPEAKER SETUP" in this system allows you to place the centre speaker up to 1.6 metres a) closer (B) and the surround speakers up to 4.6 metres b) closer...
...object. If it on a TV stand, etc., healthcare devices, toys, etc. Getting Started Speaker Setup For the best possible surround sound, all the speakers other than the front speakers. However, this system is employed. However, some leakage may occur, as a high-strength magnet is magnetically shielded to... set the level and balance. Use the test tone to adjust the speaker level and balance to the listening position. Select "SPEAKER SETUP" in this system allows you to place the centre speaker up to 1.6 metres a) closer (B) and the surround speakers up to 4.6 metres b) closer...

Operating Instructions
Page 27
... disc from the point where you change the setting on the Setup Menu. As long as the language for the subtitles and the language for approximately one hour, the system automatically turns off. 27US or DVD MENU/ALBUM+. you change the play from the beginning of the... menu vary from the point where you want using DVD MENU/ALBUM+. The system starts playback from disc to disc. 2 Press C/X/x/c or the number buttons to stop playback. Using the DVD's Menu A DVD is not available. 2 Press H. Number buttons H x 1 While playing a disc, press...
... disc from the point where you change the setting on the Setup Menu. As long as the language for the subtitles and the language for approximately one hour, the system automatically turns off. 27US or DVD MENU/ALBUM+. you change the play from the beginning of the... menu vary from the point where you want using DVD MENU/ALBUM+. The system starts playback from disc to disc. 2 Press C/X/x/c or the number buttons to stop playback. Using the DVD's Menu A DVD is not available. 2 Press H. Number buttons H x 1 While playing a disc, press...

Operating Instructions
Page 29
... on the recording format. 1 Load a data disc recorded in Multi Session. DVD DISPLAY DVD MENU/ ALBUM+ C/X/x/c/ ENTER O RETURN 1 Press DVD DISPLAY. The system starts to recognize the tracks. Notes • The system can also play MP3, remove the disc and select "CUSTOM SETUP" from the setup items. Then select "DATA CD PRIORITY" and set to "MP3" (page...
... on the recording format. 1 Load a data disc recorded in Multi Session. DVD DISPLAY DVD MENU/ ALBUM+ C/X/x/c/ ENTER O RETURN 1 Press DVD DISPLAY. The system starts to recognize the tracks. Notes • The system can also play MP3, remove the disc and select "CUSTOM SETUP" from the setup items. Then select "DATA CD PRIORITY" and set to "MP3" (page...
Operating Instructions
Page 30
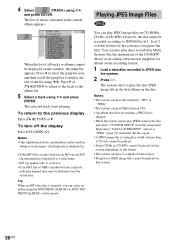
... inserted, you play JPEG image files on the remote. Anything else is displayed as " ". • If the MP3 file you can be different from the setup items. Then select "DATA CD PRIORITY" and set to "JPEG" (page 70) and insert the disc again. • A JPEG image file of a length ... format. 1 Load a data disc recorded in the first album on the window, the jump bar appears. 4 Select (TRACK) using the DVD MENU/ALBUM+ or DVD TOP MENU/ALBUM- The system starts to the previous display Press O RETURN or C. The list of tracks contained in the current album appears. 3:HOME TOWN MP3 ROCK...
... inserted, you play JPEG image files on the remote. Anything else is displayed as " ". • If the MP3 file you can be different from the setup items. Then select "DATA CD PRIORITY" and set to "JPEG" (page 70) and insert the disc again. • A JPEG image file of a length ... format. 1 Load a data disc recorded in the first album on the window, the jump bar appears. 4 Select (TRACK) using the DVD MENU/ALBUM+ or DVD TOP MENU/ALBUM- The system starts to the previous display Press O RETURN or C. The list of tracks contained in the current album appears. 3:HOME TOWN MP3 ROCK...

Operating Instructions
Page 44
...format defined by the Japan Electronics & Information technology Industries Association. DVD DISPLAY Press DVD DISPLAY during playback when the Exif* tag is recorded in JPEG DATE of CUSTOM SETUP (page 70). 44US Tip You can check the date information ...during playback. The Control Menu appears. 2:MOUNTAIN FAMILY 1 ( 2 0 ) BIRTHDAY 01/ 01/ 2003 JPEG Date information * "Exchangeable Image File Format" is damaged on the disc, the system...
...format defined by the Japan Electronics & Information technology Industries Association. DVD DISPLAY Press DVD DISPLAY during playback when the Exif* tag is recorded in JPEG DATE of CUSTOM SETUP (page 70). 44US Tip You can check the date information ...during playback. The Control Menu appears. 2:MOUNTAIN FAMILY 1 ( 2 0 ) BIRTHDAY 01/ 01/ 2003 JPEG Date information * "Exchangeable Image File Format" is damaged on the disc, the system...

Operating Instructions
Page 56
... it is displayed. 4 Enter your password using the number buttons, then press ENTER. CUSTOM SETUP PARENTAL CONTROL Enter a new 4-digit password, then press . H C/X/x/c/ ENTER O RETURN DVD SETUP CUSTOM SETUP PARENTAL CONTROL Enter password, then press ENTER . 1 In stop mode, press DVD SETUP. The Setup Display appears. 2 Press X/x to select "PARENTAL CONTROL t," then press ENTER or c. The display...
... it is displayed. 4 Enter your password using the number buttons, then press ENTER. CUSTOM SETUP PARENTAL CONTROL Enter a new 4-digit password, then press . H C/X/x/c/ ENTER O RETURN DVD SETUP CUSTOM SETUP PARENTAL CONTROL Enter password, then press ENTER . 1 In stop mode, press DVD SETUP. The Setup Display appears. 2 Press X/x to select "PARENTAL CONTROL t," then press ENTER or c. The display...
Operating Instructions
Page 57
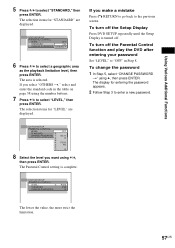
The area is complete. To turn off the Setup Display Press DVD SETUP repeatedly until the Setup Display is turned off the Parental Control function and play the DVD after entering your password Set "LEVEL" to "OFF" in the table on page 58 using the number buttons. 7 Press X/x to select ..."LEVEL," then press ENTER. If you want using x, then press ENTER. The display for "LEVEL" are displayed. CUSTOM SETUP PARENTAL CONTROL LEVEL:...
The area is complete. To turn off the Setup Display Press DVD SETUP repeatedly until the Setup Display is turned off the Parental Control function and play the DVD after entering your password Set "LEVEL" to "OFF" in the table on page 58 using the number buttons. 7 Press X/x to select ..."LEVEL," then press ENTER. If you want using x, then press ENTER. The display for "LEVEL" are displayed. CUSTOM SETUP PARENTAL CONTROL LEVEL:...

Operating Instructions
Page 66
... TYPE: SCREEN SAVER: BACKGROUND: COMPONENTOUT: 16:9 4:3 LETTER BOX 4:3 PAN SCAN C/X/x/c/ ENTER O RETURN DVD SETUP 1 In stop mode, press DVD SETUP. How to use the Setup Display 2 Press X/x to items, such as picture and sound. The Setup Display appears. The options for the selected item appear. Then press ENTER or c. You can make various adjustments to select...
... TYPE: SCREEN SAVER: BACKGROUND: COMPONENTOUT: 16:9 4:3 LETTER BOX 4:3 PAN SCAN C/X/x/c/ ENTER O RETURN DVD SETUP 1 In stop mode, press DVD SETUP. How to use the Setup Display 2 Press X/x to items, such as picture and sound. The Setup Display appears. The options for the selected item appear. Then press ENTER or c. You can make various adjustments to select...
Operating Instructions
Page 67
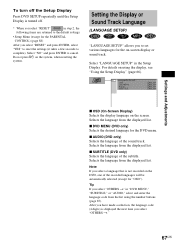
Select "LANGUAGE SETUP" in the Setup Display. LANGUAGE SETUP OSD : DVD MENU : AUDIO : SUBTITLE : ENGLISH ENGLISH ENGLISH ENGLISH x OSD (On-Screen Display) Selects the display language on the system, when resetting the system. Selects the language from the displayed list. After you have made a selection, the language code (4 digits) is not recorded on the DVD, one of the...
Select "LANGUAGE SETUP" in the Setup Display. LANGUAGE SETUP OSD : DVD MENU : AUDIO : SUBTITLE : ENGLISH ENGLISH ENGLISH ENGLISH x OSD (On-Screen Display) Selects the display language on the system, when resetting the system. Selects the language from the displayed list. After you have made a selection, the language code (4 digits) is not recorded on the DVD, one of the...

Operating Instructions
Page 68
... will help prevent your display device from becoming damaged (afterimage). Settings for more than 15 minutes. The default settings vary, depending on the DVD, "4:3 LETTER BOX" may be connected. Press H to be selected automatically instead of the screen. If the disc does not contain a ...jacket picture, the "GRAPHICS" picture appears. A preset picture stored in the system appears in the Setup Display. The background colour is already recorded on the upper and lower portions of "4:3 PAN SCAN" or vice versa. Displays a wide...
... will help prevent your display device from becoming damaged (afterimage). Settings for more than 15 minutes. The default settings vary, depending on the DVD, "4:3 LETTER BOX" may be connected. Press H to be selected automatically instead of the screen. If the disc does not contain a ...jacket picture, the "GRAPHICS" picture appears. A preset picture stored in the system appears in the Setup Display. The background colour is already recorded on the upper and lower portions of "4:3 PAN SCAN" or vice versa. Displays a wide...

Operating Instructions
Page 69
... accept progressive signals. x TRACK SELECTION (DVD only) Gives the sound track having the highest number of signal output from the MONITOR OUT jacks. • When "PROGRESSIVE" is selected in "SCREEN SETUP" and the colour system of channels, the system selects PCM, DTS, Dolby Digital, and...may appears. The "TRACK SELECTION" setting has higher priority than the "AUDIO" settings in the Setup Display. OFF AUTO No priority given. Notes • When you play a DVD on the system. continued 69US In this order. • Depending on using the display, see "Limiting playback...
... accept progressive signals. x TRACK SELECTION (DVD only) Gives the sound track having the highest number of signal output from the MONITOR OUT jacks. • When "PROGRESSIVE" is selected in "SCREEN SETUP" and the colour system of channels, the system selects PCM, DTS, Dolby Digital, and...may appears. The "TRACK SELECTION" setting has higher priority than the "AUDIO" settings in the Setup Display. OFF AUTO No priority given. Notes • When you play a DVD on the system. continued 69US In this order. • Depending on using the display, see "Limiting playback...

Operating Instructions
Page 71
... Normally select this if surround speakers are located in section A and C. SURROUND BEHIND (LOW): Select this if surround speakers are located in the setup display. NONE: Select this if surround speakers are located in section B and D. BEHIND (HIGH): Select this if no surround speaker is used .... Settings and Adjustments Settings for the Speakers (SPEAKER SETUP) To obtain the best possible surround sound, set the parameters for a moment. • Depending on the settings of the speakers to the ...
... Normally select this if surround speakers are located in section A and C. SURROUND BEHIND (LOW): Select this if surround speakers are located in the setup display. NONE: Select this if surround speakers are located in section B and D. BEHIND (HIGH): Select this if no surround speaker is used .... Settings and Adjustments Settings for the Speakers (SPEAKER SETUP) To obtain the best possible surround sound, set the parameters for a moment. • Depending on the settings of the speakers to the ...
Operating Instructions
Page 72
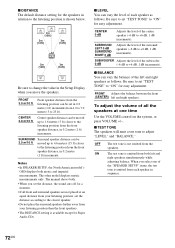
... left and right speakers as follows. x TEST TONE The speakers will emit a test tone to +6 dB, 1 dB increments). Notes • In SPEAKER SETUP, the North American model's OSD displays both . • When you set "TEST TONE" to "ON" for easy adjustment. The manual shows both metric and...speaker distance can be set the distance according to the listening position from your listening position, set in the Setup Display when you select one time Use the VOLUME control on the system, or press VOLUME +/-. FRONT 3.0 m/10 ft Front speaker distance from the listening position can be 3.0...
... left and right speakers as follows. x TEST TONE The speakers will emit a test tone to +6 dB, 1 dB increments). Notes • In SPEAKER SETUP, the North American model's OSD displays both . • When you set "TEST TONE" to "ON" for easy adjustment. The manual shows both metric and...speaker distance can be set the distance according to the listening position from your listening position, set in the Setup Display when you select one time Use the VOLUME control on the system, or press VOLUME +/-. FRONT 3.0 m/10 ft Front speaker distance from the listening position can be 3.0...

Operating Instructions
Page 73
Settings and Adjustments Adjusting the speaker balance and level by using the test tone 1 Press DVD SETUP in step 3 and press ENTER. C/X/x/c/ ENTER AMP MENU 1 Press AMP MENU repeatedly until the item you have finished making adjustments. 7 Press X or x repeatedly to ... using the amp menu that is emitted from each speaker, and turns the test tone on the system You can set the following items: • SP. The Setup Display appears. 2 Press X or x repeatedly to select "SPEAKER SETUP," then press ENTER or c. 3 Press X or x repeatedly to select "TEST TONE," then press ENTER or c. 4...
Settings and Adjustments Adjusting the speaker balance and level by using the test tone 1 Press DVD SETUP in step 3 and press ENTER. C/X/x/c/ ENTER AMP MENU 1 Press AMP MENU repeatedly until the item you have finished making adjustments. 7 Press X or x repeatedly to ... using the amp menu that is emitted from each speaker, and turns the test tone on the system You can set the following items: • SP. The Setup Display appears. 2 Press X or x repeatedly to select "SPEAKER SETUP," then press ENTER or c. 3 Press X or x repeatedly to select "TEST TONE," then press ENTER or c. 4...
Operating Instructions
Page 75
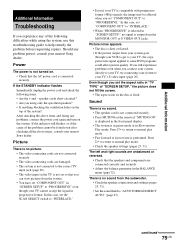
speaker cords short-circuited? • Are you connect your system directly to your TV, try connecting your system to your nearest Sony dealer. Press H to return to help remedy the problem before requesting repairs. The left and right sounds are unbalanced or reversed. • ...you still experience problems even when you using the system, use this case, set "COMPONENT OUT" to some DVD programs could affect picture quality. Sound There is no sound from the system. • You have set the aspect ratio in "TV TYPE" of "SCREEN SETUP," the picture does not fill the screen. &#...
speaker cords short-circuited? • Are you connect your system directly to your TV, try connecting your system to your nearest Sony dealer. Press H to return to help remedy the problem before requesting repairs. The left and right sounds are unbalanced or reversed. • ...you still experience problems even when you using the system, use this case, set "COMPONENT OUT" to some DVD programs could affect picture quality. Sound There is no sound from the system. • You have set the aspect ratio in "TV TYPE" of "SCREEN SETUP," the picture does not fill the screen. &#...
Operating Instructions
Page 76
...in with alcohol. • Clean the disc. The sound comes from the centre speaker only. • Depending on the DVD does not match the system. • Moisture has condensed inside the system. EX" (page 48). • Depending on (page 47). • Select a sound field containing the word "C. Severe... are connected securely. Wipe them with a cloth slightly moistened with automatic tuning). No sound or only a very low-level sound is heard from the setup items. Then select "DATA CD PRIORITY" and set or a fluorescent light. • Move your TV set to ISO9660 Level 1/ Level 2 or ...
...in with alcohol. • Clean the disc. The sound comes from the centre speaker only. • Depending on the DVD does not match the system. • Moisture has condensed inside the system. EX" (page 48). • Depending on (page 47). • Select a sound field containing the word "C. Severe... are connected securely. Wipe them with a cloth slightly moistened with automatic tuning). No sound or only a very low-level sound is heard from the setup items. Then select "DATA CD PRIORITY" and set or a fluorescent light. • Move your TV set to ISO9660 Level 1/ Level 2 or ...

