
Limited Warranty (US Only)
Page 1
... limitations or exclusions may not apply to any authorized Sony service facility. For your authorized dealer, call: 1-800-488-SONY (7669) Printed in material or workmanship as fuses or batteries). 4-557-172-02 General Stereo/Hifi Components/Tape Decks ® CD Players/Mini Disc Players/Audio Systems Hifi Audio LIMITED WARRANTY Sony Electronics Inc. ("Sony") warrants this Product is determined to be presented to...
... limitations or exclusions may not apply to any authorized Sony service facility. For your authorized dealer, call: 1-800-488-SONY (7669) Printed in material or workmanship as fuses or batteries). 4-557-172-02 General Stereo/Hifi Components/Tape Decks ® CD Players/Mini Disc Players/Audio Systems Hifi Audio LIMITED WARRANTY Sony Electronics Inc. ("Sony") warrants this Product is determined to be presented to...
Operating Instructions
Page 4
... Clean the cabinet, panel, and controls with a soft cloth slightly moistened with very low level inputs or no audio signals. On cleaning discs Do not use of holding a still video image or on-screen display image on the main unit. The system is played. On your TV's colour If the speakers should cause the TV screen to this case, remove the disc and leave the system turned on your television...
... Clean the cabinet, panel, and controls with a soft cloth slightly moistened with very low level inputs or no audio signals. On cleaning discs Do not use of holding a still video image or on-screen display image on the main unit. The system is played. On your TV's colour If the speakers should cause the TV screen to this case, remove the disc and leave the system turned on your television...
Operating Instructions
Page 5
... Controls 11 Guide to the Control Menu Display (Magic Pad 15 Getting Started 17 Quick Overview 17 Unpacking ...17 Inserting Batteries into the Remote 18 Step 1: Speaker System Hookup 18 Step 2: Antenna Hookups 21 Step 3: TV and Video Component Hookups 23 Speaker Setup 25 Presetting Radio Stations 30 Playing Discs 32 Playing Discs 32 Resuming Playback from the Point Where You Stopped the Disc (Resume Play 34 Using the DVD's Menu 35 Playing VIDEO CDs with PBC Functions (PBC Playback 36 Selecting the Disc Mode...
... Controls 11 Guide to the Control Menu Display (Magic Pad 15 Getting Started 17 Quick Overview 17 Unpacking ...17 Inserting Batteries into the Remote 18 Step 1: Speaker System Hookup 18 Step 2: Antenna Hookups 21 Step 3: TV and Video Component Hookups 23 Speaker Setup 25 Presetting Radio Stations 30 Playing Discs 32 Playing Discs 32 Resuming Playback from the Point Where You Stopped the Disc (Resume Play 34 Using the DVD's Menu 35 Playing VIDEO CDs with PBC Functions (PBC Playback 36 Selecting the Disc Mode...
Operating Instructions
Page 6
... Play Information (ADVANCED 54 Using Various Additional Functions 55 Locking Discs (CUSTOM PARENTAL CONTROL, PARENTAL CONTROL) ... 55 Other Operations 60 Controlling the TV with the Supplied Remote 60 Watching the Video or other Unit 61 Listening to the Radio 62 Using the Radio Data System (RDS) (Only for the European models 63 Naming Preset Stations 63 Settings and Adjustments 65 Using the Setup Display 65 Setting the Display or Sound Track Language (LANGUAGE SETUP 66 Settings for the Display (SCREEN SETUP...
... Play Information (ADVANCED 54 Using Various Additional Functions 55 Locking Discs (CUSTOM PARENTAL CONTROL, PARENTAL CONTROL) ... 55 Other Operations 60 Controlling the TV with the Supplied Remote 60 Watching the Video or other Unit 61 Listening to the Radio 62 Using the Radio Data System (RDS) (Only for the European models 63 Naming Preset Stations 63 Settings and Adjustments 65 Using the Setup Display 65 Setting the Display or Sound Track Language (LANGUAGE SETUP 66 Settings for the Display (SCREEN SETUP...

Operating Instructions
Page 16
... (page 40) ONE/ALL DISCS (page 37) ADVANCED (DVD only) (page 54) CUSTOM PARENTAL CONTROL (page 55) SETUP (page 65) Displays the subtitles. The "ANGLE" indicator lights up in green only when the angles can make various adjustments to items such as follows: , Control Menu display m ADVANCED display (Appears if you press DVD DISPLAY, the Control Menu display changes as picture and sound. CUSTOM Setup By using the Setup Display, you select "REPEAT" except "OFF."
... (page 40) ONE/ALL DISCS (page 37) ADVANCED (DVD only) (page 54) CUSTOM PARENTAL CONTROL (page 55) SETUP (page 65) Displays the subtitles. The "ANGLE" indicator lights up in green only when the angles can make various adjustments to items such as follows: , Control Menu display m ADVANCED display (Appears if you press DVD DISPLAY, the Control Menu display changes as picture and sound. CUSTOM Setup By using the Setup Display, you select "REPEAT" except "OFF."
Operating Instructions
Page 20
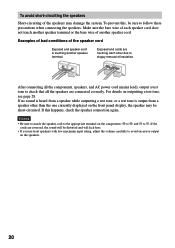
... speaker connection again. After connecting all the components, speakers, and AC power cord (mains lead), output a test tone to avoid excessive output on the front panel display, the speaker may damage the system. If this , be distorted and will lack bass. • If you use front speakers with low maximum input rating, adjust the volume carefully to check that all the speakers are touching each speaker cord does not touch another speaker terminal or the bare wire...
... speaker connection again. After connecting all the components, speakers, and AC power cord (mains lead), output a test tone to avoid excessive output on the front panel display, the speaker may damage the system. If this , be distorted and will lack bass. • If you use front speakers with low maximum input rating, adjust the volume carefully to check that all the speakers are touching each speaker cord does not touch another speaker terminal or the bare wire...
Operating Instructions
Page 24
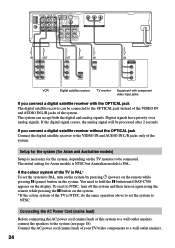
... models) Setup is NTSC, do the same operation above to set the system to the OPTICAL jack instead of the VIDEO IN and AUDIO IN L/R jacks of the system. The system can be connected to PAL, turn on again using the remote while pressing the X button on the display. Digital signals have priority over analog signals. Connect the AC power cord (mains lead) of the TV is PAL. If you connect a digital satellite receiver with the OPTICAL jack The digital...
... models) Setup is NTSC, do the same operation above to set the system to the OPTICAL jack instead of the VIDEO IN and AUDIO IN L/R jacks of the system. The system can be connected to PAL, turn on again using the remote while pressing the X button on the display. Digital signals have priority over analog signals. Connect the AC power cord (mains lead) of the TV is PAL. If you connect a digital satellite receiver with the OPTICAL jack The digital...
Operating Instructions
Page 26
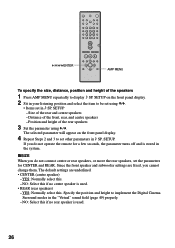
... front, rear, and centre speakers - SETUP. NO: Select this if no centre speaker is used . 26 Distance of the rear and centre speakers - Position and height of the speakers 1 Press AMP MENU repeatedly to implement the Digital Cinema Surround modes in 9 SP. The selected parameter will appear on the front panel display. 2 Sit in the system. Since the front speaker and subwoofer settings are underlined. • CENTER (centre speaker) - NO: Select this if no rear speaker is...
... front, rear, and centre speakers - SETUP. NO: Select this if no centre speaker is used . 26 Distance of the rear and centre speakers - Position and height of the speakers 1 Press AMP MENU repeatedly to implement the Digital Cinema Surround modes in 9 SP. The selected parameter will appear on the front panel display. 2 Sit in the system. Since the front speaker and subwoofer settings are underlined. • CENTER (centre speaker) - NO: Select this if no rear speaker is...
Operating Instructions
Page 29
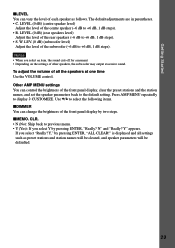
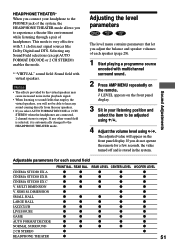
... steps. Getting Started xLEVEL You can control the brightness of the front panel display, clear the preset stations and the station names, and set the speaker parameters back to the default setting. LEVEL (0 dB) (rear speakers level) Adjust the level of the rear speakers (-6 dB to +6 dB, 1 dB steps). • R. Other AMP MENU settings You can vary the level of other speakers, the subwoofer may output excessive sound. xMEMO. Y" appears. The default adjustments are in parentheses. • C. CLR...
... steps. Getting Started xLEVEL You can control the brightness of the front panel display, clear the preset stations and the station names, and set the speaker parameters back to the default setting. LEVEL (0 dB) (rear speakers level) Adjust the level of the rear speakers (-6 dB to +6 dB, 1 dB steps). • R. Other AMP MENU settings You can vary the level of other speakers, the subwoofer may output excessive sound. xMEMO. Y" appears. The default adjustments are in parentheses. • C. CLR...
Operating Instructions
Page 33
Doing so may cancel the menu settings. When you turn off the system completely, press POWER on the remote. z On Auto-Function If a disc is being play and remove Press OPEN/CLOSE. Resume play mode Press >. To cancel muting, press it back simply by pressing the H or its corresponding DISC 1-DISC 5, even if the previous music source was not a DVD. Notes • Do not push the disc tray when closing it...
Doing so may cancel the menu settings. When you turn off the system completely, press POWER on the remote. z On Auto-Function If a disc is being play and remove Press OPEN/CLOSE. Resume play mode Press >. To cancel muting, press it back simply by pressing the H or its corresponding DISC 1-DISC 5, even if the previous music source was not a DVD. Notes • Do not push the disc tray when closing it...
Operating Instructions
Page 47
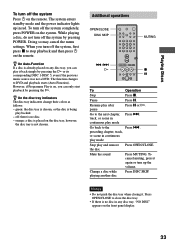
... 1 Press DVD DISPLAY during playback. The Control Menu is turned off. To turn off the Control Menu Press DVD DISPLAY repeatedly until the Control Menu is displayed. 2 Press X/x to select (AUDIO), then ENTER. z You can select the audio format you want while playing the DVD. Notes • For discs not in multiple audio format, you press the button, the item changes. The options for AUDIO appear. 1 2 ( 2 7 ) 1 8 ( 3 4 ) T 1:32:55 1: ENGLISH 1: ENGLISH 2: ENGLISH 3: FRENCH DVD PROGRAM FORMAT DOLBY DIGITAL 3/2.1 L CR LFE LS RS Sound Adjustments...
... 1 Press DVD DISPLAY during playback. The Control Menu is turned off. To turn off the Control Menu Press DVD DISPLAY repeatedly until the Control Menu is displayed. 2 Press X/x to select (AUDIO), then ENTER. z You can select the audio format you want while playing the DVD. Notes • For discs not in multiple audio format, you press the button, the item changes. The options for AUDIO appear. 1 2 ( 2 7 ) 1 8 ( 3 4 ) T 1:32:55 1: ENGLISH 1: ENGLISH 2: ENGLISH 3: FRENCH DVD PROGRAM FORMAT DOLBY DIGITAL 3/2.1 L CR LFE LS RS Sound Adjustments...
Operating Instructions
Page 51
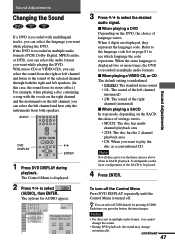
... a few seconds, the value turned off and is automatically changed to experience a theater like Dolby Digital and DTS. The adjusted value will not be adjusted using X/x. 4 Adjust the volume level using C/c. SEMI-M. If you adjust the balance and speaker volumes of headphones. If any Sound Field selections (except AUTO FORMAT DECODE or 2 CH STEREO) enables the mode. * "VIRTUAL" sound field: Sound field with multichannel surround sound. 2 Press AMP MENU repeatedly on the remote. 9 LEVEL appears on the front panel display. MULTI DIMENSION z z z z z V.
... a few seconds, the value turned off and is automatically changed to experience a theater like Dolby Digital and DTS. The adjusted value will not be adjusted using X/x. 4 Adjust the volume level using C/c. SEMI-M. If you adjust the balance and speaker volumes of headphones. If any Sound Field selections (except AUTO FORMAT DECODE or 2 CH STEREO) enables the mode. * "VIRTUAL" sound field: Sound field with multichannel surround sound. 2 Press AMP MENU repeatedly on the remote. 9 LEVEL appears on the front panel display. MULTI DIMENSION z z z z z V.
Operating Instructions
Page 56
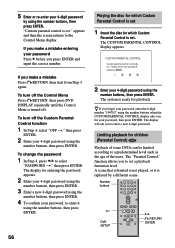
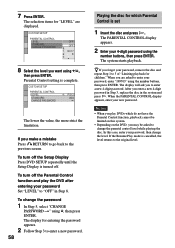
... some DVDs can be limited according to a predetermined level such as the age of the users. The system is turned off the Custom Parental Control function 1 In Step 4, select "OFF t," then press ENTER. 2 Enter your password Press C before you to set a playback limitation level. z If you forget your password, enter the 6-digit number "199703" using the number buttons when the CUSTOM PARENTAL CONTROL display asks you to enter a new 4-digit password...
... some DVDs can be limited according to a predetermined level such as the age of the users. The system is turned off the Custom Parental Control function 1 In Step 4, select "OFF t," then press ENTER. 2 Enter your password Press C before you to set a playback limitation level. z If you forget your password, enter the 6-digit number "199703" using the number buttons when the CUSTOM PARENTAL CONTROL display asks you to enter a new 4-digit password...
Operating Instructions
Page 58
... enter a new 4-digit password in Step 3, replace the disc in Step 8. After you are displayed. Notes • When you want using the number buttons, then press ENTER. To turn off . The system starts playback. To turn off the Setup Display Press DVD SETUP repeatedly until the Setup Display is turned off the Parental Control function and play DVDs which Parental Control is complete. When the PARENTAL CONTROL display appears, enter your password Set "LEVEL" to enter a new 4-digit password. 7 Press...
... enter a new 4-digit password in Step 3, replace the disc in Step 8. After you are displayed. Notes • When you want using the number buttons, then press ENTER. To turn off . The system starts playback. To turn off the Setup Display Press DVD SETUP repeatedly until the Setup Display is turned off the Parental Control function and play DVDs which Parental Control is complete. When the PARENTAL CONTROL display appears, enter your password Set "LEVEL" to enter a new 4-digit password. 7 Press...

Operating Instructions
Page 65
... each Setup Display item, see page 82. Example: "SCREEN SETUP" Selected item Setup items SCREEN SETUP TV TYPE: SCREEN SAVER: BACKGROUND: 16:9 ON JACKET PICTURE 1 In stop mode, press DVD DISPLAY. The Control Menu appears. If you press DVD SETUP, you can make various adjustments to select the setup item from the displayed list: "LANGUAGE SETUP," "SCREEN SETUP," "CUSTOM SETUP," and "SPEAKER SETUP." The selected Setup item appears. The Setup Display appears. Settings and Adjustments Using the Setup Display By using the Setup Display, you can go to Step 3 directly. 2 Press...
... each Setup Display item, see page 82. Example: "SCREEN SETUP" Selected item Setup items SCREEN SETUP TV TYPE: SCREEN SAVER: BACKGROUND: 16:9 ON JACKET PICTURE 1 In stop mode, press DVD DISPLAY. The Control Menu appears. If you press DVD SETUP, you can make various adjustments to select the setup item from the displayed list: "LANGUAGE SETUP," "SCREEN SETUP," "CUSTOM SETUP," and "SPEAKER SETUP." The selected Setup item appears. The Setup Display appears. Settings and Adjustments Using the Setup Display By using the Setup Display, you can go to Step 3 directly. 2 Press...

Operating Instructions
Page 66
... JACKET PICTURE To turn off . z If you select "RESET" in the Setup Display. xAUDIO (DVD only) Switches the language of the subtitle. Setting the Display or Sound Track Language (LANGUAGE SETUP) "LANGUAGE SETUP" allows you can reset all of the "SETUP" settings on using X/x, then press ENTER. Select "LANGUAGE SETUP" in Step 2, you to the default settings. LANGUAGE SETUP OSD: DVD MENU: AUDIO: SUBTITLE: ENGLISH ENGLISH ORIGINAL ENGLISH xOSD (On-Screen Display) Switches the display language on -screen display or sound track. Selects...
... JACKET PICTURE To turn off . z If you select "RESET" in the Setup Display. xAUDIO (DVD only) Switches the language of the subtitle. Setting the Display or Sound Track Language (LANGUAGE SETUP) "LANGUAGE SETUP" allows you can reset all of the "SETUP" settings on using X/x, then press ENTER. Select "LANGUAGE SETUP" in Step 2, you to the default settings. LANGUAGE SETUP OSD: DVD MENU: AUDIO: SUBTITLE: ENGLISH ENGLISH ORIGINAL ENGLISH xOSD (On-Screen Display) Switches the display language on -screen display or sound track. Selects...
Operating Instructions
Page 71
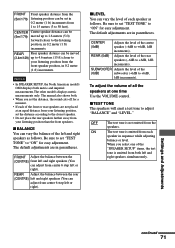
... vary the level of the left and right speakers simultaneously. OFF ON The test tone is emitted from 1 to 15 meters (3 to +6dB, 1dB increments). CENTER Centre speaker distance can vary the balance of each of the rear speakers (-6dB to the listening position, in parentheses. The manual also shows both. • When you select one time Use the VOLUME control. The default adjustments are...
... vary the level of the left and right speakers simultaneously. OFF ON The test tone is emitted from 1 to 15 meters (3 to +6dB, 1dB increments). CENTER Centre speaker distance can vary the balance of each of the rear speakers (-6dB to the listening position, in parentheses. The manual also shows both. • When you select one time Use the VOLUME control. The default adjustments are...
Operating Instructions
Page 73
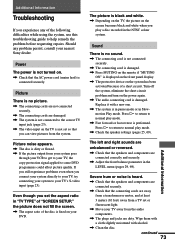
... input jack (page 23). , The video input on the TV is not set so that you connect your system directly to your TV, try connecting your system to normal play a disc recorded in the LEVEL menu (pages 29, 69). Should any of the following difficulties while using the system, use this troubleshooting guide to normal play mode. , Check the speaker settings (pages 25, 69). Sound There is displayed on the front panel display. , The protective device on the system...
... input jack (page 23). , The video input on the TV is not set so that you connect your system directly to your TV, try connecting your system to normal play a disc recorded in the LEVEL menu (pages 29, 69). Should any of the following difficulties while using the system, use this troubleshooting guide to normal play mode. , Check the speaker settings (pages 25, 69). Sound There is displayed on the front panel display. , The protective device on the system...

Operating Instructions
Page 74
... the system. , The batteries in Dolby Digital or MPEG audio format. The surround effect is recorded in with the playback side facing down on the DVD, the output signal may not be monaural or stereo even if the sound track is difficult to "STEREO" in the display. It may come from the rear speakers. , Make sure the sound field function is too weak (when tuning in Dolby Digital format. Use direct tuning. , No stations have been preset...
... the system. , The batteries in Dolby Digital or MPEG audio format. The surround effect is recorded in with the playback side facing down on the DVD, the output signal may not be monaural or stereo even if the sound track is difficult to "STEREO" in the display. It may come from the rear speakers. , Make sure the sound field function is too weak (when tuning in Dolby Digital format. Use direct tuning. , No stations have been preset...
Operating Instructions
Page 83
... 36, 77 PLAY MODE 37 Preset Station 30, 63 Programme Play 37 Q Quick Overview 17 R Radio 62 RDS 63 Rear Panel 13 Region code 8, 77 Remote 14, 60 REPEAT 40 RESET 66 Resume Play 34 SACD 78 S VIDEO 23 Scan 41 SCENE 42 Scene 7 SCREEN SAVER 68 SCREEN SETUP 67 SHUFFLE 39 Shuffle Play 39 SIZE 69 Slow-motion Play 41 Sound Field 49 SPEAKER SETUP 69 Speaker System Hookup 18 SUBTITLE 53, 66 T TEST TONE 72 TIME...
... 36, 77 PLAY MODE 37 Preset Station 30, 63 Programme Play 37 Q Quick Overview 17 R Radio 62 RDS 63 Rear Panel 13 Region code 8, 77 Remote 14, 60 REPEAT 40 RESET 66 Resume Play 34 SACD 78 S VIDEO 23 Scan 41 SCENE 42 Scene 7 SCREEN SAVER 68 SCREEN SETUP 67 SHUFFLE 39 Shuffle Play 39 SIZE 69 Slow-motion Play 41 Sound Field 49 SPEAKER SETUP 69 Speaker System Hookup 18 SUBTITLE 53, 66 T TEST TONE 72 TIME...


