Operating Instructions
Page 1
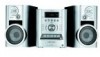
4-246-667-12(1) Micro Hi-Fi Component System Operating Instructions Owner's Record The model and serial numbers are located on the rear of the unit. Model No Serial No CMT-HP7 ©2003 Sony Corporation Refer to them whenever you call upon your Sony dealer regarding this product. Record the serial number in the space provided below.
4-246-667-12(1) Micro Hi-Fi Component System Operating Instructions Owner's Record The model and serial numbers are located on the rear of the unit. Model No Serial No CMT-HP7 ©2003 Sony Corporation Refer to them whenever you call upon your Sony dealer regarding this product. Record the serial number in the space provided below.
Operating Instructions
Page 2
... operate this product meets the ENERGY STAR® guidelines for proper grounding and, in particular, specifies that may cause harmful interference to the presence of the apparatus with this manual could void your authority to persons. Reorient or relocate the receiving antenna. - registered mark. To prevent fire, do not cover the ventilation of important operating and maintenance (servicing) instructions...
... operate this product meets the ENERGY STAR® guidelines for proper grounding and, in particular, specifies that may cause harmful interference to the presence of the apparatus with this manual could void your authority to persons. Reorient or relocate the receiving antenna. - registered mark. To prevent fire, do not cover the ventilation of important operating and maintenance (servicing) instructions...
Operating Instructions
Page 3
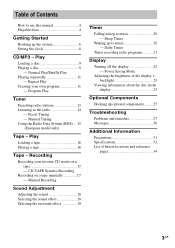
Manual Recording Sound Adjustment Adjusting the sound 18 Selecting the sound effect 18 Selecting the surround effect 19 Timer Falling asleep to use this manual 4 Playable discs 4 Getting Started Hooking up the system 6 Setting the clock 8 CD/MP3 - Power Saving Mode Adjusting the brightness of the display's backlight 23 Viewing information about the disc in the display 23 Optional Components Hooking up to the radio 14 - Repeat Play Creating your favorite CD tracks on a tape manually 17 - Preset Tuning...
Manual Recording Sound Adjustment Adjusting the sound 18 Selecting the sound effect 18 Selecting the surround effect 19 Timer Falling asleep to use this manual 4 Playable discs 4 Getting Started Hooking up the system 6 Setting the clock 8 CD/MP3 - Power Saving Mode Adjusting the brightness of the display's backlight 23 Viewing information about the disc in the display 23 Optional Components Hooking up to the radio 14 - Repeat Play Creating your favorite CD tracks on a tape manually 17 - Preset Tuning...
Operating Instructions
Page 4
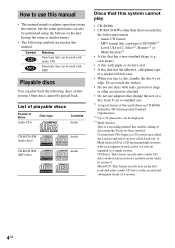
... use this manual • This manual mainly explains operations using the remote, but the same operations can also be performed using the Track-At-Once method. How to use adaptors that enables adding of data using the buttons on the unit having multiple sessions, with paper or stickers on this system cannot play back the following discs on it . • When you eject a disc, handle the disc...
... use this manual • This manual mainly explains operations using the remote, but the same operations can also be performed using the Track-At-Once method. How to use adaptors that enables adding of data using the buttons on the unit having multiple sessions, with paper or stickers on this system cannot play back the following discs on it . • When you eject a disc, handle the disc...
Operating Instructions
Page 5
... level 1 and 2, folder names or file names may not be displayed correctly. • The following discs take a longer time to start playback. - Notes on CD-R/CD-RW drives may not be played back because of scratches, dirt, recording condition or the driver's characteristics. • CD-R and CD-RW discs that have not been finalized (processing to allow play by a normal CD player) cannot be played...
... level 1 and 2, folder names or file names may not be displayed correctly. • The following discs take a longer time to start playback. - Notes on CD-R/CD-RW drives may not be played back because of scratches, dirt, recording condition or the driver's characteristics. • CD-R and CD-RW discs that have not been finalized (processing to allow play by a normal CD player) cannot be played...
Operating Instructions
Page 7
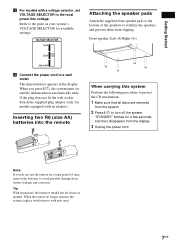
.... Tip With normal use the remote for about six months. Getting Started 3 For models with an adaptor). "STANDBY" flashes for available settings. Attaching the speaker pads Attach the supplied front speaker pads to the bottom of time, remove the batteries to the local power line voltage. The demonstration appears in the display. When the remote no longer operates the system, replace both batteries with new ones. 7GB...
.... Tip With normal use the remote for about six months. Getting Started 3 For models with an adaptor). "STANDBY" flashes for available settings. Attaching the speaker pads Attach the supplied front speaker pads to the bottom of time, remove the batteries to the local power line voltage. The demonstration appears in the display. When the remote no longer operates the system, replace both batteries with new ones. 7GB...
Operating Instructions
Page 9
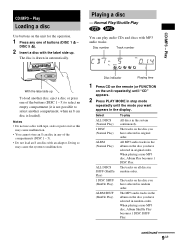
... remote (or FUNCTION on the unit for the operation. 1 Press any of the compartments (DISC 1 - 5). • Do not load an 8 cm disc with tape, seals or paste on the disc you have selected in random order. continued 9GB Play Loading a disc Use buttons on the unit repeatedly) until "CD" appears. 2 Press PLAY MODE in stop mode repeatedly until the mode you have selected in the display. DISC 5 Z). 2 Insert a disc with MP3 audio tracks...
... remote (or FUNCTION on the unit for the operation. 1 Press any of the compartments (DISC 1 - 5). • Do not load an 8 cm disc with tape, seals or paste on the disc you have selected in random order. continued 9GB Play Loading a disc Use buttons on the unit repeatedly) until "CD" appears. 2 Press PLAY MODE in stop mode repeatedly until the mode you have selected in the display. DISC 5 Z). 2 Insert a disc with MP3 audio tracks...
Operating Instructions
Page 10
... as disabled playback, sound interruptions and noise. 10GB Select a disc in stop mode Press D. DISC 5 Z on the unit). *1 You may encounter such problems as many albums or nonMP3 audio tracks on the disc, it at the time an MP3 audio track is inserted, the player reads all discs in the (Program Play) order you may not be able to start playback of MP3 audio tracks and albums that can be needed to start play. •...
... as disabled playback, sound interruptions and noise. 10GB Select a disc in stop mode Press D. DISC 5 Z on the unit). *1 You may encounter such problems as many albums or nonMP3 audio tracks on the disc, it at the time an MP3 audio track is inserted, the player reads all discs in the (Program Play) order you may not be able to start playback of MP3 audio tracks and albums that can be needed to start play. •...
Operating Instructions
Page 11
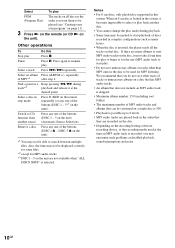
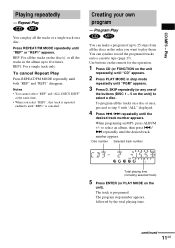
Repeat Play You can play them. Program Play You can synchro record the programed tracks onto a cassette tape (page 17). Use buttons on the remote for the operation. 1 Press CD (or FUNCTION on a disc. to play all the tracks or a single track on the unit repeatedly) until "CD" appears. 2 Press PLAY MODE in stop mode repeatedly until "REP1" is programed. Play Playing repeatedly - Press REPEAT/FM MODE repeatedly until both "REP" and "REP1" disappear. Notes • You cannot...
Repeat Play You can play them. Program Play You can synchro record the programed tracks onto a cassette tape (page 17). Use buttons on the remote for the operation. 1 Press CD (or FUNCTION on a disc. to play all the tracks or a single track on the unit repeatedly) until "CD" appears. 2 Press PLAY MODE in stop mode repeatedly until "REP1" is programed. Play Playing repeatedly - Press REPEAT/FM MODE repeatedly until both "REP" and "REP1" disappear. Notes • You cannot...
Operating Instructions
Page 13
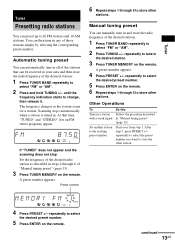
... a station with a weak signal Set another station to change, then release it. A preset number appears. repeatedly to select the desired preset number. 5 Press ENTER on the remote. repeatedly to tune in your area and then store the radio frequency of the desired radio station as the system scans for an FM stereo program) appear. If "TUNED" does not appear and the scanning does not stop Set the...
... a station with a weak signal Set another station to change, then release it. A preset number appears. repeatedly to select the desired preset number. 5 Press ENTER on the remote. repeatedly to tune in your area and then store the radio frequency of the desired radio station as the system scans for an FM stereo program) appear. If "TUNED" does not appear and the scanning does not stop Set the...
Operating Instructions
Page 14
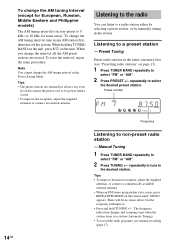
... power cord or if a power failure occurs. • To improve the reception, adjust the supplied antennas or connect an external antenna. Listening to the radio You can listen to select "FM" or "AM". 2 Press PRESET +/- Preset number 14GB Frequency Listening to select the desired preset station. The frequency indication changes and scanning stops when the system tunes in the station. Note You cannot change the interval, all the AM preset stations...
... power cord or if a power failure occurs. • To improve the reception, adjust the supplied antennas or connect an external antenna. Listening to the radio You can listen to select "FM" or "AM". 2 Press PRESET +/- Preset number 14GB Frequency Listening to select the desired preset station. The frequency indication changes and scanning stops when the system tunes in the station. Note You cannot change the interval, all the AM preset stations...
Operating Instructions
Page 17
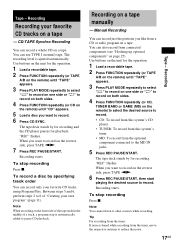
... a disc you want to other sources while recording. Recording starts. Between steps 5 and 6, perform steps 2 to record. Use buttons on the unit for the operation. 1 Load a recordable tape. 2 Press FUNCTION repeatedly (or TAPE A/B on the remote) to select the desired source to reduce the noise. 17GB Tape - When you want to record. 6 Press CD SYNC. Note You cannot listen to record on page 25). To stop recording Press x. Manual Recording You can record...
... a disc you want to other sources while recording. Recording starts. Between steps 5 and 6, perform steps 2 to record. Use buttons on the unit for the operation. 1 Load a recordable tape. 2 Press FUNCTION repeatedly (or TAPE A/B on the remote) to select the desired source to reduce the noise. 17GB Tape - When you want to record. 6 Press CD SYNC. Note You cannot listen to record on page 25). To stop recording Press x. Manual Recording You can record...
Operating Instructions
Page 20
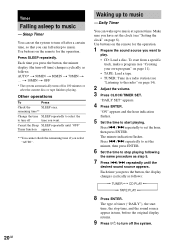
... time) changes cyclically as follows: t TUNER y CD PLAY T t TAPE PLAY T 8 Press ENTER. Make sure you want to music - To start playing. Sleep Timer You can fall asleep to turn off the system. 20GB Waking up to start from a specific track, make a program (see "Creating your own program" on the remote for the operation. 1 Prepare the sound source you press the button, the display changes cyclically as follows: AUTO* t 90MIN t 80MIN t 70MIN t ... Press ./> repeatedly to set...
... time) changes cyclically as follows: t TUNER y CD PLAY T t TAPE PLAY T 8 Press ENTER. Make sure you want to music - To start playing. Sleep Timer You can fall asleep to turn off the system. 20GB Waking up to start from a specific track, make a program (see "Creating your own program" on the remote for the operation. 1 Prepare the sound source you press the button, the display changes cyclically as follows: AUTO* t 90MIN t 80MIN t 70MIN t ... Press ./> repeatedly to set...
Operating Instructions
Page 21
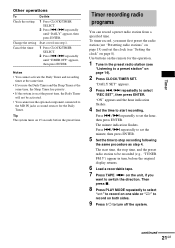
.... Use buttons on page 8). "ON" appears and the hour indication flashes. 4 Set the time to set the clock (see "Setting the clock" on the remote for the Daily Timer. Press ./> repeatedly to start time, the stop recording following the same procedure as sound sources for the operation. 1 Tune in turn off the system. Start over from a specified time. continued 21GB To timer record, you must first preset the radio station (see "Listening to switch the direction...
.... Use buttons on page 8). "ON" appears and the hour indication flashes. 4 Set the time to set the clock (see "Setting the clock" on the remote for the Daily Timer. Press ./> repeatedly to start time, the stop recording following the same procedure as sound sources for the operation. 1 Tune in turn off the system. Start over from a specified time. continued 21GB To timer record, you must first preset the radio station (see "Listening to switch the direction...
Operating Instructions
Page 25
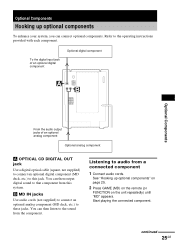
..., etc.) to these jacks. Start playing the connected component. continued 25GB Optional Components Hooking up optional components" on page 25. 2 Press GAME (MD) on the remote (or FUNCTION on the unit repeatedly) until "MD" appears. You can then listen to that component from this jack. You can then output digital sound to the sound from a connected component 1 Connect audio cords. Listening to the operating instructions provided with each component...
..., etc.) to these jacks. Start playing the connected component. continued 25GB Optional Components Hooking up optional components" on page 25. 2 Press GAME (MD) on the remote (or FUNCTION on the unit repeatedly) until "MD" appears. You can then listen to that component from this jack. You can then output digital sound to the sound from a connected component 1 Connect audio cords. Listening to the operating instructions provided with each component...
Operating Instructions
Page 27
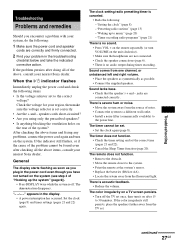
... the troubleshooting checklist below and take the indicated corrective action. When the ?/1 indicator flashes Immediately unplug the power cord and check the following : -"Setting the clock" (page 8) -"Presetting radio stations" (page 13) -"Waking up the system" (page 6)). • Press DISPLAY twice while the system is no audio output during timer recording. General The display starts flashing as soon as possible. • Connect the supplied speakers. The clock setting/radio presetting/timer is set to music" (page...
... the troubleshooting checklist below and take the indicated corrective action. When the ?/1 indicator flashes Immediately unplug the power cord and check the following : -"Setting the clock" (page 8) -"Presetting radio stations" (page 13) -"Waking up the system" (page 6)). • Press DISPLAY twice while the system is no audio output during timer recording. General The display starts flashing as soon as possible. • Connect the supplied speakers. The clock setting/radio presetting/timer is set to music" (page...
Operating Instructions
Page 28
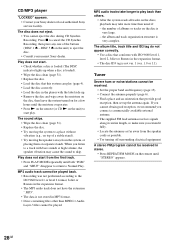
...). • Replace the disc. • Load the disc that provide good reception, then set up the antenna again. CD/MP3 player "LOCKED" appears. • Contact your nearest Sony dealer. MP3 audio tracks take more time than others. • After the system reads all tracks on the unit) to Normal Play. A stereo FM program cannot be received. • Set the proper band and frequency (page 13). • Connect the antenna properly...
...). • Replace the disc. • Load the disc that provide good reception, then set up the antenna again. CD/MP3 player "LOCKED" appears. • Contact your nearest Sony dealer. MP3 audio tracks take more time than others. • After the system reads all tracks on the unit) to Normal Play. A stereo FM program cannot be received. • Set the proper band and frequency (page 13). • Connect the antenna properly...
Operating Instructions
Page 29
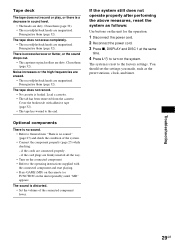
... the factory settings. if the cord plugs are magnetised. Cover the broken tab with the connected component and start playing. • Press GAME (MD) on the remote (or FUNCTION on the connected component. • Refer to the operating instructions supplied with adhesive tape (page 32). • The tape has wound to turn on the system. Noise increases or the high frequencies are erased. • The record/playback heads...
... the factory settings. if the cord plugs are magnetised. Cover the broken tab with the connected component and start playing. • Press GAME (MD) on the remote (or FUNCTION on the connected component. • Refer to the operating instructions supplied with adhesive tape (page 32). • The tape has wound to turn on the system. Noise increases or the high frequencies are erased. • The record/playback heads...
Operating Instructions
Page 31
... or used near the speaker system, such as hot air ducts, nor leave it may not be changed only at a high volume, the cabinet temperature of the top, side and bottom rises considerably. Wipe the disc from a cold to place objects in direct sunlight. • When using discs that have labels printed using . Subject to parts inside the CD player. On the speaker...
... or used near the speaker system, such as hot air ducts, nor leave it may not be changed only at a high volume, the cabinet temperature of the top, side and bottom rises considerably. Wipe the disc from a cold to place objects in direct sunlight. • When using discs that have labels printed using . Subject to parts inside the CD player. On the speaker...
Operating Instructions
Page 32
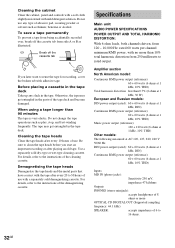
..., 10% THD) Inputs MD IN (phono jacks): Sensitivity 250 mV, impedance 47 kilohms Outputs PHONES (stereo minijack): accepts headphones of use. Specifications Main unit AUDIO POWER SPECIFICATIONS POWER OUTPUT AND TOTAL HARMONIC DISTORTION: With 6 ohm loads, both channels driven, from 250 milliwatts to the instructions of abrasive pad, scouring powder or solvent such as play, stop, and fast-winding frequently. Do not use with the tape after every 10...
..., 10% THD) Inputs MD IN (phono jacks): Sensitivity 250 mV, impedance 47 kilohms Outputs PHONES (stereo minijack): accepts headphones of use. Specifications Main unit AUDIO POWER SPECIFICATIONS POWER OUTPUT AND TOTAL HARMONIC DISTORTION: With 6 ohm loads, both channels driven, from 250 milliwatts to the instructions of abrasive pad, scouring powder or solvent such as play, stop, and fast-winding frequently. Do not use with the tape after every 10...


