
Operating Instructions
Page 3
Sleep Timer 17 Waking up the system 4 Step 2: Setting the time 6 Step 3: Presetting radio stations 7 Saving the power in standby mode 8 Basic Operations Playing a CD 9 Listening to the radio 10 The CD Player Playing the CD tracks in random order -- Table of connected components 21 Recording a CD on an MD/a tape 22 Connecting external antennas 22 Additional Information...
Sleep Timer 17 Waking up the system 4 Step 2: Setting the time 6 Step 3: Presetting radio stations 7 Saving the power in standby mode 8 Basic Operations Playing a CD 9 Listening to the radio 10 The CD Player Playing the CD tracks in random order -- Table of connected components 21 Recording a CD on an MD/a tape 22 Connecting external antennas 22 Additional Information...

Operating Instructions
Page 5
... than ordinary glass. Note Keep the antenna away from battery leakage. When the remote no longer operates the system, replace both batteries with new ones. Inserting two R6 (size AA) batteries into the remote e EE ...white cord to the U terminal, and the red cord to level the speakers. To connect optional component See "Optional Components" on the glass cover of the speaker bottoms to the other terminal. Getting Started 3 Connect ... the supplied speaker legs to the rear of CD player The CD player cover is scratched. Tip With normal use the remote for about six months.
... than ordinary glass. Note Keep the antenna away from battery leakage. When the remote no longer operates the system, replace both batteries with new ones. Inserting two R6 (size AA) batteries into the remote e EE ...white cord to the U terminal, and the red cord to level the speakers. To connect optional component See "Optional Components" on the glass cover of the speaker bottoms to the other terminal. Getting Started 3 Connect ... the supplied speaker legs to the rear of CD player The CD player cover is scratched. Tip With normal use the remote for about six months.
Operating Instructions
Page 10
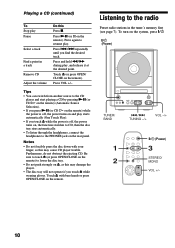
...; Do not forcibly press the disc down with bare hands or press OPEN/CLOSE on the remote). Touch Z with your finger, as this may cause CD player trouble. "/1 (Power) ?/1 Z NX x .m M> TUNER/ BAND ./> TUNING -/+ VOL -/+ "/1 (Power) 1 3 2 STEREO/ MONO VOL +/- 10 Tips • You can switch from another... disc tray. • Do not push strongly on the system, press "/1. Be sure to touch Z (or press OPEN/CLOSE on the remote) to the radio Preset radio stations in a track Remove CD Adjust the volume Do this may damage the player. • The disc tray will not operate if you...
...; Do not forcibly press the disc down with bare hands or press OPEN/CLOSE on the remote). Touch Z with your finger, as this may cause CD player trouble. "/1 (Power) ?/1 Z NX x .m M> TUNER/ BAND ./> TUNING -/+ VOL -/+ "/1 (Power) 1 3 2 STEREO/ MONO VOL +/- 10 Tips • You can switch from another... disc tray. • Do not push strongly on the system, press "/1. Be sure to touch Z (or press OPEN/CLOSE on the remote) to the radio Preset radio stations in a track Remove CD Adjust the volume Do this may damage the player. • The disc tray will not operate if you...
Operating Instructions
Page 12
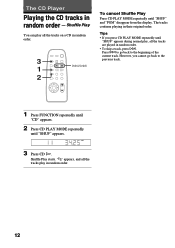
...Shuffle Play You can play in random order. 3 l/L 1 2 To cancel Shuffle Play Press CD PLAY MODE repeatedly until "SHUF" appears. The CD Player Playing the CD tracks in their original order. SHUF 3 Press CD H. The tracks continue playing in random order -- Press l to go back to the beginning of... the current track. Shuffle Play starts. However, you press CD PLAY MODE repeatedly until "...
...Shuffle Play You can play in random order. 3 l/L 1 2 To cancel Shuffle Play Press CD PLAY MODE repeatedly until "SHUF" appears. The CD Player Playing the CD tracks in their original order. SHUF 3 Press CD H. The tracks continue playing in random order -- Press l to go back to the beginning of... the current track. Shuffle Play starts. However, you press CD PLAY MODE repeatedly until "...
Operating Instructions
Page 13
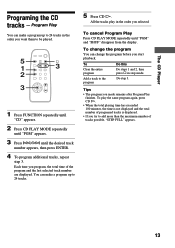
...displayed. You can change the program You can make a program up to be played. 5 s 1 3 2 3 1 Press FUNCTION repeatedly until "CD" appears. 2 Press CD PLAY MODE repeatedly until "PGM" appears. 3 Press l/L until "PGM" and "SHUF" disappear from the display. To change the program before you...possible, "STEP FULL" appears. 13 To cancel Program Play Press CD PLAY MODE repeatedly until the desired track number appears, then press ENTER. 4 To program additional tracks, repeat step 3. The CD Player Programing the CD tracks -- Each time you made remains after Program Play finishes.
...displayed. You can change the program You can make a program up to be played. 5 s 1 3 2 3 1 Press FUNCTION repeatedly until "CD" appears. 2 Press CD PLAY MODE repeatedly until "PGM" appears. 3 Press l/L until "PGM" and "SHUF" disappear from the display. To change the program before you...possible, "STEP FULL" appears. 13 To cancel Program Play Press CD PLAY MODE repeatedly until the desired track number appears, then press ENTER. 4 To program additional tracks, repeat step 3. The CD Player Programing the CD tracks -- Each time you made remains after Program Play finishes.
Operating Instructions
Page 15
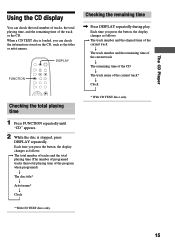
... remaining time of the CD r The track name of the current track* r Clock Checking the total playing time 1 Press FUNCTION repeatedly until "CD" appears. 2 While the disc is loaded, you press the button, the display changes as the titles or artist names. The CD Player Using the CD display You can check... the information stored on the CD, such as follows: t The total number of tracks and the total playing time (The number of programed tracks...
... remaining time of the CD r The track name of the current track* r Clock Checking the total playing time 1 Press FUNCTION repeatedly until "CD" appears. 2 While the disc is loaded, you press the button, the display changes as the titles or artist names. The CD Player Using the CD display You can check... the information stored on the CD, such as follows: t The total number of tracks and the total playing time (The number of programed tracks...

Operating Instructions
Page 24
... picture on the lens inside the CD player. Also, be sure not to direct sunlight or heat sources such as audio racks, TV stands and toys. Set the clock and timer settings again. If you have any questions or problems concerning your system, please consult your nearest Sony dealer. These may become magnetically distorted...
... picture on the lens inside the CD player. Also, be sure not to direct sunlight or heat sources such as audio racks, TV stands and toys. Set the clock and timer settings again. If you have any questions or problems concerning your system, please consult your nearest Sony dealer. These may become magnetically distorted...

Operating Instructions
Page 25
... down ?/1, then plug the AC power cord into the wall outlet again. CD Player The CD cannot be read. • The CD was not placed in stereo. • Press STEREO/MONO so "STEREO" appears. Exchange the CD. • The CD is scratched. Play does not start from the first track. • The... MODE repeatedly until the moisture evaporates. If other problems not described above occur, reset the system as the preset stations, clock, and timer are cleared. The system is too weak. Place a CD vertically in program or shuffle mode. to return to the factory settings. Adjust the antenna. &#...
... down ?/1, then plug the AC power cord into the wall outlet again. CD Player The CD cannot be read. • The CD was not placed in stereo. • Press STEREO/MONO so "STEREO" appears. Exchange the CD. • The CD is scratched. Play does not start from the first track. • The... MODE repeatedly until the moisture evaporates. If other problems not described above occur, reset the system as the preset stations, clock, and timer are cleared. The system is too weak. Place a CD vertically in program or shuffle mode. to return to the factory settings. Adjust the antenna. &#...

Operating Instructions
Page 26
..., 10% THD, 220 V) Inputs TAPE IN: voltage 250 mV, impedance 47 kilohms Outputs TAPE OUT: voltage 250 mV, impedance 1 kilohms CD OUT: Optical PHONES (stereo mini jack): accepts headphones of 8 ohms or more than 0.9% total harmonic distortion from the objective lens surface on ... Specifications Amplifier section For the U.S. rated 10 watts per channel minimum RMS power, with no more CD player section System Laser Laser output Frequency response Compact disc and digital audio system Semiconductor laser (λ=780 nm) Emission duration: continuous Max. 44.6 µW* * This output ...
..., 10% THD, 220 V) Inputs TAPE IN: voltage 250 mV, impedance 47 kilohms Outputs TAPE OUT: voltage 250 mV, impedance 1 kilohms CD OUT: Optical PHONES (stereo mini jack): accepts headphones of 8 ohms or more than 0.9% total harmonic distortion from the objective lens surface on ... Specifications Amplifier section For the U.S. rated 10 watts per channel minimum RMS power, with no more CD player section System Laser Laser output Frequency response Compact disc and digital audio system Semiconductor laser (λ=780 nm) Emission duration: continuous Max. 44.6 µW* * This output ...

Operating Instructions
Page 28
... to the radio 10 the sound of connected components 21 M Manual Tuning 7, 11 N Normal Play 9 O One Touch Play 10, 11 P, Q Playing a CD 9 tracks in random order (Shuffle Play) ... Program Play 13 R Radio stations presetting 7 tuning in 10 RDS 17 Recording a CD 22 Repeat Play 14 Resetting the system 25 S Setting the time 6 Shuffle Play 12 Sleep Timer 17 Speakers 4 Surround ... 7, 10 Tuning interval 8 Sony Corporation Printed in China Index A Adjusting the sound 16 the volume 10, 11 Antennas 5, 22 Automatic Source Selection 10, 11 Automatic Tuning 7, 11 B Batteries 5 C CD player 9, 12 Clock setting 6...
... to the radio 10 the sound of connected components 21 M Manual Tuning 7, 11 N Normal Play 9 O One Touch Play 10, 11 P, Q Playing a CD 9 tracks in random order (Shuffle Play) ... Program Play 13 R Radio stations presetting 7 tuning in 10 RDS 17 Recording a CD 22 Repeat Play 14 Resetting the system 25 S Setting the time 6 Shuffle Play 12 Sleep Timer 17 Speakers 4 Surround ... 7, 10 Tuning interval 8 Sony Corporation Printed in China Index A Adjusting the sound 16 the volume 10, 11 Antennas 5, 22 Automatic Source Selection 10, 11 Automatic Tuning 7, 11 B Batteries 5 C CD player 9, 12 Clock setting 6...


