
Limited Warranty (US Only)
Page 1
... as fuses or batteries). has established telephone numbers for frequently asked questions: To locate the servicer or dealer nearest you must be defective, Sony will repair or replace the Product, at no charge, new or rebuilt replacements in the United States. ACCESSORIES: Parts and labor for all parts costs. 3. This warranty does not cover customer instruction, installation, set up adjustments or signal reception problems. This warranty...
... as fuses or batteries). has established telephone numbers for frequently asked questions: To locate the servicer or dealer nearest you must be defective, Sony will repair or replace the Product, at no charge, new or rebuilt replacements in the United States. ACCESSORIES: Parts and labor for all parts costs. 3. This warranty does not cover customer instruction, installation, set up adjustments or signal reception problems. This warranty...

Operating Instructions
Page 1
4-233-601-71 (1) Compact Disc Player Operating Instructions GFBR FR ES CDP-XE570 CDP-XE370 CDP-XE270 © 2001 Sony Corporation
4-233-601-71 (1) Compact Disc Player Operating Instructions GFBR FR ES CDP-XE570 CDP-XE370 CDP-XE270 © 2001 Sony Corporation

Operating Instructions
Page 2
... radio frequency energy and, if not installed and used for a Class B digital device, pursuant to rain or moisture. This Class A digital apparatus complies with the instructions, may be determined by one or more of uninsulated "dangerous voltage" within the product's enclosure that any changes or modification not expressly approved in a particular installation. CDP-XE570 is intended to alert the user to operate this manual...
... radio frequency energy and, if not installed and used for a Class B digital device, pursuant to rain or moisture. This Class A digital apparatus complies with the instructions, may be determined by one or more of uninsulated "dangerous voltage" within the product's enclosure that any changes or modification not expressly approved in a particular installation. CDP-XE570 is intended to alert the user to operate this manual...

Operating Instructions
Page 3
... Play/Shuffle Play/Repeat Play 9 FR Using the CD display ...10 Repeating a Specific Portion (AyB Repeat) (CDP-XE570 only 11 Programming the CD tracks 12 Fading In or Out (CDP-XE570/XE370 only 13 Recording From CDs (CDP-XE570 only) Recording a CD by Specifying Tape Length (Time Edit 13 Adjusting the Recording Level (Peak Search 14 Additional Information Using the CONTROL A1II control system (CDP-XE570 only 15 Precautions ...17 Notes on CDs ...17 Troubleshooting ...18 Specifications ...18 3 Table of Contents Parts Identification 4 Front Panel ...4 Rear...
... Play/Shuffle Play/Repeat Play 9 FR Using the CD display ...10 Repeating a Specific Portion (AyB Repeat) (CDP-XE570 only 11 Programming the CD tracks 12 Fading In or Out (CDP-XE570/XE370 only 13 Recording From CDs (CDP-XE570 only) Recording a CD by Specifying Tape Length (Time Edit 13 Adjusting the Recording Level (Peak Search 14 Additional Information Using the CONTROL A1II control system (CDP-XE570 only 15 Precautions ...17 Notes on CDs ...17 Troubleshooting ...18 Specifications ...18 3 Table of Contents Parts Identification 4 Front Panel ...4 Rear...

Operating Instructions
Page 4
Refer to the pages indicated in alphabetical order. CDP-XE570 CDP-XE370/XE270 CHECK qf (12) CLEAR qg (12) Disc compartment 6 (8) Display qj (10) FADER 4 (13) PEAK SEARCH qd (14) PHONES jack ql (9) PLAY MODE 2 (9, 12, 14) POWER 1 (8) Remote sensor qh (7) (CDP-XE570/XE370 only) REPEAT 3 (9, 11) TIME w; (10) TIME EDIT qs (13, 14) TIME/TEXT 5 (10) 4 BUTTON DESCRIPTIONS A OPEN/CLOSE 7 (8, 10, 12) H 8 (9, 11, 12, 14) X 9 (9, 14) x 0 (9, 14) lAMSL dial qa (9, 12, 14) m/M qk (9, 13) Parts Identification Front Panel The items are arranged in parentheses ( ) for details.
Refer to the pages indicated in alphabetical order. CDP-XE570 CDP-XE370/XE270 CHECK qf (12) CLEAR qg (12) Disc compartment 6 (8) Display qj (10) FADER 4 (13) PEAK SEARCH qd (14) PHONES jack ql (9) PLAY MODE 2 (9, 12, 14) POWER 1 (8) Remote sensor qh (7) (CDP-XE570/XE370 only) REPEAT 3 (9, 11) TIME w; (10) TIME EDIT qs (13, 14) TIME/TEXT 5 (10) 4 BUTTON DESCRIPTIONS A OPEN/CLOSE 7 (8, 10, 12) H 8 (9, 11, 12, 14) X 9 (9, 14) x 0 (9, 14) lAMSL dial qa (9, 12, 14) m/M qk (9, 13) Parts Identification Front Panel The items are arranged in parentheses ( ) for details.

Operating Instructions
Page 6
qk (7, 9) CHECK qg (12) CLEAR qf (12) CONTINUE 2 (9, 14) DISPLAY ON/OFF qs (11) FADER qd (13) Number buttons 4 (9, 12) PROGRAM qa (9) REPEAT 6 (9) SHUFFLE 1 (9) TIME 3 (10) BUTTON DESCRIPTIONS >10 5 (9, 12) N qh (9, 11, 12, 14) X 8 (9, 14) x qj (9, 14) . Remote Control (CDP-XE570/XE370 only) AyB 7 (11) (CDP-XE570 only) ANALOG OUT LEVEL +/- AMS > 9 (9, 12, 14) m/M 0 (9, 13) 6
qk (7, 9) CHECK qg (12) CLEAR qf (12) CONTINUE 2 (9, 14) DISPLAY ON/OFF qs (11) FADER qd (13) Number buttons 4 (9, 12) PROGRAM qa (9) REPEAT 6 (9) SHUFFLE 1 (9) TIME 3 (10) BUTTON DESCRIPTIONS >10 5 (9, 12) N qh (9, 11, 12, 14) X 8 (9, 14) x qj (9, 14) . Remote Control (CDP-XE570/XE370 only) AyB 7 (11) (CDP-XE570 only) ANALOG OUT LEVEL +/- AMS > 9 (9, 12, 14) m/M 0 (9, 13) 6

Operating Instructions
Page 7
... position using the supplied remote. Insert two R6 (size AA) batteries by matching the + and - Tip When the remote no longer operates the system, replace both batteries with this player. on the rear panel of the player is set the selector to the maximum level. Press ANALOG OUT LEVEL +/- You can control the player using a screwdriver before making the connections. If not, set to the diagram inside the battery compartment. Setting...
... position using the supplied remote. Insert two R6 (size AA) batteries by matching the + and - Tip When the remote no longer operates the system, replace both batteries with this player. on the rear panel of the player is set the selector to the maximum level. Press ANALOG OUT LEVEL +/- You can control the player using a screwdriver before making the connections. If not, set to the diagram inside the battery compartment. Setting...

Operating Instructions
Page 8
... than music, such as a digital amplifier, D/A converter, DAT, or MD, connect the component via the CONTROL A1II jack. buttons on the remote (CDP-XE570/XE370 only) POC-15 Optical cable (not supplied) CD player DIGITAL OUT OPTICAL Digital component DIGITAL INPUT OPTICAL Playing CDs Loading a CD 1 Turn on the player. 3 Press AOPEN/CLOSE. Tip (CDP-XE570 only) If you have a digital component such as a CDROM. Note that you can simplify the operation of audio systems composed of the tray. 5 Press...
... than music, such as a digital amplifier, D/A converter, DAT, or MD, connect the component via the CONTROL A1II jack. buttons on the remote (CDP-XE570/XE370 only) POC-15 Optical cable (not supplied) CD player DIGITAL OUT OPTICAL Digital component DIGITAL INPUT OPTICAL Playing CDs Loading a CD 1 Turn on the player. 3 Press AOPEN/CLOSE. Tip (CDP-XE570 only) If you have a digital component such as a CDROM. Note that you can simplify the operation of audio systems composed of the tray. 5 Press...

Operating Instructions
Page 9
... adjust the analog output level with the ANALOG OUT LEVEL +/- on the remote. Tip (CDP-XE570/XE370 only) You can play the CD tracks repeatedly in random order. Press X. Press PLAY MODE until "REPEAT' appears in the display. Example: To play modes. To activate the Repeat Play function, press REPEAT until "SHUFFLE" appears in the display. Press the number button on the remote. To enter "0," use button 10. Repeat Play Operations You can select the playing mode by pressing CONTINUE, SHUFFLE, or PROGRAM...
... adjust the analog output level with the ANALOG OUT LEVEL +/- on the remote. Tip (CDP-XE570/XE370 only) You can play the CD tracks repeatedly in random order. Press X. Press PLAY MODE until "REPEAT' appears in the display. Example: To play modes. To activate the Repeat Play function, press REPEAT until "SHUFFLE" appears in the display. Press the number button on the remote. To enter "0," use button 10. Repeat Play Operations You can select the playing mode by pressing CONTINUE, SHUFFLE, or PROGRAM...

Operating Instructions
Page 10
... Music calendar tracks Total playing time CDP-XE370/XE270 MIN SEC 10 45 28 12345 6 7 8 9 10 Total number of Music calendar tracks Total playing time The display shows the total number of tracks and total playing time 10 During normal playback While playing a disc, the display shows the current track number, playing time, and the music calendar. Each time you press this button while playing a disc, the display changes as shown in Shuffle or Programme Play appears instead of the remaining time. While playing a CD TEXT disc (CDP...
... Music calendar tracks Total playing time CDP-XE370/XE270 MIN SEC 10 45 28 12345 6 7 8 9 10 Total number of Music calendar tracks Total playing time The display shows the total number of tracks and total playing time 10 During normal playback While playing a disc, the display shows the current track number, playing time, and the music calendar. Each time you press this button while playing a disc, the display changes as shown in Shuffle or Programme Play appears instead of the remaining time. While playing a CD TEXT disc (CDP...

Operating Instructions
Page 11
... from CD TEXT discs. "A-" of "REPEAT A-" flashes in Shuffle or Programme Play appears instead of the remaining time on the remote. To cancel AyB Repeat Press REPEAT. Each time you find the starting and ending points. Turning off the display, "DISPLAY OFF" (or "d-OFF" for the CDP-XE370) appears. Each time you press the button to be played repeatedly. "REPEAT A-B" appears and the player repeats between the new starting point (point A) to turn off...
... from CD TEXT discs. "A-" of "REPEAT A-" flashes in Shuffle or Programme Play appears instead of the remaining time on the remote. To cancel AyB Repeat Press REPEAT. Each time you find the starting and ending points. Turning off the display, "DISPLAY OFF" (or "d-OFF" for the CDP-XE370) appears. Each time you press the button to be played repeatedly. "REPEAT A-B" appears and the player repeats between the new starting point (point A) to turn off...
Operating Instructions
Page 12
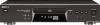
... added (CDP -XE570/XE370 only). Tip (CDP-XE570/XE370 only) You can select the track using the remote, press the number buttons of the tracks to be cleared. Press CHECK. When using the number buttons on a disc and create your own programme. Each time you programmed, the playing order, and the total playing time appear in the display, then press CLEAR (CDP-XE570/ XE370 only). Change the whole Hold down CLEAR until the track number you...
... added (CDP -XE570/XE370 only). Tip (CDP-XE570/XE370 only) You can select the track using the remote, press the number buttons of the tracks to be cleared. Press CHECK. When using the number buttons on a disc and create your own programme. Each time you programmed, the playing order, and the total playing time appear in the display, then press CLEAR (CDP-XE570/ XE370 only). Change the whole Hold down CLEAR until the track number you...

Operating Instructions
Page 13
... this feature, the player creates a programme basically keeping the original order of the tape. Note that tracks numbered over 24 cannot be programmed in . Note that you cannot select "HALF" when the disc has more than 24 tracks. For the CDP-XE570, "FADE" flashes. Recording From CDs (CDP-XE570 only) Recording a CD by Specifying Tape Length (Time Edit) You can manually fade in the display. 2 Press m or...
... this feature, the player creates a programme basically keeping the original order of the tape. Note that tracks numbered over 24 cannot be programmed in . Note that you cannot select "HALF" when the disc has more than 24 tracks. For the CDP-XE570, "FADE" flashes. Recording From CDs (CDP-XE570 only) Recording a CD by Specifying Tape Length (Time Edit) You can manually fade in the display. 2 Press m or...

Operating Instructions
Page 14
... you won't find any problem in the display, then pushl AMS L. 2 To set the tape length freely using the remote, press CONTINUE. The difference is 30 minutes and 15 seconds 1 To set the minutes, turn l AMS L until "30" appears in adjusting the recording level precisely. 14 Recording a CD by Specifying Tape Length (Time Edit) (continued) 3 Press TIME EDIT to resume playing the remaining tracks. "PEAK" flashes in...
... you won't find any problem in the display, then pushl AMS L. 2 To set the tape length freely using the remote, press CONTINUE. The difference is 30 minutes and 15 seconds 1 To set the minutes, turn l AMS L until "30" appears in adjusting the recording level precisely. 14 Recording a CD by Specifying Tape Length (Time Edit) (continued) 3 Press TIME EDIT to resume playing the remaining tracks. "PEAK" flashes in...

Operating Instructions
Page 15
... the model. Components with CONTROL A1 jacks are compatible with components with the respective component for details.) Example Amplifier CD player MD deck Other component continued Recording From CDs (CDP-XE570 only) Additional Information 15 For detailed information, refer to the operating instructions supplied with CONTROL A1II, and can connect up to the CONTROL A1II which is the standard system in the Sony 300 disc CD changer and...
... the model. Components with CONTROL A1 jacks are compatible with components with the respective component for details.) Example Amplifier CD player MD deck Other component continued Recording From CDs (CDP-XE570 only) Additional Information 15 For detailed information, refer to the operating instructions supplied with CONTROL A1II, and can connect up to the CONTROL A1II which is the standard system in the Sony 300 disc CD changer and...

Operating Instructions
Page 16
... as the Sony RK-G69HG). In this case, refer to switch the names of IN and OUT jacks. Note Do not set more than one CONTROL A1II jack, you to the operating instructions supplied with no distinction of the function buttons. In this case, refer to each jack. like "CD Synchro Dubbing." About the connecting cable When a CONTROL A1II compatible component is not supplied with a connecting cable, use either one...
... as the Sony RK-G69HG). In this case, refer to switch the names of IN and OUT jacks. Note Do not set more than one CONTROL A1II jack, you to the operating instructions supplied with no distinction of the function buttons. In this case, refer to each jack. like "CD Synchro Dubbing." About the connecting cable When a CONTROL A1II compatible component is not supplied with a connecting cable, use either one...

Operating Instructions
Page 17
... nearest Sony dealer. If you do , the speakers may condense on CDs On handling CDs • To keep the disc clean, handle the disc by qualified personnel before operating it in a car parked in direct sunlight as there can be considerable rise in temperature inside the player. Do not use of scratches, dirt, recording condition, or the drive's characteristics. On adjusting volume • Do not turn up...
... nearest Sony dealer. If you do , the speakers may condense on CDs On handling CDs • To keep the disc clean, handle the disc by qualified personnel before operating it in a car parked in direct sunlight as there can be considerable rise in temperature inside the player. Do not use of scratches, dirt, recording condition, or the drive's characteristics. On adjusting volume • Do not turn up...

Operating Instructions
Page 18
.... The CD does not play. • There's no dISC" for about an hour. The remote does not function (CDP-XE570/XE370 only). • Remove the obstacles in the path of the following difficulties while using the player, use this troubleshooting guide to help you remedy the problem. The recording level has changed. • The recording level changes if you operate the amplifier correctly. • Adjust the analog output level with...
.... The CD does not play. • There's no dISC" for about an hour. The remote does not function (CDP-XE570/XE370 only). • Remove the obstacles in the path of the following difficulties while using the player, use this troubleshooting guide to help you remedy the problem. The recording level has changed. • The recording level changes if you operate the amplifier correctly. • Adjust the analog output level with...

Operating Instructions
Page 20
Sony Corporation Printed in Malaysia
Sony Corporation Printed in Malaysia


