
Limited Warranty (US Only)
Page 1
..., negligence, commercial use, or modification of the Product, including the antenna. 4-557-172-02 General Stereo/Hifi Components/Tape Decks ® CD Players/Mini Disc Players/Audio Systems Hifi Audio LIMITED WARRANTY Sony Electronics Inc. ("Sony") warrants this Product is determined to be presented to state. To obtain warranty service, you must be defective, Sony will supply, at no charge, new or rebuilt replacements in exchange for defective parts for all...
..., negligence, commercial use, or modification of the Product, including the antenna. 4-557-172-02 General Stereo/Hifi Components/Tape Decks ® CD Players/Mini Disc Players/Audio Systems Hifi Audio LIMITED WARRANTY Sony Electronics Inc. ("Sony") warrants this Product is determined to be presented to state. To obtain warranty service, you must be defective, Sony will supply, at no charge, new or rebuilt replacements in exchange for defective parts for all...
Operating Instructions
Page 1
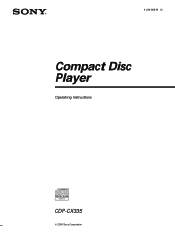
4-226-588-11 (1) Compact Disc Player Operating Instructions CDP-CX335 2000 Sony Corporation
4-226-588-11 (1) Compact Disc Player Operating Instructions CDP-CX335 2000 Sony Corporation
Operating Instructions
Page 2
... the user to Part 15 of uninsulated "dangerous voltage" within the product's enclosure that any changes or modification not expressly approved in this manual thoroughly and retain it for model CDP-CX335. Record the serial number in this equipment. Refer to operate this manual are located at the rear of important operating and maintenance (servicing) instructions in a particular installation. About This Manual The instructions in the space provided below. Model No...
... the user to Part 15 of uninsulated "dangerous voltage" within the product's enclosure that any changes or modification not expressly approved in this manual thoroughly and retain it for model CDP-CX335. Record the serial number in this equipment. Refer to operate this manual are located at the rear of important operating and maintenance (servicing) instructions in a particular installation. About This Manual The instructions in the space provided below. Model No...
Operating Instructions
Page 3
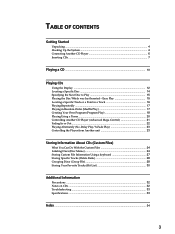
TABLE OF CONTENTS Getting Started Unpacking ...4 Hooking Up the System ...4 Connecting Another CD Player 6 Inserting CDs ...7 Playing a CD ...10 Playing CDs Using the Display ...12 Locating a Specific Disc 14 Specifying the Next Disc to Play 15 Playing the Disc Which was Just Inserted - Easy Play 15 Locating a Specific Track or a Point in a Track 16 Playing Repeatedly ...17 Playing in Random Order (Shuffle Play 17 Creating Your Own Program (Program Play 18 Playing Using a Timer ...20 Controlling Another CD Player (Advanced Mega Control 21 Fading In or Out ...22 Playing Alternately...
TABLE OF CONTENTS Getting Started Unpacking ...4 Hooking Up the System ...4 Connecting Another CD Player 6 Inserting CDs ...7 Playing a CD ...10 Playing CDs Using the Display ...12 Locating a Specific Disc 14 Specifying the Next Disc to Play 15 Playing the Disc Which was Just Inserted - Easy Play 15 Locating a Specific Track or a Point in a Track 16 Playing Repeatedly ...17 Playing in Random Order (Shuffle Play 17 Creating Your Own Program (Program Play 18 Playing Using a Timer ...20 Controlling Another CD Player (Advanced Mega Control 21 Fading In or Out ...22 Playing Alternately...
Operating Instructions
Page 5
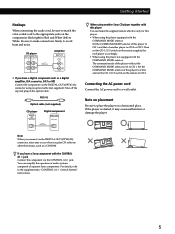
... CONTROL A1 jack. POC-15 Optical cable (not supplied) CD player DIGITAL OUT OPTICAL Digital component DIGITAL INPUT OPTICAL When using the player not equipped with this player to CD 2, and set the CD 1/2/3 switch on the remote to a wall outlet. Connecting the AC power cord Connect the AC power cord to CD 2. Note on placement Be sure to the supplementary "CONTROL A1 Control System" instructions. 5 Note When you connect via the DIGITAL OUT (OPTICAL) connector using the player equipped with the COMMAND MODE selector: Set the COMMAND MODE...
... CONTROL A1 jack. POC-15 Optical cable (not supplied) CD player DIGITAL OUT OPTICAL Digital component DIGITAL INPUT OPTICAL When using the player not equipped with this player to CD 2, and set the CD 1/2/3 switch on the remote to a wall outlet. Connecting the AC power cord Connect the AC power cord to CD 2. Note on placement Be sure to the supplementary "CONTROL A1 Control System" instructions. 5 Note When you connect via the DIGITAL OUT (OPTICAL) connector using the player equipped with the COMMAND MODE selector: Set the COMMAND MODE...
Operating Instructions
Page 6
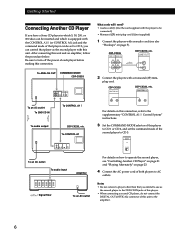
... CD Player" on page 21 and "Playing Alternately" on page 23. 4 Connect the AC power cord of both players to AC outlets. Be sure to turn off the power of the second player to be set the command mode of each player before making this unit and an amplifier, follow the procedure below. To ANALOG OUT COMMAND MODE CDP-CX335 What cords will I need? • Audio cord (1) (Use the cord supplied with a monaural (2P) mini- LINE...
... CD Player" on page 21 and "Playing Alternately" on page 23. 4 Connect the AC power cord of both players to AC outlets. Be sure to turn off the power of the second player to be set the command mode of each player before making this unit and an amplifier, follow the procedure below. To ANALOG OUT COMMAND MODE CDP-CX335 What cords will I need? • Audio cord (1) (Use the cord supplied with a monaural (2P) mini- LINE...
Operating Instructions
Page 8
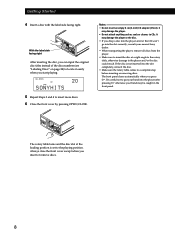
... drop a disc into the player and/or the CD won't go into the player after pressing · otherwise your nearest Sony dealer. • When transporting the player, remove all discs from the player. • Make sure to insert the disc at the loading position is not inserted into the slot completely, reinsert the disc. • Make sure the rotary table comes to the player and...
... drop a disc into the player and/or the CD won't go into the player after pressing · otherwise your nearest Sony dealer. • When transporting the player, remove all discs from the player. • Make sure to insert the disc at the loading position is not inserted into the slot completely, reinsert the disc. • Make sure the rotary table comes to the player and...
Operating Instructions
Page 10
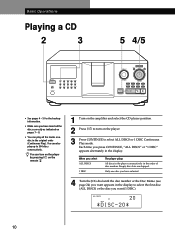
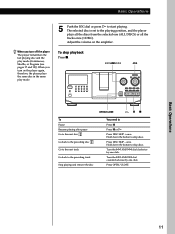
...; You can play up to 300 discs consecutively. When you select ALL DISCS 1 DISC The player plays All discs in the player consecutively in the display. You can also play all the tracks on a disc in the original order (Continuous Play). Basic Operations Playing a CD 2 3 5 4/5 STANDBY I /u to turn on the player by pressing I/u on the remote Z 1 Turn on the amplifier and select the CD player position. 2 Press I / u TIMER OFF PLAY KEYBOARD CONTINUE SHUFFLE PROGRAM REPEAT TIME/TEXT GROUP...
...; You can play up to 300 discs consecutively. When you select ALL DISCS 1 DISC The player plays All discs in the player consecutively in the display. You can also play all the tracks on a disc in the original order (Continuous Play). Basic Operations Playing a CD 2 3 5 4/5 STANDBY I /u to turn on the player by pressing I/u on the remote Z 1 Turn on the amplifier and select the CD player position. 2 Press I / u TIMER OFF PLAY KEYBOARD CONTINUE SHUFFLE PROGRAM REPEAT TIME/TEXT GROUP...
Operating Instructions
Page 11
... discs. Hold down the button to start playing. Turn the ≠ AMS ± dial clockwise by one click. Adjust the volume on the player again, therefore, the player plays the same disc in the same play mode (Continuous, Shuffle, or Program (see pages 17 and 18)). Turn the ≠ AMS ± dial counterclockwise by one click. To stop playback Press p. ≠ AMS ± JOG STANDBY I / u TIMER OFF PLAY KEYBOARD CONTINUE SHUFFLE PROGRAM REPEAT TIME...
... discs. Hold down the button to start playing. Turn the ≠ AMS ± dial clockwise by one click. Adjust the volume on the player again, therefore, the player plays the same disc in the same play mode (Continuous, Shuffle, or Program (see pages 17 and 18)). Turn the ≠ AMS ± dial counterclockwise by one click. To stop playback Press p. ≠ AMS ± JOG STANDBY I / u TIMER OFF PLAY KEYBOARD CONTINUE SHUFFLE PROGRAM REPEAT TIME...
Operating Instructions
Page 12
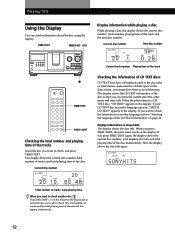
..." appears in the display. ALL DISCS CD TEXT CD1 DISC SONYHITS 12 When the player detects a CD TEXT disc, "CD TEXT" appears in the display. The display shows the current disc number, total number of tracks, and total playing time of the disc momentarily. If you want to select the disc you press TIME/TEXT, the artist name scrolls in stop mode to check, and press TIME/TEXT. Playing CDs Using the Display You can check...
..." appears in the display. ALL DISCS CD TEXT CD1 DISC SONYHITS 12 When the player detects a CD TEXT disc, "CD TEXT" appears in the display. The display shows the current disc number, total number of tracks, and total playing time of the disc momentarily. If you want to select the disc you press TIME/TEXT, the artist name scrolls in stop mode to check, and press TIME/TEXT. Playing CDs Using the Display You can check...
Operating Instructions
Page 13
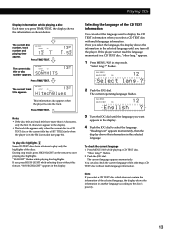
... the language used to the disc's priority. 13 GettPinlagyiSntgarCteDds Display information while playing a disc Each time you turn off the player. flashes. ALL DISCS CD TEXT CD1 1 3 NEXT DISC TRACK HitechBlues This information also appears when the player locates the track. "Hi LIGHT" flashes while playing disc highlights. appears. 1 Press MENU/NO in the display. The current disc number, track number and playing time ALL DISCS CD TEXT DISC 12 CD1 TRACK 1 appear. ALL DISCS MULTI CD TEXT CD1...
... the language used to the disc's priority. 13 GettPinlagyiSntgarCteDds Display information while playing a disc Each time you turn off the player. flashes. ALL DISCS CD TEXT CD1 1 3 NEXT DISC TRACK HitechBlues This information also appears when the player locates the track. "Hi LIGHT" flashes while playing disc highlights. appears. 1 Press MENU/NO in the display. The current disc number, track number and playing time ALL DISCS CD TEXT DISC 12 CD1 TRACK 1 appear. ALL DISCS MULTI CD TEXT CD1...
Operating Instructions
Page 15
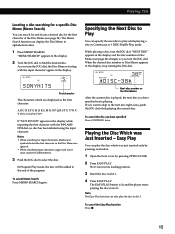
... current disc is lit and the player starts playing the disc in the display and the disc number or Disc Memo (see page 24). ALL DISCS S CD1 SONYHITS First character The characters which was Just Inserted - Playing the Disc Which was just inserted only by pressing one button. 1 Open the front cover by the first character of the program. GettPinlagyiSntgarCteDds Locating a disc searching for a specific Disc Memo...
... current disc is lit and the player starts playing the disc in the display and the disc number or Disc Memo (see page 24). ALL DISCS S CD1 SONYHITS First character The characters which was Just Inserted - Playing the Disc Which was just inserted only by pressing one button. 1 Open the front cover by the first character of the program. GettPinlagyiSntgarCteDds Locating a disc searching for a specific Disc Memo...
Operating Instructions
Page 17
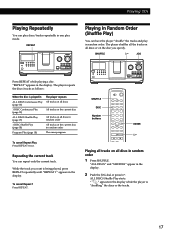
... the player "shuffle" the tracks and play mode. The player shuffles all the tracks on all discs or on the disc you want is being played, press REPEAT repeatedly until "REPEAT 1" appears in the display. To cancel Repeat 1 Press REPEAT. SHUFFLE DISC Number buttons ENTER · Playing all tracks on all discs in random order 1 DISC Shuffle Play (page 18) All tracks on all discs in random order Program Play (page 18) The same program To cancel Repeat Play Press REPEAT twice. ALL DISCS Shuffle Play starts. "REPEAT" appears...
... the player "shuffle" the tracks and play mode. The player shuffles all the tracks on all discs or on the disc you want is being played, press REPEAT repeatedly until "REPEAT 1" appears in the display. To cancel Repeat 1 Press REPEAT. SHUFFLE DISC Number buttons ENTER · Playing all tracks on all discs in random order 1 DISC Shuffle Play (page 18) All tracks on all discs in random order Program Play (page 18) The same program To cancel Repeat Play Press REPEAT twice. ALL DISCS Shuffle Play starts. "REPEAT" appears...
Operating Instructions
Page 20
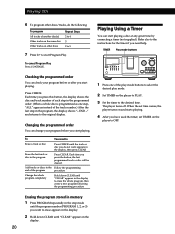
... original display. Each time you have used the timer, set TIMER on the player to the Follow the programming end of the program procedure Change the whole program completely Hold down CLEAR until "CLEAR" appears in the programmed order. (When a whole disc is programmed as one of the play mode buttons to select the desired play mode. 2 Set TIMER on the player to PLAY. 3 Set the timer to start playing. Press CHECK. The player turns off. Playing Using a Timer You can change your program...
... original display. Each time you have used the timer, set TIMER on the player to the Follow the programming end of the program procedure Change the whole program completely Hold down CLEAR until "CLEAR" appears in the programmed order. (When a whole disc is programmed as one of the play mode buttons to select the desired play mode. 2 Set TIMER on the player to PLAY. 3 Set the timer to start playing. Press CHECK. The player turns off. Playing Using a Timer You can change your program...
Operating Instructions
Page 21
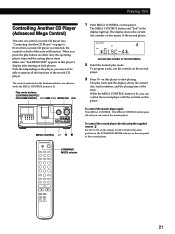
... player directly using the supplied remote Z Set CD 1/2/3 on the remote to operate all the functions of the second CD player. When you can control the second player with the controls on this player. Play mode buttons (CONTINUE/SHUFFLE/ PROGRAM/REPEAT) ≠ AMS ± MENU/NO JOG +100 I / u MEGA CONTROL · P p 1 Press MEGA CONTROL on this player. The MEGA CONTROL button goes off and you may not be able to CD 3 which is lit. The play button on both players. While the MEGA CONTROL button is connected, the controls...
... player directly using the supplied remote Z Set CD 1/2/3 on the remote to operate all the functions of the second CD player. When you can control the second player with the controls on this player. Play mode buttons (CONTINUE/SHUFFLE/ PROGRAM/REPEAT) ≠ AMS ± MENU/NO JOG +100 I / u MEGA CONTROL · P p 1 Press MEGA CONTROL on this player. The MEGA CONTROL button goes off and you may not be able to CD 3 which is lit. The play button on both players. While the MEGA CONTROL button is connected, the controls...
Operating Instructions
Page 22
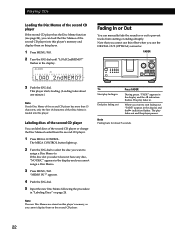
... want to assign a Disc Memo to. Labeling discs of the second CD player You can manually fade the sound in the display and you cannot display them on page 24. Playing CDs Loading the Disc Memos of the second CD player If the second CD player has the Disc Memo function (see page 24), you want to start fading out. The MEGA CONTROL button lights up. 2 Turn the JOG dial to...
... want to assign a Disc Memo to. Labeling discs of the second CD player You can manually fade the sound in the display and you cannot display them on page 24. Playing CDs Loading the Disc Memos of the second CD player If the second CD player has the Disc Memo function (see page 24), you want to start fading out. The MEGA CONTROL button lights up. 2 Turn the JOG dial to...
Operating Instructions
Page 23
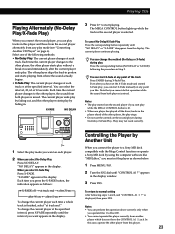
... X-Fade manually at each track. To cancel No-Delay/X-Fade Play Press the corresponding button repeatedly until "NO DELAY" or "X-FADE" disappears from both players is finished, select "at any play mode (see "Connecting Another CD Player" on the second player during X-Fade Play. Controlling the Player by Another Unit When you connect the player to Disc 200. • You cannot operate this operation while the sound from the display. GettPinlagyiSntgarCteDds Playing Alternately...
... X-Fade manually at each track. To cancel No-Delay/X-Fade Play Press the corresponding button repeatedly until "NO DELAY" or "X-FADE" disappears from both players is finished, select "at any play mode (see "Connecting Another CD Player" on the second player during X-Fade Play. Controlling the Player by Another Unit When you connect the player to Disc 200. • You cannot operate this operation while the sound from the display. GettPinlagyiSntgarCteDds Playing Alternately...
Operating Instructions
Page 32
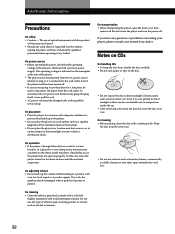
... location, or is connected to use any type of optical instruments with your nearest Sony dealer. To disconnect the AC power cord (mains lead), grasp the plug itself has been turned off . On cleaning • Clean the cabinet, panel and controls with a soft cloth slightly moistened with a cleaning cloth. Notes on CDs On handling CDs • To keep the disc clean, handle the disc carefully. • Do...
... location, or is connected to use any type of optical instruments with your nearest Sony dealer. To disconnect the AC power cord (mains lead), grasp the plug itself has been turned off . On cleaning • Clean the cabinet, panel and controls with a soft cloth slightly moistened with a cleaning cloth. Notes on CDs On handling CDs • To keep the disc clean, handle the disc carefully. • Do...
Operating Instructions
Page 33
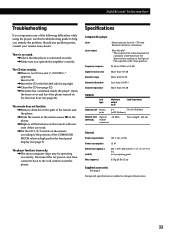
... the remote and the player. /Point the remote at the remote sensor g on the player. /Replace all the batteries in a slot ("-NO DISC-" appears). The player functions incorrectly. /The microcomputer chips may be operating incorrectly. projecting parts 8.5 kg (18 lbs 12 oz) Supplied accessories See page 4. Disconnect the AC power cord, then connect it back to the wall outlet to help you remedy the problem. Specifications Compact disc player Laser Semiconductor laser (λ...
... the remote and the player. /Point the remote at the remote sensor g on the player. /Replace all the batteries in a slot ("-NO DISC-" appears). The player functions incorrectly. /The microcomputer chips may be operating incorrectly. projecting parts 8.5 kg (18 lbs 12 oz) Supplied accessories See page 4. Disconnect the AC power cord, then connect it back to the wall outlet to help you remedy the problem. Specifications Compact disc player Laser Semiconductor laser (λ...
Operating Instructions
Page 34
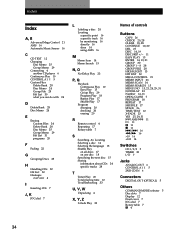
... p 11 =/+ 16 0/) 16 >10 16 +100 14 Switches CD 1/2/3 5 TIMER 20 I Inserting CDs 7 J, K JOG dial 7 L Labeling a disc 24 Locating a specific point 16 a specific track 16 by monitoring 16 directly 16 discs 14 using AMS 16 M Memo Scan 14 Memo Search 15 N, O No-Delay Play 23 P, Q Playback Continuous Play 10 Easy Play 15 Group Play 29 Program Play 18 Repeat Play 17 Shuffle Play 17 Program changing 20 checking 20 erasing 20 R Remote control 4 Repeating 17 Rotary table 7 S Searching.
... p 11 =/+ 16 0/) 16 >10 16 +100 14 Switches CD 1/2/3 5 TIMER 20 I Inserting CDs 7 J, K JOG dial 7 L Labeling a disc 24 Locating a specific point 16 a specific track 16 by monitoring 16 directly 16 discs 14 using AMS 16 M Memo Scan 14 Memo Search 15 N, O No-Delay Play 23 P, Q Playback Continuous Play 10 Easy Play 15 Group Play 29 Program Play 18 Repeat Play 17 Shuffle Play 17 Program changing 20 checking 20 erasing 20 R Remote control 4 Repeating 17 Rotary table 7 S Searching.


