Operating Instructions
Page 2
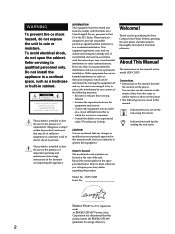
... receiver. - Consult the dealer or an experienced radio/TV technician for purchasing the Sony Compact Disc Player. Refer to the presence of the following icons are used in the literature accompanying the appliance. CDP-CX335 Serial No ENERGY STAR is intended to alert the user to them whenever ...controls on a circuit different from that to which can do not open the cabinet. To avoid electrical shock, do the task using the remote. Before operating the unit, please read this product. Indicates hints and tips for energy efficiency. 2 Model No. Do not install the...
... receiver. - Consult the dealer or an experienced radio/TV technician for purchasing the Sony Compact Disc Player. Refer to the presence of the following icons are used in the literature accompanying the appliance. CDP-CX335 Serial No ENERGY STAR is intended to alert the user to them whenever ...controls on a circuit different from that to which can do not open the cabinet. To avoid electrical shock, do the task using the remote. Before operating the unit, please read this product. Indicates hints and tips for energy efficiency. 2 Model No. Do not install the...
Operating Instructions
Page 4
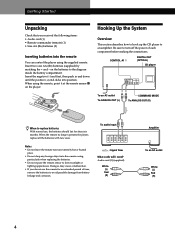
... push in and down until the positive (+) end clicks into the remote You can control the player using the remote, point it at the remote sensor g on the batteries to an amplifier. Notes • Do not leave the remote near an extremely hot or humid place. • Do not drop...White (L) Red (R) Amplifier To an AC outlet White (L) Red (R) 4 When using the supplied remote. When the remote no longer operates the player, replace all the batteries with new ones. CONTROL A1 DIGITAL OUT (OPTICAL) CD player To an AC outlet To ANALOG OUT (L) COMMAND MODE To ANALOG OUT (R) When to avoid ...
... push in and down until the positive (+) end clicks into the remote You can control the player using the remote, point it at the remote sensor g on the batteries to an amplifier. Notes • Do not leave the remote near an extremely hot or humid place. • Do not drop...White (L) Red (R) Amplifier To an AC outlet White (L) Red (R) 4 When using the supplied remote. When the remote no longer operates the player, replace all the batteries with new ones. CONTROL A1 DIGITAL OUT (OPTICAL) CD player To an AC outlet To ANALOG OUT (L) COMMAND MODE To ANALOG OUT (R) When to avoid ...
Operating Instructions
Page 5
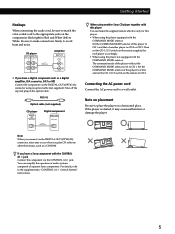
...DIGITAL OUT (OPTICAL) connector using an optical cable (not supplied). Be sure to make the supplied remote effective only for each player accordingly. • When using another player to place the player on placement Be sure to CD 2 or CD 3. Connecting the AC power cord Connect the AC... (not supplied) CD player DIGITAL OUT OPTICAL Digital component DIGITAL INPUT OPTICAL When using the player not equipped with the COMMAND MODE selector: The command mode of separate Sony components. Then set to CD 1 and that of another Sony CD player together with this player You can simplify the ...
...DIGITAL OUT (OPTICAL) connector using an optical cable (not supplied). Be sure to make the supplied remote effective only for each player accordingly. • When using another player to place the player on placement Be sure to CD 2 or CD 3. Connecting the AC power cord Connect the AC... (not supplied) CD player DIGITAL OUT OPTICAL Digital component DIGITAL INPUT OPTICAL When using the player not equipped with the COMMAND MODE selector: The command mode of separate Sony components. Then set to CD 1 and that of another Sony CD player together with this player You can simplify the ...
Operating Instructions
Page 10
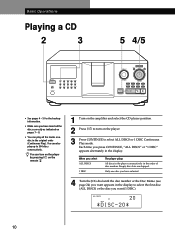
You can also play all the tracks on a disc in the display. Empty disc slots are skipped. Basic Operations Playing a CD 2 3 5 4/5 STANDBY I /u to turn on the player by pressing I/u on the remote Z 1 Turn on the amplifier and select the CD player position. 2 Press I / u TIMER OFF PLAY KEYBOARD CONTINUE SHUFFLE PROGRAM REPEAT TIME/TEXT GROUP 1 GROUP 2 GROUP...
You can also play all the tracks on a disc in the display. Empty disc slots are skipped. Basic Operations Playing a CD 2 3 5 4/5 STANDBY I /u to turn on the player by pressing I/u on the remote Z 1 Turn on the amplifier and select the CD player position. 2 Press I / u TIMER OFF PLAY KEYBOARD CONTINUE SHUFFLE PROGRAM REPEAT TIME/TEXT GROUP 1 GROUP 2 GROUP...
Operating Instructions
Page 12
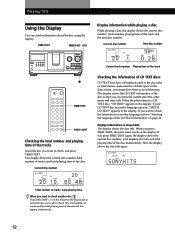
.... When you want to "Selecting the language of the CD TEXT information" on the remote in a blank space on the discs where, on normal discs, there is no information. If you can check information about the disc using the display. TIME/TEXT MENU/NO JOG +100 I / u p TIME/TEXT HIGH-LIGHT ...Checking the total number and playing time of the disc so that you press TIME/TEXT again, the display shows the current disc number, total number of tracks, and total playing time of the disc. on page 13. When the player detects a CD TEXT disc, "CD TEXT" appears in the display. The...
.... When you want to "Selecting the language of the CD TEXT information" on the remote in a blank space on the discs where, on normal discs, there is no information. If you can check information about the disc using the display. TIME/TEXT MENU/NO JOG +100 I / u p TIME/TEXT HIGH-LIGHT ...Checking the total number and playing time of the disc so that you press TIME/TEXT again, the display shows the current disc number, total number of tracks, and total playing time of the disc. on page 13. When the player detects a CD TEXT disc, "CD TEXT" appears in the display. The...
Operating Instructions
Page 13
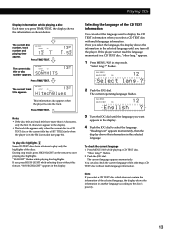
... 13 characters appear in the display. • The track title appears only when the current disc is a CD TEXT disc or the current title has a HIT TITLE (only when the player is in another language according to select the language. "Show lang.?" You can select the ... 1 3 NEXT DISC TRACK HitechBlues This information also appears when the player locates the track. The current operating language flashes. The current language appears momentarily. "Reading text" appears momentarily, then the display shows the information in stop mode, press HIGH-LIGHT on the remote to display the ...
... 13 characters appear in the display. • The track title appears only when the current disc is a CD TEXT disc or the current title has a HIT TITLE (only when the player is in another language according to select the language. "Show lang.?" You can select the ... 1 3 NEXT DISC TRACK HitechBlues This information also appears when the player locates the track. The current operating language flashes. The current language appears momentarily. "Reading text" appears momentarily, then the display shows the information in stop mode, press HIGH-LIGHT on the remote to display the ...
Operating Instructions
Page 14
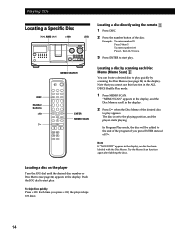
...disc has been labeled with the Disc Memo. Locating a disc on the player Turn the JOG dial until the desired disc number or Disc Memo (see page 24) in the display . Locating a disc by scanning each Disc Memo (Memo Scan) Z You can locate a desired disc to play quickly by scanning the Disc...SCAN. To skip discs quickly Press +100. Playing CDs Locating a Specific Disc ≠ AMS ± +100 JOG +100 I / u MEMO SEARCH DISC Number buttons >10 · ENTER MEMO SCAN Locating a disc directly using the remote 1 Press DISC. 2 Press the number button of the desired disc to play appears....
...disc has been labeled with the Disc Memo. Locating a disc on the player Turn the JOG dial until the desired disc number or Disc Memo (see page 24) in the display . Locating a disc by scanning each Disc Memo (Memo Scan) Z You can locate a desired disc to play quickly by scanning the Disc...SCAN. To skip discs quickly Press +100. Playing CDs Locating a Specific Disc ≠ AMS ± +100 JOG +100 I / u MEMO SEARCH DISC Number buttons >10 · ENTER MEMO SCAN Locating a disc directly using the remote 1 Press DISC. 2 Press the number button of the desired disc to play appears....
Operating Instructions
Page 16
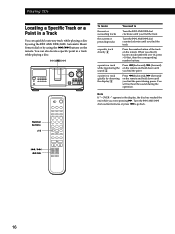
... the sound Z a point in a track quickly by using the =/+ buttons on the remote. Playing CDs Locating a Specific Track or a Point in a Track You can also locate a specific point in the display, the disc has reached the end while you directly locate a track numbered over 10, press >10 first...down until you find the point Press 0 (backward)/) (forward) on the remote and hold down until you find the track a specific track directly Z Press the number button of the track on the remote. OVER -" appears in a track while playing a disc. ≠ AMS ± +100 I / u To locate You need ...
... the sound Z a point in a track quickly by using the =/+ buttons on the remote. Playing CDs Locating a Specific Track or a Point in a Track You can also locate a specific point in the display, the disc has reached the end while you directly locate a track numbered over 10, press >10 first...down until you find the point Press 0 (backward)/) (forward) on the remote and hold down until you find the track a specific track directly Z Press the number button of the track on the remote. OVER -" appears in a track while playing a disc. ≠ AMS ± +100 I / u To locate You need ...
Operating Instructions
Page 18
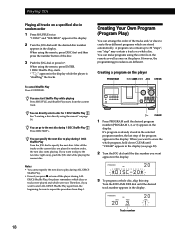
... last step of the program appears in the display while the player is "shuffling" the tracks. After all tracks on the player. When using the controls on the remote as well as ones on a specified disc in random order, the next disc starts playing. PROGRAM1 DISC 20 CD1 TRACK 3 20 STEP 1 Track number 18 Therefore, if...
... last step of the program appears in the display while the player is "shuffling" the tracks. After all tracks on the player. When using the controls on the remote as well as ones on a specified disc in random order, the next disc starts playing. PROGRAM1 DISC 20 CD1 TRACK 3 20 STEP 1 Track number 18 Therefore, if...
Operating Instructions
Page 19
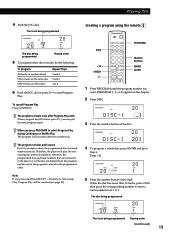
... -- 20 STEP 1 5 Press the number button of the disc. When you can play the new existing disc and track numbers. PROGRAM1 CD1 DISC-[ 20 20] 4 To program a whole disc, press ENTER and go to 9. Therefore, the player will be canceled (see page 29). Creating a program using the remote Z DISC >10 CHECK · PROGRAM Number buttons ENTER CLEAR...
... -- 20 STEP 1 5 Press the number button of the disc. When you can play the new existing disc and track numbers. PROGRAM1 CD1 DISC-[ 20 20] 4 To program a whole disc, press ENTER and go to 9. Therefore, the player will be canceled (see page 29). Creating a program using the remote Z DISC >10 CHECK · PROGRAM Number buttons ENTER CLEAR...
Operating Instructions
Page 21
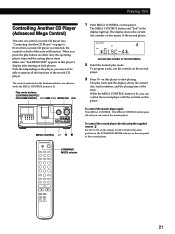
... selector on both of the units will function. ALL DISCS 4 CD1 2nd DISC *DISC-4* Current disc number or the Disc Memo 2 Select the desired play button on both players. To control the second player directly using the supplied remote Z Set CD 1/2/3 on page 6). When you can control the master player. Make sure "2nd DETECTED" appears in the illustration below...
... selector on both of the units will function. ALL DISCS 4 CD1 2nd DISC *DISC-4* Current disc number or the Disc Memo 2 Select the desired play button on both players. To control the second player directly using the supplied remote Z Set CD 1/2/3 on page 6). When you can control the master player. Make sure "2nd DETECTED" appears in the illustration below...

Operating Instructions
Page 26
..., and then ENTER. 3 Press MEMO INPUT. You can also go to the next space by pressing other discs. 26 Storing Information About CDs (Custom Files) Labeling discs using the remote Z DEL MEMO INPUT =/+ SPACE CAPS Number buttons ENTER CLEAR 5 To input a letter, press the number button corresponding ...to the letter you want . 6 Press ENTER to select the character. The Disc Memo lights up , and the ...
..., and then ENTER. 3 Press MEMO INPUT. You can also go to the next space by pressing other discs. 26 Storing Information About CDs (Custom Files) Labeling discs using the remote Z DEL MEMO INPUT =/+ SPACE CAPS Number buttons ENTER CLEAR 5 To input a letter, press the number button corresponding ...to the letter you want . 6 Press ENTER to select the character. The Disc Memo lights up , and the ...

Operating Instructions
Page 30
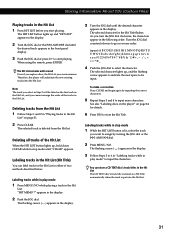
...You can jump to the playing position. When using the remote, press DISC SKIP repeatedly until the disc number you want appears in the display, then press ENTER. 4 Press ENTER or · when the Disc Memo of the disc you want . The Disc Memos of the discs in the selected group scroll in the Hit List. To...input the 33rd track into the Hit List, the 32nd track will be replaced. • You cannot store the tracks from a second CD player. 30 Note that disc. HIT LIST 1 Press GROUP first, then the number button of the group you cannot use this function in the display and then start ...
...You can jump to the playing position. When using the remote, press DISC SKIP repeatedly until the disc number you want appears in the display, then press ENTER. 4 Press ENTER or · when the Disc Memo of the disc you want . The Disc Memos of the discs in the selected group scroll in the Hit List. To...input the 33rd track into the Hit List, the 32nd track will be replaced. • You cannot store the tracks from a second CD player. 30 Note that disc. HIT LIST 1 Press GROUP first, then the number button of the group you cannot use this function in the display and then start ...
Operating Instructions
Page 31
...and "HIT LIST" appears in the display. 2 Turn the JOG dial or the ≠ AMS ± dial until "CLEAR" appears. When using the remote, press ENTER. The selected character for details. 6 Press YES to store the Hit Title. "HIT MEMO ?" Note The track you turn the JOG dial... flashing cursor ( ) appears in the display. 3 Turn the JOG dial until erased Even if you replace discs, the Hit List you cannot arrange the order of two methods described below. See also "Labeling discs on the player" on page 31. 2 Press CLEAR. The flashing cursor ( ) appears in the display. 3 Follow Steps 3...
...and "HIT LIST" appears in the display. 2 Turn the JOG dial or the ≠ AMS ± dial until "CLEAR" appears. When using the remote, press ENTER. The selected character for details. 6 Press YES to store the Hit Title. "HIT MEMO ?" Note The track you turn the JOG dial... flashing cursor ( ) appears in the display. 3 Turn the JOG dial until erased Even if you replace discs, the Hit List you cannot arrange the order of two methods described below. See also "Labeling discs on the player" on page 31. 2 Press CLEAR. The flashing cursor ( ) appears in the display. 3 Follow Steps 3...
Operating Instructions
Page 33
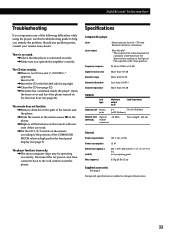
... the front panel display (see page 32). /Moisture has condensed inside the player. Should any of 200 mm from the objective lens surface on for about an hour (see page 32). Specifications Compact disc player Laser Semiconductor laser (λ = 780 nm) Emission duration: continuous Laser output...switch on the remote according to reset the player. The remote does not function. /Remove obstacles in the path of the COMMAND MODE selector displayed in .) incl. Additional Information Troubleshooting If you experience any problem persist, consult your nearest Sony dealer. projecting ...
... the front panel display (see page 32). /Moisture has condensed inside the player. Should any of 200 mm from the objective lens surface on for about an hour (see page 32). Specifications Compact disc player Laser Semiconductor laser (λ = 780 nm) Emission duration: continuous Laser output...switch on the remote according to reset the player. The remote does not function. /Remove obstacles in the path of the COMMAND MODE selector displayed in .) incl. Additional Information Troubleshooting If you experience any problem persist, consult your nearest Sony dealer. projecting ...
Operating Instructions
Page 34
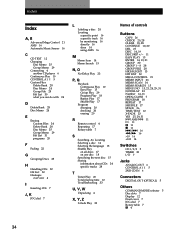
Index Index A, B Advanced Mega Control 21 AMS 16 Automatic Music Sensor 16 C CD TEXT 12 Changing Disc Memo 25 Group Memo 29 Connecting 4 another CD player 6 Continuous Play 10 CONTROL A1 5 Custom Files Delete Bank 28 Disc Memo 24 Group File 28 Hit List 30 what you can do with 24 D Delete Bank 28... by monitoring 16 directly 16 discs 14 using AMS 16 M Memo Scan 14 Memo Search 15 N, O No-Delay Play 23 P, Q Playback Continuous Play 10 Easy Play 15 Group Play 29 Program Play 18 Repeat Play 17 Shuffle Play 17 Program changing 20 checking 20 erasing 20 R Remote control 4 Repeating 17 Rotary table...
Index Index A, B Advanced Mega Control 21 AMS 16 Automatic Music Sensor 16 C CD TEXT 12 Changing Disc Memo 25 Group Memo 29 Connecting 4 another CD player 6 Continuous Play 10 CONTROL A1 5 Custom Files Delete Bank 28 Disc Memo 24 Group File 28 Hit List 30 what you can do with 24 D Delete Bank 28... by monitoring 16 directly 16 discs 14 using AMS 16 M Memo Scan 14 Memo Search 15 N, O No-Delay Play 23 P, Q Playback Continuous Play 10 Easy Play 15 Group Play 29 Program Play 18 Repeat Play 17 Shuffle Play 17 Program changing 20 checking 20 erasing 20 R Remote control 4 Repeating 17 Rotary table...


