
Operating Instructions (primary manual)
Page 1
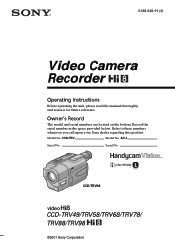
Model No. AC-L Serial No. Record the serial number in the space provided below. CCD-TRV Model No. Serial No. Refer to these numbers whenever you call upon your Sony dealer regarding this manual thoroughly, and retain it for future reference. 3-065-648-11 (3) Video Camera Recorder Operating Instructions Before operating the unit, please read this product. Owner's Record The model and serial numbers are located on the bottom. CCD-TRV98 CCD-TRV49/TRV58/TRV68/TRV78/ TRV88/TRV98 ©2001 Sony Corporation
Model No. AC-L Serial No. Record the serial number in the space provided below. CCD-TRV Model No. Serial No. Refer to these numbers whenever you call upon your Sony dealer regarding this manual thoroughly, and retain it for future reference. 3-065-648-11 (3) Video Camera Recorder Operating Instructions Before operating the unit, please read this product. Owner's Record The model and serial numbers are located on the bottom. CCD-TRV98 CCD-TRV49/TRV58/TRV68/TRV78/ TRV88/TRV98 ©2001 Sony Corporation
Operating Instructions (primary manual)
Page 2
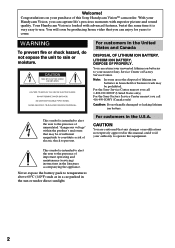
... some areas the disposal of lithium ion batteries in this manual could void your nearest Sony Service Center or Factory Service Center. For the Sony Service Center nearest you call 1-800-222-SONY (United States only) For the Sony Factory Service Center nearest you can return your unwanted lithium... not expressly approved in household or business trash may be producing home video that may be prohibited. With your purchase of uninsulated "dangerous voltage" within the product's enclosure that you call 416-499-SONY (Canada only) Caution: Do not handle damaged or leaking lithium ion...
... some areas the disposal of lithium ion batteries in this manual could void your nearest Sony Service Center or Factory Service Center. For the Sony Service Center nearest you call 1-800-222-SONY (United States only) For the Sony Factory Service Center nearest you can return your unwanted lithium... not expressly approved in household or business trash may be producing home video that may be prohibited. With your purchase of uninsulated "dangerous voltage" within the product's enclosure that you call 416-499-SONY (Canada only) Caution: Do not handle damaged or leaking lithium ion...
Operating Instructions (primary manual)
Page 4
...settings. ) D ZOOM [MENU] (p. 52) •Focusing manually Manual focus (p. 42) •Shooting distant subjects Landscape mode (p. 39) •Recording fast-moving subjects Sports lesson mode (p. 39) Functions to use in editing (in the recording mode) •Watching the picture on a wide-screen TV ... the picture on a TV without connecting a cord •Recording with the date/time SUPER LASER LINK (p. 33) (CCD-TRV98 only) Date and time (p. 27) •Enhancing old tapes ORC [MENU] (p. 54) Functions to use after recording (in the playback mode) •Correcting jitter TBC [MENU...
...settings. ) D ZOOM [MENU] (p. 52) •Focusing manually Manual focus (p. 42) •Shooting distant subjects Landscape mode (p. 39) •Recording fast-moving subjects Sports lesson mode (p. 39) Functions to use in editing (in the recording mode) •Watching the picture on a wide-screen TV ... the picture on a TV without connecting a cord •Recording with the date/time SUPER LASER LINK (p. 33) (CCD-TRV98 only) Date and time (p. 27) •Enhancing old tapes ORC [MENU] (p. 54) Functions to use after recording (in the playback mode) •Correcting jitter TBC [MENU...
Operating Instructions (primary manual)
Page 5
... and time ........ 17 Step 3 Inserting a cassette 19 Recording - END SEARCH 28 Playback - Basics Recording a picture 20 Shooting backlit subjects - Basics Playing back a tape 29 Viewing the recording on pictures 27 Checking the recording - Picture effect 38 Using the PROGRAM AE function .... 39 Adjusting the exposure manually ...... 41 Focusing manually 42 Superimposing a title 43 Making your camcorder...
... and time ........ 17 Step 3 Inserting a cassette 19 Recording - END SEARCH 28 Playback - Basics Recording a picture 20 Shooting backlit subjects - Basics Playing back a tape 29 Viewing the recording on pictures 27 Checking the recording - Picture effect 38 Using the PROGRAM AE function .... 39 Adjusting the exposure manually ...... 41 Focusing manually 42 Superimposing a title 43 Making your camcorder...
Operating Instructions (primary manual)
Page 8
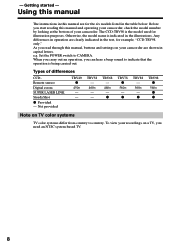
.... TRV58 - 460× - - The CCD-TRV98 is indicated in this manual are for example, "CCD-TRV98 only." Otherwise, the model name is the model used for illustration purposes. When you carry out an operation, you start reading this manual, buttons and settings on your camcorder. Before you can hear a beep sound to CAMERA. Types of your camcorder...
.... TRV58 - 460× - - The CCD-TRV98 is indicated in this manual are for example, "CCD-TRV98 only." Otherwise, the model name is the model used for illustration purposes. When you carry out an operation, you start reading this manual, buttons and settings on your camcorder. Before you can hear a beep sound to CAMERA. Types of your camcorder...
Operating Instructions (primary manual)
Page 9
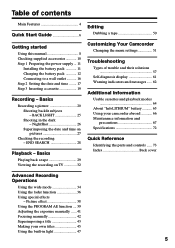
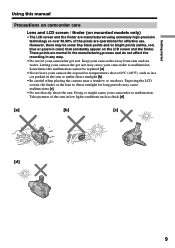
... sun. Take pictures of the pixels are normal in the manufacturing process and do not affect the recording in any way. • Do not let your camcorder get wet may be repaired [a]. •... as in a car parked in low light conditions such as duck [d]. [a] [b] [c] [d] 9 Sometimes this manual Precautions on camcorder care Lens and LCD screen / finder (on the LCD screen and the finder. Keep your... sun in the sun or under direct sunlight [b]. • Be careful when placing the camera near a window or outdoors. However, there may cause your camcorder to malfunction. Doing so might...
... sun. Take pictures of the pixels are normal in the manufacturing process and do not affect the recording in any way. • Do not let your camcorder get wet may be repaired [a]. •... as in a car parked in low light conditions such as duck [d]. [a] [b] [c] [d] 9 Sometimes this manual Precautions on camcorder care Lens and LCD screen / finder (on the LCD screen and the finder. Keep your... sun in the sun or under direct sunlight [b]. • Be careful when placing the camera near a window or outdoors. However, there may cause your camcorder to malfunction. Doing so might...
Operating Instructions (primary manual)
Page 26
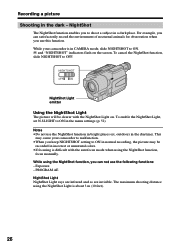
... to OFF. Exposure - Recording a picture Shooting in CAMERA mode, slide NIGHTSHOT to ON. NightShot The NightShot function enables you can satisfactorily record the environment of nocturnal animals for observation when you keep NIGHTSHOT setting to ON in normal recording, the picture may cause ...- This may be clearer with the autofocus mode when using the NightShot function, focus manually. NIGHTSHOT OFF ON NightShot Light emitter Using the NightShot Light The picture will be recorded in the daytime). Notes •Do not use this function. and "NIGHTSHOT" indicators ...
... to OFF. Exposure - Recording a picture Shooting in CAMERA mode, slide NIGHTSHOT to ON. NightShot The NightShot function enables you can satisfactorily record the environment of nocturnal animals for observation when you keep NIGHTSHOT setting to ON in normal recording, the picture may cause ...- This may be clearer with the autofocus mode when using the NightShot function, focus manually. NIGHTSHOT OFF ON NightShot Light emitter Using the NightShot Light The picture will be recorded in the daytime). Notes •Do not use this function. and "NIGHTSHOT" indicators ...
Operating Instructions (primary manual)
Page 27
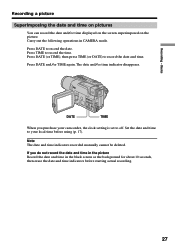
... time indicator disappears. DATE TIME When you do not record the date and time in the picture Record the date and time in CAMERA mode. Basics Recording a picture Superimposing the date and time on pictures You can record the date and/or time displayed on the screen superimposed... on the picture. Set the date and time to your camcorder, the clock setting is set to record the date. Note The date and time indicators recorded manually...
... time indicator disappears. DATE TIME When you do not record the date and time in the picture Record the date and time in CAMERA mode. Basics Recording a picture Superimposing the date and time on pictures You can record the date and/or time displayed on the screen superimposed... on the picture. Set the date and time to your camcorder, the clock setting is set to record the date. Note The date and time indicators recorded manually...
Operating Instructions (primary manual)
Page 41
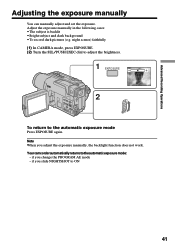
... backlight function does not work. if you slide NIGHTSHOT to the automatic exposure mode: - Advanced Recording Operations Adjusting the exposure manually You can manually adjust and set the exposure. night scenes) faithfully (1) In CAMERA mode, press EXPOSURE. (2) Turn the SEL/PUSH EXEC dial to adjust the brightness. 1 EXPOSURE 2 To return to the automatic exposure...
... backlight function does not work. if you slide NIGHTSHOT to the automatic exposure mode: - Advanced Recording Operations Adjusting the exposure manually You can manually adjust and set the exposure. night scenes) faithfully (1) In CAMERA mode, press EXPOSURE. (2) Turn the SEL/PUSH EXEC dial to adjust the brightness. 1 EXPOSURE 2 To return to the automatic exposure...
Operating Instructions (primary manual)
Page 42
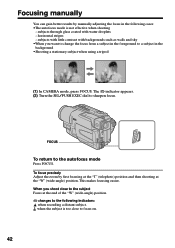
... focusing easier. When you want to change the focus from a subject in the foreground to a subject in the following indicators: when recording a distant subject. subjects with little contrast with water droplets - when the subject is not effective when shooting - horizontal stripes - FOCUS... close to focus on. 42 To focus precisely Adjust the zoom by manually adjusting the focus in the background •Shooting a stationary subject when using a tripod (1) In CAMERA mode, press FOCUS. Focusing manually You can gain better results by first focusing at the "T" (telephoto)...
... focusing easier. When you want to change the focus from a subject in the foreground to a subject in the following indicators: when recording a distant subject. subjects with little contrast with water droplets - when the subject is not effective when shooting - horizontal stripes - FOCUS... close to focus on. 42 To focus precisely Adjust the zoom by manually adjusting the focus in the background •Shooting a stationary subject when using a tripod (1) In CAMERA mode, press FOCUS. Focusing manually You can gain better results by first focusing at the "T" (telephoto)...

Operating Instructions (primary manual)
Page 52
... z is the default setting. Natural pictures are displayed as the following icons: MANUAL SET CAMERA SET PLAYER SET LCD SET TAPE SET SETUP MENU OTHERS Depending on the TV... -- To use the NightShot Light function (p. 26) To cancel the NightShot Light function POWER switch CAMERA CAMERA CAMERA CAMERA CAMERA CAMERA * CCD-TRV68/TRV78/TRV88/TRV98 only 52 D ZOOM z OFF 40× 450× z OFF 40× 460×... like those in this illustration. To record in the CINEMA mode (p. 34) To record in the 16:9FULL mode To compensate for camera-shake To cancel the SteadyShot function. Menu...
... z is the default setting. Natural pictures are displayed as the following icons: MANUAL SET CAMERA SET PLAYER SET LCD SET TAPE SET SETUP MENU OTHERS Depending on the TV... -- To use the NightShot Light function (p. 26) To cancel the NightShot Light function POWER switch CAMERA CAMERA CAMERA CAMERA CAMERA CAMERA * CCD-TRV68/TRV78/TRV88/TRV98 only 52 D ZOOM z OFF 40× 450× z OFF 40× 460×... like those in this illustration. To record in the CINEMA mode (p. 34) To record in the 16:9FULL mode To compensate for camera-shake To cancel the SteadyShot function. Menu...
Operating Instructions (primary manual)
Page 57
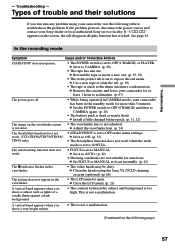
... Adjust the viewfinder lens. (p. 24) The SteadyShot function does not work. (CCD-TRV68/TRV78/TRV88/ TRV98 only) • STEADYSHOT is set to expose the red mark. c Set FOCUS to MANUAL to the drum (moisture condensation). The autofocusing function does not work when the ...wide mode is set to CAMERA again. (p. 20) • The battery pack is not adjusted. c Clean the heads using your Sony...
... Adjust the viewfinder lens. (p. 24) The SteadyShot function does not work. (CCD-TRV68/TRV78/TRV88/ TRV98 only) • STEADYSHOT is set to expose the red mark. c Set FOCUS to MANUAL to the drum (moisture condensation). The autofocusing function does not work when the ...wide mode is set to CAMERA again. (p. 20) • The battery pack is not adjusted. c Clean the heads using your Sony...

Operating Instructions (primary manual)
Page 79
... AE indicator (p. 40) q; TRV68/TRV78/TRV88/TRV98 only) (p. 52) qs Manual focusing indicator (p. 42) qd Built-in the viewfinder only wd Date or time indicator (p. 18, 27)/Tape counter indicator (p. 25)/Self-diagnosis display indicator (p. 61) 79 Time indicator (p. 18, 27) wa Warning indicators (p. 62) ws Recording lamp (p. 20) This indicator appears in...
... AE indicator (p. 40) q; TRV68/TRV78/TRV88/TRV98 only) (p. 52) qs Manual focusing indicator (p. 42) qd Built-in the viewfinder only wd Date or time indicator (p. 18, 27)/Tape counter indicator (p. 25)/Self-diagnosis display indicator (p. 61) 79 Time indicator (p. 18, 27) wa Warning indicators (p. 62) ws Recording lamp (p. 20) This indicator appears in...
Operating Instructions (primary manual)
Page 80
... H Fade in/out 37 FADER 36 FOCUS 42 Grip strap 77 Heads 68 Hi8 system 64 M, N Manual focus 42 Menu settings 51 Mirror mode 21 Moisture condensation .......... 67 MONOTONE 36 ...Recording mode 54 Recording time 14 Remaining battery time indicator 25 Remaining tape indicator ...... 25 RESET 60 RFU adaptor 32 S Self-diagnosis display 61 Shoulder strap 75 Skip scan 31 Slow playback 31 Standard 8 mm system .......... 64 STEADYSHOT 52 STRIPE 36 Superimposing the date and time 17 SUPER LASER LINK 33 S VIDEO...screen 21 LP mode 54 Sony Corporation Printed in Japan 306564811
... H Fade in/out 37 FADER 36 FOCUS 42 Grip strap 77 Heads 68 Hi8 system 64 M, N Manual focus 42 Menu settings 51 Mirror mode 21 Moisture condensation .......... 67 MONOTONE 36 ...Recording mode 54 Recording time 14 Remaining battery time indicator 25 Remaining tape indicator ...... 25 RESET 60 RFU adaptor 32 S Self-diagnosis display 61 Shoulder strap 75 Skip scan 31 Slow playback 31 Standard 8 mm system .......... 64 STEADYSHOT 52 STRIPE 36 Superimposing the date and time 17 SUPER LASER LINK 33 S VIDEO...screen 21 LP mode 54 Sony Corporation Printed in Japan 306564811


