Operating Instructions (primary manual)
Page 1
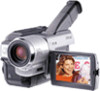
Record the serial number in the space provided below. CCD-TRV Model No. CCD-TRV98 CCD-TRV49/TRV58/TRV68/TRV78/ TRV88/TRV98 ©2001 Sony Corporation Owner's Record The model and serial numbers are located on the bottom. Model No. Refer to these numbers whenever you call upon your Sony dealer regarding this manual thoroughly, and retain it for future reference. 3-065-648-11 (3) Video Camera Recorder Operating Instructions Before operating the unit, please read this product. AC-L Serial No. Serial No.
Record the serial number in the space provided below. CCD-TRV Model No. CCD-TRV98 CCD-TRV49/TRV58/TRV68/TRV78/ TRV88/TRV98 ©2001 Sony Corporation Owner's Record The model and serial numbers are located on the bottom. Model No. Refer to these numbers whenever you call upon your Sony dealer regarding this manual thoroughly, and retain it for future reference. 3-065-648-11 (3) Video Camera Recorder Operating Instructions Before operating the unit, please read this product. AC-L Serial No. Serial No.
Operating Instructions (primary manual)
Page 4
... digital zoom power in D ZOOM in the menu settings. ) D ZOOM [MENU] (p. 52) •Focusing manually Manual focus (p. 42) •Shooting distant subjects Landscape mode (p. 39) •Recording fast-moving subjects Sports lesson mode (p. 39) Functions to use in editing (in the recording mode) •Watching the picture on a wide-screen TV Wide mode (p. 34) •Playing back the picture on a TV without connecting a cord •Recording with the date/time SUPER LASER LINK (p. 33) (CCD-TRV98 only) Date and time (p. 27) •Enhancing old tapes...
... digital zoom power in D ZOOM in the menu settings. ) D ZOOM [MENU] (p. 52) •Focusing manually Manual focus (p. 42) •Shooting distant subjects Landscape mode (p. 39) •Recording fast-moving subjects Sports lesson mode (p. 39) Functions to use in editing (in the recording mode) •Watching the picture on a wide-screen TV Wide mode (p. 34) •Playing back the picture on a TV without connecting a cord •Recording with the date/time SUPER LASER LINK (p. 33) (CCD-TRV98 only) Date and time (p. 27) •Enhancing old tapes...
Operating Instructions (primary manual)
Page 5
... controls ...... 73 Index Back cover Advanced Recording Operations Using the wide mode 34 Using the fader function 36 Using special effects - NightShot 26 Superimposing the date and time on TV 32 Customizing Your Camcorder Changing the menu settings 51 Troubleshooting Types of contents Main Features 4 Quick Start Guide 6 Editing Dubbing a tape 50 Getting started Using this manual 8 Checking supplied accessories 10 Step 1 Preparing the power supply ... 11 Installing the battery pack 11 Charging the battery pack 12 Connecting...
... controls ...... 73 Index Back cover Advanced Recording Operations Using the wide mode 34 Using the fader function 36 Using special effects - NightShot 26 Superimposing the date and time on TV 32 Customizing Your Camcorder Changing the menu settings 51 Troubleshooting Types of contents Main Features 4 Quick Start Guide 6 Editing Dubbing a tape 50 Getting started Using this manual 8 Checking supplied accessories 10 Step 1 Preparing the power supply ... 11 Installing the battery pack 11 Charging the battery pack 12 Connecting...
Operating Instructions (primary manual)
Page 7
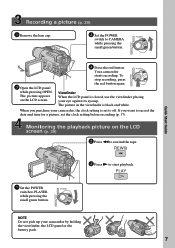
... the battery pack. 7 REW 3 Press N to rewind the tape. The picture appears on the LCD screen (p. 29) 2 Press m to start playback. Your camcorder starts recording. To stop recording, press the red button again. The picture in the viewfinder is black and white. PLAY 1 Set the POWER switch to CAMERA while pressing the small green button. Recording a picture (p. 20) 1 Remove the lens cap. 2 Set the POWER switch to PLAYER while pressing the small green button. OFF (CHARGE) PLAYER POWER CAMERA Quick Start Guide 3 Open the LCD panel...
... the battery pack. 7 REW 3 Press N to rewind the tape. The picture appears on the LCD screen (p. 29) 2 Press m to start playback. Your camcorder starts recording. To stop recording, press the red button again. The picture in the viewfinder is black and white. PLAY 1 Set the POWER switch to CAMERA while pressing the small green button. Recording a picture (p. 20) 1 Remove the lens cap. 2 Set the POWER switch to PLAYER while pressing the small green button. OFF (CHARGE) PLAYER POWER CAMERA Quick Start Guide 3 Open the LCD panel...
Operating Instructions (primary manual)
Page 8
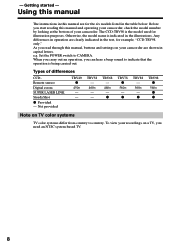
... - Otherwise, the model name is the model used for illustration purposes. When you carry out an operation, you need an NTSC system-based TV. 8 Any differences in operation are for example, "CCD-TRV98 only." Using this manual The instructions in this manual and operating your camcorder, check the model number by looking at the bottom of differences CCDRemote sensor Digital zoom SUPER LASER LINK SteadyShot z Provided - The CCD-TRV98 is indicated in...
... - Otherwise, the model name is the model used for illustration purposes. When you carry out an operation, you need an NTSC system-based TV. 8 Any differences in operation are for example, "CCD-TRV98 only." Using this manual The instructions in this manual and operating your camcorder, check the model number by looking at the bottom of differences CCDRemote sensor Digital zoom SUPER LASER LINK SteadyShot z Provided - The CCD-TRV98 is indicated in...
Operating Instructions (primary manual)
Page 14
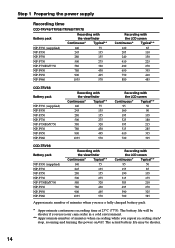
...155 500 275 580 320 780 430 900 495 1035 570 Recording with the LCD screen Continuous* Typical** 95 50 160 90 195 105 325 180 395 215 515 285 610 335 720 395 CCD-TRV98 Battery pack NP-F330 (supplied) NP-F530 NP-F550 NP-F730... 570 Recording with the LCD screen Continuous* Typical** 95 50 155 85 190 105 315 175 385 210 495 270 590 325 700 385 Approximate number of minutes when recording while you use your camcorder in a cold environment. ** Approximate number of minutes when you repeat recording start/ stop, zooming and turning the power on/...
...155 500 275 580 320 780 430 900 495 1035 570 Recording with the LCD screen Continuous* Typical** 95 50 160 90 195 105 325 180 395 215 515 285 610 335 720 395 CCD-TRV98 Battery pack NP-F330 (supplied) NP-F530 NP-F550 NP-F730... 570 Recording with the LCD screen Continuous* Typical** 95 50 155 85 190 105 315 175 385 210 495 270 590 325 700 385 Approximate number of minutes when recording while you use your camcorder in a cold environment. ** Approximate number of minutes when you repeat recording start/ stop, zooming and turning the power on/...
Operating Instructions (primary manual)
Page 18
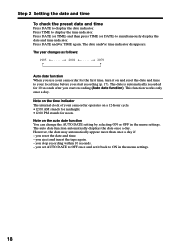
... menu settings. you set AUTO DATE to OFF once and set it on and reset the date and time to display the time indicator. The date and/or time indicator disappears. you stop recording within 10 seconds. - Press TIME to your local time before you start recording (p. 17). Note on the time indicator The internal clock of your camcorder for the first time, turn it back to simultaneously display the date and time indicator. The auto date function automatically displays...
... menu settings. you set AUTO DATE to OFF once and set it on and reset the date and time to display the time indicator. The date and/or time indicator disappears. you stop recording within 10 seconds. - Press TIME to your local time before you start recording (p. 17). Note on the time indicator The internal clock of your camcorder for the first time, turn it back to simultaneously display the date and time indicator. The auto date function automatically displays...
Operating Instructions (primary manual)
Page 20
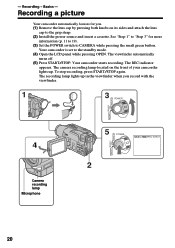
... lens cap to the grip strap. (2) Install the power source and insert a cassette. The recording lamp lights up . - The REC indicator appears. Recording - Basics - See "Step 1" to "Step 3" for you record with the viewfinder. 1 3 POWER PLAYER OFF (CHARGE) CAMERA 4 Camera recording lamp Microphone PLAYER 5 POWER 40min REC 0:00:01 OFF (CHARGE) CAMERA 2 20 Recording a picture Your camcorder automatically focuses for more information (p. 11 to 19). (3) Set the POWER switch to the standby mode. (4) Open the LCD panel while pressing OPEN...
... lens cap to the grip strap. (2) Install the power source and insert a cassette. The recording lamp lights up . - The REC indicator appears. Recording - Basics - See "Step 1" to "Step 3" for you record with the viewfinder. 1 3 POWER PLAYER OFF (CHARGE) CAMERA 4 Camera recording lamp Microphone PLAYER 5 POWER 40min REC 0:00:01 OFF (CHARGE) CAMERA 2 20 Recording a picture Your camcorder automatically focuses for more information (p. 11 to 19). (3) Set the POWER switch to the standby mode. (4) Open the LCD panel while pressing OPEN...
Operating Instructions (primary manual)
Page 21
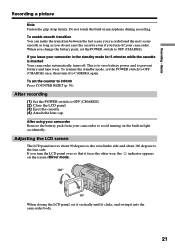
..., the indicator appears on the built-in light accidentally. This is inserted Your camcorder automatically turns off your camcorder in microphone during recording. After using your camcorder Remove the battery pack from your camcorder to avoid turning on the screen (Mirror mode). 180° 90° When closing the LCD panel, set the POWER switch to CAMERA again. After recording (1) Set the POWER switch to the lens side. To enable smooth transition You can...
..., the indicator appears on the built-in light accidentally. This is inserted Your camcorder automatically turns off your camcorder in microphone during recording. After using your camcorder Remove the battery pack from your camcorder to avoid turning on the screen (Mirror mode). 180° 90° When closing the LCD panel, set the POWER switch to CAMERA again. After recording (1) Set the POWER switch to the lens side. To enable smooth transition You can...

Operating Instructions (primary manual)
Page 32
... the playback picture on the LCD screen. Refer to the LINE IN input on the VCR by using the A/V connecting cable. Connect your camcorder to LINE. Set the input selector on the VCR to the TV using the A/V connecting cable supplied with your camcorder to connect the yellow (video) plug of your TV and the RFU adaptor. With this connection, you power your camcorder from a wall outlet using an S video cable (optional) to the operating instructions of the A/V connecting cable. Viewing the recording...
... the playback picture on the LCD screen. Refer to the LINE IN input on the VCR by using the A/V connecting cable. Connect your camcorder to LINE. Set the input selector on the VCR to the TV using the A/V connecting cable supplied with your camcorder to connect the yellow (video) plug of your TV and the RFU adaptor. With this connection, you power your camcorder from a wall outlet using an S video cable (optional) to the operating instructions of the A/V connecting cable. Viewing the recording...
Operating Instructions (primary manual)
Page 33
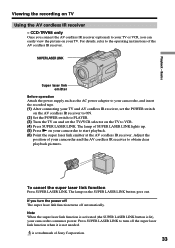
... and set the TV/VCR selector on the TV to the operating instructions of the AV cordless IR receiver. Adjust the position of Sony Corporation. 33 Playback - If you can easily view the picture on your camcorder and the AV cordless IR receiver to start playback. (6) Point the super laser link emitter at the AV cordless IR receiver. CCD-TRV98 only Once you connect...
... and set the TV/VCR selector on the TV to the operating instructions of the AV cordless IR receiver. Adjust the position of Sony Corporation. 33 Playback - If you can easily view the picture on your camcorder and the AV cordless IR receiver to start playback. (6) Point the super laser link emitter at the AV cordless IR receiver. CCD-TRV98 only Once you connect...
Operating Instructions (primary manual)
Page 35
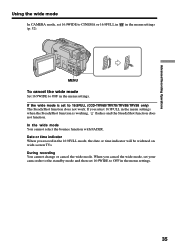
... SteadyShot function is set 16:9WIDE to 16:9FULL (CCD-TRV68/TRV78/TRV88/TRV98 only) The SteadyShot function does not work. in the menu settings MENU To cancel the wide mode Set 16:9WIDE to CINEMA or 16:9FULL in (p. 52). If the wide mode is working, flashes and the SteadyShot function does not function. During recording You cannot change or cancel the wide mode. Advanced Recording Operations Using the wide mode In CAMERA mode, set...
... SteadyShot function is set 16:9WIDE to 16:9FULL (CCD-TRV68/TRV78/TRV88/TRV98 only) The SteadyShot function does not work. in the menu settings MENU To cancel the wide mode Set 16:9WIDE to CINEMA or 16:9FULL in (p. 52). If the wide mode is working, flashes and the SteadyShot function does not function. During recording You cannot change or cancel the wide mode. Advanced Recording Operations Using the wide mode In CAMERA mode, set...

Operating Instructions (primary manual)
Page 52
... 16:9FULL mode To compensate for camera-shake To cancel the SteadyShot function. If you set to OFF, digital zoom is deactivated and up to images (p. 38). Changing the menu settings Menu items are produced when shooting a stationary object with a tripod. Selecting the mode setting of the POWER switch. To use the NightShot Light function (p. 26) To cancel the NightShot Light function POWER switch CAMERA CAMERA CAMERA CAMERA CAMERA CAMERA * CCD-TRV68/TRV78/TRV88/TRV98 only 52 If you can operate at...
... 16:9FULL mode To compensate for camera-shake To cancel the SteadyShot function. If you set to OFF, digital zoom is deactivated and up to images (p. 38). Changing the menu settings Menu items are produced when shooting a stationary object with a tripod. Selecting the mode setting of the POWER switch. To use the NightShot Light function (p. 26) To cancel the NightShot Light function POWER switch CAMERA CAMERA CAMERA CAMERA CAMERA CAMERA * CCD-TRV68/TRV78/TRV88/TRV98 only 52 If you can operate at...
Operating Instructions (primary manual)
Page 54
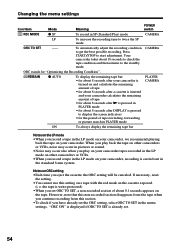
..., reset the setting. •You cannot use this section. •To check if you eject the cassette, the ORC setting will be canceled. However, note that this non-recorded section disappears from the tape when you continue recording from this setting on a tape with the red mark on ORC setting •Each time you have already set . 54 e. Changing the menu settings Icon/item Mode Meaning POWER switch REC MODE z SP To record in the menu settings.
..., reset the setting. •You cannot use this section. •To check if you eject the cassette, the ORC setting will be canceled. However, note that this non-recorded section disappears from the tape when you continue recording from this setting on a tape with the red mark on ORC setting •Each time you have already set . 54 e. Changing the menu settings Icon/item Mode Meaning POWER switch REC MODE z SP To record in the menu settings.
Operating Instructions (primary manual)
Page 57
.... c Set FOCUS to MANUAL to expose the red mark. c Install a fully charged battery pack. (p. 11, 12) The image on the screen, the self-diagnosis display function has worked. c Set it to acclimatize. (p. 67) The power goes off. • While being operated in the menu settings. If the problem persists, disconnect the power source and contact your camcorder has been in the standby mode for at least 1 hour to CAMERA. (p. 20) • The tape...
.... c Set FOCUS to MANUAL to expose the red mark. c Install a fully charged battery pack. (p. 11, 12) The image on the screen, the self-diagnosis display function has worked. c Set it to acclimatize. (p. 67) The power goes off. • While being operated in the menu settings. If the problem persists, disconnect the power source and contact your camcorder has been in the standby mode for at least 1 hour to CAMERA. (p. 20) • The tape...

Operating Instructions (primary manual)
Page 58
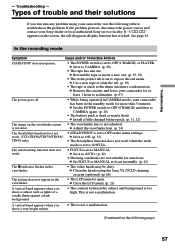
... after you set the POWER switch to CAMERA or DEMO MODE is set to minimum. c Cancel it to ON in a bright place. c Set it . (p. 25) In the playback mode Symptom The tape does not move when a video control button is heard when playing back a tape. c Clean the heads using the Sony V8-25CLD cleaning cassette (optional). (p. 68) • The volume is turned to ON in a dark place. (p. 26) • The backlight function is working. Types of trouble and...
... after you set the POWER switch to CAMERA or DEMO MODE is set to minimum. c Cancel it to ON in a bright place. c Set it . (p. 25) In the playback mode Symptom The tape does not move when a video control button is heard when playing back a tape. c Clean the heads using the Sony V8-25CLD cleaning cassette (optional). (p. 68) • The volume is turned to ON in a dark place. (p. 26) • The backlight function is working. Types of trouble and...
Operating Instructions (primary manual)
Page 72
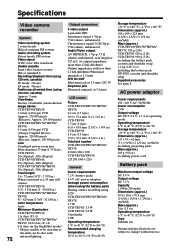
... and specifications are subject to 86 °F) Fastforward/rewind time (using 120 min. Specifications Video camera recorder Output connectors S video output Storage temperature -20 °C to +60 °C (-4 °F to +140 °F) Dimensions (approx.) 4-pin mini DIN 104 × 109 × 223 mm System Video recording system 2 rotary heads Helical scanning FM system Audio recording system Rotary heads, FM system Video signal NTSC color, EIA standards Usable cassette 8mm video format cassette Hi8 or standard 8 Recording/playback time (using...
... and specifications are subject to 86 °F) Fastforward/rewind time (using 120 min. Specifications Video camera recorder Output connectors S video output Storage temperature -20 °C to +60 °C (-4 °F to +140 °F) Dimensions (approx.) 4-pin mini DIN 104 × 109 × 223 mm System Video recording system 2 rotary heads Helical scanning FM system Audio recording system Rotary heads, FM system Video signal NTSC color, EIA standards Usable cassette 8mm video format cassette Hi8 or standard 8 Recording/playback time (using...
Operating Instructions (primary manual)
Page 74
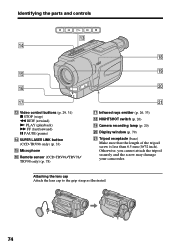
qj qd Video control buttons (p. 29, 31) x STOP (stop) m REW (rewind) N PLAY (playback) M FF (fastforward) X PAUSE (pause) qf SUPER LASER LINK button (CCD-TRV98 only) (p. 33) qg Microphone qh Remote sensor (CCD-TRV49/TRV78/ TRV98 only) (p. 78) wa qj Infrared rays emitter (p. 26, 33) qk NIGHTSHOT switch (p. 26) ql Camera recording lamp (p. 20) w; Display window (p. 79) wa Tripod receptacle (base) Make sure that the length of the tripod screw is less than...
qj qd Video control buttons (p. 29, 31) x STOP (stop) m REW (rewind) N PLAY (playback) M FF (fastforward) X PAUSE (pause) qf SUPER LASER LINK button (CCD-TRV98 only) (p. 33) qg Microphone qh Remote sensor (CCD-TRV49/TRV78/ TRV98 only) (p. 78) wa qj Infrared rays emitter (p. 26, 33) qk NIGHTSHOT switch (p. 26) ql Camera recording lamp (p. 20) w; Display window (p. 79) wa Tripod receptacle (base) Make sure that the length of the tripod screw is less than...
Operating Instructions (primary manual)
Page 75
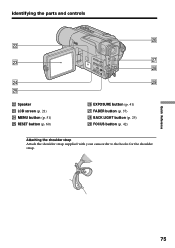
Identifying the parts and controls ws wd wf wg ws Speaker wd LCD screen (p. 21) wf MENU button (p. 51) wg RESET button (p. 60) wh wj wk wl wh EXPOSURE button (p. 41) wj FADER button (p. 37) wk BACK LIGHT button (p. 25) wl FOCUS button (p. 42) Attaching the shoulder strap Attach the shoulder strap supplied with your camcorder to the hooks for the shoulder strap. Quick Reference 75
Identifying the parts and controls ws wd wf wg ws Speaker wd LCD screen (p. 21) wf MENU button (p. 51) wg RESET button (p. 60) wh wj wk wl wh EXPOSURE button (p. 41) wj FADER button (p. 37) wk BACK LIGHT button (p. 25) wl FOCUS button (p. 42) Attaching the shoulder strap Attach the shoulder strap supplied with your camcorder to the hooks for the shoulder strap. Quick Reference 75
Operating Instructions (primary manual)
Page 80
... 77 Heads 68 Hi8 system 64 M, N Manual focus 42 Menu settings 51 Mirror mode 21 Moisture condensation .......... 67 MONOTONE 36 Mosaic fader 36 NIGHTSHOT 26 NTSC system 66 O, P, Q Operation indicators 79 ORC 54 Picture effect 38 Picture search 31 Playback pause 31 Power zoom 23 PROGRAM AE 39 R Recording and playback systems 64 Recording mode 54 Recording time 14 Remaining battery time indicator 25 Remaining tape indicator ...... 25 RESET 60 RFU adaptor 32 S Self-diagnosis display...
... 77 Heads 68 Hi8 system 64 M, N Manual focus 42 Menu settings 51 Mirror mode 21 Moisture condensation .......... 67 MONOTONE 36 Mosaic fader 36 NIGHTSHOT 26 NTSC system 66 O, P, Q Operation indicators 79 ORC 54 Picture effect 38 Picture search 31 Playback pause 31 Power zoom 23 PROGRAM AE 39 R Recording and playback systems 64 Recording mode 54 Recording time 14 Remaining battery time indicator 25 Remaining tape indicator ...... 25 RESET 60 RFU adaptor 32 S Self-diagnosis display...


