Camera Operations Guide
Page 1
2-515-259-12(1) Camera Operations Guide Read this first Video Camera Recorder/Digital Video Camera Recorder CCD-TRV138/TRV338 DCR-TRV280 © 2005 Sony Corporation
2-515-259-12(1) Camera Operations Guide Read this first Video Camera Recorder/Digital Video Camera Recorder CCD-TRV138/TRV338 DCR-TRV280 © 2005 Sony Corporation
Camera Operations Guide
Page 2
... the application or disconnect and connect the communication cable (USB, etc.) again. b Notice If static electricity or electromagnetism causes data transfer to rain or moisture. The number below . Address: 16450 W. Serial No. 2 and CANADA RECYCLING LITHIUM-ION BATTERIES Lithium-Ion batteries are located on the bottom. You can help preserve our environment by returning your Sony dealer regarding recycling of electric...
... the application or disconnect and connect the communication cable (USB, etc.) again. b Notice If static electricity or electromagnetism causes data transfer to rain or moisture. The number below . Address: 16450 W. Serial No. 2 and CANADA RECYCLING LITHIUM-ION BATTERIES Lithium-Ion batteries are located on the bottom. You can help preserve our environment by returning your Sony dealer regarding recycling of electric...
Camera Operations Guide
Page 3
... the camera near a window or outdoors. • Do not aim at dusk. If this instruction manual, each local language are designed to make sure the picture and sound are operational for long periods of time may be provided, even if recording or playback is not possible due to insert the connector plug in a particular installation. The supplied interface cable must be some tiny black points...
... the camera near a window or outdoors. • Do not aim at dusk. If this instruction manual, each local language are designed to make sure the picture and sound are operational for long periods of time may be provided, even if recording or playback is not possible due to insert the connector plug in a particular installation. The supplied interface cable must be some tiny black points...
Camera Operations Guide
Page 7
... Using the (SETUP MENU) - LCD B.L./LCD COLOR, etc. ......51 Using the (TAPE SET) menu - CLOCK SET/USB STREAM/ LANGUAGE, etc 55 Using the (OTHERS) menu - WORLD TIME/VIDEO EDIT, etc 57 Dubbing/Editing Connecting to a VCR 59 Dubbing to DVD") ( TRV280 79 Troubleshooting Troubleshooting 82 Warning indicators and messages .....92 Additional Information Using your camcorder abroad 94 Usable cassette tapes 95 About the "InfoLITHIUM" battery pack 96 About i.LINK 97 Maintenance and precautions 98 Specification 101 Quick Reference Identifying parts and controls...
... Using the (SETUP MENU) - LCD B.L./LCD COLOR, etc. ......51 Using the (TAPE SET) menu - CLOCK SET/USB STREAM/ LANGUAGE, etc 55 Using the (OTHERS) menu - WORLD TIME/VIDEO EDIT, etc 57 Dubbing/Editing Connecting to a VCR 59 Dubbing to DVD") ( TRV280 79 Troubleshooting Troubleshooting 82 Warning indicators and messages .....92 Additional Information Using your camcorder abroad 94 Usable cassette tapes 95 About the "InfoLITHIUM" battery pack 96 About i.LINK 97 Maintenance and precautions 98 Specification 101 Quick Reference Identifying parts and controls...
Camera Operations Guide
Page 13
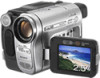
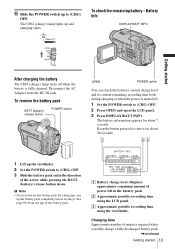
...% REC TIME AVAILABLE LCD SCREEN: 81 min VIEWFINDER: 112 min A Battery charge level: Displays approximate remaining amount of power left in the direction of the battery pack. The battery information appears for about 20 seconds. 1 Lift up the battery pack completely before storing it. The CHG (charge) lamp lights up to (CHG) OFF. 3 Slide the battery pack out in the battery pack. To remove the battery pack BATT (battery) release button POWER switch OPEN POWER switch...
...% REC TIME AVAILABLE LCD SCREEN: 81 min VIEWFINDER: 112 min A Battery charge level: Displays approximate remaining amount of power left in the direction of the battery pack. The battery information appears for about 20 seconds. 1 Lift up the battery pack completely before storing it. The CHG (charge) lamp lights up to (CHG) OFF. 3 Slide the battery pack out in the battery pack. To remove the battery pack BATT (battery) release button POWER switch OPEN POWER switch...
Camera Operations Guide
Page 14
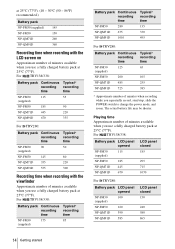
... 105 NP-QM71D 485 255 NP-QM91D 725 385 * Approximate number of minutes when recording while you use a fully charged battery pack at 25°C (77°F). Playing time Approximate number of minutes available when you repeatedly record, start/stop, slide the POWER switch to change the power mode, and zoom. For TRV138/338: Battery pack Continuous Typical* recording recording time time NP-FM30 115 55 (supplied) NP-FM50 185 90...
... 105 NP-QM71D 485 255 NP-QM91D 725 385 * Approximate number of minutes when recording while you use a fully charged battery pack at 25°C (77°F). Playing time Approximate number of minutes available when you repeatedly record, start/stop, slide the POWER switch to change the power mode, and zoom. For TRV138/338: Battery pack Continuous Typical* recording recording time time NP-FM30 115 55 (supplied) NP-FM50 185 90...

Camera Operations Guide
Page 22
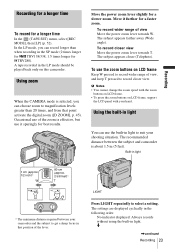
... not be displayed during playback by yourself in SP mode and LP mode on the same tape. - You can also use . For TRV138/338: 1 23 4 60min SP REC 0:00:00 6 5 For TRV280: Date/time and camera settings data (p. 37) will automatically turn the power off to preserve battery power ([A.SHUT OFF], p. 57). G Time code/Tape counter (hour: minute: second)/Tape photo recording ( TRV280) b Notes • Before changing the battery pack, slide the POWER switch up to...
... not be displayed during playback by yourself in SP mode and LP mode on the same tape. - You can also use . For TRV138/338: 1 23 4 60min SP REC 0:00:00 6 5 For TRV280: Date/time and camera settings data (p. 37) will automatically turn the power off to preserve battery power ([A.SHUT OFF], p. 57). G Time code/Tape counter (hour: minute: second)/Tape photo recording ( TRV280) b Notes • Before changing the battery pack, slide the POWER switch up to...
Camera Operations Guide
Page 23
... time In the (TAPE SET) menu, select [REC MODE], then [LP] (p. 52). To record closer view Move the power zoom lever towards W. The recommended distance between your camcorder and the subject to get a sharp focus in the following order. In the LP mode, you can choose zoom to record closer view. No indicator displayed: Always records without using the built-in the LP mode should be played back only on LCD frame, support...
... time In the (TAPE SET) menu, select [REC MODE], then [LP] (p. 52). To record closer view Move the power zoom lever towards W. The recommended distance between your camcorder and the subject to get a sharp focus in the following order. In the LP mode, you can choose zoom to record closer view. No indicator displayed: Always records without using the built-in the LP mode should be played back only on LCD frame, support...
Camera Operations Guide
Page 49
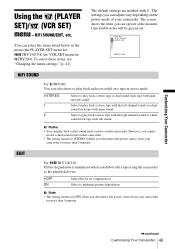
... camcorder. Select to minimize picture degradation. The settings you disconnect the power source from your camcorder. VCR SET H i F i SOUND AUDIO MIX [MENU] : END HiFi SOUND For TRV280: You can adjust vary depending on this for more than 5 minutes. ,continued Customizing Your Camcorder 49 The screen shows the items you dub or edit a tape using the camcorder as the playback device. You can operate at the moment. Customizing Your Camcorder Using the (PLAYER SET)/ (VCR SET) menu...
... camcorder. Select to minimize picture degradation. The settings you disconnect the power source from your camcorder. VCR SET H i F i SOUND AUDIO MIX [MENU] : END HiFi SOUND For TRV280: You can adjust vary depending on this for more than 5 minutes. ,continued Customizing Your Camcorder 49 The screen shows the items you dub or edit a tape using the camcorder as the playback device. You can operate at the moment. Customizing Your Camcorder Using the (PLAYER SET)/ (VCR SET) menu...
Camera Operations Guide
Page 55
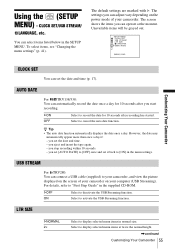
... to your camcorder, and view the picture displayed on the screen of your camcorder on the power mode of your computer (USB Streaming). Using the (SETUP MENU) - Select to cancel the auto date function. SETUP MENU CLOCK SET USB STREAM LTR SIZE LANGUAGE DEMO MODE [MENU] : END Customizing Your Camcorder CLOCK SET You can select items listed below in the supplied CD-ROM. you can adjust vary depending on your camcorder. CLOCK SET/USB STREAM/ LANGUAGE, etc. The settings you can operate at twice...
... to your camcorder, and view the picture displayed on the screen of your camcorder on the power mode of your computer (USB Streaming). Using the (SETUP MENU) - Select to cancel the auto date function. SETUP MENU CLOCK SET USB STREAM LTR SIZE LANGUAGE DEMO MODE [MENU] : END Customizing Your Camcorder CLOCK SET You can select items listed below in the supplied CD-ROM. you can adjust vary depending on your camcorder. CLOCK SET/USB STREAM/ LANGUAGE, etc. The settings you can operate at twice...
Camera Operations Guide
Page 57
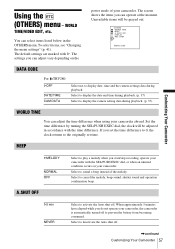
... play a melody when you start/stop recording, operate your camcorder with the SEL/PUSH EXEC dial, or when an unusual condition occurs on the power mode of the melody. Using the (OTHERS) menu - If you can operate at the moment. When approximately 5 minutes have elapsed while you can adjust vary depending on your camcorder, the camcorder is automatically turned off to display date, time and the camera settings data during playback...
... play a melody when you start/stop recording, operate your camcorder with the SEL/PUSH EXEC dial, or when an unusual condition occurs on the power mode of the melody. Using the (OTHERS) menu - If you can operate at the moment. When approximately 5 minutes have elapsed while you can adjust vary depending on your camcorder, the camcorder is automatically turned off to display date, time and the camera settings data during playback...
Camera Operations Guide
Page 73
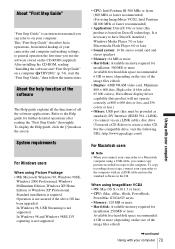
... operation the first time you connect your computer To copy recordings from initial hookup of the image files edited) ,continued Using with your computer 73 Using with an i.LINK cable and use the software stored on your camcorder to create a video CD. It is necessary to have DirectX installed.) Windows Media Player 7.0 or later Macromedia Flash Player 6.0 or later • Sound system: 16 bit stereo sound card and stereo speakers • Memory...
... operation the first time you connect your computer To copy recordings from initial hookup of the image files edited) ,continued Using with your computer 73 Using with an i.LINK cable and use the software stored on your camcorder to create a video CD. It is necessary to have DirectX installed.) Windows Media Player 7.0 or later Macromedia Flash Player 6.0 or later • Sound system: 16 bit stereo sound card and stereo speakers • Memory...
Camera Operations Guide
Page 85
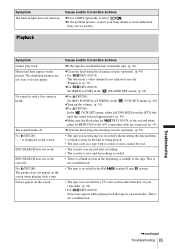
... (VCR SET) menu. (p. 49) cTurn up the volume. (p. 34) cFor TRV280: In the (VCR SET) menu, adjust [AUDIO MIX] from the [ST2] side until the sound is heard appropriately. (p. 50) cMake sure the black plug for TRV138/338, or the red and white plugs for TRV280 of the A/V connecting cable are connected. (p. 39) cClean the head using the cleaning cassette (optional). (p. 99) • For TRV138/338: The television's video channel is displayed on the screen...
... (VCR SET) menu. (p. 49) cTurn up the volume. (p. 34) cFor TRV280: In the (VCR SET) menu, adjust [AUDIO MIX] from the [ST2] side until the sound is heard appropriately. (p. 50) cMake sure the black plug for TRV138/338, or the red and white plugs for TRV280 of the A/V connecting cable are connected. (p. 39) cClean the head using the cleaning cassette (optional). (p. 99) • For TRV138/338: The television's video channel is displayed on the screen...
Camera Operations Guide
Page 86
... the power switch of the VCR. (p. 68) cEnter a correct [IR SETUP] code. (p. 63) cSelect the mode used to cancel recording pause again. (p. 68) cSet your camcorder and VCR for operation." (p. 67) cAdjust the synchronization of the video camera recorder is not a Sony product via an i.LINK cable. cSet the input selector on the VCR correctly, then check the connection between your camcorder and the VCR. (p. 60) cWhen your camcorder is connected to a DV device that is set...
... the power switch of the VCR. (p. 68) cEnter a correct [IR SETUP] code. (p. 63) cSelect the mode used to cancel recording pause again. (p. 68) cSet your camcorder and VCR for operation." (p. 67) cAdjust the synchronization of the video camera recorder is not a Sony product via an i.LINK cable. cSet the input selector on the VCR correctly, then check the connection between your camcorder and the VCR. (p. 60) cWhen your camcorder is connected to a DV device that is set...
Camera Operations Guide
Page 88
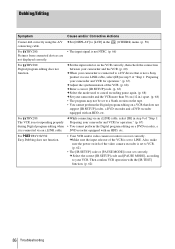
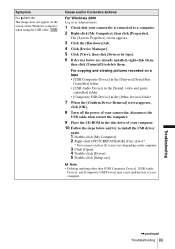
... a tape • [USB Audio Device] in the [Sound, video and game controllers] folder • [USB Device] in the [Other devices] folder • [USB Composite Device] in the [Universal Serial Bus Controller] folder 5 When the [Confirm Device Removal] screen appears, click [OK]. 6 Turn off the power of your camcorder, disconnect the USB cable, then restart the computer. 7 Place the CD-ROM in the disc drive of your camcorder before the installation of the Windows computer when using a computer, the operation is connected...
... a tape • [USB Audio Device] in the [Sound, video and game controllers] folder • [USB Device] in the [Other devices] folder • [USB Composite Device] in the [Universal Serial Bus Controller] folder 5 When the [Confirm Device Removal] screen appears, click [OK]. 6 Turn off the power of your camcorder, disconnect the USB cable, then restart the computer. 7 Place the CD-ROM in the disc drive of your camcorder before the installation of the Windows computer when using a computer, the operation is connected...
Camera Operations Guide
Page 89
... [USB Composite Device], [USB Audio Device], and [Composite USB Device] may vary depending on a tape • [USB Composite Device] in the [Universal Serial Bus Controller] folder • [USB Audio Device] in the [Sound, video and game controller] folder • [Composite USB Device] in the [Other devices] folder 7 When the [Confirm Device Removal] screen appears, click [OK]. 8 Turn off the power of your camcorder, disconnect the USB cable, then restart the computer. 9 Place the CD-ROM in the disc drive of the Windows computer...
... [USB Composite Device], [USB Audio Device], and [Composite USB Device] may vary depending on a tape • [USB Composite Device] in the [Universal Serial Bus Controller] folder • [USB Audio Device] in the [Sound, video and game controller] folder • [Composite USB Device] in the [Other devices] folder 7 When the [Confirm Device Removal] screen appears, click [OK]. 8 Turn off the power of your camcorder, disconnect the USB cable, then restart the computer. 9 Place the CD-ROM in the disc drive of the Windows computer...
Camera Operations Guide
Page 90
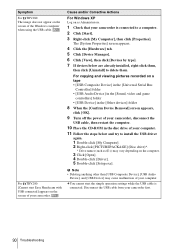
... Troubleshooting Cause and/or Corrective Actions For Windows XP Log on a tape • [USB Composite Device] in the [Universal Serial Bus Controller] folder • [USB Audio Device] in the [Sound, video and game controllers] folder • [USB Device] in the [Other devices] folder 8 When the [Confirm Device Removal] screen appears, click [OK]. 9 Turn off the power of your camcorder, disconnect the USB cable, then restart the computer. 10 Place the CD-ROM in the disc drive of...
... Troubleshooting Cause and/or Corrective Actions For Windows XP Log on a tape • [USB Composite Device] in the [Universal Serial Bus Controller] folder • [USB Audio Device] in the [Sound, video and game controllers] folder • [USB Device] in the [Other devices] folder 8 When the [Confirm Device Removal] screen appears, click [OK]. 9 Turn off the power of your camcorder, disconnect the USB cable, then restart the computer. 10 Place the CD-ROM in the disc drive of...
Camera Operations Guide
Page 100
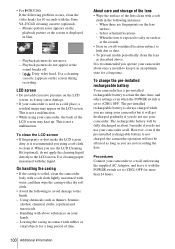
... the playback picture or the screen is recommended you operate your camcorder. Leaving the casing in a well-ventilated location subject to the LCD screen. To charge the pre-installed rechargeable battery Your camcorder has a pre-installed rechargeable battery to (CHG) OFF for a long time. On handling the casing • If the casing is set to retain the date, time, and other settings even when the POWER switch is soiled, clean the camcorder...
... the playback picture or the screen is recommended you operate your camcorder. Leaving the casing in a well-ventilated location subject to the LCD screen. To charge the pre-installed rechargeable battery Your camcorder has a pre-installed rechargeable battery to (CHG) OFF for a long time. On handling the casing • If the casing is set to retain the date, time, and other settings even when the POWER switch is soiled, clean the camcorder...
Camera Operations Guide
Page 101
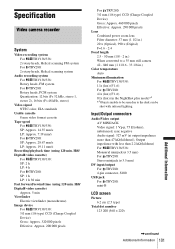
... Additional Information Specification Video camera recorder System Video recording system For TRV138/338: 2 rotary heads, Helical scanning FM system For TRV280: 2 rotary heads, Helical scanning system Audio recording system For TRV138/338: Rotary heads, FM system For TRV280: Rotary heads, PCM system Quantization: 12 bits (Fs 32 kHz, stereo 1, stereo 2), 16 bits (Fs 48 kHz, stereo) Video signal NTSC color, EIA standards Usable cassette 8 mm video format cassette Tape speed For...
... Additional Information Specification Video camera recorder System Video recording system For TRV138/338: 2 rotary heads, Helical scanning FM system For TRV280: 2 rotary heads, Helical scanning system Audio recording system For TRV138/338: Rotary heads, FM system For TRV280: Rotary heads, PCM system Quantization: 12 bits (Fs 32 kHz, stereo 1, stereo 2), 16 bits (Fs 48 kHz, stereo) Video signal NTSC color, EIA standards Usable cassette 8 mm video format cassette Tape speed For...
Camera Operations Guide
Page 109
... Adjusting the viewfinder ...16 AUDIO MIX 50 AUDIO MODE 52 AUTO DATE 55 AUTO SHTR 44 Auto shut off function (A.SHUT OFF 57 B BACK LIGHT 27 Battery Battery Info 13 Battery pack 12 Remaining battery time 22, 96 BEEP 57 BLACK FADER 30 Built-in light 23 BURN DVD/VCD .....79, 106 C Camera settings data display 37 Cassette 18, 95 CD-ROM 72 Charging the battery Battery Pack 12 Pre-installed rechargeable battery 100 Cleaning cassette 100 Clock set (CLOCK SET) ......17, 55 D Data code (DATA CODE...
... Adjusting the viewfinder ...16 AUDIO MIX 50 AUDIO MODE 52 AUTO DATE 55 AUTO SHTR 44 Auto shut off function (A.SHUT OFF 57 B BACK LIGHT 27 Battery Battery Info 13 Battery pack 12 Remaining battery time 22, 96 BEEP 57 BLACK FADER 30 Built-in light 23 BURN DVD/VCD .....79, 106 C Camera settings data display 37 Cassette 18, 95 CD-ROM 72 Charging the battery Battery Pack 12 Pre-installed rechargeable battery 100 Cleaning cassette 100 Clock set (CLOCK SET) ......17, 55 D Data code (DATA CODE...


