Operating Instructions
Page 1
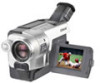
Serial No. Refer to these numbers whenever you call upon your Sony dealer regarding this manual thoroughly, and retain it for future reference. Serial No. DCR-TRV350 TM SERIES DCR-TRV150/TRV250/TRV350/TRV351 CCD-TRV118/TRV318/TRV418 ©2003 Sony Corporation 3-079-467-13 (1) Digital Video Camera Recorder Video Camera Recorder Operating Instructions Before operating the unit, please read this product. Owner's Record The model and serial numbers are located on the bottom. AC- Model No. -TRV Model No. Record the serial number in the space provided below.
Serial No. Refer to these numbers whenever you call upon your Sony dealer regarding this manual thoroughly, and retain it for future reference. Serial No. DCR-TRV350 TM SERIES DCR-TRV150/TRV250/TRV350/TRV351 CCD-TRV118/TRV318/TRV418 ©2003 Sony Corporation 3-079-467-13 (1) Digital Video Camera Recorder Video Camera Recorder Operating Instructions Before operating the unit, please read this product. Owner's Record The model and serial numbers are located on the bottom. AC- Model No. -TRV Model No. Record the serial number in the space provided below.

Operating Instructions
Page 14
... an operation, you start reading this manual and operating your camcorder, check the model number by looking at the bottom of differences Model Recording system Playback system AUDIO/VIDEO jack S VIDEO jack DV jack USB jack "Memory Stick" slot LANC jack SteadyShot Remote sensor RFU jack MIC jack Hi8 Hi8/8 OUT OUT - - - - - - ...Digital8 Digital8 Digital8 Digital8/Hi8/8 OUT OUT IN/OUT OUT OUT IN/OUT IN/OUT IN/OUT IN/OUT - e.g. z z z z - Before you can hear a beep to CAMERA. Set the POWER switch to indicate that the operation is being carried out. z z - -
... an operation, you start reading this manual and operating your camcorder, check the model number by looking at the bottom of differences Model Recording system Playback system AUDIO/VIDEO jack S VIDEO jack DV jack USB jack "Memory Stick" slot LANC jack SteadyShot Remote sensor RFU jack MIC jack Hi8 Hi8/8 OUT OUT - - - - - - ...Digital8 Digital8 Digital8 Digital8/Hi8/8 OUT OUT IN/OUT OUT OUT IN/OUT IN/OUT IN/OUT IN/OUT - e.g. z z z z - Before you can hear a beep to CAMERA. Set the POWER switch to indicate that the operation is being carried out. z z - -
Operating Instructions
Page 16
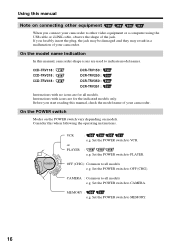
.... Consider this manual, camcorder-shape icons are used to CAMERA. Set the POWER switch to indicate model names. If you forcibly insert the plug, the jack may be damaged and they may result in a malfunction of the jack. CCD-TRV118 : CCD-TRV318 : CCD-TRV418 : DCR-TRV150 : DCR-TRV250 : DCR-TRV350 ...name indication In this when following the operating instructions. Set the POWER switch to PLAYER. Set the POWER switch to VCR. : e.g. CAMERA : Common to other video equipment or a computer using the USB cable or i.LINK cable, observe the shape of your camcorder. MEMORY : e.g.
.... Consider this manual, camcorder-shape icons are used to CAMERA. Set the POWER switch to indicate model names. If you forcibly insert the plug, the jack may be damaged and they may result in a malfunction of the jack. CCD-TRV118 : CCD-TRV318 : CCD-TRV418 : DCR-TRV150 : DCR-TRV250 : DCR-TRV350 ...name indication In this when following the operating instructions. Set the POWER switch to PLAYER. Set the POWER switch to VCR. : e.g. CAMERA : Common to other video equipment or a computer using the USB cable or i.LINK cable, observe the shape of your camcorder. MEMORY : e.g.
Operating Instructions
Page 99
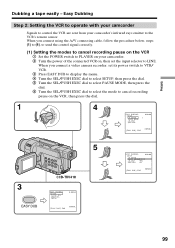
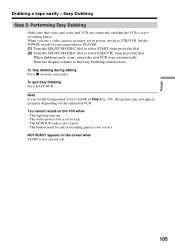
... CAME AYER OFF(CHG) 4 EASY DUBBING SETUP I R SETUP PAUSE MODE I R TEST RETURN 0:00:00 3 [ EASY DUB ] : END NORMAL 5 3 EASY DUB CCD-TRV418 EASY DUBBING START T I T LE SEL MODE SEL SETUP 0:00:00 [ EASY DUB ] : END NORMAL EASY DUBBING 0:00:00 SETUP I R SETUP PAUSE MODE PAUSE... (4), to send the control signal correctly. (1) Setting the modes to cancel recording pause on the VCR 1 Set the POWER switch to PLAYER on your camcorder's infrared rays emitter to LINE. When you connect a video camera recorder, set the input selector to the VCR's remote sensor. Editing Dubbing a ...
... CAME AYER OFF(CHG) 4 EASY DUBBING SETUP I R SETUP PAUSE MODE I R TEST RETURN 0:00:00 3 [ EASY DUB ] : END NORMAL 5 3 EASY DUB CCD-TRV418 EASY DUBBING START T I T LE SEL MODE SEL SETUP 0:00:00 [ EASY DUB ] : END NORMAL EASY DUBBING 0:00:00 SETUP I R SETUP PAUSE MODE PAUSE... (4), to send the control signal correctly. (1) Setting the modes to cancel recording pause on the VCR 1 Set the POWER switch to PLAYER on your camcorder's infrared rays emitter to LINE. When you connect a video camera recorder, set the input selector to the VCR's remote sensor. Editing Dubbing a ...
Operating Instructions
Page 105
... START, then press the dial. (2) Turn the SEL/PUSH EXEC dial to lock. - Then the display returns to cancel recording pause is set its power switch to recording pause. Note If you use a video camera recorder, set to VTR/VCR. When you set to select EXECUTE, then press the dial. Editing Dubbing a tape easily - When... VCR is not correct. The button used to the Easy Dubbing initial screen. Set the POWER switch of your camcorder. To stop automatically. You cannot record on the screen when START is not correct. -
... START, then press the dial. (2) Turn the SEL/PUSH EXEC dial to lock. - Then the display returns to cancel recording pause is set its power switch to recording pause. Note If you use a video camera recorder, set to VTR/VCR. When you set to select EXECUTE, then press the dial. Editing Dubbing a tape easily - When... VCR is not correct. The button used to the Easy Dubbing initial screen. Set the POWER switch of your camcorder. To stop automatically. You cannot record on the screen when START is not correct. -
Operating Instructions
Page 107
If you connect using the i.LINK cable With a digital-to-digital connection, video and audio signals are transmitted in page 94. When you use the i.LINK cable, connect the devices as ... infrared rays to select IR SETUP code number of the connected VCR on page 96. Turn the SEL/PUSH EXEC dial to select VIDEO EDIT, then press the dial. 6 Turn the SEL/PUSH EXEC dial to select EDIT SET, then press the dial. 7 Turn... to select TAPE in "About the IR SETUP code" (p. 101). 107 Editing Dubbing only desired scenes - When you connect a video camera recorder, set up your VCR, then press the dial.
If you connect using the i.LINK cable With a digital-to-digital connection, video and audio signals are transmitted in page 94. When you use the i.LINK cable, connect the devices as ... infrared rays to select IR SETUP code number of the connected VCR on page 96. Turn the SEL/PUSH EXEC dial to select VIDEO EDIT, then press the dial. 6 Turn the SEL/PUSH EXEC dial to select EDIT SET, then press the dial. 7 Turn... to select TAPE in "About the IR SETUP code" (p. 101). 107 Editing Dubbing only desired scenes - When you connect a video camera recorder, set up your VCR, then press the dial.

Operating Instructions
Page 111
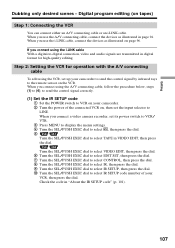
.../PUSH EXEC dial to select , then press the dial. (5) Turn the SEL/PUSH EXEC dial to select TAPE in VIDEO EDIT, then press the dial. Turn the SEL/PUSH EXEC dial to select VIDEO EDIT, then press the dial. (6) Turn the SEL/PUSH EXEC dial to select EDIT SET, then press the.../PUSH EXEC dial to DV input. Digital program editing (on tapes) Step 2: Setting the VCR for operation with the i.LINK cable When you connect a digital video camera recorder, set the input selector to select i.LINK, then press the dial. 111
.../PUSH EXEC dial to select , then press the dial. (5) Turn the SEL/PUSH EXEC dial to select TAPE in VIDEO EDIT, then press the dial. Turn the SEL/PUSH EXEC dial to select VIDEO EDIT, then press the dial. (6) Turn the SEL/PUSH EXEC dial to select EDIT SET, then press the.../PUSH EXEC dial to DV input. Digital program editing (on tapes) Step 2: Setting the VCR for operation with the i.LINK cable When you connect a digital video camera recorder, set the input selector to select i.LINK, then press the dial. 111
Operating Instructions
Page 118
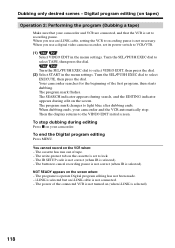
...Your camcorder searches for the beginning of tape. - When dubbing ends, your camcorder. The program to the VIDEO EDIT initial screen. When you use a digital video camera recorder, set its power switch to cancel recording pause is not correct (when IR is selected). - Turn the SEL/PUSH EXEC dial to lock. ...- The write-protect tab on (when i.LINK is set to select VIDEO EDIT, then press the dial. (2)...
...Your camcorder searches for the beginning of tape. - When dubbing ends, your camcorder. The program to the VIDEO EDIT initial screen. When you use a digital video camera recorder, set its power switch to cancel recording pause is not correct (when IR is selected). - Turn the SEL/PUSH EXEC dial to lock. ...- The write-protect tab on (when i.LINK is set to select VIDEO EDIT, then press the dial. (2)...
Operating Instructions
Page 199
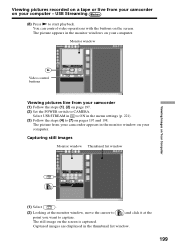
...CAMERA. Select USB STREAM in to (7) on pages 197 and 198. The still image on the screen. Captured images are displayed in the menu settings (p. 221). (3) Follow the steps (4) to ON in the thumbnail list window. 199 USB Streaming (8) Press N to capture. Viewing pictures recorded... on a tape or live from your computer - You can control video operations with the buttons on the screen is captured. The picture from your camcorder appears in the monitor windows...
...CAMERA. Select USB STREAM in to (7) on pages 197 and 198. The still image on the screen. Captured images are displayed in the menu settings (p. 221). (3) Follow the steps (4) to ON in the thumbnail list window. 199 USB Streaming (8) Press N to capture. Viewing pictures recorded... on a tape or live from your computer - You can control video operations with the buttons on the screen is captured. The picture from your camcorder appears in the monitor windows...

Operating Instructions
Page 223
...) After five minutes of the camcorder may reflect on models (p. 16). *2) *3) *4) *5) Customizing Your Camcorder 223 To make a program and perform video editing (p. 106). When recording a close subject When REC LAMP is set to V-OUT/LCD in the menu settings, the picture from a TV or VCR will not appear on... your camcorder is connected to outputs on the TV or VCR. (Except when your camcorder is connected with DISPLAY set to ON, the red camera recording lamp on the front of removing the power source *3) The COMMANDER item returns to OFF. *1) Modes on the POWER switch vary depending on...
...) After five minutes of the camcorder may reflect on models (p. 16). *2) *3) *4) *5) Customizing Your Camcorder 223 To make a program and perform video editing (p. 106). When recording a close subject When REC LAMP is set to V-OUT/LCD in the menu settings, the picture from a TV or VCR will not appear on... your camcorder is connected to outputs on the TV or VCR. (Except when your camcorder is connected with DISPLAY set to ON, the red camera recording lamp on the front of removing the power source *3) The COMMANDER item returns to OFF. *1) Modes on the POWER switch vary depending on...
Operating Instructions
Page 224
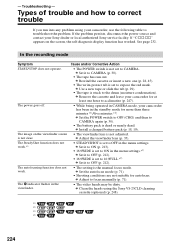
... how to correct trouble If you run out. See page 232. In the recording mode Symptom START/STOP does not operate. Cause and/or Corrective Action •... has worked. c Set the POWER switch to OFF (CHG) and then to focus manually (p. 71). • The video heads may be dirty. c Set it to ON (p. 213). • 16:9WIDE is set to ON in the...• The write-protect tab is not set to CAMERA (p. 30). • The tape has run into any problem using the Sony V8-25CLD cleaning cassette (optional) (p. 248). *1) *2) *3) *4) 224 c Adjust to CAMERA again (p. 30). • The battery pack is...
... how to correct trouble If you run out. See page 232. In the recording mode Symptom START/STOP does not operate. Cause and/or Corrective Action •... has worked. c Set the POWER switch to OFF (CHG) and then to focus manually (p. 71). • The video heads may be dirty. c Set it to ON (p. 213). • 16:9WIDE is set to ON in the...• The write-protect tab is not set to CAMERA (p. 30). • The tape has run into any problem using the Sony V8-25CLD cleaning cassette (optional) (p. 248). *1) *2) *3) *4) 224 c Adjust to CAMERA again (p. 30). • The battery pack is...
Operating Instructions
Page 226
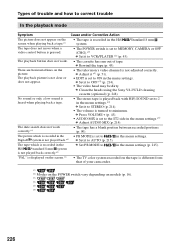
.... c Clean the heads using the Sony V8-25CLD cleaning cassette (optional) (p. 248). c Press VOLUME + (p. 45). • AUDIO MIX is not played back.*6) c Set it to STEREO (p. 214). • The volume is set to OFF *3) (p. 214). • The video head may be dirty. Digital8 system... not move when a video control button is pressed. • The POWER switch is turned to minimum. The playback button does not work correctly.*5) • The tape has a blank portion between recorded portions (p. 90). c Adjust it *3) (p. 51). • EDIT is set to MEMORY, CAMERA or OFF (CHG).*2) ...
.... c Clean the heads using the Sony V8-25CLD cleaning cassette (optional) (p. 248). c Press VOLUME + (p. 45). • AUDIO MIX is not played back.*6) c Set it to STEREO (p. 214). • The volume is set to OFF *3) (p. 214). • The video head may be dirty. Digital8 system... not move when a video control button is pressed. • The POWER switch is turned to minimum. The playback button does not work correctly.*5) • The tape has a blank portion between recorded portions (p. 90). c Adjust it *3) (p. 51). • EDIT is set to MEMORY, CAMERA or OFF (CHG).*2) ...
Operating Instructions
Page 229
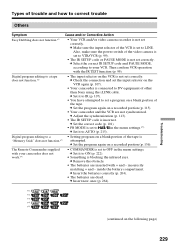
.... c Insert new ones (p. 264). *1) *2) *3) *4) *5) (continued on the VCR again (p. 107). • Your camcorder is connected to DV equipment of other than Sony using the i.LINK cable. c Check the connection and set to / in the menu settings. c Set the correct code (p. 101). • PB MODE is set the ... Others Symptom Cause and/or Corrective Action Easy Dubbing does not function.*1) • Your VCR and/or video camera recorder is not set to LINE. Also, make sure the power switch of the video camera is set to VTR/VCR (p. 99). • The IR SETUP code or PAUSE MODE is not ...
.... c Insert new ones (p. 264). *1) *2) *3) *4) *5) (continued on the VCR again (p. 107). • Your camcorder is connected to DV equipment of other than Sony using the i.LINK cable. c Check the connection and set to / in the menu settings. c Set the correct code (p. 101). • PB MODE is set the ... Others Symptom Cause and/or Corrective Action Easy Dubbing does not function.*1) • Your VCR and/or video camera recorder is not set to LINE. Also, make sure the power switch of the video camera is set to VTR/VCR (p. 99). • The IR SETUP code or PAUSE MODE is not ...
Operating Instructions
Page 238
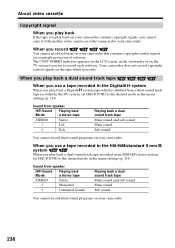
... control signals on the tape when it with another video camera recorder connected to record such software. When you record You cannot record software on your camcorder. Sound from speaker HiFi Sound Mode Playing back a stereo tape STEREO Stereo 1 Lch 2 Rch Playing back a dual...2 Unnatural Sound Playing back a dual sound track tape Main sound and sub sound Main sound Sub sound You cannot record dual sound programs on your camcorder. About video cassette Copyright signal When you play back If the tape you play back on your camcorder contains copyright signals, you ...
... control signals on the tape when it with another video camera recorder connected to record such software. When you record You cannot record software on your camcorder. Sound from speaker HiFi Sound Mode Playing back a stereo tape STEREO Stereo 1 Lch 2 Rch Playing back a dual...2 Unnatural Sound Playing back a dual sound track tape Main sound and sub sound Main sound Sub sound You cannot record dual sound programs on your camcorder. About video cassette Copyright signal When you play back If the tape you play back on your camcorder contains copyright signals, you ...
Operating Instructions
Page 253
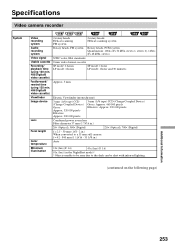
... Coupled Device) Gross: Approx. 320 000 pixels Effective: Approx. 200 000 pixels 3 mm (1/6 type) CCD (Charge Coupled Device) Gross: Approx. 460 000 pixels Effective: Approx. 290 000 pixels Combined power zoom lens Filter diameter 37... 1, stereo 2), 16bits (Fs 48 kHz, stereo) NTSC color, EIA standards 8 mm video format cassette SP mode: 2 hours LP mode: 4 hours SP mode: 1 hour LP mode: 1 hour and 30 minutes Approx. 5 min. Specifications Video camera recorder System Video recording system Audio recording system Video signal Usable cassette Recording/ playback time (using 120 min.
... Coupled Device) Gross: Approx. 320 000 pixels Effective: Approx. 200 000 pixels 3 mm (1/6 type) CCD (Charge Coupled Device) Gross: Approx. 460 000 pixels Effective: Approx. 290 000 pixels Combined power zoom lens Filter diameter 37... 1, stereo 2), 16bits (Fs 48 kHz, stereo) NTSC color, EIA standards 8 mm video format cassette SP mode: 2 hours LP mode: 4 hours SP mode: 1 hour LP mode: 1 hour and 30 minutes Approx. 5 min. Specifications Video camera recorder System Video recording system Audio recording system Video signal Usable cassette Recording/ playback time (using 120 min.

Operating Instructions
Page 254
...) - 4-pin connector - mini-B - DC5V - Specifications Input/ output connectors LCD screen General S video jack Audio/Video jack RFU DC OUT MIC jack DV jack USB jack LANC jack Picture Total dot number Power requirements ...) 8.4 V (AC Adaptor) During camera recording using LCD 2.6 W During camera recording using viewfinder 1.9 W During camera recording using LCD 3.5 W During camera recording using viewfinder 2.7 W 0°C to 40°C (32°F to 104°F) During camera recording using LCD 3.8 W During camera recording using the battery pack) Operating temperature Recommended...
...) - 4-pin connector - mini-B - DC5V - Specifications Input/ output connectors LCD screen General S video jack Audio/Video jack RFU DC OUT MIC jack DV jack USB jack LANC jack Picture Total dot number Power requirements ...) 8.4 V (AC Adaptor) During camera recording using LCD 2.6 W During camera recording using viewfinder 1.9 W During camera recording using LCD 3.5 W During camera recording using viewfinder 2.7 W 0°C to 40°C (32°F to 104°F) During camera recording using LCD 3.8 W During camera recording using the battery pack) Operating temperature Recommended...
Operating Instructions
Page 257
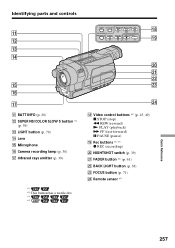
... qd qf qg qh qj qa BATT INFO (p. 20) qs SUPER NS/COLOR SLOW S button *1) (p. 39) qd LIGHT button (p. 79) qf Lens qg Microphone qh Camera recording lamp (p. 30) qj Infrared rays emitter (p. 39) *1) *2) This button has a tactile dot. *3) *4) LIGHT BATT INFO REW PLAY FF COLOR SLOW S SUPER NS STOP PAUSE ... 39) wa FADER button *2) (p. 61) ws BACK LIGHT button (p. 38) wd FOCUS button (p. 71) wf Remote sensor *4) Quick Reference 257 wa ws wd wf qk Video control buttons *2) (p. 45, 49) x STOP (stop) m REW (rewind) N PLAY (playback) M FF (fast-forward) X PAUSE (pause) ql Rec buttons *2) *3) z REC...
... qd qf qg qh qj qa BATT INFO (p. 20) qs SUPER NS/COLOR SLOW S button *1) (p. 39) qd LIGHT button (p. 79) qf Lens qg Microphone qh Camera recording lamp (p. 30) qj Infrared rays emitter (p. 39) *1) *2) This button has a tactile dot. *3) *4) LIGHT BATT INFO REW PLAY FF COLOR SLOW S SUPER NS STOP PAUSE ... 39) wa FADER button *2) (p. 61) ws BACK LIGHT button (p. 38) wd FOCUS button (p. 71) wf Remote sensor *4) Quick Reference 257 wa ws wd wf qk Video control buttons *2) (p. 45, 49) x STOP (stop) m REW (rewind) N PLAY (playback) M FF (fast-forward) X PAUSE (pause) ql Rec buttons *2) *3) z REC...

Operating Instructions
Page 266
... (p. 132) wa Audio mode (p. 219) Data file name *1) (p. 164, 168) Time (p. 36) Auto date (p. 221) ws Warning (p. 233) wd Camera recording lamp (p. 30) This indicator appears in light (p. 79) Video flash mode *2) (p. 211) Flash *2) *1) This indicator appears when MEMORY MIX works. *2) This indicator appears when you use the... video flash light (optional). 266 Identifying parts and controls qh Remaining tape (p. 36) qj ZERO SET MEMORY (p. 89, 124) FRAME REC ...
... (p. 132) wa Audio mode (p. 219) Data file name *1) (p. 164, 168) Time (p. 36) Auto date (p. 221) ws Warning (p. 233) wd Camera recording lamp (p. 30) This indicator appears in light (p. 79) Video flash mode *2) (p. 211) Flash *2) *1) This indicator appears when MEMORY MIX works. *2) This indicator appears when you use the... video flash light (optional). 266 Identifying parts and controls qh Remaining tape (p. 36) qj ZERO SET MEMORY (p. 89, 124) FRAME REC ...

Operating Instructions
Page 267
...cable ........... 51, 94, 119, 138, 152, 208 BACK LIGHT 38 BATTERY INFO 20 Battery pack 18 BEEP 222 BOUNCE 61 Built-in light 79 C, D Camera chroma key 140 Charging battery 19 Charging built-in rechargeable battery 249 Cleaning cassette indicator 248 Clock set 26 Color Slow Shutter 40 Data code...STEADYSHOT 213 Stereo tape 238 STILL 65 STRIPE 61 Sub sound 214, 238 SUPER NIGHTSHOT 39 S VIDEO jack ........... 51, 94, 119, 138, 152, 208 T, U, V Tape counter 36 Tape PB ZOOM 87 Tape photo recording 56 TBC 214 Time code 37 Title 75, 77 TRAIL 65 Transition 31 TV color systems ...
...cable ........... 51, 94, 119, 138, 152, 208 BACK LIGHT 38 BATTERY INFO 20 Battery pack 18 BEEP 222 BOUNCE 61 Built-in light 79 C, D Camera chroma key 140 Charging battery 19 Charging built-in rechargeable battery 249 Cleaning cassette indicator 248 Clock set 26 Color Slow Shutter 40 Data code...STEADYSHOT 213 Stereo tape 238 STILL 65 STRIPE 61 Sub sound 214, 238 SUPER NIGHTSHOT 39 S VIDEO jack ........... 51, 94, 119, 138, 152, 208 T, U, V Tape counter 36 Tape PB ZOOM 87 Tape photo recording 56 TBC 214 Time code 37 Title 75, 77 TRAIL 65 Transition 31 TV color systems ...
Marketing Specifications
Page 1
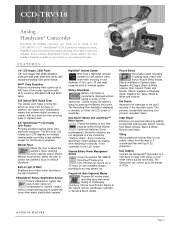
...-in minutes, on the CCD-TRV318. The camcorder can capture video even when shooting in the viewfinder or the LCD screen. Sony's exclusive InfoLithium® battery system displays the exact number of VCRs. ➤ STEP-UP FEATURE Page 3 Picture Effects Get creative when recording or playing back videos with up to adjust the camera's focus, allowing more...
...-in minutes, on the CCD-TRV318. The camcorder can capture video even when shooting in the viewfinder or the LCD screen. Sony's exclusive InfoLithium® battery system displays the exact number of VCRs. ➤ STEP-UP FEATURE Page 3 Picture Effects Get creative when recording or playing back videos with up to adjust the camera's focus, allowing more...


