
Operating Instructions
Page 18
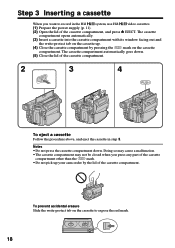
...automatically. (3) Insert a cassette into the cassette compartment with its window facing out and the write-protect tab on the cassette up your camcorder by pressing the mark on the cassette compartment. Notes •Do not press the cassette compartment down . (5) Close the lid of the ...cassette compartment. 2 3 4 EJECT To eject a cassette Follow the procedure above, and eject the cassette in the Hi8 system, use Hi8 video cassettes. (1) Prepare the power supply (p. 11). (2) Open the lid of the cassette compartment, and press Z EJECT. To prevent ...
...automatically. (3) Insert a cassette into the cassette compartment with its window facing out and the write-protect tab on the cassette up your camcorder by pressing the mark on the cassette compartment. Notes •Do not press the cassette compartment down . (5) Close the lid of the ...cassette compartment. 2 3 4 EJECT To eject a cassette Follow the procedure above, and eject the cassette in the Hi8 system, use Hi8 video cassettes. (1) Prepare the power supply (p. 11). (2) Open the lid of the cassette compartment, and press Z EJECT. To prevent ...
Operating Instructions
Page 24
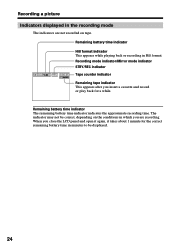
... the conditions in the recording mode The indicators are recording. The indicator may not be displayed. 24 Remaining battery time indicator Hi8 format indicator This appears while playing back or recording in minutes to be correct, depending on tape. Remaining battery time indicator ...The remaining battery time indicator indicates the approximate recording time. When you close the LCD panel and open it again, it takes about 1 minute for a while. Recording a picture Indicators displayed in which you insert a ...
... the conditions in the recording mode The indicators are recording. The indicator may not be displayed. 24 Remaining battery time indicator Hi8 format indicator This appears while playing back or recording in minutes to be correct, depending on tape. Remaining battery time indicator ...The remaining battery time indicator indicates the approximate recording time. When you close the LCD panel and open it again, it takes about 1 minute for a while. Recording a picture Indicators displayed in which you insert a ...

Operating Instructions
Page 50
With this connection, you have finished dubbing a tape Press x on VCRs that support the following systems: 8 mm , Hi8 , Digital 8 , VHS , S-VHS , VHSC , S-VHSC , Betamax , ED Betamax , mini DV , or DV If your VCR is a stereo type Connect the audio plug of the A/V connecting ... do not need to connect the yellow (video) plug of the A/V connecting cable. Connect an S video cable (optional) to the S video jacks of both your camcorder and the VCR. 50 You can edit on both your...
With this connection, you have finished dubbing a tape Press x on VCRs that support the following systems: 8 mm , Hi8 , Digital 8 , VHS , S-VHS , VHSC , S-VHSC , Betamax , ED Betamax , mini DV , or DV If your VCR is a stereo type Connect the audio plug of the A/V connecting ... do not need to connect the yellow (video) plug of the A/V connecting cable. Connect an S video cable (optional) to the S video jacks of both your camcorder and the VCR. 50 You can edit on both your...

Operating Instructions
Page 51
... With this connection, you do not need to put in a title, you do not need to connect the yellow (video) plug of both your camcorder and the VCR. 51 Step 4 Selecting the dubbing mode (p. 57). Connect an S video cable (optional) to 55). Using the Easy Dubbing function ... 3 Selecting the title (p. 56). You can edit on VCRs that support the following systems: 8 mm , Hi8 , Digital 8 , VHS , S-VHS , VHSC , S-VHSC , Betamax , ED Betamax , mini DV , or DV If your camcorder (p. 52 to the S video jacks of the A/V connecting cable. Step 2 Setting the VCR to obtain optimum...
... With this connection, you do not need to put in a title, you do not need to connect the yellow (video) plug of both your camcorder and the VCR. 51 Step 4 Selecting the dubbing mode (p. 57). Connect an S video cable (optional) to 55). Using the Easy Dubbing function ... 3 Selecting the title (p. 56). You can edit on VCRs that support the following systems: 8 mm , Hi8 , Digital 8 , VHS , S-VHS , VHSC , S-VHSC , Betamax , ED Betamax , mini DV , or DV If your camcorder (p. 52 to the S video jacks of the A/V connecting cable. Step 2 Setting the VCR to obtain optimum...

Operating Instructions
Page 80
... TV color systems used in the Hi8 system. This Hi8 system is an extension of the recorded picture in the Hi8 system correctly on your camcorder, the playback mode is carried out in the standard 8 mm system. When you record on your camcorder abroad" (p. 83) to the...different video recorder on video recorders/players other than a Hi8 video recorder/player. If you use both Hi8 and standard 8 mm video cassettes on a Hi8 video cassette in the LP mode, recording is automatically selected according to "Using your camcorder. When you play back The playback mode (SP/LP...
... TV color systems used in the Hi8 system. This Hi8 system is an extension of the recorded picture in the Hi8 system correctly on your camcorder, the playback mode is carried out in the standard 8 mm system. When you record on your camcorder abroad" (p. 83) to the...different video recorder on video recorders/players other than a Hi8 video recorder/player. If you use both Hi8 and standard 8 mm video cassettes on a Hi8 video cassette in the LP mode, recording is automatically selected according to "Using your camcorder. When you play back The playback mode (SP/LP...

Operating Instructions
Page 89
...820 mm (1 5 / 8 - 32 3 / 8 in.) Color temperature Auto Minimum illumination CCD-TRV308/TRV408/TRV608: 0.4 lx (lux) (F 1.4) CCD-TRV107/TRV108: 1 lx (lux) (F 1.4) 0 lx (lux) (in .) CCD- Hi8 cassette, lens cap and shoulder strap Supplied accessories See page 10. AC power adaptor Power requirements... 7.2 V (battery pack) 8.4 V (AC power adaptor) Average power consumption (when using the battery pack) During camera recording using LCD CCD-TRV107/TRV108/TRV308/ TRV408: 2.6 W CCD-TRV608: 3.1 W Viewfinder 1.9 W Operating temperature 0 °C to 40 °C (32 °F to 104 °F) Recommended ...
...820 mm (1 5 / 8 - 32 3 / 8 in.) Color temperature Auto Minimum illumination CCD-TRV308/TRV408/TRV608: 0.4 lx (lux) (F 1.4) CCD-TRV107/TRV108: 1 lx (lux) (F 1.4) 0 lx (lux) (in .) CCD- Hi8 cassette, lens cap and shoulder strap Supplied accessories See page 10. AC power adaptor Power requirements... 7.2 V (battery pack) 8.4 V (AC power adaptor) Average power consumption (when using the battery pack) During camera recording using LCD CCD-TRV107/TRV108/TRV308/ TRV408: 2.6 W CCD-TRV608: 3.1 W Viewfinder 1.9 W Operating temperature 0 °C to 40 °C (32 °F to 104 °F) Recommended ...
Operating Instructions
Page 97
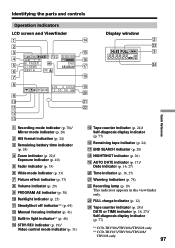
... 27)/ Self-diagnosis display indicator (p. 77) *1) CCD-TRV308/TRV408/TRV608 only *2) CCD-TRV107/TRV308/TRV408/ TRV608 only 97 Time indicator (p....(p. 26) ql AUTO DATE indicator (p. 17)/ Date indicator (p. 16, 27) w; Identifying the parts and controls Operation indicators LCD screen and Viewfinder 1 qf 2 3 4 40min W T 5 M . FADER C I N EMA 6 SEP I A...wd FULL 3 AM PM wf Quick Reference 1 Recording mode indicator (p. 70)/ Mirror mode indicator (p. 20) 2 Hi8 format indication (p. 24) 3 Remaining battery time indicator (p. 24) 4 Zoom indicator (p. 22)/ Exposure indicator (p. 40...
... 27)/ Self-diagnosis display indicator (p. 77) *1) CCD-TRV308/TRV408/TRV608 only *2) CCD-TRV107/TRV308/TRV408/ TRV608 only 97 Time indicator (p....(p. 26) ql AUTO DATE indicator (p. 17)/ Date indicator (p. 16, 27) w; Identifying the parts and controls Operation indicators LCD screen and Viewfinder 1 qf 2 3 4 40min W T 5 M . FADER C I N EMA 6 SEP I A...wd FULL 3 AM PM wf Quick Reference 1 Recording mode indicator (p. 70)/ Mirror mode indicator (p. 20) 2 Hi8 format indication (p. 24) 3 Remaining battery time indicator (p. 24) 4 Zoom indicator (p. 22)/ Exposure indicator (p. 40...
Operating Instructions
Page 98
... 51 EDIT 69 END SEARCH 28 Exposure 40 F, G, H Fade in/out 35 FADER 35 FOCUS 41 Grip strap 95 Heads 85 Hi8 system 80 I, J, K, L "InfoLITHIUM" battery ..... 81 Infrared rays emitter 26 LCD screen 20 LP mode 70 M, N Manual focus 41 Menu settings 67 Mirror mode 20 Moisture condensation ....... 84 MONOTONE 35 Mosaic...
... 51 EDIT 69 END SEARCH 28 Exposure 40 F, G, H Fade in/out 35 FADER 35 FOCUS 41 Grip strap 95 Heads 85 Hi8 system 80 I, J, K, L "InfoLITHIUM" battery ..... 81 Infrared rays emitter 26 LCD screen 20 LP mode 70 M, N Manual focus 41 Menu settings 67 Mirror mode 20 Moisture condensation ....... 84 MONOTONE 35 Mosaic...


