Operating Instructions
Page 1
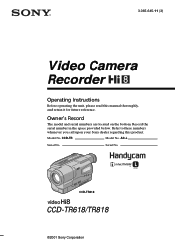
Model No. AC-L Serial No. 3-065-645-11 (3) Video Camera Recorder Operating Instructions Before operating the unit, please read this product. Serial No. Refer to these numbers whenever you call upon your Sony dealer regarding this manual thoroughly, and retain it for future reference. CCD-TR818 CCD-TR618/TR818 ©2001 Sony Corporation CCD-TR Model No. Record the serial number in the space provided below. Owner's Record The model and serial numbers are located on the bottom.
Model No. AC-L Serial No. 3-065-645-11 (3) Video Camera Recorder Operating Instructions Before operating the unit, please read this product. Serial No. Refer to these numbers whenever you call upon your Sony dealer regarding this manual thoroughly, and retain it for future reference. CCD-TR818 CCD-TR618/TR818 ©2001 Sony Corporation CCD-TR Model No. Record the serial number in the space provided below. Owner's Record The model and serial numbers are located on the bottom.
Operating Instructions
Page 5
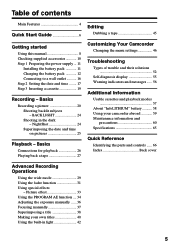
... Specifications 65 Quick Reference Identifying the parts and controls ...... 66 Index Back cover Advanced Recording Operations Using the wide mode 29 Using the fader function 31 Using special effects - Basics Connections for playback 26 Playing back a tape 27 Customizing Your Camcorder Changing the menu settings 46 Troubleshooting Types of contents Main Features 4 Quick Start Guide 6 Editing Dubbing a tape 45 Getting started Using this manual 8 Checking supplied accessories 10 Step 1 Preparing the power supply ... 11 Installing the battery pack 11 Charging the battery...
... Specifications 65 Quick Reference Identifying the parts and controls ...... 66 Index Back cover Advanced Recording Operations Using the wide mode 29 Using the fader function 31 Using special effects - Basics Connections for playback 26 Playing back a tape 27 Customizing Your Camcorder Changing the menu settings 46 Troubleshooting Types of contents Main Features 4 Quick Start Guide 6 Editing Dubbing a tape 45 Getting started Using this manual 8 Checking supplied accessories 10 Step 1 Preparing the power supply ... 11 Installing the battery pack 11 Charging the battery...
Operating Instructions
Page 7
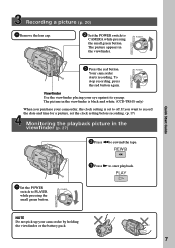
... camcorder, the clock setting is set the clock setting before recording. (p. 17) Monitoring the playback picture in the viewfinder. REW 1 Set the POWER switch to start playback. Quick Start Guide Recording a picture (p. 20) 1 Remove the lens cap. 2 Set the POWER switch to off. OFF (CHARGE) PLAYER POWER CAMERA 3 Press the red button. The picture appears in the viewfinder (p. 27) 2 Press m to rewind the tape. OFF (CHARGE) PLAYER POWER CAMERA Viewfinder Use the viewfinder placing your camcorder by holding the viewfinder or the battery...
... camcorder, the clock setting is set the clock setting before recording. (p. 17) Monitoring the playback picture in the viewfinder. REW 1 Set the POWER switch to start playback. Quick Start Guide Recording a picture (p. 20) 1 Remove the lens cap. 2 Set the POWER switch to off. OFF (CHARGE) PLAYER POWER CAMERA 3 Press the red button. The picture appears in the viewfinder (p. 27) 2 Press m to rewind the tape. OFF (CHARGE) PLAYER POWER CAMERA Viewfinder Use the viewfinder placing your camcorder by holding the viewfinder or the battery...
Operating Instructions
Page 8
... to country. The CCD-TR818 is the model used for example, "CCD-TR818 only." Types of your camcorder are clearly indicated in light Digital zoom SteadyShot z Provided - e.g. When you carry out an operation, you can hear a beep sound to CAMERA. Not provided TR618 B/W z 450 × - Otherwise, the model name is being carried out. TR818 Color - 460 × z Note on your camcorder. Getting started - Set the POWER switch to indicate that the...
... to country. The CCD-TR818 is the model used for example, "CCD-TR818 only." Types of your camcorder are clearly indicated in light Digital zoom SteadyShot z Provided - e.g. When you carry out an operation, you can hear a beep sound to CAMERA. Not provided TR618 B/W z 450 × - Otherwise, the model name is being carried out. TR818 Color - 460 × z Note on your camcorder. Getting started - Set the POWER switch to indicate that the...
Operating Instructions
Page 14
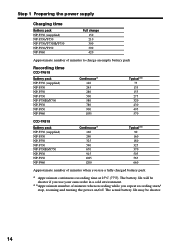
... number of minutes when you repeat recording start/ stop, zooming and turning the power on/off. The battery life will be shorter. 14 Step 1 Preparing the power supply Charging time Battery pack NP-F330 (supplied) NP-F530/F550 NP-F730/F730H/F750 NP-F930/F950 NP-F960 Full charge 150 210 300 390 420 Approximate number of minutes to charge an empty battery pack Recording time CCD-TR618 Battery...
... number of minutes when you repeat recording start/ stop, zooming and turning the power on/off. The battery life will be shorter. 14 Step 1 Preparing the power supply Charging time Battery pack NP-F330 (supplied) NP-F530/F550 NP-F730/F730H/F750 NP-F930/F950 NP-F960 Full charge 150 210 300 390 420 Approximate number of minutes to charge an empty battery pack Recording time CCD-TR618 Battery...
Operating Instructions
Page 16
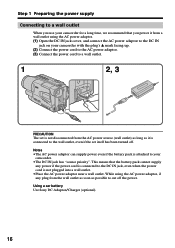
... a wall outlet. Using a car battery Use Sony DC Adaptor/Charger (optional). 16 This means that you use your camcorder for a long time, we recommend that the battery pack cannot supply any plug from the wall outlet as soon as it is connected to the wall outlet, even if the set itself has been turned off the power. Step 1 Preparing the power supply Connecting to a wall outlet...
... a wall outlet. Using a car battery Use Sony DC Adaptor/Charger (optional). 16 This means that you use your camcorder for a long time, we recommend that the battery pack cannot supply any plug from the wall outlet as soon as it is connected to the wall outlet, even if the set itself has been turned off the power. Step 1 Preparing the power supply Connecting to a wall outlet...
Operating Instructions
Page 18
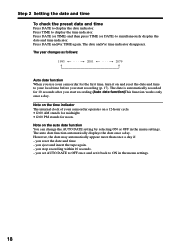
... the menu settings. you reset the date and time. - Press DATE (or TIME) and then press TIME (or DATE) to display the time indicator. The year changes as follows: 1995 T t 2001 T t 2079 Auto date function When you use your camcorder operates on a 12-hour cycle. •12:00 AM stands for midnight. •12:00 PM stands for the first time, turn it back to your local time before you start recording...
... the menu settings. you reset the date and time. - Press DATE (or TIME) and then press TIME (or DATE) to display the time indicator. The year changes as follows: 1995 T t 2001 T t 2079 Auto date function When you use your camcorder operates on a 12-hour cycle. •12:00 AM stands for midnight. •12:00 PM stands for the first time, turn it back to your local time before you start recording...
Operating Instructions
Page 20
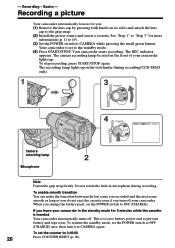
... do not eject the cassette even if you change the battery pack, set the counter to the standby mode. (4) Press START/STOP. To set the POWER switch to "Step 3" for you leave your camcorder in the standby mode for 5 minutes while the cassette is inserted Your camcorder automatically turns off your camcorder lights up in microphone during recording(CCD-TR618 only). 1 3 POWER PLAYER OFF (CHARGE) CAMERA PLAYER 4 POWER 40min REC 0:00:01 OFF (CHARGE) CAMERA Camera recording lamp 2 Microphone Note...
... do not eject the cassette even if you change the battery pack, set the counter to the standby mode. (4) Press START/STOP. To set the POWER switch to "Step 3" for you leave your camcorder in the standby mode for 5 minutes while the cassette is inserted Your camcorder automatically turns off your camcorder lights up in microphone during recording(CCD-TR618 only). 1 3 POWER PLAYER OFF (CHARGE) CAMERA PLAYER 4 POWER 40min REC 0:00:01 OFF (CHARGE) CAMERA Camera recording lamp 2 Microphone Note...
Operating Instructions
Page 26
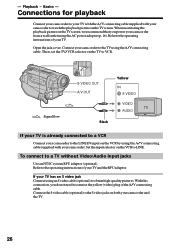
... power adaptor (p. 16). Set the input selector on the VCR to the S video jacks on the TV screen, we recommend that you do not need to the operating instructions of the A/V connecting cable. With this connection, you power your TV and the RFU adaptor. Open the jack cover. Refer to connect the yellow (video) plug of your camcorder from a wall outlet using an S video cable (optional) to a TV without Video/Audio input jacks Use an NTSC...
... power adaptor (p. 16). Set the input selector on the VCR to the S video jacks on the TV screen, we recommend that you do not need to the operating instructions of the A/V connecting cable. With this connection, you power your TV and the RFU adaptor. Open the jack cover. Refer to connect the yellow (video) plug of your camcorder from a wall outlet using an S video cable (optional) to a TV without Video/Audio input jacks Use an NTSC...
Operating Instructions
Page 30
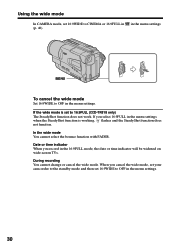
... bounce function with FADER. Using the wide mode In CAMERA mode, set to 16:9FULL (CCD-TR818 only) The SteadyShot function does not work. If you select 16:9FULL in the menu settings. 30 When you record in the 16:9FULL mode, the date or time indicator will be widened on wide-screen TVs. Date or time indicator When you cancel the wide mode, set your camcorder to the standby mode and then set...
... bounce function with FADER. Using the wide mode In CAMERA mode, set to 16:9FULL (CCD-TR818 only) The SteadyShot function does not work. If you select 16:9FULL in the menu settings. 30 When you record in the 16:9FULL mode, the date or time indicator will be widened on wide-screen TVs. Date or time indicator When you cancel the wide mode, set your camcorder to the standby mode and then set...
Operating Instructions
Page 45
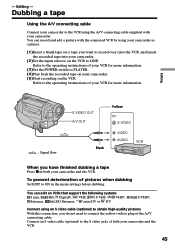
... on VCRs that support the following systems 8 mm, Hi8, Digital8, VHS, S-VHS, VHSC, Betamax, ED Betamax, mini DV or DV S-VHSC, Connect using your camcorder as a player. ( 1 )Insert a blank tape (or a tape you want to PLAYER. ( 4 )Play back the recorded tape on the VCR. - Editing : Signal flow S VIDEO OUT A/V OUT Yellow IN S VIDEO Black VIDEO AUDIO When you do not need to connect the yellow (video) plug of pictures when dubbing Set EDIT...
... on VCRs that support the following systems 8 mm, Hi8, Digital8, VHS, S-VHS, VHSC, Betamax, ED Betamax, mini DV or DV S-VHSC, Connect using your camcorder as a player. ( 1 )Insert a blank tape (or a tape you want to PLAYER. ( 4 )Play back the recorded tape on the VCR. - Editing : Signal flow S VIDEO OUT A/V OUT Yellow IN S VIDEO Black VIDEO AUDIO When you do not need to connect the yellow (video) plug of pictures when dubbing Set EDIT...
Operating Instructions
Page 47
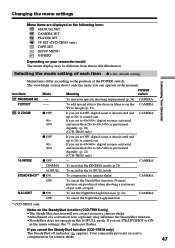
...: MANUAL SET CAMERA SET PLAYER SET VF SET (CCD-TR818 only) TAPE SET SETUP MENU OTHERS Depending on your specific shooting requirement (p. 34) CAMERA P EFFECT -- Icon/item Mode Meaning POWER switch PROGRAM AE -- D ZOOM z OFF 40× 450× If you set to OFF, digital zoom is deactivated and up to 40×/460× is performed digitally. (p. 22) (CCD-TR818 only) 16:9WIDE z OFF - N.S.LIGHT z ON To use the NightShot Light function (p. 24) CAMERA OFF To cancel the NightShot Light function * CCD-TR818...
...: MANUAL SET CAMERA SET PLAYER SET VF SET (CCD-TR818 only) TAPE SET SETUP MENU OTHERS Depending on your specific shooting requirement (p. 34) CAMERA P EFFECT -- Icon/item Mode Meaning POWER switch PROGRAM AE -- D ZOOM z OFF 40× 450× If you set to OFF, digital zoom is deactivated and up to 40×/460× is performed digitally. (p. 22) (CCD-TR818 only) 16:9WIDE z OFF - N.S.LIGHT z ON To use the NightShot Light function (p. 24) CAMERA OFF To cancel the NightShot Light function * CCD-TR818...
Operating Instructions
Page 48
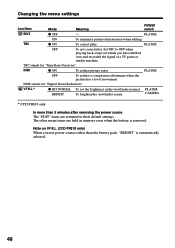
... screen PLAYER CAMERA * CCD-TR818 only In more than the battery pack, "BRIGHT" is removed. DNR z ON To reduce picture noise PLAYER OFF To reduce a conspicuous afterimage when the picture has a lot of a TV game or similar machine. VF B.L.* z BRT NORMAL To set the brightness in memory even when the battery is automatically selected. 48 Note on which you use power sources other menu...
... screen PLAYER CAMERA * CCD-TR818 only In more than the battery pack, "BRIGHT" is removed. DNR z ON To reduce picture noise PLAYER OFF To reduce a conspicuous afterimage when the picture has a lot of a TV game or similar machine. VF B.L.* z BRT NORMAL To set the brightness in memory even when the battery is automatically selected. 48 Note on which you use power sources other menu...

Operating Instructions
Page 49
...". Customizing Your Camcorder Changing the menu settings Icon/item Mode Meaning POWER switch REC MODE z SP To record in the menu settings. Press START/ STOP to the standby mode. When you play back the tape on other camcorders or VCRs, noise may occur in pictures or sound. • Noise may occur also when you play on your camcorder tapes recorded in the LP mode on ORC setting • Each time you have already set the ORC setting, select ORC...
...". Customizing Your Camcorder Changing the menu settings Icon/item Mode Meaning POWER switch REC MODE z SP To record in the menu settings. Press START/ STOP to the standby mode. When you play back the tape on other camcorders or VCRs, noise may occur in pictures or sound. • Noise may occur also when you play on your camcorder tapes recorded in the LP mode on ORC setting • Each time you have already set the ORC setting, select ORC...
Operating Instructions
Page 52
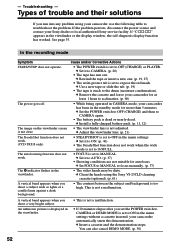
... POWER switch is dead or nearly dead. c Remove the cassette and leave your camcorder for at least 1 hour to expose the red mark. c Install a fully charged battery pack. (p. 11, 12) • The viewfinder lens is displayed in the viewfinder or the display window, the self-diagnosis display function has worked. c Set FOCUS to MANUAL to CAMERA again. • The battery pack is set to acclimatize. (p. 60) • While being operated in CAMERA mode, your camcorder automatically...
... POWER switch is dead or nearly dead. c Remove the cassette and leave your camcorder for at least 1 hour to expose the red mark. c Install a fully charged battery pack. (p. 11, 12) • The viewfinder lens is displayed in the viewfinder or the display window, the self-diagnosis display function has worked. c Set FOCUS to MANUAL to CAMERA again. • The battery pack is set to acclimatize. (p. 60) • While being operated in CAMERA mode, your camcorder automatically...

Operating Instructions
Page 53
... remaining battery time. c Clean the heads using the Sony V8-25CLD cleaning cassette (optional). (p. 61) In the recording and playback modes Symptom Cause and/or Corrective Actions The power does not turn on the following page) 53 c Set it . (p. 24) Troubleshooting In the playback mode Symptom The tape does not move when a video control button is set to OFF. (p. 24) • NIGHTSHOT is pressed. c Cancel it to CAMERA or OFF (CHARGE). c Replace with a new battery pack...
... remaining battery time. c Clean the heads using the Sony V8-25CLD cleaning cassette (optional). (p. 61) In the recording and playback modes Symptom Cause and/or Corrective Actions The power does not turn on the following page) 53 c Set it . (p. 24) Troubleshooting In the playback mode Symptom The tape does not move when a video control button is set to OFF. (p. 24) • NIGHTSHOT is pressed. c Cancel it to CAMERA or OFF (CHARGE). c Replace with a new battery pack...
Operating Instructions
Page 56
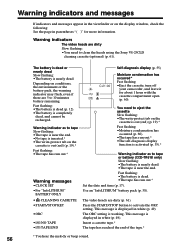
...). •The battery is working. The ORC setting is completely dead, and cannot be recharged. This message is displayed in white (p. 49). Warning indicators and messages If indicators and messages appear in the viewfinder or on the display window, check the following: See the page in parentheses "( )" for about 1 hour with the cassette compartment open (p. 60). Warning indicators The video heads are 5 to eject the cassette Slow flashing: •...
...). •The battery is working. The ORC setting is completely dead, and cannot be recharged. This message is displayed in white (p. 49). Warning indicators and messages If indicators and messages appear in the viewfinder or on the display window, check the following: See the page in parentheses "( )" for about 1 hour with the cassette compartment open (p. 60). Warning indicators The video heads are 5 to eject the cassette Slow flashing: •...

Operating Instructions
Page 62
... of the POWER switch. You may remove only the screw to retain the date and time, etc., regardless of the setting of the lens. •Keep the POWER switch set to OFF (CHARGE) when you do not use your camcorder with the POWER switch turned off for more than 24 hours. •Or install the fully charged battery pack in about 4 months if you are not using your camcorder. Even if...
... of the POWER switch. You may remove only the screw to retain the date and time, etc., regardless of the setting of the lens. •Keep the POWER switch set to OFF (CHARGE) when you do not use your camcorder with the POWER switch turned off for more than 24 hours. •Or install the fully charged battery pack in about 4 months if you are not using your camcorder. Even if...
Operating Instructions
Page 65
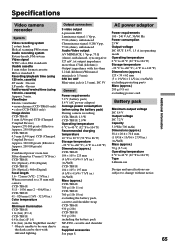
..., (at output impedance more than 2.2 kΩ (kilohms)/Monaural minijack (ø 3.5 mm) RFU DC OUT Mini-mini jack (ø 2.5 mm), DC 5V General Power requirements 7.2 V (battery pack) 8.4 V (AC power adaptor) Average power consumption (when using 120 min. Specifications Additional Information Video camera recorder System Video recording system 2 rotary heads Helical scanning FM system Audio recording system Rotary heads, FM system Video signal NTSC color, EIA standards Usable cassette 8 mm video format cassette Hi8 or standard 8 Recording/playback time (using 120...
..., (at output impedance more than 2.2 kΩ (kilohms)/Monaural minijack (ø 3.5 mm) RFU DC OUT Mini-mini jack (ø 2.5 mm), DC 5V General Power requirements 7.2 V (battery pack) 8.4 V (AC power adaptor) Average power consumption (when using 120 min. Specifications Additional Information Video camera recorder System Video recording system 2 rotary heads Helical scanning FM system Audio recording system Rotary heads, FM system Video signal NTSC color, EIA standards Usable cassette 8 mm video format cassette Hi8 or standard 8 Recording/playback time (using 120...
Operating Instructions
Page 72
... emitter 24 LP mode 49 M, N Manual focus 37 Menu settings 46 Moisture condensation .......... 60 MONOTONE 31 Mosaic fader 31 NIGHTSHOT 24 NTSC system 59 O, P, Q Operation indicators 71 ORC 49 Picture effect 33 Picture search 28 Playback pause 28 Power zoom 22 PROGRAM AE 34 R Recording and playback systems 57 Recording mode 49 Recording time 14 Remaining battery time indicator 23 Remaining tape indicator ...... 23 RESET 54 RFU adaptor 26 S Self-diagnosis display 55 Shoulder...
... emitter 24 LP mode 49 M, N Manual focus 37 Menu settings 46 Moisture condensation .......... 60 MONOTONE 31 Mosaic fader 31 NIGHTSHOT 24 NTSC system 59 O, P, Q Operation indicators 71 ORC 49 Picture effect 33 Picture search 28 Playback pause 28 Power zoom 22 PROGRAM AE 34 R Recording and playback systems 57 Recording mode 49 Recording time 14 Remaining battery time indicator 23 Remaining tape indicator ...... 23 RESET 54 RFU adaptor 26 S Self-diagnosis display 55 Shoulder...


