
Operating Instructions
Page 2
...for years to the presence of this equipment. This symbol is intended to alert the user to come. Congratulations on your nearest Sony Service Center or Factory Service Center. LITHIUM ION BATTERY. You will soon be producing home video that you can return your unwanted ...lithium ion batteries to operate this Sony Handycam® camcorder. With your authority to your purchase of important operating and maintenance (servicing) instructions in the United States and Canada DISPOSAL OF...
...for years to the presence of this equipment. This symbol is intended to alert the user to come. Congratulations on your nearest Sony Service Center or Factory Service Center. LITHIUM ION BATTERY. You will soon be producing home video that you can return your unwanted ...lithium ion batteries to operate this Sony Handycam® camcorder. With your authority to your purchase of important operating and maintenance (servicing) instructions in the United States and Canada DISPOSAL OF...
Operating Instructions
Page 5
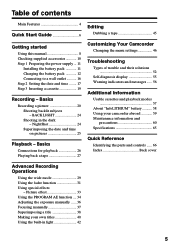
...your own titles 40 Using the built-in the dark - Basics Connections for playback 26 Playing back a tape 27 Customizing Your Camcorder Changing the menu settings 46 Troubleshooting Types of contents Main Features 4 Quick Start Guide 6 Editing Dubbing a tape 45 Getting ...Using the PROGRAM AE function .... 34 Adjusting the exposure manually ...... 36 Focusing manually 37 Superimposing a title 38 Making your camcorder abroad 59 Maintenance information and precautions 60 Specifications 65 Quick Reference Identifying the parts and controls ...... 66 Index Back cover Advanced...
...your own titles 40 Using the built-in the dark - Basics Connections for playback 26 Playing back a tape 27 Customizing Your Camcorder Changing the menu settings 46 Troubleshooting Types of contents Main Features 4 Quick Start Guide 6 Editing Dubbing a tape 45 Getting ...Using the PROGRAM AE function .... 34 Adjusting the exposure manually ...... 36 Focusing manually 37 Superimposing a title 38 Making your camcorder abroad 59 Maintenance information and precautions 60 Specifications 65 Quick Reference Identifying the parts and controls ...... 66 Index Back cover Advanced...
Operating Instructions
Page 6
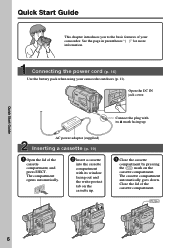
... compartment opens automatically. The cassette compartment automatically goes down. Connecting the power cord (p. 16) Use the battery pack when using your camcorder. Connect the plug with its v mark facing up . 3 Close the cassette compartment by pressing the mark on the cassette compartment.... the cassette compartment, and press EJECT. Quick Start Guide 6 Quick Start Guide This chapter introduces you to the basic features of your camcorder outdoors (p. 11). Open the DC IN jack cover. EJECT 2 Insert a cassette into the cassette compartment with its window facing out...
... compartment opens automatically. The cassette compartment automatically goes down. Connecting the power cord (p. 16) Use the battery pack when using your camcorder. Connect the plug with its v mark facing up . 3 Close the cassette compartment by pressing the mark on the cassette compartment.... the cassette compartment, and press EJECT. Quick Start Guide 6 Quick Start Guide This chapter introduces you to the basic features of your camcorder outdoors (p. 11). Open the DC IN jack cover. EJECT 2 Insert a cassette into the cassette compartment with its window facing out...
Operating Instructions
Page 7
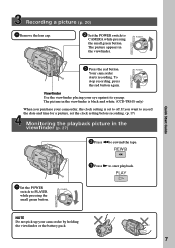
...switch to start playback. OFF (CHARGE) PLAYER POWER CAMERA 3 Press the red button. The picture in the viewfinder is black and white. (CCD-TR618 only) When you want to record the date and time for a picture, set to rewind the tape. OFF (CHARGE) PLAYER POWER CAMERA... Viewfinder Use the viewfinder placing your camcorder by holding the viewfinder or the battery pack. 7 If you purchase your camcorder, the clock setting is set the clock setting before recording. (p. 17) Monitoring the playback picture in ...
...switch to start playback. OFF (CHARGE) PLAYER POWER CAMERA 3 Press the red button. The picture in the viewfinder is black and white. (CCD-TR618 only) When you want to record the date and time for a picture, set to rewind the tape. OFF (CHARGE) PLAYER POWER CAMERA... Viewfinder Use the viewfinder placing your camcorder by holding the viewfinder or the battery pack. 7 If you purchase your camcorder, the clock setting is set the clock setting before recording. (p. 17) Monitoring the playback picture in ...
Operating Instructions
Page 8
... - Any differences in operation are clearly indicated in the text, for the two models listed in the table below. TR818 Color - 460 × z Note on your camcorder are for example, "CCD-TR818 only." To view your camcorder. Types of your recordings on a TV, you need an NTSC system-based TV. 8 As you can hear a beep...
... - Any differences in operation are clearly indicated in the text, for the two models listed in the table below. TR818 Color - 460 × z Note on your camcorder are for example, "CCD-TR818 only." To view your camcorder. Types of your recordings on a TV, you need an NTSC system-based TV. 8 As you can hear a beep...
Operating Instructions
Page 9
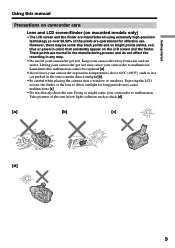
However, there may be repaired [a]. • Never leave your camcorder to malfunction. Keep your camcorder to malfunction. Sometimes this manual Precautions on camcorder care Lens and LCD screen/finder (on the LCD screen and the finder. Getting started Using this malfunction cannot be some tiny black ... finder are manufactured using extremely high-precision technology so over 99.99% of the sun in any way. • Do not let your camcorder get wet. Doing so might cause your camcorder away from rain and sea water. These points are operational for long periods may cause your...
However, there may be repaired [a]. • Never leave your camcorder to malfunction. Keep your camcorder to malfunction. Sometimes this manual Precautions on camcorder care Lens and LCD screen/finder (on the LCD screen and the finder. Getting started Using this malfunction cannot be some tiny black ... finder are manufactured using extremely high-precision technology so over 99.99% of the sun in any way. • Do not let your camcorder get wet. Doing so might cause your camcorder away from rain and sea water. These points are operational for long periods may cause your...
Operating Instructions
Page 10
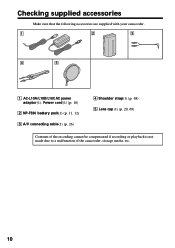
Checking supplied accessories Make sure that the following accessories are supplied with your camcorder. 1 2 3 4 5 1 AC-L10A/L10B/L10C AC power adaptor (1), Power cord (1) (p. 16) 2 NP-F330 battery pack(1) (p. 11, 12) 3 A/V connecting cable(1) (p. 26) 4 Shoulder strap(1) (p. 68) 5 Lens cap (1) (p. 20, 69) Contents of the recording cannot be compensated if recording or playback is not made due to a malfunction of the camcorder, storage media, etc. 10
Checking supplied accessories Make sure that the following accessories are supplied with your camcorder. 1 2 3 4 5 1 AC-L10A/L10B/L10C AC power adaptor (1), Power cord (1) (p. 16) 2 NP-F330 battery pack(1) (p. 11, 12) 3 A/V connecting cable(1) (p. 26) 4 Shoulder strap(1) (p. 68) 5 Lens cap (1) (p. 20, 69) Contents of the recording cannot be compensated if recording or playback is not made due to a malfunction of the camcorder, storage media, etc. 10
Operating Instructions
Page 11
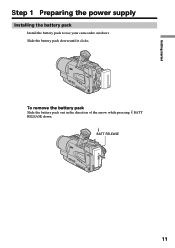
BATT RELEASE 11 Getting started Step 1 Preparing the power supply Installing the battery pack Install the battery pack to use your camcorder outdoors. To remove the battery pack Slide the battery pack out in the direction of the arrow while pressing BATT RELEASE down until it clicks. Slide the battery pack down .
BATT RELEASE 11 Getting started Step 1 Preparing the power supply Installing the battery pack Install the battery pack to use your camcorder outdoors. To remove the battery pack Slide the battery pack out in the direction of the arrow while pressing BATT RELEASE down until it clicks. Slide the battery pack down .
Operating Instructions
Page 12
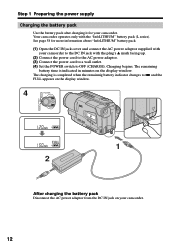
... time is completed when the remainnig battery indicator changes to OFF (CHARGE). The charging is indicated in minutes on your camcorder. 12 Your camcorder operates only with your camcorder. Step 1 Preparing the power supply Charging the battery pack Use the battery pack after charging it for more information about...Open the DC IN jack cover and connect the AC power adaptor supplied with the "InfoLITHIUM" battery pack (L series). See page 58 for your camcorder to the DC IN jack with the plug's v mark facing up. (2) Connect the power cord to the AC power adaptor. (3) Connect the ...
... time is completed when the remainnig battery indicator changes to OFF (CHARGE). The charging is indicated in minutes on your camcorder. 12 Your camcorder operates only with your camcorder. Step 1 Preparing the power supply Charging the battery pack Use the battery pack after charging it for more information about...Open the DC IN jack cover and connect the AC power adaptor supplied with the "InfoLITHIUM" battery pack (L series). See page 58 for your camcorder to the DC IN jack with the plug's v mark facing up. (2) Connect the power cord to the AC power adaptor. (3) Connect the ...
Operating Instructions
Page 13
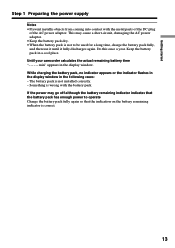
..., charge the battery pack fully, and then use it until it fully discharges again. Do this once a year. min" appears in a cool place. Until your camcorder calculates the actual remaining battery time "- - - - Keep the battery pack in the display window. Something is not to operate Charge the battery pack fully again...
..., charge the battery pack fully, and then use it until it fully discharges again. Do this once a year. min" appears in a cool place. Until your camcorder calculates the actual remaining battery time "- - - - Keep the battery pack in the display window. Something is not to operate Charge the battery pack fully again...
Operating Instructions
Page 14
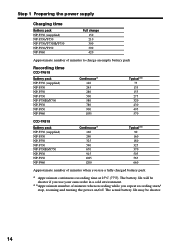
...charge 150 210 300 390 420 Approximate number of minutes to charge an empty battery pack Recording time CCD-TR618 Battery pack NP-F330 (supplied) NP-F530 NP-F550 NP-F730 NP-F730H/F750 NP-F930...* 140 245 280 500 580 780 900 1035 Typical** 75 135 155 275 320 430 495 570 CCD-TR818 Battery pack NP-F330 (supplied) NP-F530 NP-F550 NP-F730 NP-F730H/F750 NP-F930 NP-F950... 915 1025 1200 Typical** 90 160 180 325 370 505 565 660 Approximate number of minutes when you use your camcorder in a cold environment. * *Approximate number of minutes when recording while you use a fully charged battery pack ...
...charge 150 210 300 390 420 Approximate number of minutes to charge an empty battery pack Recording time CCD-TR618 Battery pack NP-F330 (supplied) NP-F530 NP-F550 NP-F730 NP-F730H/F750 NP-F930...* 140 245 280 500 580 780 900 1035 Typical** 75 135 155 275 320 430 495 570 CCD-TR818 Battery pack NP-F330 (supplied) NP-F530 NP-F550 NP-F730 NP-F730H/F750 NP-F930 NP-F950... 915 1025 1200 Typical** 90 160 180 325 370 505 565 660 Approximate number of minutes when you use your camcorder in a cold environment. * *Approximate number of minutes when recording while you use a fully charged battery pack ...
Operating Instructions
Page 15
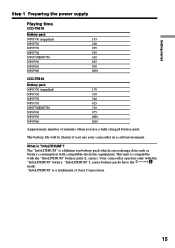
...use a fully charged battery pack The battery life will be shorter if you use your camcorder in a cold environment. This unit is a lithium ion battery pack which can exchange data such... equipment. Your camcorder operates only with the "InfoLITHIUM" battery pack (L series). The "InfoLITHIUM" is compatible with the "InfoLITHIUM" battery. Getting started Step 1 Preparing the power supply Playing time CCD-TR618 Battery pack...F730H/F750 NP-F930 NP-F950 NP-F960 145 260 295 525 610 825 930 1090 CCD-TR818 Battery pack NP-F330 (supplied) NP-F530 NP-F550 NP-F730 NP-F730H/F750 NP...
...use a fully charged battery pack The battery life will be shorter if you use your camcorder in a cold environment. This unit is a lithium ion battery pack which can exchange data such... equipment. Your camcorder operates only with the "InfoLITHIUM" battery pack (L series). The "InfoLITHIUM" is compatible with the "InfoLITHIUM" battery. Getting started Step 1 Preparing the power supply Playing time CCD-TR618 Battery pack...F730H/F750 NP-F930 NP-F950 NP-F960 145 260 295 525 610 825 930 1090 CCD-TR818 Battery pack NP-F330 (supplied) NP-F530 NP-F550 NP-F730 NP-F730H/F750 NP...
Operating Instructions
Page 16
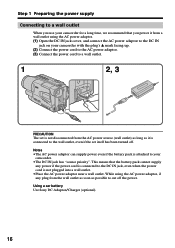
Using a car battery Use Sony DC Adaptor/Charger (optional). 16 While using the AC power adaptor. (1) Open the DC IN jack cover, and connect the AC power adaptor to the DC IN jack on your camcorder. •The DC IN jack has "source priority". Notes •The AC power adaptor can supply ...power even if the battery pack is attached to your camcorder with the plug's v mark facing up. (2) Connect the power cord to the AC power adaptor. (3) Connect the power cord to a wall outlet. 1 2, 3 PRECAUTION The ...
Using a car battery Use Sony DC Adaptor/Charger (optional). 16 While using the AC power adaptor. (1) Open the DC IN jack cover, and connect the AC power adaptor to the DC IN jack on your camcorder. •The DC IN jack has "source priority". Notes •The AC power adaptor can supply ...power even if the battery pack is attached to your camcorder with the plug's v mark facing up. (2) Connect the power cord to the AC power adaptor. (3) Connect the power cord to a wall outlet. 1 2, 3 PRECAUTION The ...
Operating Instructions
Page 17
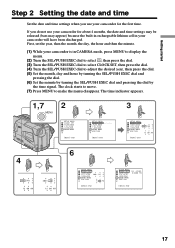
... pressing the dial by the time signal. First, set the year, then the month, the day, the hour and then the minute. (1) While your camcorder is in your camcorder will have been discharged. The time indicator appears. 1,7 MENU 2 SETUP MENU CLOCK SET AUTO DATE LTR S I ZE L ANGUAGE DEMO MODE [ MENU ] : END SETUP... ] : END SETUP MENU CLOCK SET AUTO DATE LTR S I ZE L ANGUAGE DEMO MODE RETURN JUL 4 2001 5:30:00 PM [ MENU ] : END 17 If you use your camcorder for the first time. Getting started Step 2 Setting the date and time Set the date and time settings when you do not use your...
... pressing the dial by the time signal. First, set the year, then the month, the day, the hour and then the minute. (1) While your camcorder is in your camcorder will have been discharged. The time indicator appears. 1,7 MENU 2 SETUP MENU CLOCK SET AUTO DATE LTR S I ZE L ANGUAGE DEMO MODE [ MENU ] : END SETUP... ] : END SETUP MENU CLOCK SET AUTO DATE LTR S I ZE L ANGUAGE DEMO MODE RETURN JUL 4 2001 5:30:00 PM [ MENU ] : END 17 If you use your camcorder for the first time. Getting started Step 2 Setting the date and time Set the date and time settings when you do not use your...
Operating Instructions
Page 18
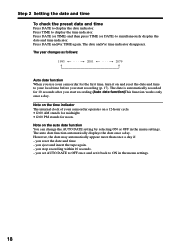
The year changes as follows: 1995 T t 2001 T t 2079 Auto date function When you use your camcorder for noon. Step 2 Setting the date and time To check the preset date and time Press DATE to display the time indicator. Press TIME to ... change the AUTO DATE setting by selecting ON or OFF in the menu settings. 18 Note on and reset the date and time to your camcorder operates on a 12-hour cycle. •12:00 AM stands for midnight. •12:00 PM stands for the first time, turn it back to...
The year changes as follows: 1995 T t 2001 T t 2079 Auto date function When you use your camcorder for noon. Step 2 Setting the date and time To check the preset date and time Press DATE to display the time indicator. Press TIME to ... change the AUTO DATE setting by selecting ON or OFF in the menu settings. 18 Note on and reset the date and time to your camcorder operates on a 12-hour cycle. •12:00 AM stands for midnight. •12:00 PM stands for the first time, turn it back to...
Operating Instructions
Page 19
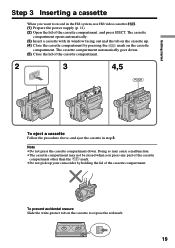
The cassette compartment opens automatically. (3) Insert a cassette with its window facing out and the tab on the cassette up your camcorder by holding the lid of the cassette compartment other than the mark. •Do not pick up . (4) Close the cassette compartment by pressing the mark ...
The cassette compartment opens automatically. (3) Insert a cassette with its window facing out and the tab on the cassette up your camcorder by holding the lid of the cassette compartment other than the mark. •Do not pick up . (4) Close the cassette compartment by pressing the mark ...
Operating Instructions
Page 20
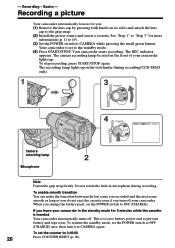
... on the front of your camcorder. Your camcorder starts recording. The recording lamp lights up . When you leave your camcorder in the standby mode for 5 minutes while the cassette is inserted Your camcorder automatically turns off your camcorder lights up in microphone during recording(CCD-TR618 only). 1 3 POWER...(p. 69). To stop recording, press START/STOP again. Recording - The REC indicator appears. Basics - Recording a picture Your camcorder automatically focuses for more information (p. 11 to 19). (3) Set the POWER switch to prevent battery and tape wear. Your...
... on the front of your camcorder. Your camcorder starts recording. The recording lamp lights up . When you leave your camcorder in the standby mode for 5 minutes while the cassette is inserted Your camcorder automatically turns off your camcorder lights up in microphone during recording(CCD-TR618 only). 1 3 POWER...(p. 69). To stop recording, press START/STOP again. Recording - The REC indicator appears. Basics - Recording a picture Your camcorder automatically focuses for more information (p. 11 to 19). (3) Set the POWER switch to prevent battery and tape wear. Your...
Operating Instructions
Page 21
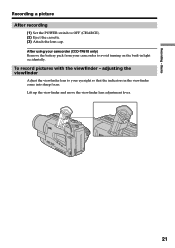
Lift up the viewfinder and move the viewfinder lens adjustment lever. 21 To record pictures with the viewfinder - adjusting the viewfinder Adjust the viewfinder lens to your camcorder to OFF (CHARGE). (2) Eject the cassette. (3) Attach the lens cap. Basics Recording a picture After recording (1) Set the POWER switch to avoid turning on the built-in the viewfinder come into sharp focus. After using your camcorder (CCD-TR618 only) Remove the battery pack from your eyesight so that the indicators in light accidentally. Recording -
Lift up the viewfinder and move the viewfinder lens adjustment lever. 21 To record pictures with the viewfinder - adjusting the viewfinder Adjust the viewfinder lens to your camcorder to OFF (CHARGE). (2) Eject the cassette. (3) Attach the lens cap. Basics Recording a picture After recording (1) Set the POWER switch to avoid turning on the built-in the viewfinder come into sharp focus. After using your camcorder (CCD-TR618 only) Remove the battery pack from your eyesight so that the indicators in light accidentally. Recording -
Operating Instructions
Page 24
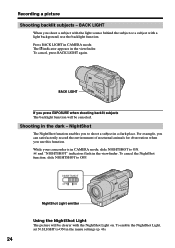
.... NightShot The NightShot function enables you press EXPOSURE when shooting backlit subjects The backlight function will be canceled. Recording a picture Shooting backlit subjects - While your camcorder is in CAMERA mode, slide NIGHTSHOT to shoot a subject in the menu settings (p. 46). 24 BACK LIGHT When you use the backlight function. indicator appears...
.... NightShot The NightShot function enables you press EXPOSURE when shooting backlit subjects The backlight function will be canceled. Recording a picture Shooting backlit subjects - While your camcorder is in CAMERA mode, slide NIGHTSHOT to shoot a subject in the menu settings (p. 46). 24 BACK LIGHT When you use the backlight function. indicator appears...

Operating Instructions
Page 25
...the black screen as the background for about 3 m (10 feet). While using (p. 17). Press DATE (or TIME), then press TIME (or DATE) to your camcorder, the clock setting is about 10 seconds, then erase the date and time indicators before using the NightShot function, you purchase your local time before...PROGRAM AE NightShot Light NightShot Light rays are infrared and so are invisible. Press DATE to ON in normal recording, the picture may cause your camcorder to malfunction. • When you do not record the date and time in the picture Record the date and time in CAMERA mode. This ...
...the black screen as the background for about 3 m (10 feet). While using (p. 17). Press DATE (or TIME), then press TIME (or DATE) to your camcorder, the clock setting is about 10 seconds, then erase the date and time indicators before using the NightShot function, you purchase your local time before...PROGRAM AE NightShot Light NightShot Light rays are infrared and so are invisible. Press DATE to ON in normal recording, the picture may cause your camcorder to malfunction. • When you do not record the date and time in the picture Record the date and time in CAMERA mode. This ...


