Operating Instructions
Page 4
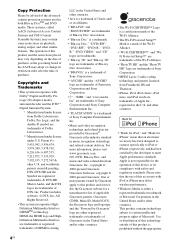
...mark of the Wi-Fi Alliance. • "Wi-Fi CERTIFIED™" and "WiFi Protected Setup™" are trademarks of the Wi-Fi Alliance. • "PhotoTV HD" and the "PhotoTV HD" logo are trademarks of Sony Corporation. • MPEG Layer-3 audio coding technology and patents licensed from Fraunhofer IIS and ...or other countries. • The Wi-Fi CERTIFIED™ Logo is a certification mark of the Wi-Fi Alliance. • The Wi-Fi Protected Setup™ Mark is a trademark of Oracle and/ or its compliance with iPod or iPhone may vary depending on playback, analog output, and other U.S....
...mark of the Wi-Fi Alliance. • "Wi-Fi CERTIFIED™" and "WiFi Protected Setup™" are trademarks of the Wi-Fi Alliance. • "PhotoTV HD" and the "PhotoTV HD" logo are trademarks of Sony Corporation. • MPEG Layer-3 audio coding technology and patents licensed from Fraunhofer IIS and ...or other countries. • The Wi-Fi CERTIFIED™ Logo is a certification mark of the Wi-Fi Alliance. • The Wi-Fi Protected Setup™ Mark is a trademark of Oracle and/ or its compliance with iPod or iPhone may vary depending on playback, analog output, and other U.S....
Operating Instructions
Page 6
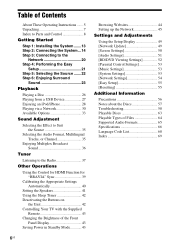
...Started Step 1: Installing the System .......13 Step 2: Connecting the System ...14 Step 3: Connecting to the Network 20 Step 4: Performing the Easy Setup 21 Step 5: Selecting the Source .......22 Step 6: Enjoying Surround Sound 23 Playback Playing a Disc 26 Playing from a USB Device 27 Enjoying ...51 [BD/DVD Viewing Settings 52 [Parental Control Settings 53 [Music Settings 53 [System Settings 53 [Network Settings 54 [Easy Setup 55 [Resetting 55 Additional Information Precautions 56 Notes about the Discs 57 Troubleshooting 58 Playable Discs 63 Playable Types of Files 64 Supported...
...Started Step 1: Installing the System .......13 Step 2: Connecting the System ...14 Step 3: Connecting to the Network 20 Step 4: Performing the Easy Setup 21 Step 5: Selecting the Source .......22 Step 6: Enjoying Surround Sound 23 Playback Playing a Disc 26 Playing from a USB Device 27 Enjoying ...51 [BD/DVD Viewing Settings 52 [Parental Control Settings 53 [Music Settings 53 [System Settings 53 [Network Settings 54 [Easy Setup 55 [Resetting 55 Additional Information Precautions 56 Notes about the Discs 57 Troubleshooting 58 Playable Discs 63 Playable Types of Files 64 Supported...
Operating Instructions
Page 7
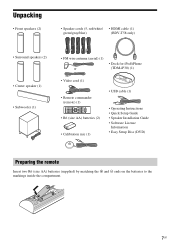
Unpacking • Front speakers (2) • Speaker cords (5, red/white/ • HDMI cable (1) green/gray/blue) (BDV-T58 only) • Surround speakers (2) • Center speaker (1) • Subwoofer (1) • FM wire antenna (aerial) (1) or • Dock for ...(size AA) batteries (2) • Calibration mic (1) • USB cable (1) • Operating Instructions • Quick Setup Guide • Speaker Installation Guide • Software License Information • Easy Setup Disc (DVD) Preparing the remote Insert two R6 (size AA) batteries (supplied) by matching the 3 and # ends...
Unpacking • Front speakers (2) • Speaker cords (5, red/white/ • HDMI cable (1) green/gray/blue) (BDV-T58 only) • Surround speakers (2) • Center speaker (1) • Subwoofer (1) • FM wire antenna (aerial) (1) or • Dock for ...(size AA) batteries (2) • Calibration mic (1) • USB cable (1) • Operating Instructions • Quick Setup Guide • Speaker Installation Guide • Software License Information • Easy Setup Disc (DVD) Preparing the remote Insert two R6 (size AA) batteries (supplied) by matching the 3 and # ends...

Operating Instructions
Page 16
...an HDMI jack or a component video input jack, make a separate audio connection for listening to select the type of output signal in the Easy Setup (page 21). When connecting with a component video cable. For setting the Audio Return Channel function, see "[HDMI Settings]" (page 53). B ...other components" (page 17). 16US Picture quality will provide better image quality compared to select the type of output signal when performing the Easy Setup (page 21). For further HDMI settings, see [Audio Return Channel] (page 53). About Audio Return Channel If your TV with an HDMI...
...an HDMI jack or a component video input jack, make a separate audio connection for listening to select the type of output signal in the Easy Setup (page 21). When connecting with a component video cable. For setting the Audio Return Channel function, see "[HDMI Settings]" (page 53). B ...other components" (page 17). 16US Picture quality will provide better image quality compared to select the type of output signal when performing the Easy Setup (page 21). For further HDMI settings, see [Audio Return Channel] (page 53). About Audio Return Channel If your TV with an HDMI...
Operating Instructions
Page 21
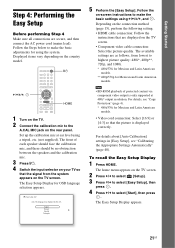
...so that the picture is only supported at ear level using a tripod, etc. (not supplied). For details about [Auto Calibration] settings in [Easy Setup], see "Copy Protection" (page 4). * 480i/576i for Mexican and Latin American models. • BD-ROM playback of each speaker should face the ...make the basic settings using the system. Follow the Steps below to make the basic adjustments for OSD language selection appears. 5 Perform the [Easy Setup]. Displayed items vary depending on the country model. 123 456 789 0 "/1 C/X/x/c, HOME 1 Turn on the TV. 2 Connect the calibration mic...
...so that the picture is only supported at ear level using a tripod, etc. (not supplied). For details about [Auto Calibration] settings in [Easy Setup], see "Copy Protection" (page 4). * 480i/576i for Mexican and Latin American models. • BD-ROM playback of each speaker should face the ...make the basic settings using the system. Follow the Steps below to make the basic adjustments for OSD language selection appears. 5 Perform the [Easy Setup]. Displayed items vary depending on the country model. 123 456 789 0 "/1 C/X/x/c, HOME 1 Turn on the TV. 2 Connect the calibration mic...
Operating Instructions
Page 24
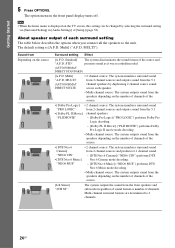
... by selecting the surround setting via [Surround Setting] in the front panel display turns off. • When the home menu is [A.F.D. About speaker output of [Setup] (page 52).
... by selecting the surround setting via [Surround Setting] in the front panel display turns off. • When the home menu is [A.F.D. About speaker output of [Setup] (page 52).
Operating Instructions
Page 40
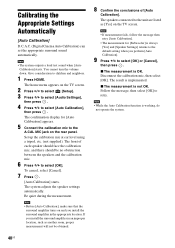
... [Auto Calibration]. • The measurement for [Auto Calibration] appears. 5 Connect the calibration mic to the A.CAL MIC jack on the TV screen. 2 Press C/c to select [Setup]. 3 Press X/x to select [Audio Settings], then press . 4 Press X/x to select [Auto Calibration], then press . Follow the message, then select [OK] to select [OK] or [Cancel...
... [Auto Calibration]. • The measurement for [Auto Calibration] appears. 5 Connect the calibration mic to the A.CAL MIC jack on the TV screen. 2 Press C/c to select [Setup]. 3 Press X/x to select [Audio Settings], then press . 4 Press X/x to select [Auto Calibration], then press . Follow the message, then select [OK] to select [OK] or [Cancel...

Operating Instructions
Page 41
... units (feet or meters) by pressing the color button (RED). The speakers in the [Connection] setting. • Depending on the TV screen. 2 Press C/c to select [Setup]. 3 Press X/x to select [Audio Settings], then press . 4 Press X/x to 7.0 meters). Since the front speaker and subwoofer settings are fixed, you cannot change them. [Front] [Yes...
... units (feet or meters) by pressing the color button (RED). The speakers in the [Connection] setting. • Depending on the TV screen. 2 Press C/c to select [Setup]. 3 Press X/x to select [Audio Settings], then press . 4 Press X/x to 7.0 meters). Since the front speaker and subwoofer settings are fixed, you cannot change them. [Front] [Yes...

Operating Instructions
Page 45
...the network. The available items differ depending on the TV screen. 2 Press C/c to select [Setup]. 45US Displays server certificates sent from pages that support SSL. Items Details [Browser Setup] Displays the Internet Browser settings. • [Zoom]: Increases or decreases the size of all currently...the cursor during text input. [Window List] Displays a list of the displayed contents. • [JavaScript Setup]: Sets whether to enable or disable JavaScript. • [Cookie Setup]: Sets whether or not to accept browser cookies. • [SSL Alarm Display]: Sets whether to enable or...
...the network. The available items differ depending on the TV screen. 2 Press C/c to select [Setup]. 45US Displays server certificates sent from pages that support SSL. Items Details [Browser Setup] Displays the Internet Browser settings. • [Zoom]: Increases or decreases the size of all currently...the cursor during text input. [Window List] Displays a list of the displayed contents. • [JavaScript Setup]: Sets whether to enable or disable JavaScript. • [Cookie Setup]: Sets whether or not to accept browser cookies. • [SSL Alarm Display]: Sets whether to enable or...

Operating Instructions
Page 46
... the [Internet Settings] display, then press . 2 Press X/x to select [Wired Setup] on -screen messages. The setup is now complete.] appears, then press . For customers in the U.S.: http://www.sony.com/support For customers in Canada: English: http://www.sony.ca/support French: http://fr.sony.ca/support For customers in Mexico and Latin America: http...
... the [Internet Settings] display, then press . 2 Press X/x to select [Wired Setup] on -screen messages. The setup is now complete.] appears, then press . For customers in the U.S.: http://www.sony.com/support For customers in Canada: English: http://www.sony.ca/support French: http://fr.sony.ca/support For customers in Mexico and Latin America: http...

Operating Instructions
Page 47
... sets the DNS setting automatically. For details about activating the WPS function, see the operating instructions of "Manual setting" in )] or [USB Wireless Setup] on the [Internet Settings] display, then press . 2 Press X/x to 7 of your router. 4 Check that the message [Internet Settings is... finished. Follow Steps 4 to select [Wi-Fi Protected Setup (WPS)], then press . 3 Activate the WPS function of wireless LAN connectivity and the IP address is now complete.] appears, then press . Press ...
... sets the DNS setting automatically. For details about activating the WPS function, see the operating instructions of "Manual setting" in )] or [USB Wireless Setup] on the [Internet Settings] display, then press . 2 Press X/x to 7 of your router. 4 Check that the message [Internet Settings is... finished. Follow Steps 4 to select [Wi-Fi Protected Setup (WPS)], then press . 3 Activate the WPS function of wireless LAN connectivity and the IP address is now complete.] appears, then press . Press ...
Operating Instructions
Page 48
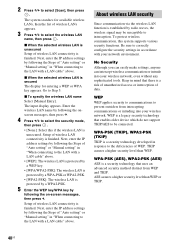
...LAN with your wireless network. Next, enter the IP address settings by following the on-screen messages, then press c. Setup of wireless LAN connectivity is unsecured Setup of WEP. WEP is a legacy security technology that there is finished. TKIP assures a higher security level than WEP... or TKIP. 48US Go to select [Scan], then press . Setup of wireless LAN connectivity is a risk of unauthorized access or interception of "Auto setting" or "Manual setting" in response to the LAN with...
...LAN with your wireless network. Next, enter the IP address settings by following the on-screen messages, then press c. Setup of wireless LAN connectivity is unsecured Setup of WEP. WEP is a legacy security technology that there is finished. TKIP assures a higher security level than WEP... or TKIP. 48US Go to select [Scan], then press . Setup of wireless LAN connectivity is a risk of unauthorized access or interception of "Auto setting" or "Manual setting" in response to the LAN with...
Operating Instructions
Page 49
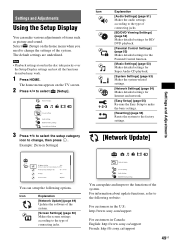
...settings according to the type of items such as picture and sound. You can setup the following website: For customers in the U.S.: http://www.sony.com/support For customers in the disc take priority over the Setup Display settings and not all the functions described may work. 1 Press HOME. ...The home menu appears on the home menu when you need to change the settings of the system. Select (Setup) on the ...
...settings according to the type of items such as picture and sound. You can setup the following website: For customers in the U.S.: http://www.sony.com/support For customers in the disc take priority over the Setup Display settings and not all the functions described may work. 1 Press HOME. ...The home menu appears on the home menu when you need to change the settings of the system. Select (Setup) on the ...

Operating Instructions
Page 55
x [Initialize Personal Information] You can reset the system settings to make the basic settings. All the settings within the group will be reset. Settings and Adjustments [Easy Setup] Re-runs the Easy Setup to the factory default by selecting the group of settings. Follow the on-screen instructions. [Resetting] x [Reset to Factory Default Settings] You can erase your personal information stored in the system. 55US
x [Initialize Personal Information] You can reset the system settings to make the basic settings. All the settings within the group will be reset. Settings and Adjustments [Easy Setup] Re-runs the Easy Setup to the factory default by selecting the group of settings. Follow the on-screen instructions. [Resetting] x [Reset to Factory Default Settings] You can erase your personal information stored in the system. 55US
Operating Instructions
Page 58
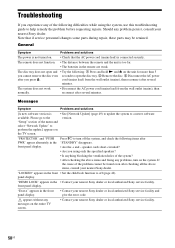
... solutions [A new software version is too far. • The batteries in the front panel display. • Contact your nearest Sony dealer or local authorized Sony service facility. front panel display. • Are the + and - General Symptom Problems and solutions The power is not turned ... the front • Set the child lock function to the version. appears without any problem persist, consult your nearest Sony dealer or local authorized Sony service facility. 58US "Setup" section of the menu and select "Network Update" to open the disc tray. 2 Remove the disc. 3 Disconnect...
... solutions [A new software version is too far. • The batteries in the front panel display. • Contact your nearest Sony dealer or local authorized Sony service facility. front panel display. • Are the + and - General Symptom Problems and solutions The power is not turned ... the front • Set the child lock function to the version. appears without any problem persist, consult your nearest Sony dealer or local authorized Sony service facility. 58US "Setup" section of the menu and select "Network Update" to open the disc tray. 2 Remove the disc. 3 Disconnect...
Operating Instructions
Page 62
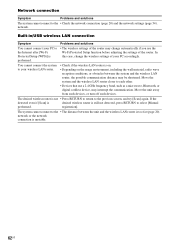
Built-in/USB wireless LAN connection Symptom Problems and solutions You cannot connect your PC to the Internet after [Wi-Fi Protected Setup (WPS)] is performed. • The wireless settings of the router may be shortened. You cannot connect the system to each other. • Devices that ...use the Wi-Fi Protected Setup function before adjusting the settings of your wireless LAN router. • Check if the wireless LAN router is on. • Depending on the usage ...
Built-in/USB wireless LAN connection Symptom Problems and solutions You cannot connect your PC to the Internet after [Wi-Fi Protected Setup (WPS)] is performed. • The wireless settings of the router may be shortened. You cannot connect the system to each other. • Devices that ...use the Wi-Fi Protected Setup function before adjusting the settings of your wireless LAN router. • Check if the wireless LAN router is on. • Depending on the usage ...

Operating Instructions
Page 69
..., 53 D D.C.A.C. (Digital Cinema Auto Calibration) 40 DLNA 31, 54 Dolby Digital 35 DTS 35 DVD 63 DVD Aspect Ratio 50 DVD Parental Control 53 E Easy Setup 21, 55 F FM MODE 37 Front panel 8 Front panel display 9 G Gracenote Settings 54 H HDMI YCbCr/RGB (HDMI) 51 HDMI Deep Color Output 51 I Illumination/Display...
..., 53 D D.C.A.C. (Digital Cinema Auto Calibration) 40 DLNA 31, 54 Dolby Digital 35 DTS 35 DVD 63 DVD Aspect Ratio 50 DVD Parental Control 53 E Easy Setup 21, 55 F FM MODE 37 Front panel 8 Front panel display 9 G Gracenote Settings 54 H HDMI YCbCr/RGB (HDMI) 51 HDMI Deep Color Output 51 I Illumination/Display...


