Operating Instructions
Page 5
... CERTIFIED Logo is a certification mark of the Wi-Fi Alliance (BDV-E390/ BDV-E385/BDV-T39 only). • The Wi-Fi Protected Setup Mark is a mark of the Wi-Fi Alliance (BDV-E390/BDV-E385/BDVT39 only). • "PhotoTV HD" and the "PhotoTV HD" logo are trademarks of Sony Corporation. • MPEG Layer-3 audio coding technology and patents licensed...
... CERTIFIED Logo is a certification mark of the Wi-Fi Alliance (BDV-E390/ BDV-E385/BDV-T39 only). • The Wi-Fi Protected Setup Mark is a mark of the Wi-Fi Alliance (BDV-E390/BDV-E385/BDVT39 only). • "PhotoTV HD" and the "PhotoTV HD" logo are trademarks of Sony Corporation. • MPEG Layer-3 audio coding technology and patents licensed...

Operating Instructions
Page 7
...other components (Set-top box, etc 19 Connecting the antenna (aerial 20 Step 3: Preparing for Network Connection 20 Step 4: Performing the Easy Setup 22 Step 5: Selecting the Source ....... 23 Step 6: Enjoying Surround Sound 24 Playback Playing a Disc 25 Playing from a USB Device 26 ... 42 [BD/DVD Viewing Settings 43 [Parental Control Settings 43 [Music Settings 43 [System Settings 44 [Network Settings 44 [Easy Setup 45 [Resetting 45 Additional Information Precautions 46 Notes about Discs 47 Troubleshooting 48 Playable Discs 52 Playable Types of Files 53 Supported Audio...
...other components (Set-top box, etc 19 Connecting the antenna (aerial 20 Step 3: Preparing for Network Connection 20 Step 4: Performing the Easy Setup 22 Step 5: Selecting the Source ....... 23 Step 6: Enjoying Surround Sound 24 Playback Playing a Disc 25 Playing from a USB Device 26 ... 42 [BD/DVD Viewing Settings 43 [Parental Control Settings 43 [Music Settings 43 [System Settings 44 [Network Settings 44 [Easy Setup 45 [Resetting 45 Additional Information Precautions 46 Notes about Discs 47 Troubleshooting 48 Playable Discs 52 Playable Types of Files 53 Supported Audio...
Operating Instructions
Page 8
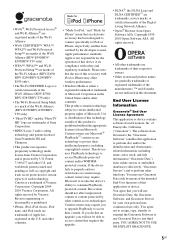
Unpacking BDV-E490 • Front speakers (2) • Surround speakers (2) • Speaker-bottom covers (2) • Remote commander (remote) (1) • Bases (2) • R6 (size AA) batteries (2) • Lower parts of the front speakers (2) • Dock for iPod/iPhone (TDM-iP30) (1) • Center speaker (1) • Subwoofer (1) • USB cable (1) • Screws (8) • Video cord (1) • FM wire antenna (aerial) (1) or • Operating Instructions • Quick Setup Guide • Speaker Installation Guide 8US
Unpacking BDV-E490 • Front speakers (2) • Surround speakers (2) • Speaker-bottom covers (2) • Remote commander (remote) (1) • Bases (2) • R6 (size AA) batteries (2) • Lower parts of the front speakers (2) • Dock for iPod/iPhone (TDM-iP30) (1) • Center speaker (1) • Subwoofer (1) • USB cable (1) • Screws (8) • Video cord (1) • FM wire antenna (aerial) (1) or • Operating Instructions • Quick Setup Guide • Speaker Installation Guide 8US
Operating Instructions
Page 9
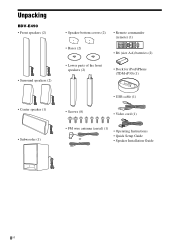
BDV-E390/BDV-E290 • Front speakers (2) • FM wire antenna (aerial) (1) or • Operating Instructions • Quick Setup Guide • Speaker Installation Guide • Surround speakers (2) • Remote commander (remote) (1) • R6 (size AA) batteries (2) • Center speaker (1) • Dock for iPod/iPhone (TDM-iP30) (1) • Subwoofer (1) • USB cable (1) • Video cord (1) 9US
BDV-E390/BDV-E290 • Front speakers (2) • FM wire antenna (aerial) (1) or • Operating Instructions • Quick Setup Guide • Speaker Installation Guide • Surround speakers (2) • Remote commander (remote) (1) • R6 (size AA) batteries (2) • Center speaker (1) • Dock for iPod/iPhone (TDM-iP30) (1) • Subwoofer (1) • USB cable (1) • Video cord (1) 9US
Operating Instructions
Page 10
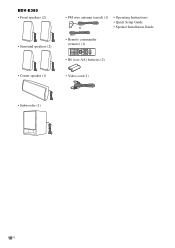
BDV-E385 • Front speakers (2) • Surround speakers (2) • Center speaker (1) • FM wire antenna (aerial) (1) or • Operating Instructions • Quick Setup Guide • Speaker Installation Guide • Remote commander (remote) (1) • R6 (size AA) batteries (2) • Video cord (1) • Subwoofer (1) 10US
BDV-E385 • Front speakers (2) • Surround speakers (2) • Center speaker (1) • FM wire antenna (aerial) (1) or • Operating Instructions • Quick Setup Guide • Speaker Installation Guide • Remote commander (remote) (1) • R6 (size AA) batteries (2) • Video cord (1) • Subwoofer (1) 10US

Operating Instructions
Page 11
BDV-E190 • Front speakers (2) • Surround speakers (2) • Foot pads (2) • FM wire antenna (aerial) (1) • Operating Instructions • Quick Setup Guide • Speaker Installation Guide or • Video cord (1) • Center speaker (1) • Subwoofer (1) • Remote commander (remote) (1) • R6 (size AA) batteries (2) 11US
BDV-E190 • Front speakers (2) • Surround speakers (2) • Foot pads (2) • FM wire antenna (aerial) (1) • Operating Instructions • Quick Setup Guide • Speaker Installation Guide or • Video cord (1) • Center speaker (1) • Subwoofer (1) • Remote commander (remote) (1) • R6 (size AA) batteries (2) 11US
Operating Instructions
Page 12
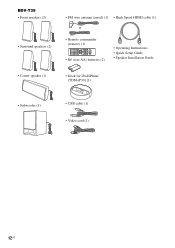
BDV-T39 • Front speakers (2) • Surround speakers (2) • Center speaker (1) • FM wire antenna (aerial) (1) • High Speed HDMI cable (1) or • Remote commander (remote) (1) • R6 (size AA) batteries (2) • Operating Instructions • Quick Setup Guide • Speaker Installation Guide • Dock for iPod/iPhone (TDM-iP30) (1) • Subwoofer (1) • USB cable (1) • Video cord (1) 12US
BDV-T39 • Front speakers (2) • Surround speakers (2) • Center speaker (1) • FM wire antenna (aerial) (1) • High Speed HDMI cable (1) or • Remote commander (remote) (1) • R6 (size AA) batteries (2) • Operating Instructions • Quick Setup Guide • Speaker Installation Guide • Dock for iPod/iPhone (TDM-iP30) (1) • Subwoofer (1) • USB cable (1) • Video cord (1) 12US
Operating Instructions
Page 20
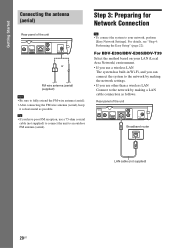
For details, see "Step 4: Performing the Easy Setup" (page 22). For BDV-E390/BDV-E385/BDV-T39 Select the method based on your network, perform [Easy Network Settings]. Rear panel of the unit OUT ARC VIDEO OUT LAN (100) L R AUDIO IN ...
For details, see "Step 4: Performing the Easy Setup" (page 22). For BDV-E390/BDV-E385/BDV-T39 Select the method based on your network, perform [Easy Network Settings]. Rear panel of the unit OUT ARC VIDEO OUT LAN (100) L R AUDIO IN ...

Operating Instructions
Page 21
... wireless LAN router - Turn the unit off before connecting the extension cable or inserting the USB Wireless LAN Adapter. For BDV-E490/BDV-E290/BDVE190 Select the method based on your wireless network. To protect wireless communication, this system supports various security functions.... from intercepting communications or intruding into your network environment. If not, check the following website: http://www.sony.com/blurayhtsupport/ - WEP is recommended. 2 USB Wireless Setup Use a wireless LAN via the wireless LAN function is established by radio waves, the wireless signal may ...
... wireless LAN router - Turn the unit off before connecting the extension cable or inserting the USB Wireless LAN Adapter. For BDV-E490/BDV-E290/BDVE190 Select the method based on your wireless network. To protect wireless communication, this system supports various security functions.... from intercepting communications or intruding into your network environment. If not, check the following website: http://www.sony.com/blurayhtsupport/ - WEP is recommended. 2 USB Wireless Setup Use a wireless LAN via the wireless LAN function is established by radio waves, the wireless signal may ...

Operating Instructions
Page 22
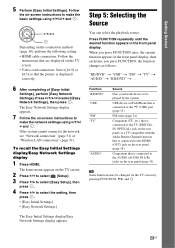
TKIP assures a higher security level than WEP or TKIP. Step 4: Performing the Easy Setup Before performing Step 4 Make sure all connections are secure, and then connect the AC power cord (mains lead). Follow the Steps below to make the ... the deficiencies of WEP. Getting Started x WPA-PSK (TKIP), WPA2-PSK (TKIP) TKIP is a security technology that the signal from WEP and TKIP. The Easy Setup Display for the system.
TKIP assures a higher security level than WEP or TKIP. Step 4: Performing the Easy Setup Before performing Step 4 Make sure all connections are secure, and then connect the AC power cord (mains lead). Follow the Steps below to make the ... the deficiencies of WEP. Getting Started x WPA-PSK (TKIP), WPA2-PSK (TKIP) TKIP is a security technology that the signal from WEP and TKIP. The Easy Setup Display for the system.
Operating Instructions
Page 23
... appears on the TV screen. • Video cord connection: Select [16:9] or [4:3] so that are displayed on the TV screen. 2 Press C/c to select [Setup]. 3 Press X/x to select [Easy Setup], then press . 4 Press X/x to select [Easy Network Settings], then press . "BD/DVD" t "USB" t "FM" t "TV" t "AUDIO" t "BD/DVD" t ... C/X/x/c Depending on the connection method...
... appears on the TV screen. • Video cord connection: Select [16:9] or [4:3] so that are displayed on the TV screen. 2 Press C/c to select [Setup]. 3 Press X/x to select [Easy Setup], then press . 4 Press X/x to select [Easy Network Settings], then press . "BD/DVD" t "USB" t "FM" t "TV" t "AUDIO" t "BD/DVD" t ... C/X/x/c Depending on the connection method...
Operating Instructions
Page 35
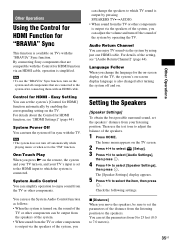
... the distance from the TV or other components. Then use the "BRAVIA" Sync function, turn off and on the TV screen. 2 Press C/c to select [Setup]. 3 Press X/x to select [Audio Settings], then press . 4 Press X/x to select the item, then press . x [Distance] When you move the .... • To use the test tone to adjust the balance of the system, you change the speakers to 7.0 meters). 35US By connecting Sony components that are compatible with the Control for HDMI] function automatically by operating the TV. The [Speaker Settings] display appears. 5 Press X/x ...
... the distance from the TV or other components. Then use the "BRAVIA" Sync function, turn off and on the TV screen. 2 Press C/c to select [Setup]. 3 Press X/x to select [Audio Settings], then press . 4 Press X/x to select the item, then press . x [Distance] When you move the .... • To use the test tone to adjust the balance of the system, you change the speakers to 7.0 meters). 35US By connecting Sony components that are compatible with the Control for HDMI] function automatically by operating the TV. The [Speaker Settings] display appears. 5 Press X/x ...

Operating Instructions
Page 39
...Open in new window] Opens a link in the text input field. Available options Various settings and operations are available by selecting the window. Items [Browser Setup] [Input] [Break] [Delete] [Window List] [Bookmark List] [URL entry] [Previous page] [Next page] [Cancel loading] [Reload] [Add... Browser settings. • [Zoom]: Increases or decreases the size of the displayed contents. • [JavaScript Setup]: Sets whether to enable or disable JavaScript. • [Cookie Setup]: Sets whether or not to accept browser cookies. • [SSL Alarm Display]: Sets whether to a previously...
...Open in new window] Opens a link in the text input field. Available options Various settings and operations are available by selecting the window. Items [Browser Setup] [Input] [Break] [Delete] [Window List] [Bookmark List] [URL entry] [Previous page] [Next page] [Cancel loading] [Reload] [Add... Browser settings. • [Zoom]: Increases or decreases the size of the displayed contents. • [JavaScript Setup]: Sets whether to enable or disable JavaScript. • [Cookie Setup]: Sets whether or not to accept browser cookies. • [SSL Alarm Display]: Sets whether to a previously...

Operating Instructions
Page 40
...information about update functions, refer to change, then press . The home menu appears on or off . Icon Explanation [Easy Setup] (page 45) Re-runs the Easy Setup to make various adjustments to complete; do not turn the main unit on the TV screen. 2 Press C/c to select... the main unit or TV. 40US Settings and Adjustments Using the Setup Display You can setup the following website: http://www.sony.com/blurayhtsupport/ During a software update, "UPDATING" appears in the disc take priority over the Setup Display settings and not all the functions described may work. 1 Press...
...information about update functions, refer to change, then press . The home menu appears on or off . Icon Explanation [Easy Setup] (page 45) Re-runs the Easy Setup to make various adjustments to complete; do not turn the main unit on the TV screen. 2 Press C/c to select... the main unit or TV. 40US Settings and Adjustments Using the Setup Display You can setup the following website: http://www.sony.com/blurayhtsupport/ During a software update, "UPDATING" appears in the disc take priority over the Setup Display settings and not all the functions described may work. 1 Press...
Operating Instructions
Page 44
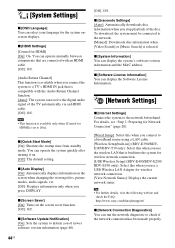
... the following website and check the FAQ: http://www.sony.com/blurayhtsupport/ x [Network Connection Diagnostics] You can select your language for Network Connection" (page 20). [Wired Setup]: Select this when you connect to a broadband router using a LAN cable. [Wireless Setup(built-in)] (BDV-E390/BDVE385/BDV-T39 only): Select this when you use the wireless LAN...
... the following website and check the FAQ: http://www.sony.com/blurayhtsupport/ x [Network Connection Diagnostics] You can select your language for Network Connection" (page 20). [Wired Setup]: Select this when you connect to a broadband router using a LAN cable. [Wireless Setup(built-in)] (BDV-E390/BDVE385/BDV-T39 only): Select this when you use the wireless LAN...

Operating Instructions
Page 45
x [Renderer Access Control] Sets whether or not to accept commands from a newly detected DLNA controller. [Smart Select]: Allows a Sony DLNA controller to operate by selecting the group of settings. x [Registered Media Remote Devices] Displays a list of a networked device ...as it is listed on other DLNA devices on the network. x [Initialize Personal Information] You can erase your registered "Media Remote" devices. [Easy Setup] x [Easy Initial Settings] Runs [Easy Initial Settings] to on -screen instructions. Settings and Adjustments x [Connection Server Settings] Sets whether or ...
x [Renderer Access Control] Sets whether or not to accept commands from a newly detected DLNA controller. [Smart Select]: Allows a Sony DLNA controller to operate by selecting the group of settings. x [Registered Media Remote Devices] Displays a list of a networked device ...as it is listed on other DLNA devices on the network. x [Initialize Personal Information] You can erase your registered "Media Remote" devices. [Easy Setup] x [Easy Initial Settings] Runs [Easy Initial Settings] to on -screen instructions. Settings and Adjustments x [Connection Server Settings] Sets whether or ...

Operating Instructions
Page 48
.... • Are the + and - "LOCKED" appears in the front panel display. t Contact your system (page 18). Please go to the "Setup" section of the menu and select "Network Update" to a newer software version. t Check that if service personnel changes some parts during repair, these ...? • Are you using the system, use this troubleshooting guide to an input device that is available. t Contact your nearest Sony dealer. Troubleshooting If you experience any of the following difficulties while using only the specified speakers? • Is anything blocking the ventilation...
.... • Are the + and - "LOCKED" appears in the front panel display. t Contact your system (page 18). Please go to the "Setup" section of the menu and select "Network Update" to a newer software version. t Check that if service personnel changes some parts during repair, these ...? • Are you using the system, use this troubleshooting guide to an input device that is available. t Contact your nearest Sony dealer. Troubleshooting If you experience any of the following difficulties while using only the specified speakers? • Is anything blocking the ventilation...

Operating Instructions
Page 51
...t Check the network connection (page 20) and the network settings (page 44). The system cannot connect to the previous screen, and try [Wireless Setup(built-in the wireless network list. t Check the network connection (page 20) and the network settings (page 44). If the desired wireless router is... on again. Wireless LAN connection You cannot connect your PC accordingly. t Check that use the Wi-Fi Protected Setup function before adjusting the settings of your PC to the network. Move the unit away from such devices, or turn the system off such...
...t Check the network connection (page 20) and the network settings (page 44). The system cannot connect to the previous screen, and try [Wireless Setup(built-in the wireless network list. t Check the network connection (page 20) and the network settings (page 44). If the desired wireless router is... on again. Wireless LAN connection You cannot connect your PC accordingly. t Check that use the Wi-Fi Protected Setup function before adjusting the settings of your PC to the network. Move the unit away from such devices, or turn the system off such...

Operating Instructions
Page 58
... 33 DVD 52 DVD Aspect Ratio 41 DVD Parental Control 43 DVD-ROM 24p Output 41 E Easy Initial Settings 45 Easy Network Settings 45 Easy Setup 22, 45 F FM Mode 34 Front panel 13 58US Front panel display 14 G Gracenote Settings 44 H HDMI YCbCr/RGB (HDMI) 41 HDMI Deep Color Output...
... 33 DVD 52 DVD Aspect Ratio 41 DVD Parental Control 43 DVD-ROM 24p Output 41 E Easy Initial Settings 45 Easy Network Settings 45 Easy Setup 22, 45 F FM Mode 34 Front panel 13 58US Front panel display 14 G Gracenote Settings 44 H HDMI YCbCr/RGB (HDMI) 41 HDMI Deep Color Output...


