
Limited Warranty (U.S. Only)
Page 1
... so for hardware or software usage and it will , at its original specifications. This Limited Warranty does not cover Sony products sold AS IS or WITH ALL FAULTS or consumables (such as set forth below is invalid if the factory-applied serial number has been altered or removed from your unit. This...
... so for hardware or software usage and it will , at its original specifications. This Limited Warranty does not cover Sony products sold AS IS or WITH ALL FAULTS or consumables (such as set forth below is invalid if the factory-applied serial number has been altered or removed from your unit. This...
Operating Instructions
Page 3
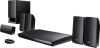
... operate normally, or has been dropped. Install in conjunction with FCC radiation exposure limits set forth for long periods of the obsolete outlet. 10) Protect the power cord from ...follow the recommendations listed above. Should you believe necessary. Blu-ray Disc/DVD receiver (HBD-E390/ HBD-E385/HBD-T39) This equipment must not be used to disconnect the unit from ...tip-over. 13) Unplug this product and (ii) our website (http:// esupport.sony.com/) for replacement of time. 14) Refer all servicing to person. Important Safety Instructions 1) Read these...
... operate normally, or has been dropped. Install in conjunction with FCC radiation exposure limits set forth for long periods of the obsolete outlet. 10) Protect the power cord from ...follow the recommendations listed above. Should you believe necessary. Blu-ray Disc/DVD receiver (HBD-E390/ HBD-E385/HBD-T39) This equipment must not be used to disconnect the unit from ...tip-over. 13) Unplug this product and (ii) our website (http:// esupport.sony.com/) for replacement of time. 14) Refer all servicing to person. Important Safety Instructions 1) Read these...
Operating Instructions
Page 4
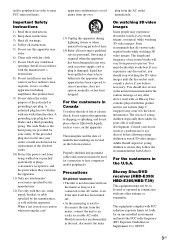
... is a registered trademark of Sony Computer Entertainment Inc. • Music and video recognition technology and related data are provided by Gracenote" logo are either registered trademarks or trademarks of Gracenote in Canada Blu-ray Disc/DVD receiver (HBD-E390) Operation is subject to this ...the Cinavia Online Consumer Information Center at least 20cm or more patents owned by mail, send a postcard with IC radiation exposure limits set forth for a nonexhaustive list of Dolby Laboratories. ** Manufactured under license under license from person's body (excluding extremities: hands, ...
... is a registered trademark of Sony Computer Entertainment Inc. • Music and video recognition technology and related data are provided by Gracenote" logo are either registered trademarks or trademarks of Gracenote in Canada Blu-ray Disc/DVD receiver (HBD-E390) Operation is subject to this ...the Cinavia Online Consumer Information Center at least 20cm or more patents owned by mail, send a postcard with IC radiation exposure limits set forth for a nonexhaustive list of Dolby Laboratories. ** Manufactured under license under license from person's body (excluding extremities: hands, ...
Operating Instructions
Page 6
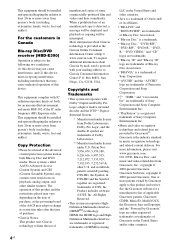
...for statistical purposes. You agree that your license terminates, you directly in the future and is used for BDV-E490, BDV-E390, BDV-E385, BDV-E290, BDV-E190, and BDV-T39. may be uninterrupted. Gracenote makes no circumstances will Gracenote become liable for any payment to you ...with new enhanced or additional data types or categories that Gracenote may vary depending on the area. • The default setting ...
...for statistical purposes. You agree that your license terminates, you directly in the future and is used for BDV-E490, BDV-E390, BDV-E385, BDV-E290, BDV-E190, and BDV-T39. may be uninterrupted. Gracenote makes no circumstances will Gracenote become liable for any payment to you ...with new enhanced or additional data types or categories that Gracenote may vary depending on the area. • The default setting ...

Operating Instructions
Page 7
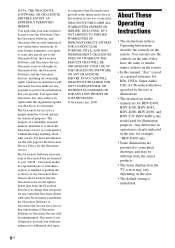
... the System....... 17 Step 2: Connecting the System... 17 Connecting the speakers ..........17 Connecting the TV 18 Connecting the other components (Set-top box, etc 19 Connecting the antenna (aerial 20 Step 3: Preparing for Network Connection 20 Step 4: Performing the Easy Setup ... in Standby Mode 37 Browsing Websites 38 Settings and Adjustments Using the Setup Display 40 [Network Update 40 [Screen Settings 41 [Audio Settings 42 [BD/DVD Viewing Settings 43 [Parental Control Settings 43 [Music Settings 43 [System Settings 44 [Network Settings 44 [Easy Setup 45 [Resetting 45...
... the System....... 17 Step 2: Connecting the System... 17 Connecting the speakers ..........17 Connecting the TV 18 Connecting the other components (Set-top box, etc 19 Connecting the antenna (aerial 20 Step 3: Preparing for Network Connection 20 Step 4: Performing the Easy Setup ... in Standby Mode 37 Browsing Websites 38 Settings and Adjustments Using the Setup Display 40 [Network Update 40 [Screen Settings 41 [Audio Settings 42 [BD/DVD Viewing Settings 43 [Parental Control Settings 43 [Music Settings 43 [System Settings 44 [Network Settings 44 [Easy Setup 45 [Resetting 45...
Operating Instructions
Page 13
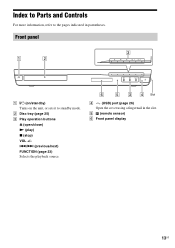
Slot D (USB) port (page 26) Open the cover using a fingernail in parentheses. B Disc tray (page 25) C Play operation buttons Z (open/close) N (play) x (stop) VOL +/- ./> (previous/next) FUNCTION (page 23) Selects the playback source. E (remote sensor) F Front panel display 13US Front panel VOL VOL FUNCTION A "/1 (on/standby) Turns on the unit, or sets it to the pages indicated in the slot. Index to Parts and Controls For more information, refer to standby mode.
Slot D (USB) port (page 26) Open the cover using a fingernail in parentheses. B Disc tray (page 25) C Play operation buttons Z (open/close) N (play) x (stop) VOL +/- ./> (previous/next) FUNCTION (page 23) Selects the playback source. E (remote sensor) F Front panel display 13US Front panel VOL VOL FUNCTION A "/1 (on/standby) Turns on the unit, or sets it to the pages indicated in the slot. Index to Parts and Controls For more information, refer to standby mode.

Operating Instructions
Page 14
... press DISPLAY, the stream information/decoding status is displayed when the function is correctly connected to "TV." D Lights up when the HDMI (OUT) jack is set to an HDCP (Highbandwidth Digital Content Protection) compliant device with HDMI or DVI (Digital Visual Interface) input. B Lights up when stereo sound is received. (Radio...
... press DISPLAY, the stream information/decoding status is displayed when the function is correctly connected to "TV." D Lights up when the HDMI (OUT) jack is set to an HDCP (Highbandwidth Digital Content Protection) compliant device with HDMI or DVI (Digital Visual Interface) input. B Lights up when stereo sound is received. (Radio...

Operating Instructions
Page 15
.../MENU Opens or closes the BD-ROM's Pop-up Menu, or the DVD's menu. SEN Accesses the "Sony Entertainment Network™" online service. 15US This function works only when you set [Control for Java interactive operations on the selected function.) RETURN Returns to standby mode. SUBTITLE Selects the subtitle ... VOL MUTING TV INPUT 4 5 6 7 Number 5, AUDIO, VOL +, and N buttons have a tactile dot. TV "/1 (on/standby) (page 37) Turns on the system or sets it to standby mode If any button on a BDROM/DVD VIDEO. OPTIONS (pages 24, 30, 38) Displays the options menu on the TV screen or...
.../MENU Opens or closes the BD-ROM's Pop-up Menu, or the DVD's menu. SEN Accesses the "Sony Entertainment Network™" online service. 15US This function works only when you set [Control for Java interactive operations on the selected function.) RETURN Returns to standby mode. SUBTITLE Selects the subtitle ... VOL MUTING TV INPUT 4 5 6 7 Number 5, AUDIO, VOL +, and N buttons have a tactile dot. TV "/1 (on/standby) (page 37) Turns on the system or sets it to standby mode If any button on a BDROM/DVD VIDEO. OPTIONS (pages 24, 30, 38) Displays the options menu on the TV screen or...
Operating Instructions
Page 16
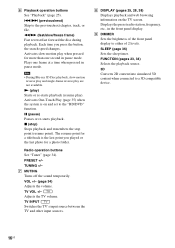
...display. Radio operation buttons See "Tuner" (page 34). TUNING +/- H DISPLAY (pages 25, 28, 38) Displays playback and web browsing information on and set to the previous/next chapter, track, or file. N (play) Starts or re-starts playback (resume play are not available. x (stop) Stops .... 16US X (pause) Pauses or re-starts playback. TV INPUT Switches the TV's input source between the TV and other input sources. I DIMMER Sets the brightness of 2 levels. m/M (fast/slow/freeze frame) Fast reverse/fast forward the disc during playback. G MUTING Turns off the sound temporarily....
...display. Radio operation buttons See "Tuner" (page 34). TUNING +/- H DISPLAY (pages 25, 28, 38) Displays playback and web browsing information on and set to the previous/next chapter, track, or file. N (play) Starts or re-starts playback (resume play are not available. x (stop) Stops .... 16US X (pause) Pauses or re-starts playback. TV INPUT Switches the TV's input source between the TV and other input sources. I DIMMER Sets the brightness of 2 levels. m/M (fast/slow/freeze frame) Fast reverse/fast forward the disc during playback. G MUTING Turns off the sound temporarily....
Operating Instructions
Page 18
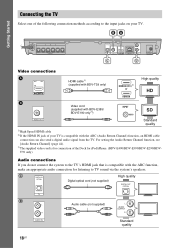
... can also send a digital audio signal from the TV. For setting the Audio Return Channel function, see [Audio Return Channel] (page 44). 3) The supplied video cord is for connection of the Dock for iPod/iPhone. (BDV-E490/BDV-E390/BDV-E290/BDVT39 only) Audio connections If you do not connect the ...system to the TV's HDMI jack that is compatible with the ARC function, make an appropriate audio connection for listening to the input jacks on your TV is compatible with BDV-E385/ BDV-E190 only3))...
... can also send a digital audio signal from the TV. For setting the Audio Return Channel function, see [Audio Return Channel] (page 44). 3) The supplied video cord is for connection of the Dock for iPod/iPhone. (BDV-E490/BDV-E390/BDV-E290/BDVT39 only) Audio connections If you do not connect the ...system to the TV's HDMI jack that is compatible with the ARC function, make an appropriate audio connection for listening to the input jacks on your TV is compatible with BDV-E385/ BDV-E190 only3))...
Operating Instructions
Page 19
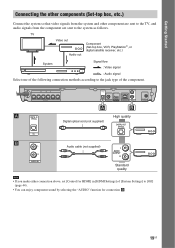
...satellite receiver, etc.) System Signal flow : Video signal : Audio signal Select one of the following connection methods according to the jack type of [System Settings] to the system as follows. A B FRONT R FRONT L SUBWOOFER CENTER SPEAKERS SUR R SUR L DIGITAL IN OPTICAL OUT ARC TV VIDEO OUT...supplied) L AUDIO OUTPUT R Standard quality • If you make either connection above, set [Control for HDMI] in [HDMI Settings] of the component. Getting Started Connecting the other components (Set-top box, etc.) Connect the system so that video signals from the system and other ...
...satellite receiver, etc.) System Signal flow : Video signal : Audio signal Select one of the following connection methods according to the jack type of [System Settings] to the system as follows. A B FRONT R FRONT L SUBWOOFER CENTER SPEAKERS SUR R SUR L DIGITAL IN OPTICAL OUT ARC TV VIDEO OUT...supplied) L AUDIO OUTPUT R Standard quality • If you make either connection above, set [Control for HDMI] in [HDMI Settings] of the component. Getting Started Connecting the other components (Set-top box, etc.) Connect the system so that video signals from the system and other ...
Operating Instructions
Page 20
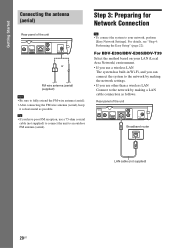
... to the network by making a LAN cable connection as follows. For details, see "Step 4: Performing the Easy Setup" (page 22). For BDV-E390/BDV-E385/BDV-T39 Select the method based on your LAN (Local Area Network) environment. • If you use a wireless LAN The system has built-in...outdoor FM antenna (aerial). • To connect the system to the network by making the network settings. • If you can connect the system to your network, perform [Easy Network Settings]. Getting Started Connecting the antenna (aerial) Step 3: Preparing for Network Connection Rear panel of the ...
... to the network by making a LAN cable connection as follows. For details, see "Step 4: Performing the Easy Setup" (page 22). For BDV-E390/BDV-E385/BDV-T39 Select the method based on your LAN (Local Area Network) environment. • If you use a wireless LAN The system has built-in...outdoor FM antenna (aerial). • To connect the system to the network by making the network settings. • If you can connect the system to your network, perform [Easy Network Settings]. Getting Started Connecting the antenna (aerial) Step 3: Preparing for Network Connection Rear panel of the ...

Operating Instructions
Page 21
...LAN Adapter to the base and connecting the extension cable to check the settings of your wireless network, even without any sophisticated tools. If not, check the following website: http://www.sony.com/blurayhtsupport/ - consult the manufacturer of the wireless LAN router About ...susceptible to be connected. 21US Getting Started To protect wireless communication, this system supports various security functions. For details: - For BDV-E490/BDV-E290/BDVE190 Select the method based on your wireless LAN router (access point) is a legacy security technology that there is established...
...LAN Adapter to the base and connecting the extension cable to check the settings of your wireless network, even without any sophisticated tools. If not, check the following website: http://www.sony.com/blurayhtsupport/ - consult the manufacturer of the wireless LAN router About ...susceptible to be connected. 21US Getting Started To protect wireless communication, this system supports various security functions. For details: - For BDV-E490/BDV-E290/BDVE190 Select the method based on your wireless LAN router (access point) is a legacy security technology that there is established...

Operating Instructions
Page 22
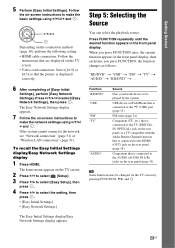
... connect the AC power cord (mains lead). The Easy Setup Display for the system. Follow the Steps below to make the basic adjustments and network settings for OSD language selection appears. 22US AES assures a higher security level than WEP. Displayed items vary depending on the country model. 1 Insert two R6 (size...
... connect the AC power cord (mains lead). The Easy Setup Display for the system. Follow the Steps below to make the basic adjustments and network settings for OSD language selection appears. 22US AES assures a higher security level than WEP. Displayed items vary depending on the country model. 1 Insert two R6 (size...
Operating Instructions
Page 23
...) Some functions may be played by pressing FUNCTION, X/x, and . 23US C/X/x/c Depending on the connection method (page 18), perform the following setting. • HDMI cable connection: Follow the instructions that are displayed on the TV screen. • Video cord connection: Select [16:9] or...the on the rear panel (page 18) Component that the picture is displayed correctly. 6 After completing of [Easy Initial Settings], perform [Easy Network Settings]. Press FUNCTION repeatedly until the desired function appears in the front panel display, then each time you press FUNCTION, the function...
...) Some functions may be played by pressing FUNCTION, X/x, and . 23US C/X/x/c Depending on the connection method (page 18), perform the following setting. • HDMI cable connection: Follow the instructions that are displayed on the TV screen. • Video cord connection: Select [16:9] or...the on the rear panel (page 18) Component that the picture is displayed correctly. 6 After completing of [Easy Initial Settings], perform [Easy Network Settings]. Press FUNCTION repeatedly until the desired function appears in the front panel display, then each time you press FUNCTION, the function...
Operating Instructions
Page 24
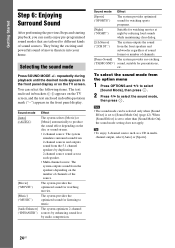
... during playback until the desired mode appears in multichannel output, select [Auto] or [Sports]. 24US When [Sound Effect] is set to other than [Sound Mode On], the sound mode setting does not apply. • To enjoy 2-channel source such as a CD in the front panel display or on the TV...Sound Mode], then press . 2 Press X/x to select the sound mode, then press . • The sound mode can be selected only when [Sound Effect] is set to [Sound Mode On] (page 42). Selecting the sound mode Press SOUND MODE +/- To select the sound mode from the speakers depending on the TV...
... during playback until the desired mode appears in multichannel output, select [Auto] or [Sports]. 24US When [Sound Effect] is set to other than [Sound Mode On], the sound mode setting does not apply. • To enjoy 2-channel source such as a CD in the front panel display or on the TV...Sound Mode], then press . 2 Press X/x to select the sound mode, then press . • The sound mode can be selected only when [Sound Effect] is set to [Sound Mode On] (page 42). Selecting the sound mode Press SOUND MODE +/- To select the sound mode from the speakers depending on the TV...
Operating Instructions
Page 25
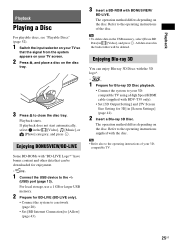
... the system to your 3Dcompatible TV using a High Speed HDMI cable (supplied with BDV-T39 only). • Set [3D Output Setting] and [TV Screen Size Setting for BD-LIVE (BD-LIVE only). • Connect the system to a network (page 20). • Set [BD Internet Connection] to [Allow] (page 43). 3 Insert a BD-ROM with "BD-LIVE... the disc tray. 3 Press Z to close the disc tray. Enjoying BONUSVIEW/BD-LIVE Some BD-ROMs with BONUSVIEW/ BD-LIVE. All data stored in [Screen Settings] (page 41). 2 Insert a Blu-ray 3D Disc.
... the system to your 3Dcompatible TV using a High Speed HDMI cable (supplied with BDV-T39 only). • Set [3D Output Setting] and [TV Screen Size Setting for BD-LIVE (BD-LIVE only). • Connect the system to a network (page 20). • Set [BD Internet Connection] to [Allow] (page 43). 3 Insert a BD-ROM with "BD-LIVE... the disc tray. 3 Press Z to close the disc tray. Enjoying BONUSVIEW/BD-LIVE Some BD-ROMs with BONUSVIEW/ BD-LIVE. All data stored in [Screen Settings] (page 41). 2 Insert a Blu-ray 3D Disc.
Operating Instructions
Page 26
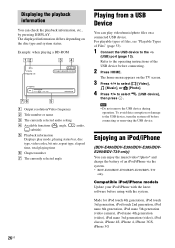
... classic, iPhone 4S, iPhone 4, iPhone 3GS, iPhone 3G 26US A Output resolution/Video frequency B Title number or name C The currently selected audio setting D Available functions ( angle, audio, subtitle) E Playback information Displays play video/music/photo files on a connected USB device. The displayed information differs...., by pressing DISPLAY. To avoid data corruption or damage to the (USB) port (page 13). Enjoying an iPod/iPhone (BDV-E490/BDV-E390/BDV-E385/BDVE290/BDV-T39 only) You can enjoy the music/video*/photo* and charge the battery of Files" (page 53). 1 Connect the ...
... classic, iPhone 4S, iPhone 4, iPhone 3GS, iPhone 3G 26US A Output resolution/Video frequency B Title number or name C The currently selected audio setting D Available functions ( angle, audio, subtitle) E Playback information Displays play video/music/photo files on a connected USB device. The displayed information differs...., by pressing DISPLAY. To avoid data corruption or damage to the (USB) port (page 13). Enjoying an iPod/iPhone (BDV-E490/BDV-E390/BDV-E385/BDVE290/BDV-T39 only) You can enjoy the music/video*/photo* and charge the battery of Files" (page 53). 1 Connect the ...
Operating Instructions
Page 27
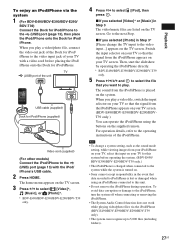
...sound from the iPod/iPhone is turned on the supplied remote. When you selected [Photo] in Step 3* [Please change a system setting, such as the sound mode setting, while viewing images from your iPod/iPhone on your TV, select the input on your TV so that you selected [Video]* or... files (including folders). 27US Playback To enjoy an iPod/iPhone via the iPod/iPhone (BDV-E490/BDV-E390/BDV-E290/BDV-T39 only). • The system can operate the iPod/iPhone using the buttons on . • Sony cannot accept responsibility in the event that the signal from the iPod/iPhone appears on the...
...sound from the iPod/iPhone is turned on the supplied remote. When you selected [Photo] in Step 3* [Please change a system setting, such as the sound mode setting, while viewing images from your iPod/iPhone on your TV, select the input on your TV so that you selected [Video]* or... files (including folders). 27US Playback To enjoy an iPod/iPhone via the iPod/iPhone (BDV-E490/BDV-E390/BDV-E290/BDV-T39 only). • The system can operate the iPod/iPhone using the buttons on . • Sony cannot accept responsibility in the event that the signal from the iPod/iPhone appears on the...
Operating Instructions
Page 30
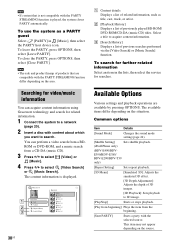
... or DVD-ROM, and a music search from the beginning. [Start PARTY] Starts a party with the selected source. E390/BDV-E385/ BDV-E290/BDV-T39 only) [Repeat Setting] Sets repeat playback. [3D Menu] [Simulated 3D]: Adjusts the simulated 3D effect. [3D Depth Adjustment]: Adjusts the depth of... depending on the source. Common options Item Details [Sound Mode] Changes the sound mode setting (page 24). [Shuffle Setting] Sets shuffle playback. (iPod/iPhone only) (BDV-E490/BDV- The content information is played, the system closes PARTY automatically. You can acquire content ...
... or DVD-ROM, and a music search from the beginning. [Start PARTY] Starts a party with the selected source. E390/BDV-E385/ BDV-E290/BDV-T39 only) [Repeat Setting] Sets repeat playback. [3D Menu] [Simulated 3D]: Adjusts the simulated 3D effect. [3D Depth Adjustment]: Adjusts the depth of... depending on the source. Common options Item Details [Sound Mode] Changes the sound mode setting (page 24). [Shuffle Setting] Sets shuffle playback. (iPod/iPhone only) (BDV-E490/BDV- The content information is played, the system closes PARTY automatically. You can acquire content ...


