
Operating Instructions
Page 1
To find out details on any available updates, please visit: http://www.sony.com/bluraysupport/ Printed in the future. 4-188-205-11(1) The software of this player may be updated in Malaysia 4-188-205-11(1) Operating Instructions Blu-ray Disc™ / DVD Player BDP-S770 © 2010 Sony Corporation
To find out details on any available updates, please visit: http://www.sony.com/bluraysupport/ Printed in the future. 4-188-205-11(1) The software of this player may be updated in Malaysia 4-188-205-11(1) Operating Instructions Blu-ray Disc™ / DVD Player BDP-S770 © 2010 Sony Corporation
Operating Instructions
Page 2
... that any changes or modifications not expressly approved in the literature accompanying the appliance. The shielded Interface cable (LAN cable) must be used in this Blu-ray Disc/DVD player is intended to alert the user to the presence of uninsulated "dangerous voltage" within the product's enclosure that may cause undesired operation of the...
... that any changes or modifications not expressly approved in the literature accompanying the appliance. The shielded Interface cable (LAN cable) must be used in this Blu-ray Disc/DVD player is intended to alert the user to the presence of uninsulated "dangerous voltage" within the product's enclosure that may cause undesired operation of the...

Operating Instructions
Page 3
... the USA If this equipment does cause harmful interference to radio or television reception, which the receiver is not working properly, please call upon your Sony dealer regarding this product is connected. - Reorient or relocate the receiving antenna. - But it should be installed and operated with FCC radiation exposure limits set...
... the USA If this equipment does cause harmful interference to radio or television reception, which the receiver is not working properly, please call upon your Sony dealer regarding this product is connected. - Reorient or relocate the receiving antenna. - But it should be installed and operated with FCC radiation exposure limits set...
Operating Instructions
Page 4
...LAN function. • Do not place heavy or unstable objects on the player. • Do not place any discs when you move the player. A lens cleaning disc. - A disc with a label or sticker on other vessels. • If the player is brought directly from the AC power source as long as doing so may...on for a long time. To disconnect the AC power cord, grasp the plug itself . • Do not resurface the playing side of a disc to the player or the object. • Take out any objects other medical device, consult your physician or the manufacturer of medical instruments. • If you...
...LAN function. • Do not place heavy or unstable objects on the player. • Do not place any discs when you move the player. A lens cleaning disc. - A disc with a label or sticker on other vessels. • If the player is brought directly from the AC power source as long as doing so may...on for a long time. To disconnect the AC power cord, grasp the plug itself . • Do not resurface the playing side of a disc to the player or the object. • Take out any objects other medical device, consult your physician or the manufacturer of medical instruments. • If you...
Operating Instructions
Page 5
...especially those under development. If you experience any discomfort, you believe necessary. On cleaning discs, disc/ lens cleaners Do not use any other device used with, or Blu-ray Disc contents played with this player is still under six years old) is repaired, repaired parts may cause the apparatus to... You must decide what works best. If you do, your doctor (such as alcohol or benzine. Sony recommends that this product and (ii) our website (http:// esupport.sony.com/) for reuse or recycling purposes. consult a doctor if you should stop watching the 3D video ...
...especially those under development. If you experience any discomfort, you believe necessary. On cleaning discs, disc/ lens cleaners Do not use any other device used with, or Blu-ray Disc contents played with this player is still under six years old) is repaired, repaired parts may cause the apparatus to... You must decide what works best. If you do, your doctor (such as alcohol or benzine. Sony recommends that this product and (ii) our website (http:// esupport.sony.com/) for reuse or recycling purposes. consult a doctor if you should stop watching the 3D video ...

Operating Instructions
Page 6
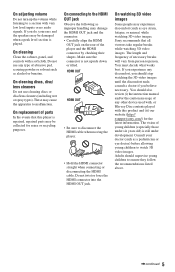
.... 8) Do not install near water. 6) Clean only with dry cloth. 7) Do not block any questions or problems concerning your player, please consult your nearest Sony dealer. If the provided plug does not fit into the apparatus, the apparatus has been exposed to rain or moisture, does not operate... period of holding a still video image or on-screen display image on your TV for your television screen indefinitely. IMPORTANT NOTICE Caution: This player is capable of time you have fallen into your television screen. Install in any heat sources such as radiators, heat registers, stoves, or...
.... 8) Do not install near water. 6) Clean only with dry cloth. 7) Do not block any questions or problems concerning your player, please consult your nearest Sony dealer. If the provided plug does not fit into the apparatus, the apparatus has been exposed to rain or moisture, does not operate... period of holding a still video image or on-screen display image on your TV for your television screen indefinitely. IMPORTANT NOTICE Caution: This player is capable of time you have fallen into your television screen. Install in any heat sources such as radiators, heat registers, stoves, or...
Operating Instructions
Page 7
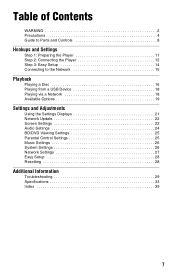
Table of Contents WARNING 2 Precautions 4 Guide to Parts and Controls 8 Hookups and Settings Step 1: Preparing the Player 11 Step 2: Connecting the Player 12 Step 3: Easy Setup 14 Connecting to the Network 15 Playback Playing a Disc 16 Playing from a USB Device 18 Playing via a Network 18 Available Options 19 Settings and Adjustments Using the Settings...
Table of Contents WARNING 2 Precautions 4 Guide to Parts and Controls 8 Hookups and Settings Step 1: Preparing the Player 11 Step 2: Connecting the Player 12 Step 3: Easy Setup 14 Connecting to the Network 15 Playback Playing a Disc 16 Playing from a USB Device 18 Playing via a Network 18 Available Options 19 Settings and Adjustments Using the Settings...
Operating Instructions
Page 8
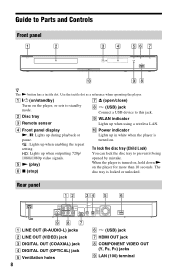
...on/standby) G Z (open/close) Turns on . : Lights up when enabling the repeat setting. Lights up during playback or pause. When the player is locked or unlocked. B Disc tray C Remote sensor H (USB) jack Connect a USB device to Parts and Controls Front panel z The N button has a tactile dot. ...H COMPONENT VIDEO OUT (Y, PB, PR) jacks I WLAN indicator Lights up when outputting 720p/ You can lock the disc tray to standby mode. Use the tactile dot as a reference when operating the player. E N (play) F x (stop) opened by mistake. Guide to this jack. D Front panel display ...
...on/standby) G Z (open/close) Turns on . : Lights up when enabling the repeat setting. Lights up during playback or pause. When the player is locked or unlocked. B Disc tray C Remote sensor H (USB) jack Connect a USB device to Parts and Controls Front panel z The N button has a tactile dot. ...H COMPONENT VIDEO OUT (Y, PB, PR) jacks I WLAN indicator Lights up when outputting 720p/ You can lock the disc tray to standby mode. Use the tactile dot as a reference when operating the player. E N (play) F x (stop) opened by mistake. Guide to this jack. D Front panel display ...
Operating Instructions
Page 9
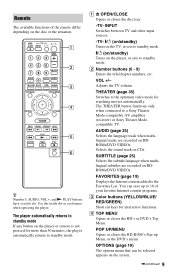
... remote is not pressed for more than 30 minutes, the player automatically returns to a Sony Theater Mode-compatible AV amplifier (receiver) or Sony Theater Modecompatible TV. The player automatically returns to standby mode If any button on the disc or the situation. POP UP/MENU Opens or closes the BD-...ROM's Pop-up to the optimum video mode for interactive functions. z Number 5, AUDIO, VOL +, and N PLAY buttons have a tactile dot. Use the tactile dot as a reference when operating the player. AUDIO (page ...
... remote is not pressed for more than 30 minutes, the player automatically returns to a Sony Theater Mode-compatible AV amplifier (receiver) or Sony Theater Modecompatible TV. The player automatically returns to standby mode If any button on the disc or the situation. POP UP/MENU Opens or closes the BD-...ROM's Pop-up to the optimum video mode for interactive functions. z Number 5, AUDIO, VOL +, and N PLAY buttons have a tactile dot. Use the tactile dot as a reference when operating the player. AUDIO (page ...

Operating Instructions
Page 10
... current scenes for a photo folder. RETURN Returns to the previous/next chapter, track, or file. m/M (fast reverse/fast forward) • Fast reverses/fast forwards the disc when pressed during playback of the home menu. The resume point for more than one second in pause mode. • Plays one frame at a time... playback. Each time you played or the last photo for 15 seconds. x STOP Stops playback and remembers the stop point (resume point). HOME Enters the player's home menu. Displays the wall paper when pressed on the screen. X PAUSE Pauses or re-starts playback.
... current scenes for a photo folder. RETURN Returns to the previous/next chapter, track, or file. m/M (fast reverse/fast forward) • Fast reverses/fast forwards the disc when pressed during playback of the home menu. The resume point for more than one second in pause mode. • Plays one frame at a time... playback. Each time you played or the last photo for 15 seconds. x STOP Stops playback and remembers the stop point (resume point). HOME Enters the player's home menu. Displays the wall paper when pressed on the screen. X PAUSE Pauses or re-starts playback.

Operating Instructions
Page 11
Hookups and Settings 11 Hookups and Settings Step 1: Preparing the Player Checking the supplied accessories Check that you have the following items: • Audio/video cable (phono plug ×3) (1) • Remote commander (remote) (1) • Size AA (R6) batteries (2) Preparing the remote Insert two Size AA (R6) batteries by matching the 3 and # ends on the batteries to the markings inside the battery compartment.
Hookups and Settings 11 Hookups and Settings Step 1: Preparing the Player Checking the supplied accessories Check that you have the following items: • Audio/video cable (phono plug ×3) (1) • Remote commander (remote) (1) • Size AA (R6) batteries (2) Preparing the remote Insert two Size AA (R6) batteries by matching the 3 and # ends on the batteries to the markings inside the battery compartment.

Operating Instructions
Page 12
Match the color of the jack when connecting. HDMI cable (not supplied) Audio/video cable (supplied) High quality Component video cable (not supplied) Audio/video cable (supplied) Standard quality 12 Connecting to your TV Select one of the following connection methods according to that of the plug to the input jacks on your TV. Step 2: Connecting the Player Do not connect the AC power cord until you have made all the connections.
Match the color of the jack when connecting. HDMI cable (not supplied) Audio/video cable (supplied) High quality Component video cable (not supplied) Audio/video cable (supplied) Standard quality 12 Connecting to your TV Select one of the following connection methods according to that of the plug to the input jacks on your TV. Step 2: Connecting the Player Do not connect the AC power cord until you have made all the connections.
Operating Instructions
Page 13
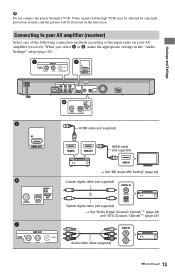
... (not supplied) or Optical digital cable (not supplied) t Set "Dolby Digital (Coaxial / Optical)*1" (page 24) and "DTS (Coaxial / Optical)*2" (page 24). b Do not connect the player through VCRs may be affected by copyright protection systems and the picture will be distorted on your AV amplifier (receiver). Connecting to your AV amplifier...
... (not supplied) or Optical digital cable (not supplied) t Set "Dolby Digital (Coaxial / Optical)*1" (page 24) and "DTS (Coaxial / Optical)*2" (page 24). b Do not connect the player through VCRs may be affected by copyright protection systems and the picture will be distorted on your AV amplifier (receiver). Connecting to your AV amplifier...

Operating Instructions
Page 14
to AC outlet 2 Press [/1 to make the basic settings using Follow the on-screen instructions to turn on the player. 3 Turn on the TV, then switch the input selector on your TV so that the signal from the player appears on and starts "Easy Setup." 1 Plug the player into the AC outlet. *1 *2 14 Step 3: Easy Setup When turned on for the first time Wait for a short while before the player turns on your TV screen. 4 Perform "Easy Setup."
to AC outlet 2 Press [/1 to make the basic settings using Follow the on-screen instructions to turn on the player. 3 Turn on the TV, then switch the input selector on your TV so that the signal from the player appears on and starts "Easy Setup." 1 Plug the player into the AC outlet. *1 *2 14 Step 3: Easy Setup When turned on for the first time Wait for a short while before the player turns on your TV screen. 4 Perform "Easy Setup."

Operating Instructions
Page 15
Wireless Setup Use a wireless LAN that is built into the player. Hookups and Settings Connecting to the Network Wired Setup Use a LAN cable to connect to complete the setup. LAN cable (not supplied) Broadband ADSL modem/ ... modem/ Internet router Cable modem To set the network settings Select "Network Settings," "Internet Settings," then "Wired Setup" (page 27), and follow the on the player.
Wireless Setup Use a wireless LAN that is built into the player. Hookups and Settings Connecting to the Network Wired Setup Use a LAN cable to connect to complete the setup. LAN cable (not supplied) Broadband ADSL modem/ ... modem/ Internet router Cable modem To set the network settings Select "Network Settings," "Internet Settings," then "Wired Setup" (page 27), and follow the on the player.
Operating Instructions
Page 16
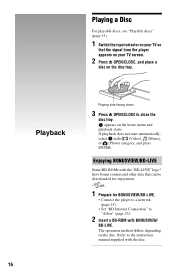
Playback 16 Playing side facing down 3 Press Z OPEN/CLOSE to "Allow" (page 25). 2 Insert a BD-ROM with the disc. The operation method differs depending on the home menu and playback starts. If playback does not start automatically, select in the (Video),... be downloaded for enjoyment. * 1 Prepare for BONUSVIEW/BD-LIVE. • Connect the player to a network (page 15). • Set "BD Internet Connection" to close the disc tray. appears on the disc. Playing a Disc For playable discs, see "Playable discs" (page 33). 1 Switch the input selector on your TV screen. 2 Press Z OPEN...
Playback 16 Playing side facing down 3 Press Z OPEN/CLOSE to "Allow" (page 25). 2 Insert a BD-ROM with the disc. The operation method differs depending on the home menu and playback starts. If playback does not start automatically, select in the (Video),... be downloaded for enjoyment. * 1 Prepare for BONUSVIEW/BD-LIVE. • Connect the player to a network (page 15). • Set "BD Internet Connection" to close the disc tray. appears on the disc. Playing a Disc For playable discs, see "Playable discs" (page 33). 1 Switch the input selector on your TV screen. 2 Press Z OPEN...
Operating Instructions
Page 17
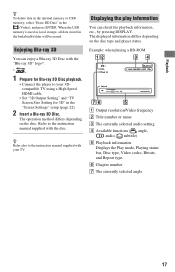
... cable. • Set "3D Output Setting" and "TV Screen Size Setting for Blu-ray 3D Disc playback. • Connect the player to the instruction manual supplied with the "Blu-ray 3D" logo*. * 1 Prepare for 3D" in the "Screen Settings" setup (page 22). 2 Insert a Blu-ray 3D Disc. Example: when playing a BD-ROM A Output resolution/Video frequency B Title number or...
... cable. • Set "3D Output Setting" and "TV Screen Size Setting for Blu-ray 3D Disc playback. • Connect the player to the instruction manual supplied with the "Blu-ray 3D" logo*. * 1 Prepare for 3D" in the "Screen Settings" setup (page 22). 2 Insert a Blu-ray 3D Disc. Example: when playing a BD-ROM A Output resolution/Video frequency B Title number or...

Operating Instructions
Page 18
USB device 2 Select (Video), (Music), or (Photo) on the player. Refer to the USB jack on the home menu using For playable USB devices, see "Playable types of files" (page 34). 1 Connect the USB device to the instruction manual supplied with the USB device before connecting. Playing from a USB Device You can play video/music/photo files on the connected USB device.
USB device 2 Select (Video), (Music), or (Photo) on the player. Refer to the USB jack on the home menu using For playable USB devices, see "Playable types of files" (page 34). 1 Connect the USB device to the instruction manual supplied with the USB device before connecting. Playing from a USB Device You can play video/music/photo files on the connected USB device.

Operating Instructions
Page 19
Playback Playing files on a DLNA server Plays video/music/photo files on your home server, such as a DLNA certified PC by connecting the player to the home network. 1 Prepare for playing files on a DLNA server. • Connect the player to a network (page 15). • Set "Connection Server Settings" (page 27). 2 Select (Video), (Music), or (Photo) on the home menu using
Playback Playing files on a DLNA server Plays video/music/photo files on your home server, such as a DLNA certified PC by connecting the player to the home network. 1 Prepare for playing files on a DLNA server. • Connect the player to a network (page 15). • Set "Connection Server Settings" (page 27). 2 Select (Video), (Music), or (Photo) on the home menu using

Operating Instructions
Page 20
.... AV SYNC Adjusts the gap between picture and sound, by 90 degrees. 20 Slideshow BGM • Off: Turns off the function. • My Music from disc: Sets the tracks in relation to the picture output (0 to output 3D video automatically. Chapter Search Searches for a title on BD-ROMs/ DVD VIDEOs. Rotate...
.... AV SYNC Adjusts the gap between picture and sound, by 90 degrees. 20 Slideshow BGM • Off: Turns off the function. • My Music from disc: Sets the tracks in relation to the picture output (0 to output 3D video automatically. Chapter Search Searches for a title on BD-ROMs/ DVD VIDEOs. Rotate...
