
Operating Instructions
Page 3
... off and on a circuit different from person's body (excluding extremities: hands, wrists, feet and ankles). A polarized plug has two blades with the apparatus. Connect the equipment into your safety. If the provided plug does not fit into an outlet on , the user is... connected. - Increase the separation between the equipment and receiver. - Important Safety Instructions 1) Read these instructions. 2) Keep these instructions. 3) Heed all warnings. 4) Follow all instructions. 5) ...
... off and on a circuit different from person's body (excluding extremities: hands, wrists, feet and ankles). A polarized plug has two blades with the apparatus. Connect the equipment into your safety. If the provided plug does not fit into an outlet on , the user is... connected. - Increase the separation between the equipment and receiver. - Important Safety Instructions 1) Read these instructions. 2) Keep these instructions. 3) Heed all warnings. 4) Follow all instructions. 5) ...
Operating Instructions
Page 4
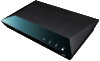
...Model No Serial No For customers in an inclined position. For Customers in Canada If this product is not working properly, please call upon your Sony dealer regarding this player in a confined space, such as power-supply cord or plug is damaged, liquid has been spilled or objects have fallen... than 3 metres. Servicing is required when the apparatus has been damaged in any objects other medical device, consult your medical device before using a connection cable shorter than discs on the disc tray. In this case, remove the disc and leave the player turned on for about half an hour...
...Model No Serial No For customers in an inclined position. For Customers in Canada If this product is not working properly, please call upon your Sony dealer regarding this player in a confined space, such as power-supply cord or plug is damaged, liquid has been spilled or objects have fallen... than 3 metres. Servicing is required when the apparatus has been damaged in any objects other medical device, consult your medical device before using a connection cable shorter than discs on the disc tray. In this case, remove the disc and leave the player turned on for about half an hour...

Operating Instructions
Page 5
...displayed on the AC power cord itself ; Do not use any questions or problems concerning your player, please consult your nearest Sony dealer. 5 Make sure the connector is connected to the wall outlet, even if the player itself has been turned off. • Disconnect the player from the wall ... abrasive pad, scouring powder or solvent such as it is not disconnected from the AC power source as long as alcohol or benzine. On connecting to the HDMI OUT jack Observe the following points to your television screen. On power sources • The player is damaged, as improper...
...displayed on the AC power cord itself ; Do not use any questions or problems concerning your player, please consult your nearest Sony dealer. 5 Make sure the connector is connected to the wall outlet, even if the player itself has been turned off. • Disconnect the player from the wall ... abrasive pad, scouring powder or solvent such as it is not disconnected from the AC power source as long as alcohol or benzine. On connecting to the HDMI OUT jack Observe the following points to your television screen. On power sources • The player is damaged, as improper...
Operating Instructions
Page 9
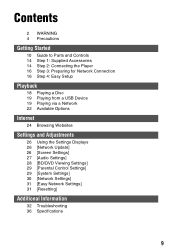
Contents 2 WARNING 4 Precautions Getting Started 10 Guide to Parts and Controls 14 Step 1: Supplied Accessories 14 Step 2: Connecting the Player 16 Step 3: Preparing for Network Connection 16 Step 4: Easy Setup Playback 18 Playing a Disc 19 Playing from a USB Device 19 Playing via a Network 22 Available Options Internet 24 Browsing Websites Settings ...
Contents 2 WARNING 4 Precautions Getting Started 10 Guide to Parts and Controls 14 Step 1: Supplied Accessories 14 Step 2: Connecting the Player 16 Step 3: Preparing for Network Connection 16 Step 4: Easy Setup Playback 18 Playing a Disc 19 Playing from a USB Device 19 Playing via a Network 22 Available Options Internet 24 Browsing Websites Settings ...

Operating Instructions
Page 10
F (USB) jack Connect a USB device to avoid accidental opening of the tray. While the player is turned on, hold down the N button on the player, or sets to standby mode. A Disc tray B Z (open/close) C N (play) D x (stop) E [/1 (on/standby) / Power indicator Turns on the player for more than 10 seconds to Parts and Controls Front panel z The N button has a tactile dot. Use the tactile dot as a reference when operating the player. G Remote sensor To lock the disc tray (Child Lock) You can lock the disc tray to this jack. Getting Started Guide to lock or unlock the tray. 10
F (USB) jack Connect a USB device to avoid accidental opening of the tray. While the player is turned on, hold down the N button on the player, or sets to standby mode. A Disc tray B Z (open/close) C N (play) D x (stop) E [/1 (on/standby) / Power indicator Turns on the player for more than 10 seconds to Parts and Controls Front panel z The N button has a tactile dot. Use the tactile dot as a reference when operating the player. G Remote sensor To lock the disc tray (Child Lock) You can lock the disc tray to this jack. Getting Started Guide to lock or unlock the tray. 10
Operating Instructions
Page 14
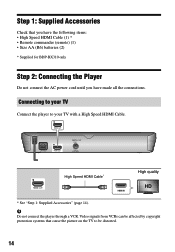
...; High Speed HDMI Cable (1) * • Remote commander (remote) (1) • Size AA (R6) batteries (2) * Supplied for BDP-BX310 only Step 2: Connecting the Player Do not connect the AC power cord until you have made all the connections. b Do not connect the player through a VCR. High Speed HDMI Cable* High quality * See "Step 1: Supplied Accessories" (page 14...
...; High Speed HDMI Cable (1) * • Remote commander (remote) (1) • Size AA (R6) batteries (2) * Supplied for BDP-BX310 only Step 2: Connecting the Player Do not connect the AC power cord until you have made all the connections. b Do not connect the player through a VCR. High Speed HDMI Cable* High quality * See "Step 1: Supplied Accessories" (page 14...
Operating Instructions
Page 15
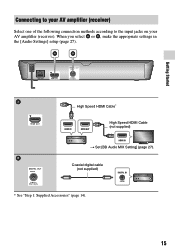
High Speed HDMI Cable* High Speed HDMI Cable (not supplied) t Set [BD Audio MIX Setting] (page 27). Coaxial digital cable (not supplied) * See "Step 1: Supplied Accessories" (page 14). 15 When you select A or B, make the appropriate settings in the [Audio Settings] setup (page 27). Getting Started Connecting to your AV amplifier (receiver) Select one of the following connection methods according to the input jacks on your AV amplifier (receiver).
High Speed HDMI Cable* High Speed HDMI Cable (not supplied) t Set [BD Audio MIX Setting] (page 27). Coaxial digital cable (not supplied) * See "Step 1: Supplied Accessories" (page 14). 15 When you select A or B, make the appropriate settings in the [Audio Settings] setup (page 27). Getting Started Connecting to your AV amplifier (receiver) Select one of the following connection methods according to the input jacks on your AV amplifier (receiver).
Operating Instructions
Page 16
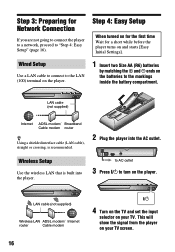
... player into the player. Step 3: Preparing for a short while before the player turns on and starts [Easy Initial Settings]. Wired Setup Use a LAN cable to connect to "Step 4: Easy Setup" (page 16). LAN cable (not supplied) Internet ADSL modem/ Broadband Cable modem router z Using a shielded interface cable (LAN cable... TV and set the input selector on your TV. Step 4: Easy Setup When turned on for the first time Wait for Network Connection If you are not going to connect the player to a network, proceed to the LAN (100) terminal on the player. 1 Insert two Size AA (R6) batteries...
... player into the player. Step 3: Preparing for a short while before the player turns on and starts [Easy Initial Settings]. Wired Setup Use a LAN cable to connect to "Step 4: Easy Setup" (page 16). LAN cable (not supplied) Internet ADSL modem/ Broadband Cable modem router z Using a shielded interface cable (LAN cable... TV and set the input selector on your TV. Step 4: Easy Setup When turned on for the first time Wait for Network Connection If you are not going to connect the player to a network, proceed to the LAN (100) terminal on the player. 1 Insert two Size AA (R6) batteries...
Operating Instructions
Page 18
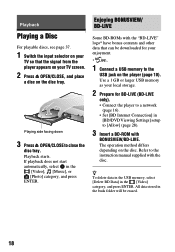
...-LIVE Some BD-ROMs with the "BD-LIVE" logo* have bonus contents and other data that the signal from the player appears on your enjoyment. * 1 Connect a USB memory to [Allow] (page 28). 3 Insert a BD-ROM with the disc. Playing side facing down 3 Press Z OPEN/CLOSE to the instruction manual supplied ...the disc tray. All data stored in the buda folder will be downloaded for BD-LIVE (BD-LIVE only). • Connect the player to a network (page 16). • Set [BD Internet Connection] in [BD/DVD Viewing Settings] setup to the USB jack on the player (page 10). If playback does not start...
...-LIVE Some BD-ROMs with the "BD-LIVE" logo* have bonus contents and other data that the signal from the player appears on your enjoyment. * 1 Connect a USB memory to [Allow] (page 28). 3 Insert a BD-ROM with the disc. Playing side facing down 3 Press Z OPEN/CLOSE to the instruction manual supplied ...the disc tray. All data stored in the buda folder will be downloaded for BD-LIVE (BD-LIVE only). • Connect the player to a network (page 16). • Set [BD Internet Connection] in [BD/DVD Viewing Settings] setup to the USB jack on the player (page 10). If playback does not start...
Operating Instructions
Page 19
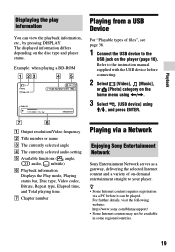
Example: when playing a BD-ROM Playing from a USB Device For "Playable types of files", see page 38. 1 Connect the USB device to the instruction manual supplied with the USB device before connecting. 2 Select [Video], [Music], or [Photo] category on the player (page 10). Playback Displaying the play information You can view the playback information, etc., by pressing DISPLAY. Refer to the USB jack on the home menu using The displayed information differs depending on the disc type and player status.
Example: when playing a BD-ROM Playing from a USB Device For "Playable types of files", see page 38. 1 Connect the USB device to the instruction manual supplied with the USB device before connecting. 2 Select [Video], [Music], or [Photo] category on the player (page 10). Playback Displaying the play information You can view the playback information, etc., by pressing DISPLAY. Refer to the USB jack on the home menu using The displayed information differs depending on the disc type and player status.
Operating Instructions
Page 20
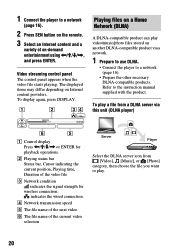
1 Connect the player to a network (page 16). 2 Press SEN button on the remote. 3 Select an Internet content and a variety of on-demand entertainment using
1 Connect the player to a network (page 16). 2 Press SEN button on the remote. 3 Select an Internet content and a variety of on-demand entertainment using
Operating Instructions
Page 21
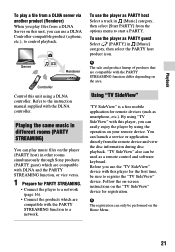
... files on the player (PARTY host) in other rooms simultaneously through Sony products (PARTY guest) which are compatible with DLNA and the PARTY STREAMING function, or vice versa. 1 Prepare for PARTY STREAMING. • Connect the player to a network (page 16). • Connect the products which are compatible with the PARTY STREAMING function differ...
... files on the player (PARTY host) in other rooms simultaneously through Sony products (PARTY guest) which are compatible with DLNA and the PARTY STREAMING function, or vice versa. 1 Prepare for PARTY STREAMING. • Connect the player to a network (page 16). • Connect the products which are compatible with the PARTY STREAMING function differ...
Operating Instructions
Page 24
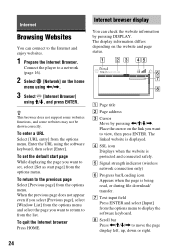
Connect the player to the Internet and enjoy websites. 1 Prepare the Internet Browser. Internet Browsing Websites You can connect to a network (page 16). 2 Select [Network] on the home menu using
Connect the player to the Internet and enjoy websites. 1 Prepare the Internet Browser. Internet Browsing Websites You can connect to a network (page 16). 2 Select [Network] on the home menu using
Operating Instructions
Page 26
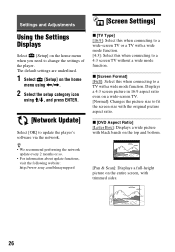
Settings and Adjustments [Screen Settings] Using the Settings Displays Select [Setup] on the home menu using The default settings are underlined. 1 Select [Setup] on the home menu when you need to change the settings of the player.
Settings and Adjustments [Screen Settings] Using the Settings Displays Select [Setup] on the home menu using The default settings are underlined. 1 Select [Setup] on the home menu when you need to change the settings of the player.

Operating Instructions
Page 27
...[HDMI Deep Color Output] [Auto]: Normally select this. [16bit]/[12bit]/[10bit]: Outputs 16bit/ 12bit/10bit video signals when the connected TV is scaled up to the appropriate conversion method. [Video]: The conversion method suited for video-based material will always be selected...select this when the picture is not compatible with Deep Color. [Off]: Select this . x [YCbCr/RGB (HDMI)] [Auto]: Automatically detects the connected TV type, and switches to the status of the material. Outputs audio signals according to the matching color setting. [YCbCr (4:2:2)]: Outputs YCbCr 4:2:2 video...
...[HDMI Deep Color Output] [Auto]: Normally select this. [16bit]/[12bit]/[10bit]: Outputs 16bit/ 12bit/10bit video signals when the connected TV is scaled up to the appropriate conversion method. [Video]: The conversion method suited for video-based material will always be selected...select this when the picture is not compatible with Deep Color. [Off]: Select this . x [YCbCr/RGB (HDMI)] [Auto]: Automatically detects the connected TV type, and switches to the status of the material. Outputs audio signals according to the matching color setting. [YCbCr (4:2:2)]: Outputs YCbCr 4:2:2 video...
Operating Instructions
Page 28
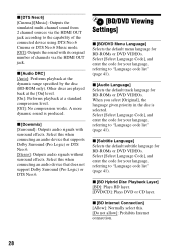
... Code], and enter the code for your language, referring to "Language code list" (page 41). x [BD Internet Connection] [Allow]: Normally select this when connecting an audio device that supports Dolby Surround (Pro Logic) or DTS Neo:6. [Stereo]: Outputs audio signals without surround effects.... DRC] [Auto]: Performs playback at a standard compression level. [Off]: No compression works. Select this . [Do not allow]: Prohibits Internet connection. 28 When you select [Original], the language given priority in the disc is produced. A more dynamic sound is selected. x [Audio Language...
... Code], and enter the code for your language, referring to "Language code list" (page 41). x [BD Internet Connection] [Allow]: Normally select this when connecting an audio device that supports Dolby Surround (Pro Logic) or DTS Neo:6. [Stereo]: Outputs audio signals without surround effects.... DRC] [Auto]: Performs playback at a standard compression level. [Off]: No compression works. Select this . [Do not allow]: Prohibits Internet connection. 28 When you select [Original], the language given priority in the disc is produced. A more dynamic sound is selected. x [Audio Language...
Operating Instructions
Page 29
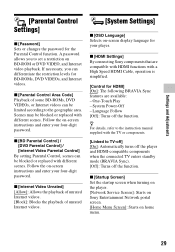
... replaced with the TV or components. [Linked to TV-off] [On]: Automatically turns off the player and HDMI-compatible components when the connected TV enters standby mode (BRAVIA Sync). [Off]: Turns off the function. x [Parental Control Area Code] Playback of unrated Internet videos.... is simplified. [Control for the Parental Control function. System Power-Off - If necessary, you to the geographic area. x [HDMI Settings] By connecting Sony components that are available: - Follow the on home menu. 29 x [BD Parental Control] / [DVD Parental Control] / [Internet Video Parental ...
... replaced with the TV or components. [Linked to TV-off] [On]: Automatically turns off the player and HDMI-compatible components when the connected TV enters standby mode (BRAVIA Sync). [Off]: Turns off the function. x [Parental Control Area Code] Playback of unrated Internet videos.... is simplified. [Control for the Parental Control function. System Power-Off - If necessary, you to the geographic area. x [HDMI Settings] By connecting Sony components that are available: - Follow the on home menu. 29 x [BD Parental Control] / [DVD Parental Control] / [Internet Video Parental ...
Operating Instructions
Page 30
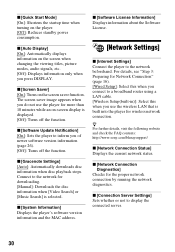
... version information and the MAC address. z For further details, visit the following website and check the FAQ contents: http://www.sony.com/bluraysupport/ x [Network Connection Status] Displays the current network status. x [Network Connection Diagnostics] Checks for downloading. [Manual]: Downloads the disc information when [Video Search] or [Music Search] is displayed. [Off]: Turns off...
... version information and the MAC address. z For further details, visit the following website and check the FAQ contents: http://www.sony.com/bluraysupport/ x [Network Connection Status] Displays the current network status. x [Network Connection Diagnostics] Checks for downloading. [Manual]: Downloads the disc information when [Video Search] or [Music Search] is displayed. [Off]: Turns off...
Operating Instructions
Page 32
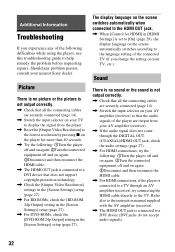
... your TV, etc.). Sound There is no picture or the picture is not output correctly. , Check that all the connecting cables are securely connected (page 14). , Switch the input selector on your nearest Sony dealer. Refer also to the instruction manual supplied with the AV amplifier (receiver). , The HDMI OUT jack is set...
... your TV, etc.). Sound There is no picture or the picture is not output correctly. , Check that all the connecting cables are securely connected (page 14). , Switch the input selector on your nearest Sony dealer. Refer also to the instruction manual supplied with the AV amplifier (receiver). , The HDMI OUT jack is set...
Operating Instructions
Page 33
... Settings] setup to [Off] (page 27). , Check that it is poor/certain programs display a loss of professionally-produced content (page 6). Sony Entertainment Network The picture/sound is an unauthorized copy of detail, especially during fast-motion or dark scenes. , Picture/sound quality may be played ...back by Cinavia and is connected via a USB hub, connect the USB device directly to the player. The interactive audio is compatible with the playback side facing down . Do not adjust...
... Settings] setup to [Off] (page 27). , Check that it is poor/certain programs display a loss of professionally-produced content (page 6). Sony Entertainment Network The picture/sound is an unauthorized copy of detail, especially during fast-motion or dark scenes. , Picture/sound quality may be played ...back by Cinavia and is connected via a USB hub, connect the USB device directly to the player. The interactive audio is compatible with the playback side facing down . Do not adjust...


