
Operating Instructions
Page 7
Table of Contents WARNING 2 Precautions 4 Guide to Parts and Controls 8 Hookups and Settings Step 1: Preparing the Player 11 Step 2: Connecting the Player 12 Step 3: Easy Setup 14 Connecting to the Network 15 Playback Playing a Disc 16 Playing from a USB Device 17 Playing via a Network 18 Available Options 18 Settings and Adjustments Using the Settings Displays...
Table of Contents WARNING 2 Precautions 4 Guide to Parts and Controls 8 Hookups and Settings Step 1: Preparing the Player 11 Step 2: Connecting the Player 12 Step 3: Easy Setup 14 Connecting to the Network 15 Playback Playing a Disc 16 Playing from a USB Device 17 Playing via a Network 18 Available Options 18 Settings and Adjustments Using the Settings Displays...
Operating Instructions
Page 10
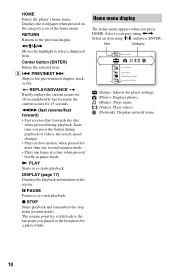
... • Plays one frame at a time, when pressed briefly in pause mode. m/M (fast reverse/fast forward) • Fast reverses/fast forwards the disc when pressed during playback of the home menu. Displays the wall paper when pressed on the screen. x STOP Stops playback and remembers the stop point... (resume point). HOME Enters the player's home menu. REPLAY/ADVANCE Briefly replays the current scenes for 10 seconds/briefly fast forwards the current scenes for a photo folder.
... • Plays one frame at a time, when pressed briefly in pause mode. m/M (fast reverse/fast forward) • Fast reverses/fast forwards the disc when pressed during playback of the home menu. Displays the wall paper when pressed on the screen. x STOP Stops playback and remembers the stop point... (resume point). HOME Enters the player's home menu. REPLAY/ADVANCE Briefly replays the current scenes for 10 seconds/briefly fast forwards the current scenes for a photo folder.
Operating Instructions
Page 13
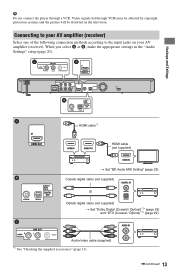
When you select A or B, make the appropriate settings in the "Audio Settings" setup (page 23). Audio/video cable (supplied) *1 See "Checking the supplied accessories" (page 11). ,continued 13 Connecting to your AV amplifier (receiver). b Do not connect the player through VCRs may be affected by copyright protection systems and the picture will be...
When you select A or B, make the appropriate settings in the "Audio Settings" setup (page 23). Audio/video cable (supplied) *1 See "Checking the supplied accessories" (page 11). ,continued 13 Connecting to your AV amplifier (receiver). b Do not connect the player through VCRs may be affected by copyright protection systems and the picture will be...
Operating Instructions
Page 14
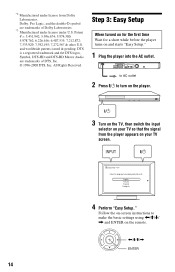
to AC outlet 2 Press [/1 to make the basic settings using *2 *3 14 Step 3: Easy Setup When turned on for the first time Wait for a short while before the player turns on your TV so that the signal from the player appears on and starts "Easy Setup." 1 Plug the player into the AC outlet. Follow the on-screen instructions to turn on the player. 3 Turn on the TV, then switch the input selector on your TV screen. 4 Perform "Easy Setup."
to AC outlet 2 Press [/1 to make the basic settings using *2 *3 14 Step 3: Easy Setup When turned on for the first time Wait for a short while before the player turns on your TV so that the signal from the player appears on and starts "Easy Setup." 1 Plug the player into the AC outlet. Follow the on-screen instructions to turn on the player. 3 Turn on the TV, then switch the input selector on your TV screen. 4 Perform "Easy Setup."
Operating Instructions
Page 15
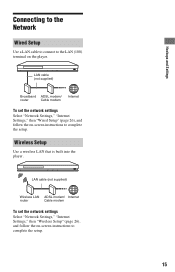
...-screen instructions to the LAN (100) terminal on -screen instructions to complete the setup. Wireless Setup Use a wireless LAN that is built into the player. Hookups and Settings Connecting to the Network Wired Setup Use a LAN cable to connect to complete the setup. 15 LAN cable (not supplied) Broadband ADSL modem/ router Cable modem Internet...
...-screen instructions to the LAN (100) terminal on -screen instructions to complete the setup. Wireless Setup Use a wireless LAN that is built into the player. Hookups and Settings Connecting to the Network Wired Setup Use a LAN cable to connect to complete the setup. 15 LAN cable (not supplied) Broadband ADSL modem/ router Cable modem Internet...
Operating Instructions
Page 20
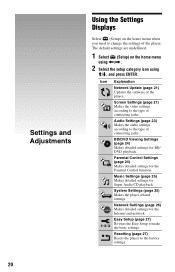
Settings and Adjustments 20 Using the Settings Displays Select (Setup) on the home menu using The default settings are underlined. 1 Select (Setup) on the home menu when you need to change the settings of the player.
Settings and Adjustments 20 Using the Settings Displays Select (Setup) on the home menu using The default settings are underlined. 1 Select (Setup) on the home menu when you need to change the settings of the player.

Operating Instructions
Page 26
... 21). DivX(R) VOD (Canada models only) For details, visit the following website and check the FAQ contents: http://www.sony.com/ bluraysupport/ Network Connection Diagnostics You can run the network diagnostic to the network for downloading. For further details, visit .... Wireless Setup Select this when you of the registered your "BD Remote" device. Software Update Notification On Sets the player to the Network" (page 15). Gracenote Settings Auto Automatically downloads disc information when disc playback stops. Network Settings Internet Settings Connect the player to a...
... 21). DivX(R) VOD (Canada models only) For details, visit the following website and check the FAQ contents: http://www.sony.com/ bluraysupport/ Network Connection Diagnostics You can run the network diagnostic to the network for downloading. For further details, visit .... Wireless Setup Select this when you of the registered your "BD Remote" device. Software Update Notification On Sets the player to the Network" (page 15). Gracenote Settings Auto Automatically downloads disc information when disc playback stops. Network Settings Internet Settings Connect the player to a...
Operating Instructions
Page 27
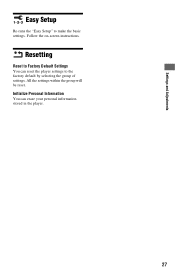
Initialize Personal Information You can reset the player settings to the factory default by selecting the group of settings. Resetting Reset to make the basic settings. Follow the on-screen instructions. All the settings within the group will be reset. Settings and Adjustments Easy Setup Re-runs the "Easy Setup" to Factory Default Settings You can erase your personal information stored in the player. 27
Initialize Personal Information You can reset the player settings to the factory default by selecting the group of settings. Resetting Reset to make the basic settings. Follow the on-screen instructions. All the settings within the group will be reset. Settings and Adjustments Easy Setup Re-runs the "Easy Setup" to Factory Default Settings You can erase your personal information stored in the player. 27
Operating Instructions
Page 28
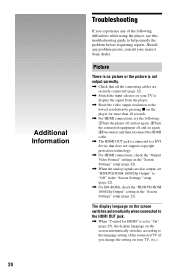
... For HDMI connections, check the "Output Video Format" settings in the "Screen Settings" setup (page 22). Should any of the connected TV (if you experience any problem persist, consult your nearest Sony dealer. The display language on the screen switches automatically when connected to the HDMI OUT ...display language on the screen automatically switches according to the language setting of the following difficulties while using the player, use this troubleshooting guide to "Off" in the "Screen Settings" setup (page 22). , For BD-ROMs, check the "BD/DVD-ROM 1080/24p Output" setting in the...
... For HDMI connections, check the "Output Video Format" settings in the "Screen Settings" setup (page 22). Should any of the connected TV (if you experience any problem persist, consult your nearest Sony dealer. The display language on the screen switches automatically when connected to the HDMI OUT ...display language on the screen automatically switches according to the language setting of the following difficulties while using the player, use this troubleshooting guide to "Off" in the "Screen Settings" setup (page 22). , For BD-ROMs, check the "BD/DVD-ROM 1080/24p Output" setting in the...
Operating Instructions
Page 29
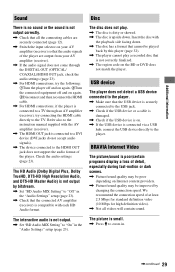
...DVI jacks do not accept audio signals). , The device connected to the HDMI OUT jack does not support the audio format of the player. Disc The disc does not play a recorded disc that is not correctly finalized. , The region code on . , If the USB device is connected via a USB hub, connect ... 32). , The player cannot play . , The disc is dirty or skewed. , The disc is upside down . , The disc has a format that cannot be played back by changing the connection speed. The interactive audio is not output. , Set "BD Audio MIX Setting" to zoom in the "Audio Settings" setup (page 23). Additional ...
...DVI jacks do not accept audio signals). , The device connected to the HDMI OUT jack does not support the audio format of the player. Disc The disc does not play a recorded disc that is not correctly finalized. , The region code on . , If the USB device is connected via a USB hub, connect ... 32). , The player cannot play . , The disc is dirty or skewed. , The disc is upside down . , The disc has a format that cannot be played back by changing the connection speed. The interactive audio is not output. , Set "BD Audio MIX Setting" to zoom in the "Audio Settings" setup (page 23). Additional ...
Operating Instructions
Page 30
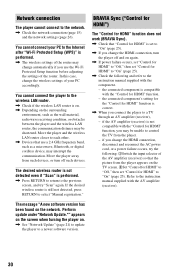
... connect to select "Manual registration." the connected component is compatible with the "Control for HDMI" function, you connect the player to the Internet after "Wi-Fi Protected Setup (WPS)" is set to "On" (page 25). , If you use a 2.4 GHz frequency band, such as the wall material, ...radio wave receiving condition, or obstacles between the player and the wireless LAN router, the communication distance may be shortened. the connected...
... connect to select "Manual registration." the connected component is compatible with the "Control for HDMI" function, you connect the player to the Internet after "Wi-Fi Protected Setup (WPS)" is set to "On" (page 25). , If you use a 2.4 GHz frequency band, such as the wall material, ...radio wave receiving condition, or obstacles between the player and the wireless LAN router, the communication distance may be shortened. the connected...
Operating Instructions
Page 33
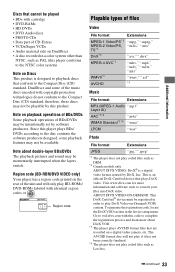
...PHOTO CDs • Data part of CD-Extras • VCDs/Super VCDs • Audio material side on DualDiscs • A disc recorded in the device setup menu. ABOUT DIVX VIDEO-ON-DEMAND: This DivX Certified® device must be registered in order to complete the registration process and .... Region code Playable types of BDs/DVDs may be played • BDs with this player plays BDs/ DVDs according to the Compact Disc (CD) standard, therefore, these discs may not be playable by this player conforms to the NTSC color system). Note on playback operations of BDs/DVDs Some playback ...
...PHOTO CDs • Data part of CD-Extras • VCDs/Super VCDs • Audio material side on DualDiscs • A disc recorded in the device setup menu. ABOUT DIVX VIDEO-ON-DEMAND: This DivX Certified® device must be registered in order to complete the registration process and .... Region code Playable types of BDs/DVDs may be played • BDs with this player plays BDs/ DVDs according to the Compact Disc (CD) standard, therefore, these discs may not be playable by this player conforms to the NTSC color system). Note on playback operations of BDs/DVDs Some playback ...

Operating Instructions
Page 34
...HDMI" function with an HDMI cable (supplied with BDP-BX57 only), operation is switched to the USB memory or devices, turn the player off automatically. • Theater When you change ...the language for the onscreen display on your TV or other connected components, refer to "On" in the "System Settings" setup (page...jack only). • To avoid data corruption or damage to the player automatically. - [/1 - up to the instruction manual supplied with a Sony AV amplifier (receiver) using DATA DVDs. Refer to folders in ...
...HDMI" function with an HDMI cable (supplied with BDP-BX57 only), operation is switched to the USB memory or devices, turn the player off automatically. • Theater When you change ...the language for the onscreen display on your TV or other connected components, refer to "On" in the "System Settings" setup (page...jack only). • To avoid data corruption or damage to the player automatically. - [/1 - up to the instruction manual supplied with a Sony AV amplifier (receiver) using DATA DVDs. Refer to folders in ...
Operating Instructions
Page 36
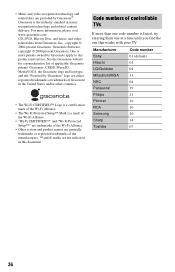
... you find the one code number is a mark of the Wi-Fi Alliance. • "Wi-Fi CERTIFIED™" and "Wi-Fi Protected Setup™" are trademarks of the Wi-Fi Alliance. • Other system and product names are generally trademarks or registered trademarks of applicable Gracenote patents....by Gracenote®. Manufacturer Sony Hitachi LG/Goldstar Mitsubishi/MGA NEC Panasonic Philips Pioneer RCA Samsung Sharp Toshiba Code number 01 (default) 02 04 13 04 19 21 16 10 20 18 07 36 Gracenote Software, copyright © 2000-present Gracenote. CD, DVD, Blu-ray Disc, and music and ...
... you find the one code number is a mark of the Wi-Fi Alliance. • "Wi-Fi CERTIFIED™" and "Wi-Fi Protected Setup™" are trademarks of the Wi-Fi Alliance. • Other system and product names are generally trademarks or registered trademarks of applicable Gracenote patents....by Gracenote®. Manufacturer Sony Hitachi LG/Goldstar Mitsubishi/MGA NEC Panasonic Philips Pioneer RCA Samsung Sharp Toshiba Code number 01 (default) 02 04 13 04 19 21 16 10 20 18 07 36 Gracenote Software, copyright © 2000-present Gracenote. CD, DVD, Blu-ray Disc, and music and ...

Operating Instructions
Page 38
...displays. A AUDIO 9 "Audio Settings" 23 B Batteries 11 "BD/DVD Viewing Settings" 24 BD-LIVE 16 BD-R 32 BD-RE 32 Bitstream 29 Blu-ray Disc 32 BONUSVIEW 16 BRAVIA Internet Video 18 BRAVIA Sync 30, 34 C CD 32 Child Lock 8, 31 Color buttons 9 Connecting AV amplifier (Receiver) 13 ...25 P Parental Control 24 "Parental Control Settings" 24 Play information 17 Playable discs 32 POP UP/MENU 9 Q "Quick Start Mode" 25 R Region code 33 Remote 9, 11 "Resetting" 27 Resetting the player 27 Resume 10, 31 S "Screen Settings" 21 "Setup" 20 Software update 21, 26 SUBTITLE 9 System Power-Off 34 "System Settings...
...displays. A AUDIO 9 "Audio Settings" 23 B Batteries 11 "BD/DVD Viewing Settings" 24 BD-LIVE 16 BD-R 32 BD-RE 32 Bitstream 29 Blu-ray Disc 32 BONUSVIEW 16 BRAVIA Internet Video 18 BRAVIA Sync 30, 34 C CD 32 Child Lock 8, 31 Color buttons 9 Connecting AV amplifier (Receiver) 13 ...25 P Parental Control 24 "Parental Control Settings" 24 Play information 17 Playable discs 32 POP UP/MENU 9 Q "Quick Start Mode" 25 R Region code 33 Remote 9, 11 "Resetting" 27 Resetting the player 27 Resume 10, 31 S "Screen Settings" 21 "Setup" 20 Software update 21, 26 SUBTITLE 9 System Power-Off 34 "System Settings...


