
Planned software update for 3D
Page 1
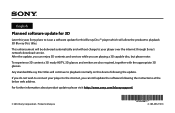
...be delivered automatically and without charge to playback 3D Blu-ray Disc titles. English Planned software update for 3D Later this year, Sony plans to issue a software update for this Blu-ray Disc™ player which will allow the product to your player to playback normally on this device following the ... 4-185-496-11(1) If you do not wish to connect your player over the internet through Sony's network download service. Any standard Blu-ray Disc titles will continue to the internet, you are playing a 3D capable disc, but please note: To experience 3D content a 3D ready HDTV,...
...be delivered automatically and without charge to playback 3D Blu-ray Disc titles. English Planned software update for 3D Later this year, Sony plans to issue a software update for this Blu-ray Disc™ player which will allow the product to your player to playback normally on this device following the ... 4-185-496-11(1) If you do not wish to connect your player over the internet through Sony's network download service. Any standard Blu-ray Disc titles will continue to the internet, you are playing a 3D capable disc, but please note: To experience 3D content a 3D ready HDTV,...
Operating Instructions
Page 1
To find out details on any available updates, please visit: http://www.sony.com/bluraysupport/ Printed in the future. 4-169-144-11(1) The software of this player may be updated in Malaysia 4-169-144-11(1) Operating Instructions Blu-ray Disc™ / DVD Player BDP-S570/BX57 © 2010 Sony Corporation
To find out details on any available updates, please visit: http://www.sony.com/bluraysupport/ Printed in the future. 4-169-144-11(1) The software of this player may be updated in Malaysia 4-169-144-11(1) Operating Instructions Blu-ray Disc™ / DVD Player BDP-S570/BX57 © 2010 Sony Corporation
Operating Instructions
Page 2
... used in order to persons. To avoid electrical shock, do not open the cabinet. As the laser beam used with the equipment in this Blu-ray Disc/DVD player is subject to disassemble the cabinet. Batteries or batteries installed apparatus shall not be unplugged from the wall socket immediately in conjunction with liquids, such...
... used in order to persons. To avoid electrical shock, do not open the cabinet. As the laser beam used with the equipment in this Blu-ray Disc/DVD player is subject to disassemble the cabinet. Batteries or batteries installed apparatus shall not be unplugged from the wall socket immediately in conjunction with liquids, such...
Operating Instructions
Page 3
If this product is not working properly, please call upon your Sony dealer regarding this product is connected. - This equipment has very low levels of the FCC Rules. Owner's Record The model and serial numbers are designed ...
If this product is not working properly, please call upon your Sony dealer regarding this product is connected. - This equipment has very low levels of the FCC Rules. Owner's Record The model and serial numbers are designed ...
Operating Instructions
Page 4
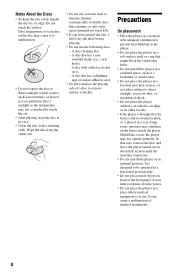
...front panel. It may condense on it. • Do not resurface the playing side of medical instruments. 4 Should this occur, the player may cause a malfunction of a disc to direct sunlight or heat sources such as hot air ducts, or leave it . - It may not operate properly...cellophane tape or sticker adhesive on the lenses inside the car. • After playing, store the disc in use the following discs. - It is in its edge. Precautions On placement • Place the player in a location with adequate ventilation to prevent heat build-up in an inclined position. A lens ...
...front panel. It may condense on it. • Do not resurface the playing side of medical instruments. 4 Should this occur, the player may cause a malfunction of a disc to direct sunlight or heat sources such as hot air ducts, or leave it . - It may not operate properly...cellophane tape or sticker adhesive on the lenses inside the car. • After playing, store the disc in use the following discs. - It is in its edge. Precautions On placement • Place the player in a location with adequate ventilation to prevent heat build-up in an inclined position. A lens ...
Operating Instructions
Page 5
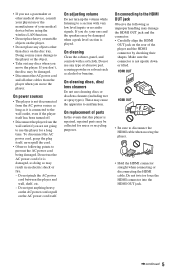
...peak level section is not disconnected from the player when you move the player. On connecting to the HDMI OUT jack Observe the following points to the player or the object. • Take out any discs when you move the player. On power sources • The player is played. Do not use any objects ...other than discs on the player. • Do not place any type of abrasive pad,...
...peak level section is not disconnected from the player when you move the player. On connecting to the HDMI OUT jack Observe the following points to the player or the object. • Take out any discs when you move the player. On power sources • The player is played. Do not use any objects ...other than discs on the player. • Do not place any type of abrasive pad,...
Operating Instructions
Page 6
...or onscreen display image displayed on your TV for replacement of the obsolete outlet. 10)Protect the power cord from being walked on your nearest Sony dealer. Install in any way, such as radiators, heat registers, stoves, or other . A grounding type plug has two blades and a ...spilled or objects have fallen into your outlet, consult an electrician for an extended period of time you have any questions or problems concerning your player, please consult your television screen indefinitely. If you risk permanent damage to rain or moisture, does not operate normally, or has been dropped...
...or onscreen display image displayed on your TV for replacement of the obsolete outlet. 10)Protect the power cord from being walked on your nearest Sony dealer. Install in any way, such as radiators, heat registers, stoves, or other . A grounding type plug has two blades and a ...spilled or objects have fallen into your outlet, consult an electrician for an extended period of time you have any questions or problems concerning your player, please consult your television screen indefinitely. If you risk permanent damage to rain or moisture, does not operate normally, or has been dropped...
Operating Instructions
Page 7
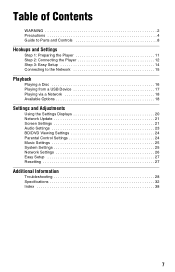
Table of Contents WARNING 2 Precautions 4 Guide to Parts and Controls 8 Hookups and Settings Step 1: Preparing the Player 11 Step 2: Connecting the Player 12 Step 3: Easy Setup 14 Connecting to the Network 15 Playback Playing a Disc 16 Playing from a USB Device 17 Playing via a Network 18 Available Options 18 Settings and Adjustments Using the Settings...
Table of Contents WARNING 2 Precautions 4 Guide to Parts and Controls 8 Hookups and Settings Step 1: Preparing the Player 11 Step 2: Connecting the Player 12 Step 3: Easy Setup 14 Connecting to the Network 15 Playback Playing a Disc 16 Playing from a USB Device 17 Playing via a Network 18 Available Options 18 Settings and Adjustments Using the Settings...
Operating Instructions
Page 8
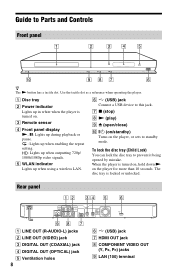
A Disc tray B Power indicator Lights up in white when the player is turned on the player for more than 10 seconds. When the player is locked or unlocked. C Remote sensor D Front panel display N, X: Lights up during playback or pause. : Lights up when enabling the repeat setting... VIDEO OUT (Y, PB, PR) jacks I Z (open/close) J [/1 (on/standby) Turns on the player, or sets to Parts and Controls Front panel z The N button has a tactile dot. To lock the disc tray (Child Lock) You can lock the disc tray to this jack. G x (stop) H N (play) I LAN (100) terminal E WLAN indicator...
A Disc tray B Power indicator Lights up in white when the player is turned on the player for more than 10 seconds. When the player is locked or unlocked. C Remote sensor D Front panel display N, X: Lights up during playback or pause. : Lights up when enabling the repeat setting... VIDEO OUT (Y, PB, PR) jacks I Z (open/close) J [/1 (on/standby) Turns on the player, or sets to Parts and Controls Front panel z The N button has a tactile dot. To lock the disc tray (Child Lock) You can lock the disc tray to this jack. G x (stop) H N (play) I LAN (100) terminal E WLAN indicator...
Operating Instructions
Page 9
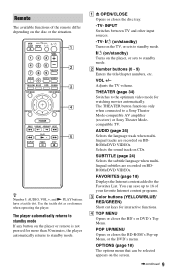
... (on/standby) Turns on the player, or sets to the optimum video mode for watching movies automatically. B Number buttons (0 - 9) Enters the title/chapter numbers, etc. SUBTITLE (page 24) Selects the subtitle language when multilingual subtitles are recorded on the disc or the situation. z Number 5, .... You can be selected appears on the player or remote is not pressed for more than 30 minutes, the player automatically returns to a Sony Theater Mode-compatible AV amplifier (receiver) or Sony Theater Modecompatible TV. The player automatically returns to standby mode If any button...
... (on/standby) Turns on the player, or sets to the optimum video mode for watching movies automatically. B Number buttons (0 - 9) Enters the title/chapter numbers, etc. SUBTITLE (page 24) Selects the subtitle language when multilingual subtitles are recorded on the disc or the situation. z Number 5, .... You can be selected appears on the player or remote is not pressed for more than 30 minutes, the player automatically returns to a Sony Theater Mode-compatible AV amplifier (receiver) or Sony Theater Modecompatible TV. The player automatically returns to standby mode If any button...
Operating Instructions
Page 10
m/M (fast reverse/fast forward) • Fast reverses/fast forwards the disc when pressed during playback of the home menu. N PLAY Starts or re-starts playback. X PAUSE Pauses or re-starts playback. x STOP Stops playback and remembers ... resume point for more than one second in pause mode. • Plays one frame at a time, when pressed briefly in pause mode. HOME Enters the player's home menu. Displays the wall paper when pressed on the screen. DISPLAY (page 17) Displays the playback information on the category icon of videos, the...
m/M (fast reverse/fast forward) • Fast reverses/fast forwards the disc when pressed during playback of the home menu. N PLAY Starts or re-starts playback. X PAUSE Pauses or re-starts playback. x STOP Stops playback and remembers ... resume point for more than one second in pause mode. • Plays one frame at a time, when pressed briefly in pause mode. HOME Enters the player's home menu. Displays the wall paper when pressed on the screen. DISPLAY (page 17) Displays the playback information on the category icon of videos, the...
Operating Instructions
Page 11
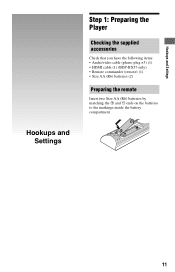
Hookups and Settings Hookups and Settings Step 1: Preparing the Player Checking the supplied accessories Check that you have the following items: • Audio/video cable (phono plug ×3) (1) • HDMI cable (1) (BDP-BX57 only) • Remote commander (remote) (1) • Size AA (R6) batteries (2) Preparing the remote Insert two Size AA (R6) batteries by matching the 3 and # ends on the batteries to the markings inside the battery compartment. 11
Hookups and Settings Hookups and Settings Step 1: Preparing the Player Checking the supplied accessories Check that you have the following items: • Audio/video cable (phono plug ×3) (1) • HDMI cable (1) (BDP-BX57 only) • Remote commander (remote) (1) • Size AA (R6) batteries (2) Preparing the remote Insert two Size AA (R6) batteries by matching the 3 and # ends on the batteries to the markings inside the battery compartment. 11
Operating Instructions
Page 12
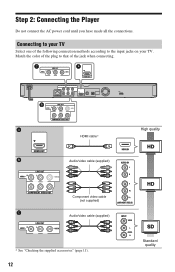
Step 2: Connecting the Player Do not connect the AC power cord until you have made all the connections. HDMI cable* Audio/video cable (supplied) High quality Component video cable (not supplied) Audio/video cable (supplied) * See "Checking the supplied accessories" (page 11). 12 Standard quality Match the color of the plug to that of the following connection methods according to your TV. Connecting to the input jacks on your TV Select one of the jack when connecting.
Step 2: Connecting the Player Do not connect the AC power cord until you have made all the connections. HDMI cable* Audio/video cable (supplied) High quality Component video cable (not supplied) Audio/video cable (supplied) * See "Checking the supplied accessories" (page 11). 12 Standard quality Match the color of the plug to that of the following connection methods according to your TV. Connecting to the input jacks on your TV Select one of the jack when connecting.
Operating Instructions
Page 13
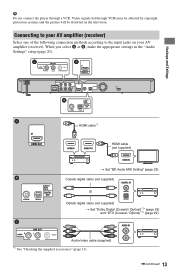
b Do not connect the player through VCRs may be affected by copyright protection systems and the picture will be distorted on your AV amplifier (receiver) Select one of the following ...
b Do not connect the player through VCRs may be affected by copyright protection systems and the picture will be distorted on your AV amplifier (receiver) Select one of the following ...
Operating Instructions
Page 14
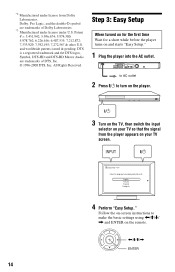
*2 *3 14 Step 3: Easy Setup When turned on for the first time Wait for a short while before the player turns on your TV so that the signal from the player appears on and starts "Easy Setup." 1 Plug the player into the AC outlet. to AC outlet 2 Press [/1 to make the basic settings using Follow the on-screen instructions to turn on the player. 3 Turn on the TV, then switch the input selector on your TV screen. 4 Perform "Easy Setup."
*2 *3 14 Step 3: Easy Setup When turned on for the first time Wait for a short while before the player turns on your TV so that the signal from the player appears on and starts "Easy Setup." 1 Plug the player into the AC outlet. to AC outlet 2 Press [/1 to make the basic settings using Follow the on-screen instructions to turn on the player. 3 Turn on the TV, then switch the input selector on your TV screen. 4 Perform "Easy Setup."
Operating Instructions
Page 15
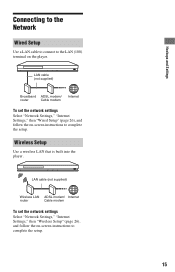
... To set the network settings Select "Network Settings," "Internet Settings," then "Wired Setup" (page 26), and follow the on the player. Wireless Setup Use a wireless LAN that is built into the player. LAN cable (not supplied) Broadband ADSL modem/ router Cable modem Internet To set the network settings Select "Network Settings," "Internet...
... To set the network settings Select "Network Settings," "Internet Settings," then "Wired Setup" (page 26), and follow the on the player. Wireless Setup Use a wireless LAN that is built into the player. LAN cable (not supplied) Broadband ADSL modem/ router Cable modem Internet To set the network settings Select "Network Settings," "Internet...
Operating Instructions
Page 16
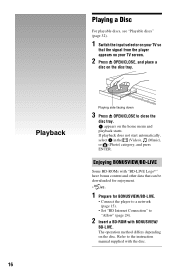
...-LIVE Logo*" have bonus content and other data that the signal from the player appears on your TV screen. 2 Press Z OPEN/CLOSE, and place a disc on the home menu and playback starts. Playing a Disc For playable discs, see "Playable discs" (page 32). 1 Switch the input selector on your TV so that ...can be downloaded for enjoyment. * 1 Prepare for BONUSVIEW/BD-LIVE. • Connect the player to a network (page 15). • Set "BD Internet Connection" to close the disc tray. Playback 16 Playing side facing down 3 Press Z OPEN/CLOSE to "Allow" (page 24). 2 Insert a BD...
...-LIVE Logo*" have bonus content and other data that the signal from the player appears on your TV screen. 2 Press Z OPEN/CLOSE, and place a disc on the home menu and playback starts. Playing a Disc For playable discs, see "Playable discs" (page 32). 1 Switch the input selector on your TV so that ...can be downloaded for enjoyment. * 1 Prepare for BONUSVIEW/BD-LIVE. • Connect the player to a network (page 15). • Set "BD Internet Connection" to close the disc tray. Playback 16 Playing side facing down 3 Press Z OPEN/CLOSE to "Allow" (page 24). 2 Insert a BD...
Operating Instructions
Page 17
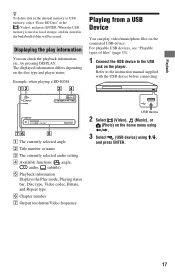
... all data stored in the (Video), and press ENTER. Displaying the play information You can play video/music/photo files on the disc type and player status. Refer to the USB jack on the home menu using Playback z To delete data in the internal memory or USB memory, ...playback information, etc., by pressing DISPLAY. F Chapter number G Output resolution/Video frequency USB device 2 Select (Video), (Music), or (Photo) on the player. For playable USB devices, see "Playable types of files" (page 33). 1 Connect the USB device to the instruction manual supplied with the USB device ...
... all data stored in the (Video), and press ENTER. Displaying the play information You can play video/music/photo files on the disc type and player status. Refer to the USB jack on the home menu using Playback z To delete data in the internal memory or USB memory, ...playback information, etc., by pressing DISPLAY. F Chapter number G Output resolution/Video frequency USB device 2 Select (Video), (Music), or (Photo) on the player. For playable USB devices, see "Playable types of files" (page 33). 1 Connect the USB device to the instruction manual supplied with the USB device ...
Operating Instructions
Page 18
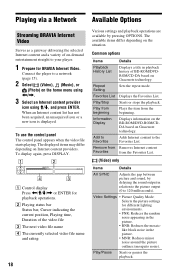
Playing via a Network Available Options Streaming BRAVIA Internet Video Serves as a gateway delivering the selected Internet content and a variety of on-demand entertainment straight to a network (page 15). 2 Select (Video), (Music), or (Photo) on the home menu using Connect the player to your player. 1 Prepare for BRAVIA Internet Video.
Playing via a Network Available Options Streaming BRAVIA Internet Video Serves as a gateway delivering the selected Internet content and a variety of on-demand entertainment straight to a network (page 15). 2 Select (Video), (Music), or (Photo) on the home menu using Connect the player to your player. 1 Prepare for BRAVIA Internet Video.

Operating Instructions
Page 19
Searches for a chapter and starts playback from the beginning. Searches for a title on BD-ROMs/ DVD VIDEOs. Adjusts the picture quality of Internet content. (Photo) only Items Slideshow Speed Slideshow Rotate Left Rotate Right Details Changes the slideshow speed. Switches to other viewing angles when multi-angles are recorded on BDROMs/DVD VIDEOs and starts playback from the beginning. Rotates the photo counterclockwise by 90 degrees. 19 Rotates the photo clockwise by 90 degrees. Displays the BD-ROM's Pop-up Menu or DVD's menu. Plays a slideshow. Playback Items Top...
Searches for a chapter and starts playback from the beginning. Searches for a title on BD-ROMs/ DVD VIDEOs. Adjusts the picture quality of Internet content. (Photo) only Items Slideshow Speed Slideshow Rotate Left Rotate Right Details Changes the slideshow speed. Switches to other viewing angles when multi-angles are recorded on BDROMs/DVD VIDEOs and starts playback from the beginning. Rotates the photo counterclockwise by 90 degrees. 19 Rotates the photo clockwise by 90 degrees. Displays the BD-ROM's Pop-up Menu or DVD's menu. Plays a slideshow. Playback Items Top...
