Limited Warranty
Page 1
...part not available from state to commercial use ; 3-084-930-02 ® DVD Recorder BD Player LIMITED WARRANTY (U.S. Any parts or product replaced under this Limited Warranty, Sony will become the property of the original Limited Warranty period or for hardware or software usage and it...It is valid only in Japan Printed in the United States. any such software is required. Term: For a period of the product, Sony will not be defective. DURATION OF IMPLIED WARRANTIES: EXCEPT TO THE EXTENT PROHIBITED BY APPLICABLE LA W, ANY IMPLIED WARRANTY OF MERCHANTABILITY OR FITNESS...
...part not available from state to commercial use ; 3-084-930-02 ® DVD Recorder BD Player LIMITED WARRANTY (U.S. Any parts or product replaced under this Limited Warranty, Sony will become the property of the original Limited Warranty period or for hardware or software usage and it...It is valid only in Japan Printed in the United States. any such software is required. Term: For a period of the product, Sony will not be defective. DURATION OF IMPLIED WARRANTIES: EXCEPT TO THE EXTENT PROHIBITED BY APPLICABLE LA W, ANY IMPLIED WARRANTY OF MERCHANTABILITY OR FITNESS...
Operating Instructions
Page 1
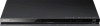
4-169-139-12(1) The software of this player may be updated in Malaysia 4-169-139-12(1) Operating Instructions Blu-ray Disc™ / DVD Player BDP-S370/BX37 © 2010 Sony Corporation To find out details on any available updates, please visit: http://www.sony.com/bluraysupport/ Printed in the future.
4-169-139-12(1) The software of this player may be updated in Malaysia 4-169-139-12(1) Operating Instructions Blu-ray Disc™ / DVD Player BDP-S370/BX37 © 2010 Sony Corporation To find out details on any available updates, please visit: http://www.sony.com/bluraysupport/ Printed in the future.
Operating Instructions
Page 2
... the risk of fire or electric shock, do not expose this product will not occur in this manual could void your authority to operate this Blu-ray Disc/DVD player is harmful to eyes, do not attempt to disassemble the cabinet. Connect the equipment into an outlet on , the user is encouraged to try...
... the risk of fire or electric shock, do not expose this product will not occur in this manual could void your authority to operate this Blu-ray Disc/DVD player is harmful to eyes, do not attempt to disassemble the cabinet. Connect the equipment into an outlet on , the user is encouraged to try...

Operating Instructions
Page 3
...and serial numbers are located at : Customer Information Service 115 Gordon Baker Road, Toronto, Ontario, M2H 3R6 Notes About the Discs • To keep the disc clean, handle the disc by its case. • Clean the disc with a label or sticker on it. - Record the serial number in Canada If this product.... A disc that has cellophane tape or sticker adhesive on it in a car parked in the USA If this product is not working properly, please call 1-877-6022008 for vinyl LPs. • If you call upon your Sony dealer regarding this product is not working...
...and serial numbers are located at : Customer Information Service 115 Gordon Baker Road, Toronto, Ontario, M2H 3R6 Notes About the Discs • To keep the disc clean, handle the disc by its case. • Clean the disc with a label or sticker on it. - Record the serial number in Canada If this product.... A disc that has cellophane tape or sticker adhesive on it in a car parked in the USA If this product is not working properly, please call 1-877-6022008 for vinyl LPs. • If you call upon your Sony dealer regarding this product is not working...
Operating Instructions
Page 4
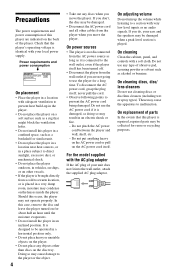
...with the AC plug adaptor If the AC plug of your ears and the speakers may cause damage to the player or the object. 4 • Take out any discs when you move the player. Doing so may be damaged when a peak level section is designed to be operated in a horizontal position...the wall outlet if you don't, the disc may cause the apparatus to malfunction. On cleaning discs, disc/ lens cleaners Do not use cleaning discs or disc/lens cleaners (including wet or spray types). In this case, remove the disc and leave the player turned on the disc tray. To disconnect the AC power cord,...
...with the AC plug adaptor If the AC plug of your ears and the speakers may cause damage to the player or the object. 4 • Take out any discs when you move the player. Doing so may be damaged when a peak level section is designed to be operated in a horizontal position...the wall outlet if you don't, the disc may cause the apparatus to malfunction. On cleaning discs, disc/ lens cleaners Do not use cleaning discs or disc/lens cleaners (including wet or spray types). In this case, remove the disc and leave the player turned on the disc tray. To disconnect the AC power cord,...
Operating Instructions
Page 5
...Do not use this apparatus near any ventilation openings. If you leave the still video image or onscreen display image displayed on your nearest Sony dealer. • Be sure to disconnect the HDMI cable when moving the cart/ apparatus combination to avoid injury from tip-over. 13...your outlet, consult an electrician for an extended period of time. ,continued 5 Make sure the connector is used, use caution when moving the player. • When connecting or disconnecting, do not screw in accordance with the manufacturer's instructions. 8) Do not install near water. 6) Clean ...
...Do not use this apparatus near any ventilation openings. If you leave the still video image or onscreen display image displayed on your nearest Sony dealer. • Be sure to disconnect the HDMI cable when moving the cart/ apparatus combination to avoid injury from tip-over. 13...your outlet, consult an electrician for an extended period of time. ,continued 5 Make sure the connector is used, use caution when moving the player. • When connecting or disconnecting, do not screw in accordance with the manufacturer's instructions. 8) Do not install near water. 6) Clean ...

Operating Instructions
Page 6
14)Refer all servicing to rain or moisture, does not operate normally, or has been dropped. 6 Servicing is required when the apparatus has been damaged in any way, such as power-supply cord or plug is damaged, liquid has been spilled or objects have fallen into the apparatus, the apparatus has been exposed to qualified service personnel.
14)Refer all servicing to rain or moisture, does not operate normally, or has been dropped. 6 Servicing is required when the apparatus has been damaged in any way, such as power-supply cord or plug is damaged, liquid has been spilled or objects have fallen into the apparatus, the apparatus has been exposed to qualified service personnel.
Operating Instructions
Page 7
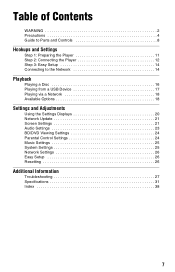
Table of Contents WARNING 2 Precautions 4 Guide to Parts and Controls 8 Hookups and Settings Step 1: Preparing the Player 11 Step 2: Connecting the Player 12 Step 3: Easy Setup 14 Connecting to the Network 14 Playback Playing a Disc 16 Playing from a USB Device 17 Playing via a Network 18 Available Options 18 Settings and Adjustments Using the Settings...
Table of Contents WARNING 2 Precautions 4 Guide to Parts and Controls 8 Hookups and Settings Step 1: Preparing the Player 11 Step 2: Connecting the Player 12 Step 3: Easy Setup 14 Connecting to the Network 14 Playback Playing a Disc 16 Playing from a USB Device 17 Playing via a Network 18 Available Options 18 Settings and Adjustments Using the Settings...
Operating Instructions
Page 8
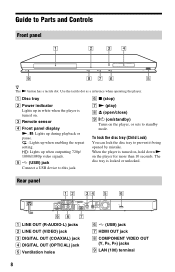
...OUT (Y, PB, PR) jacks I [/1 (on/standby) Turns on . To lock the disc tray (Child Lock) You can lock the disc tray to Parts and Controls Front panel z The N button has a tactile dot. The disc tray is turned on, hold down N on the player for more than 10 seconds. F x (stop) G N (play) H Z (...Front panel display N, X: Lights up during playback or pause. : Lights up when enabling the repeat setting. : Lights up in white when the player is turned on the player, or sets to this jack. E (USB) jack Connect a USB device to standby mode. Use the tactile dot as a reference when operating...
...OUT (Y, PB, PR) jacks I [/1 (on/standby) Turns on . To lock the disc tray (Child Lock) You can lock the disc tray to Parts and Controls Front panel z The N button has a tactile dot. The disc tray is turned on, hold down N on the player for more than 10 seconds. F x (stop) G N (play) H Z (...Front panel display N, X: Lights up during playback or pause. : Lights up when enabling the repeat setting. : Lights up in white when the player is turned on the player, or sets to this jack. E (USB) jack Connect a USB device to standby mode. Use the tactile dot as a reference when operating...

Operating Instructions
Page 9
...button functions only when connected to the Favorites List. FAVORITES (page 18) Displays the Internet content added to a Sony Theater Mode-compatible AV amplifier (receiver) or Sony Theater Modecompatible TV. POP UP/MENU Opens or closes the BD-ROM's Pop-up to 18 of the remote ...returns to standby mode. Selects the sound track on the player, or sets to standby mode. The player automatically returns to standby mode. [/1 (on/standby) Turns on CDs. Adjusts the TV volume. You can be selected appears on the disc or the situation. INPUT Switches between TV and other ...
...button functions only when connected to the Favorites List. FAVORITES (page 18) Displays the Internet content added to a Sony Theater Mode-compatible AV amplifier (receiver) or Sony Theater Modecompatible TV. POP UP/MENU Opens or closes the BD-ROM's Pop-up to 18 of the remote ...returns to standby mode. Selects the sound track on the player, or sets to standby mode. The player automatically returns to standby mode. [/1 (on/standby) Turns on CDs. Adjusts the TV volume. You can be selected appears on the disc or the situation. INPUT Switches between TV and other ...
Operating Instructions
Page 10
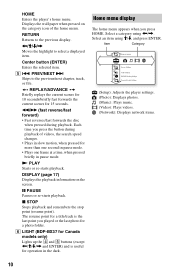
...; Fast reverses/fast forwards the disc when pressed during playback of the home menu. N PLAY Starts or re-starts playback. The resume point for a title/track is the last point you press the button during playback. RETURN Returns to the previous/next chapter, track, or file. F LIGHT (BDP-BX37 for a photo folder. X PAUSE... one second in pause mode. • Plays one frame at a time, when pressed briefly in slow motion, when pressed for 15 seconds. HOME Enters the player's home menu. Displays the wall paper when pressed on the screen.
...; Fast reverses/fast forwards the disc when pressed during playback of the home menu. N PLAY Starts or re-starts playback. The resume point for a title/track is the last point you press the button during playback. RETURN Returns to the previous/next chapter, track, or file. F LIGHT (BDP-BX37 for a photo folder. X PAUSE... one second in pause mode. • Plays one frame at a time, when pressed briefly in slow motion, when pressed for 15 seconds. HOME Enters the player's home menu. Displays the wall paper when pressed on the screen.
Operating Instructions
Page 11
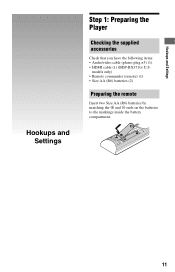
Hookups and Settings Hookups and Settings Step 1: Preparing the Player Checking the supplied accessories Check that you have the following items: • Audio/video cable (phono plug ×3) (1) • HDMI cable (1) (BDP-BX37 for U.S. models only) • Remote commander (remote) (1) • Size AA (R6) batteries (2) Preparing the remote Insert two Size AA (R6) batteries by matching the 3 and # ends on the batteries to the markings inside the battery compartment. 11
Hookups and Settings Hookups and Settings Step 1: Preparing the Player Checking the supplied accessories Check that you have the following items: • Audio/video cable (phono plug ×3) (1) • HDMI cable (1) (BDP-BX37 for U.S. models only) • Remote commander (remote) (1) • Size AA (R6) batteries (2) Preparing the remote Insert two Size AA (R6) batteries by matching the 3 and # ends on the batteries to the markings inside the battery compartment. 11

Operating Instructions
Page 12
Standard quality b Do not connect the player through VCRs may be affected by copyright protection systems and the picture will be distorted on your TV Select one of the jack when connecting. ...). Video signals fed through a VCR. Match the color of the plug to that of the following connection methods according to your TV. Step 2: Connecting the Player Do not connect the AC power cord until you have made all the connections. Connecting to the input jacks on the television. 12
Standard quality b Do not connect the player through VCRs may be affected by copyright protection systems and the picture will be distorted on your TV Select one of the jack when connecting. ...). Video signals fed through a VCR. Match the color of the plug to that of the following connection methods according to your TV. Step 2: Connecting the Player Do not connect the AC power cord until you have made all the connections. Connecting to the input jacks on the television. 12
Operating Instructions
Page 13
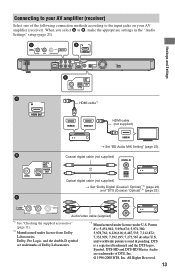
Connecting to your AV amplifier (receiver) Select one of the following connection methods according to the input jacks on your AV amplifier (receiver). Hookups and Settings HDMI cable*1 HDMI cable (not supplied) t Set "BD Audio MIX Setting" (page 23). Coaxial digital cable (not supplied) or Optical digital cable (not supplied) t Set "Dolby Digital (Coaxial / Optical)*2" (page 23) and "DTS (Coaxial / Optical)*3" (page 23). Audio/video cable (supplied) *1 See "Checking the supplied accessories" *3 (page 11). *2 13 When you select A or B, make the appropriate settings in the "Audio ...
Connecting to your AV amplifier (receiver) Select one of the following connection methods according to the input jacks on your AV amplifier (receiver). Hookups and Settings HDMI cable*1 HDMI cable (not supplied) t Set "BD Audio MIX Setting" (page 23). Coaxial digital cable (not supplied) or Optical digital cable (not supplied) t Set "Dolby Digital (Coaxial / Optical)*2" (page 23) and "DTS (Coaxial / Optical)*3" (page 23). Audio/video cable (supplied) *1 See "Checking the supplied accessories" *3 (page 11). *2 13 When you select A or B, make the appropriate settings in the "Audio ...
Operating Instructions
Page 14
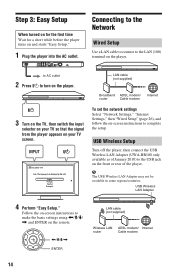
...26), and follow the on -screen instructions to make the basic settings using Follow the on -screen instructions to the LAN (100) terminal on the player. Connecting to the Network Wired Setup Use a LAN cable to connect to complete the setup. b The USB Wireless LAN Adapter may not be available ... LAN Adapter 4 Perform "Easy Setup." to AC outlet 2 Press [/1 to the USB jack on and starts "Easy Setup." 1 Plug the player into the AC outlet. USB Wireless Setup Turn off the player, then connect the USB Wireless LAN Adapter (UWA-BR100 only available as of January 2010) to turn on the...
...26), and follow the on -screen instructions to make the basic settings using Follow the on -screen instructions to the LAN (100) terminal on the player. Connecting to the Network Wired Setup Use a LAN cable to connect to complete the setup. b The USB Wireless LAN Adapter may not be available ... LAN Adapter 4 Perform "Easy Setup." to AC outlet 2 Press [/1 to the USB jack on and starts "Easy Setup." 1 Plug the player into the AC outlet. USB Wireless Setup Turn off the player, then connect the USB Wireless LAN Adapter (UWA-BR100 only available as of January 2010) to turn on the...
Operating Instructions
Page 15
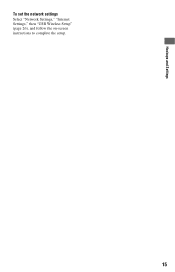
Hookups and Settings To set the network settings Select "Network Settings," "Internet Settings," then "USB Wireless Setup" (page 26), and follow the on-screen instructions to complete the setup. 15
Hookups and Settings To set the network settings Select "Network Settings," "Internet Settings," then "USB Wireless Setup" (page 26), and follow the on-screen instructions to complete the setup. 15
Operating Instructions
Page 16
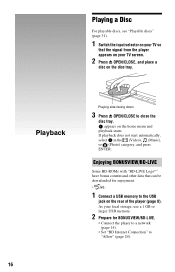
... can be downloaded for BONUSVIEW/BD-LIVE. • Connect the player to a network (page 14). • Set "BD Internet Connection" to the USB jack on the rear of the player (page 8). As your TV screen. 2 Press Z OPEN/CLOSE, and place a disc on the home menu and playback starts. appears on the... disc tray. Enjoying BONUSVIEW/BD-LIVE Some BD-ROMs with "BD-LIVE Logo*" have bonus content...
... can be downloaded for BONUSVIEW/BD-LIVE. • Connect the player to a network (page 14). • Set "BD Internet Connection" to the USB jack on the rear of the player (page 8). As your TV screen. 2 Press Z OPEN/CLOSE, and place a disc on the home menu and playback starts. appears on the... disc tray. Enjoying BONUSVIEW/BD-LIVE Some BD-ROMs with "BD-LIVE Logo*" have bonus content...
Operating Instructions
Page 17
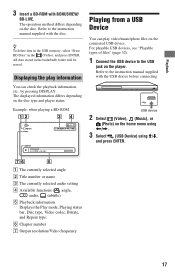
.... For playable USB devices, see "Playable types of files" (page 32). 1 Connect the USB device to the instruction manual supplied with the disc. Playback 3 Insert a BD-ROM with the USB device before connecting. The displayed information differs depending on the home menu using z To delete ... video/music/photo files on the connected USB device. USB device 2 Select (Video), (Music), or (Photo) on the disc type and player status. The operation method differs depending on the player. Refer to the instruction manual supplied with BONUSVIEW/ BD-LIVE. Refer to the USB jack on the...
.... For playable USB devices, see "Playable types of files" (page 32). 1 Connect the USB device to the instruction manual supplied with the disc. Playback 3 Insert a BD-ROM with the USB device before connecting. The displayed information differs depending on the home menu using z To delete ... video/music/photo files on the connected USB device. USB device 2 Select (Video), (Music), or (Photo) on the disc type and player status. The operation method differs depending on the player. Refer to the instruction manual supplied with BONUSVIEW/ BD-LIVE. Refer to the USB jack on the...
Operating Instructions
Page 18
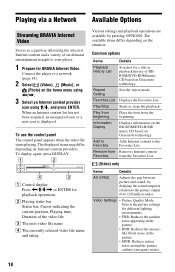
Playing via a Network Available Options Streaming BRAVIA Internet Video Serves as a gateway delivering the selected Internet content and a variety of on the home menu using Connect the player to a network (page 14). 2 Select (Video), (Music), or (Photo) on -demand entertainment straight to your player. 1 Prepare for BRAVIA Internet Video.
Playing via a Network Available Options Streaming BRAVIA Internet Video Serves as a gateway delivering the selected Internet content and a variety of on the home menu using Connect the player to a network (page 14). 2 Select (Video), (Music), or (Photo) on -demand entertainment straight to your player. 1 Prepare for BRAVIA Internet Video.
Operating Instructions
Page 19
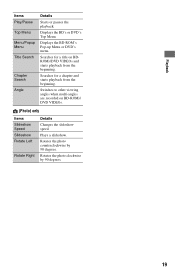
Searches for a chapter and starts playback from the beginning. Switches to other viewing angles when multi-angles are recorded on BDROMs/DVD VIDEOs and starts playback from the beginning. Rotates the photo counterclockwise by 90 degrees. 19 Searches for a title on BD-ROMs/ DVD VIDEOs. (Photo) only Items Slideshow Speed Slideshow Rotate Left Rotate Right Details Changes the slideshow speed. Playback Items Play/Pause Top Menu Menu/Popup Menu Title Search Chapter Search Angle Details Starts or pauses the playback. Displays the BD-ROM's Pop-up Menu or DVD's menu. Plays a ...
Searches for a chapter and starts playback from the beginning. Switches to other viewing angles when multi-angles are recorded on BDROMs/DVD VIDEOs and starts playback from the beginning. Rotates the photo counterclockwise by 90 degrees. 19 Searches for a title on BD-ROMs/ DVD VIDEOs. (Photo) only Items Slideshow Speed Slideshow Rotate Left Rotate Right Details Changes the slideshow speed. Playback Items Play/Pause Top Menu Menu/Popup Menu Title Search Chapter Search Angle Details Starts or pauses the playback. Displays the BD-ROM's Pop-up Menu or DVD's menu. Plays a ...
