Instruction Manual
Page 3
... area and feed dogs 60 - 61 4. KNOWING YOUR SEWING MACHINE Machine identification 6 - 7 Accessories 8 - 9 Setting up your machine 10 - 11 Spool pins 12 - 13 Presser foot lifter, Darning plate 12 - 13 Converting to free-arm sewing 12 - 13 Winding the bobbin 14 - 15 Threading the bobbin thread 16 - 17 Threading the top thread...
... area and feed dogs 60 - 61 4. KNOWING YOUR SEWING MACHINE Machine identification 6 - 7 Accessories 8 - 9 Setting up your machine 10 - 11 Spool pins 12 - 13 Presser foot lifter, Darning plate 12 - 13 Converting to free-arm sewing 12 - 13 Winding the bobbin 14 - 15 Threading the bobbin thread 16 - 17 Threading the top thread...
Instruction Manual
Page 8
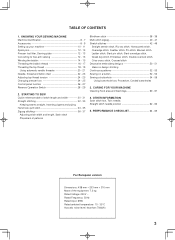
... 9. Darning plate 11. The Satin Foot (12) is called the General Purpose Foot and will be used for needle plate 10. ACCESSORIES 1. Zipper foot 12. Auxiliary spool pin 4. Spool pin cap (large) 8. Blind stitch foot 14. Buttonhole foot The Foot that ...comes on your Sewing machine is another very useful foot and should be used for most of your decorative sewing. 1 2 3 4 5...
... 9. Darning plate 11. The Satin Foot (12) is called the General Purpose Foot and will be used for needle plate 10. ACCESSORIES 1. Zipper foot 12. Auxiliary spool pin 4. Spool pin cap (large) 8. Blind stitch foot 14. Buttonhole foot The Foot that ...comes on your Sewing machine is another very useful foot and should be used for most of your decorative sewing. 1 2 3 4 5...
Instruction Manual
Page 12
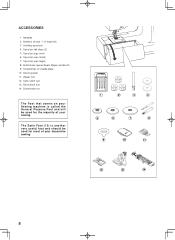
... and secure with both hands and pull it off to the left as shown. PRESSER FOOT LIFTER There are three positions for button sewing, free motion work and free motion darning. Raise needle and presser foot, and position darning plate onto the needle plate with the two pins on the spool pin. bed or...
... and secure with both hands and pull it off to the left as shown. PRESSER FOOT LIFTER There are three positions for button sewing, free motion work and free motion darning. Raise needle and presser foot, and position darning plate onto the needle plate with the two pins on the spool pin. bed or...

Instruction Manual
Page 52
General purpose foot :Darning plate Position your preference. Turn the handwheel to the backside of button. SEWING ON A BUTTON SETTINGS :Presser foot - Helpful Hint: To secure thread, pull both threads to make sure needle clears both left and right openings of the...top of garments and home decorating projects. General purpose foot or Satin Stitch Foot :Thread tension control - Use whichever patterns suit your fabric and button under the presser foot. Adjust width if required. If a button shank is required, place a darning needle on borders or hems of it as illustrated...
General purpose foot :Darning plate Position your preference. Turn the handwheel to the backside of button. SEWING ON A BUTTON SETTINGS :Presser foot - Helpful Hint: To secure thread, pull both threads to make sure needle clears both left and right openings of the...top of garments and home decorating projects. General purpose foot or Satin Stitch Foot :Thread tension control - Use whichever patterns suit your fabric and button under the presser foot. Adjust width if required. If a button shank is required, place a darning needle on borders or hems of it as illustrated...
Instruction Manual
Page 64
...damaged.- Stitches are formed. Guide it gently. * Needle size is not threaded correctly. - See page 62 - 63. Draw both threads back under presser foot before starting seam. - Needle thread breaks. * Machine is bent. - See page 24 - 25. * Needle is not threaded correctly. - Shorten stitch ... case is too tight. - Turn on needle place - Clean hook (see page 22 - 23). * Needle size is not lowered when sewing buttonhole. - Remove darning plate. Replace needle (see page 60 - 61). * Needle is not raised when sewing stitch patterns. - Remove lint (see page 60 - 61). 5. Raise ...
...damaged.- Stitches are formed. Guide it gently. * Needle size is not threaded correctly. - See page 62 - 63. Draw both threads back under presser foot before starting seam. - Needle thread breaks. * Machine is bent. - See page 24 - 25. * Needle is not threaded correctly. - Shorten stitch ... case is too tight. - Turn on needle place - Clean hook (see page 22 - 23). * Needle size is not lowered when sewing buttonhole. - Remove darning plate. Replace needle (see page 60 - 61). * Needle is not raised when sewing stitch patterns. - Remove lint (see page 60 - 61). 5. Raise ...

