Singer 1408 PROMISE Support and Manuals
Get Help and Manuals for this Singer item

View All Support Options Below
Free Singer 1408 PROMISE manuals!
Problems with Singer 1408 PROMISE?
Ask a Question
Free Singer 1408 PROMISE manuals!
Problems with Singer 1408 PROMISE?
Ask a Question
Most Recent Singer 1408 PROMISE Questions

The Inside Of My Bobbin Compartment Has Come Out And I Am Not Sure How To Put It
The inside of my bobbin compartment has come out and I cannot seem to get it back in
The inside of my bobbin compartment has come out and I cannot seem to get it back in
(Posted by teresaandted10 6 months ago)

How Many Walt's Put In Singer 1408
How many WaltS in Singer 1408 Swing Mechine
How many WaltS in Singer 1408 Swing Mechine
(Posted by lakshya113448 7 years ago)
Singer 1408 PROMISE Videos

Singer 1408 Promise Sewing Machine - Heavy Duty
Duration: 2:42
Total Views: 20,773
Duration: 2:42
Total Views: 20,773
Tutorial Mesin Jahit:Singer 1408 Promise
Duration: 13:22
Total Views: 273
Duration: 13:22
Total Views: 273
Singer 1408 Promise Sewing Machine - Features
Duration: 4:30
Total Views: 100,500
Duration: 4:30
Total Views: 100,500
Popular Singer 1408 PROMISE Manual Pages
Instruction Manual 11 - Page 2
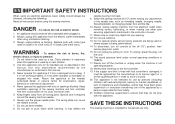
... is not intended for use as a toy. Replace bulb with any adjustments
in the instruction manual. 11. Close attention is intended for its intended use by the manufacturer or its service agent or a similar qualified person in this sewing machine. Use only attachments recommended by a person responsible for examination, repair, electrical or mechanical adjustment. 4. Return the...
Instruction Manual 11 - Page 6
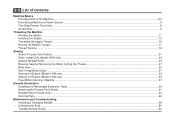
... ...31 Sewing on Buttons (Model 1408 only)...33 Sewing on Buttons (Model 1409 only)...35 Free Motion Darning, Stippling...37
General Information Installing the Removable Extension Table ...39 Attaching the Presser Foot Shank...41 Needle/Fabric/Thread Chart...43 Darning Plate...46
Maintenance and Troubleshooting Inserting & Changing Needle ...48 Changing the Bulb...50 Troubleshooting Guide ...52
Instruction Manual 11 - Page 9
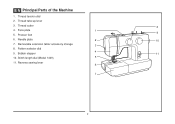
Pattern selector dial 9. Thread take-up lever 3. Face plate 5. Thread tension dial 2. Presser foot 6. Reverse sewing lever
2 Bobbin stopper 10. Thread cutter 4. Removable extension table/ accessory storage 8. Needle plate 7. EN Principal Parts of the Machine
1. Stitch length dial (Model 1409) 11.
Instruction Manual 11 - Page 22
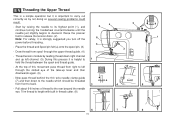
... pass thread from spool through the slotted eye of the take-up left through the upper thread guide. (4) - Start by not doing so several sewing problems could result. - Now pass thread behind the thin wire needle clamp guide (7) and then down right channel and up lever and then downwards again. (6) - Trim thread to carry...
Instruction Manual 11 - Page 26
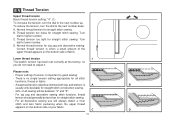
... tension for zig zag and decorative sewing. Correct thread tension is when a small amount of the upper thread appears on the bottom side of tension is A
B
usually only desirable for straight stitch sewing.
Proper setting of your fabric. C
D
19 EN Thread Tension
Upper thread tension Basic thread tension setting: "4". (1) To increase the tension, turn the...
Instruction Manual 11 - Page 28
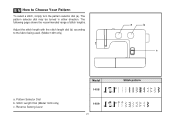
The following page shows the recommended range of stitch lengths. Stitch Length Dial (Model 1409 only) c. EN How to the fabric being used. (Model 1409 only)
a
b
c
a. Reverse Sewing Lever
3
4
2
1
3
4
2
1
21 Adjust the stitch length with the stitch length dial (b) according to Choose Your Pattern
To select a stitch, simply turn the pattern selector dial (a). ...
Instruction Manual 11 - Page 30
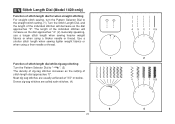
... stitches are usually achieved at "2.5" or below.
EN Stitch Length Dial (Model 1409 only)
Function of stitch length dial for when straight stitching For straight stitch sewing, turn the Pattern Selector Dial to " ". (3) The density of zig-zag stitches increases as the setting of stitch length dial approaches "0". The length of the individual stitches...
Instruction Manual 11 - Page 32
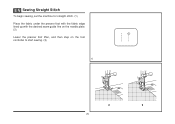
EN Sewing Straight Stitch
To begin sewing, set the machine for straight stitch. (1) Place the fabric under the presser foot with the fabric edge lined up with the desired seam guide line on the needle plate. (2) Lower the presser foot lifter, and then step on the foot controller to start sewing. (3)
1
2
3
25
Instruction Manual 11 - Page 38

... many stitches in the " " range to the next step. It is raised before turning the Pattern Selector Dial to set stitch density. The zig-zag should sew over the heavy thread or cord. (A)
31
3 4
1 2
(a) (b) 3 4
2 1
Model 1409 only
3
4
2
1
A Measure diameter and thickness of the buttonhole foot (b). Take off the all purpose foot and attach the...
Instruction Manual 11 - Page 40
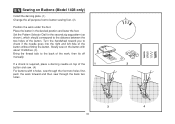
Set ... position and lower the foot. Slowly sew on the button with 4 holes, sew through the front two holes first, push the work forward and then sew through the back two holes.
3...1
2
button and sew. (4)
For buttons with about 10 stitches. (3)
Bring the thread tails to button sewing foot. (2)
Position the work under the foot. EN Sewing on Buttons (Model 1408 only)
Install the darning plate. ...
Instruction Manual 11 - Page 42
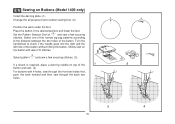
EN Sewing on Buttons (Model 1409 only)
Install the darning plate. (1) Change the all purpose foot to the distance between the two holes of the button.
Select pattern " " and sew a few securing stitches. Turn the handwheel to check if the needle goes into the right and the left hole of the
1
2
button and sew. (4)
For buttons with...
Instruction Manual 11 - Page 44
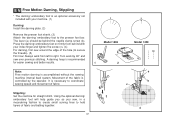
... and batting together.
37
Model 1408 2
3
Model 1409
a b c 5
4 It is necessary to hold layers of the hole (to secure
the threads). (5)
First row: Always work by the operator. Using the optional darning/ embroidery foot will help guide you as you sew, in a meandering fashion to create small curving lines to coordinate sewing speed and movement of the...
Instruction Manual 11 - Page 55
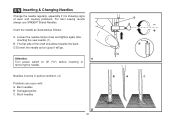
Loosen the needle clamp screw and tighten again after inserting the new needle. (1)
B. The flat side of wear and causing problems. For best sewing results always use SINGER® Brand Needles. C/D.Insert the needle as far up as follows:
A. Damaged points C. Bent needles B. Attention:
1
Turn power switch to off ("O") before inserting or
removing ...
Instruction Manual 11 - Page 57
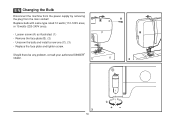
... face plate and tighten screw.
Loosen screw (A) as illustrated. (1) - Should there be any problem, consult your authorized SINGER®
retailer.
1
A B
2
C
3
50 EN Changing the Bulb
Disconnect the machine from the power supply by removing the plug from the main socket! Replace bulb with same type rated 10 watts (110-120V area) or 15 watts...
Instruction Manual 11 - Page 59
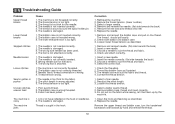
... fabric/ thread combination is damaged. 3.
Reduce the thread tension. (lower number) 3. Replace the needle. 1. Select the correct foot. 1. Do not pull on the thread. ...sewing, let it be taken up by hand and remove the thread.
52 Choose a needle to suit the thread and fabric. 4. EN Troubleshooting Guide
Problem Upper thread breaks
Lower thread breaks
Cause 1. The machine...
Singer 1408 PROMISE Reviews
We have not received any reviews for Singer yet.