Singer CE-350 Futura Support and Manuals
Get Help and Manuals for this Singer item

View All Support Options Below
Free Singer CE-350 Futura manuals!
Problems with Singer CE-350 Futura?
Ask a Question
Free Singer CE-350 Futura manuals!
Problems with Singer CE-350 Futura?
Ask a Question
Most Recent Singer CE-350 Futura Questions

My Thread Is Stuck
My thread is stuck in part of the thread guide. How can I remove it?
My thread is stuck in part of the thread guide. How can I remove it?
(Posted by diabeen 1 year ago)

Dropped Embroidery Unit Now Will Not Work 88shows On Machine
(Posted by patricklindadowney 9 years ago)
Popular Singer CE-350 Futura Manual Pages
Instruction Manual - Page 3
... 82 - 83 Attaching and removing embroidery hoop 82 - 83 Installation of software 84 - 87 Operation switches when embroidery unit is attached ------ 88 - 89 Operation switches, Thread tension control Troubleshooting 90 - 101
4. PREPARATION FOR EMBROIDERY SEWING Before attaching embroidery unit 70 - 73
Attaching embroidery foot, Inserting the bobbin, Setting top thread, Picking up bobbin...
Instruction Manual - Page 6
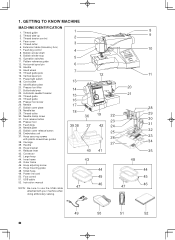
... 15. Thread guide pole 16. Thread guide 25. Thread cutter 30. Presser foot 33. Hoop securing screws
with your machine when doing embroidery sewing.
1 2 3 4 5 6 7 13 14 15 16 17 18
39 38
47
36 37
40 43
12
19 42
41 44 45 46
20 21
22 23 24 25 26 27
48
47
8 9
10
11
28...
Instruction Manual - Page 8
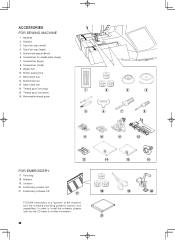
... 4. Zipper foot 10. Thread spool net (long) 15. Removable thread guide
1
2
3
4
5
6
7
8
9
10
11
12
13
FOR EMBROIDERY
17. Embroidery software CD
17
FUTURA embroidery is a "system" of the machine and the software providing powerful options and capabilities. Buttonhole foot 13. Thread spool net (short) 16. ACCESSORIES FOR SEWING MACHINE
1. Button sewing foot 11.
Instruction Manual - Page 10
... accessories.
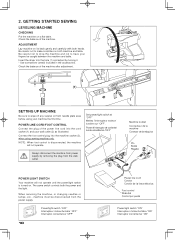
Check the balance of the machine. Set power/light switch at "OFF"
Mettez l'interrupteur moteur/ lumière sur "OFF". The same switch controls both hands. 2. GETTING STARTED SEWING
LEVELING MACHINE
CHECKING
Put the machine on . Be careful not to drop the machine and not to wipe off any surplus oil from the power supply. When servicing...
Instruction Manual - Page 26
... move the control knobs while sewing slowly.
*Pattern reference guide
Patterns in orange without blinking and a beep will sound indicating you can be sewn with circled numbers cannot be changed. Some patterns offer more opportunities for straight stitch. Stitch length and width/needle position controls
*Auto/Default settings Your sewing machine will produce most of...
Instruction Manual - Page 38
... Control. HAND-LOOK QUILT STITCH
This stitch is released.
2. Set the stitich length at 4 (maximum). 5. If the machine stops from the beginning, push the start switch again.
STRAIGHT ... Thread machine with desired top stitching color. 2. Start to look like hand sewing for the piping.
Helpful Hint: Slight adjusting of the foot. Press the foot control and the machine will sew 4 ...
Instruction Manual - Page 40
... is the selection range when setting the value manually. SATIN STITCH
This is set automatically when pattern (No. ...Set length between 0.5 and 2.0.
ZIGZAG STITCHING
SETTINGS :Presser foot - PLACEMENT OF PATTERNS
Stitch width of stabilizer to help avoid stitches puckering the fabric.
E
The top thread may appear on the bottom depending on the thread, fabric, type of stitch and sewing...
Instruction Manual - Page 42
... the zigzag part of the fabric. Sew slowly, guiding the fabric carefully along the edge of the fabric.
S - BLIND STITCH
SETTINGS :Presser foot - It should
just pierce the fold of the guide.
4. Zigzag...Envers
Under side Reverso Envers
B
3. NOTE: For a narrower or wider blindhem, first manually adjust the length and width controls to form a shell hem. Then turn the hem up...
Instruction Manual - Page 68
... button to create larger buttonholes.
* Carefully mark the buttonhole length on your garment. NOTE: If stitch length is manually set the stitch length at the beginning of buttonhole.
3. Stitch forward to complete buttonhole.
4. Sew second bartack and stitch backward until needle
1
reaches beginning of the buttonhole. Place the fabric with the buttonhole marked...
Instruction Manual - Page 86
... a lack of the FUTURA software files to the given directory on the hard disk.
Next attach the embroidery unit to your hard disk, an error message will prompt you plan to work with the installation. Attach the hoop that you to free some hard disk space before proceeding with to your computer and sewing machine.
1. You are now...
Instruction Manual - Page 88
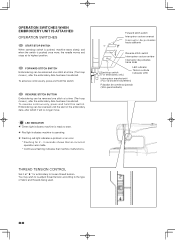
... arrière
interruptor de puntadas hacia atrás
Start/stop switch is pushed, machine starts slowly, and when the switch is operating. Flashing red light indicates a problem or an error.
* Flashing for embroidery to start. Red light indicates machine is pushed once more, the needle moves and stops at " E " for 2 - 3 seconds shows...
Instruction Manual - Page 94
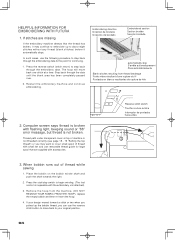
... then re-insert the hoop.
4. HELPFUL INFORMATION FOR EMBROIDERING WITH FUTURA
1.
Remove the hoop from thread breakage Points vides résultant d'une rupture du fil Puntadas en blanco resultantes de ruptura de hilo
2.
Restart the embroidery machine and continue embroidering. Computer screen says thread is not threaded correctly (see page 18 - 19 "Setting the top thread") or...
Instruction Manual - Page 98
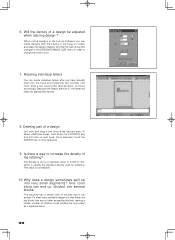
....
When sizing designs in the Futura software you have brought them into the hoop and exited the text window. Will the density of a ...set to a standard value of 4/10th of stitches (could possibly be only a few) as a separate block.
98 Deleting part of a design be changed in the DESIGN/CHANGE SIZE menu in order to increase the density of stitches that are built-in the hoop...
Instruction Manual - Page 114
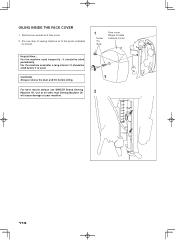
... Plaque frontale
Cubierta frontal
Helpful Hints : For the machine used frequently : It should be oiled periodically.
CAUTION: Always remove the dust and lint before it is used after a long interval : It should be oiled before oiling.
F or best results always use SINGER Brand Sewing Machine Oil. Use of sewing machine oil to your machine.
114 OILING INSIDE THE...
Instruction Manual - Page 124
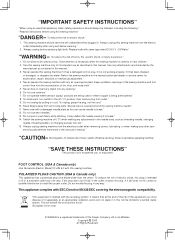
...this manual." 3. "IMPORTANT SAFETY INSTRUCTIONS"
" When using this sewing machine." "DANGER--To reduce the risk of lint, dust, and loose cloth." 5.
Return the sewing machine to the off before replacing light bulb. Special care is being administered." 8. This will benefit the environment for examination, repair, electrical or mechanical adjustment." 4. " Read all moving parts...
Singer CE-350 Futura Reviews
We have not received any reviews for Singer yet.