Instruction Manual
Page 3
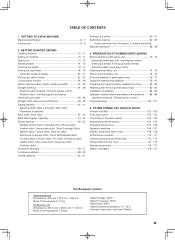
... Oiling inside the face cover 114 - 115 Special accessories 116 - 117 Helpful messages 118 - 121 For European version Sewing machine Dimensions: 428 mm × 307 mm × 294 mm Mass of the equipment: 10 kg Embroidery unit Dimensions: 433.5 mm × 269.5 mm × 133 mm Mass of patterns Blind stitch, Shell stitch...
... Oiling inside the face cover 114 - 115 Special accessories 116 - 117 Helpful messages 118 - 121 For European version Sewing machine Dimensions: 428 mm × 307 mm × 294 mm Mass of the equipment: 10 kg Embroidery unit Dimensions: 433.5 mm × 269.5 mm × 133 mm Mass of patterns Blind stitch, Shell stitch...
Instruction Manual
Page 6
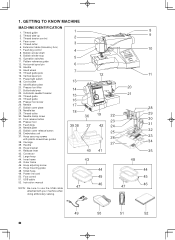
... dog control 8. Handle 14. Power/light switch 18. Presser foot lifter 21. Presser foot screw 26. Bobbin cover plate 28. Presser foot 33. Embroidery unit 37. Small hoop 49. Thread take-up 3. Extension table (Accessory box) 7. Horizontal spool pin 13. Hand wheel 15. Buttonhole lever 22.... Vertical spool pin 17. 1. Thread cutter 6. Hoop bracket 41. Needle 27. Release lever 42. Needle clamp screw 31. Hoop securing screws with your machine when doing embroidery sewing. 1 2 3 4 5 6 7 13 14 15 16 17 18 39 38 47 36 37 40 43 12 19 42 41 44 45 46 20...
... dog control 8. Handle 14. Power/light switch 18. Presser foot lifter 21. Presser foot screw 26. Bobbin cover plate 28. Presser foot 33. Embroidery unit 37. Small hoop 49. Thread take-up 3. Extension table (Accessory box) 7. Horizontal spool pin 13. Hand wheel 15. Buttonhole lever 22.... Vertical spool pin 17. 1. Thread cutter 6. Hoop bracket 41. Needle 27. Release lever 42. Needle clamp screw 31. Hoop securing screws with your machine when doing embroidery sewing. 1 2 3 4 5 6 7 13 14 15 16 17 18 39 38 47 36 37 40 43 12 19 42 41 44 45 46 20...
Instruction Manual
Page 8
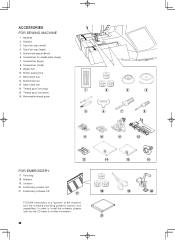
... (small) 9. Vinyl bag 18. Bobbins 3. Buttonhole opener/Brush 6. Thread spool net (long) 15. Bobbins 19. ACCESSORIES FOR SEWING MACHINE 1. Spool pin cap (small) 4. Satin stitch foot 14. Embroidery software CD 17 FUTURA embroidery is a "system" of the machine and the software providing powerful options and capabilities. In order to install the software, please look into the...
... (small) 9. Vinyl bag 18. Bobbins 3. Buttonhole opener/Brush 6. Thread spool net (long) 15. Bobbins 19. ACCESSORIES FOR SEWING MACHINE 1. Spool pin cap (small) 4. Satin stitch foot 14. Embroidery software CD 17 FUTURA embroidery is a "system" of the machine and the software providing powerful options and capabilities. In order to install the software, please look into the...

Instruction Manual
Page 34
Place the fabric under the presser foot toward the back of the material, stop switch (For embroidery only) E. Start the machine. KEEPING SEAMS STRAIGHT To keep the seam straight, use one of the face cover, as those in its center position. General Purpose Foot ...you until the needle enters the fabric. 5 5. Draw the 6 fabric to the rear and cut off excess thread with your hands. Start/stop the sewing machine. 6. Let's set the machine for narrow seams, such as shown. Feed dog control F. SETTINGS Presser foot - Needle stop position selector switch C.
Place the fabric under the presser foot toward the back of the material, stop switch (For embroidery only) E. Start the machine. KEEPING SEAMS STRAIGHT To keep the seam straight, use one of the face cover, as those in its center position. General Purpose Foot ...you until the needle enters the fabric. 5 5. Draw the 6 fabric to the rear and cut off excess thread with your hands. Start/stop the sewing machine. 6. Let's set the machine for narrow seams, such as shown. Feed dog control F. SETTINGS Presser foot - Needle stop position selector switch C.
Instruction Manual
Page 70
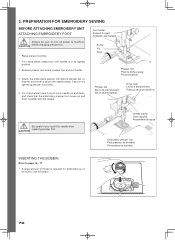
...machine CAUTION before changing presser foot. * Raise presser foot lifter. * Turn hand wheel toward you to touch the needle when CAUTION replacing presser foot. Needle clamp Serre-aiguille Abrazadera de aguja Embroidery presser foot Pied presseur de broderie Prensatelas de bordado 70 PREPARATION FOR EMBROIDERY SEWING BEFORE ATTACHING EMBROIDERY UNIT ATTACHING EMBROIDERY... needle up and down, and check that the drive lever is above the needle clamp. Attach the embroidery presser foot behind presser bar so that the embroidery presser foot moves up and down together with the needle. 3.
...machine CAUTION before changing presser foot. * Raise presser foot lifter. * Turn hand wheel toward you to touch the needle when CAUTION replacing presser foot. Needle clamp Serre-aiguille Abrazadera de aguja Embroidery presser foot Pied presseur de broderie Prensatelas de bordado 70 PREPARATION FOR EMBROIDERY SEWING BEFORE ATTACHING EMBROIDERY UNIT ATTACHING EMBROIDERY... needle up and down, and check that the drive lever is above the needle clamp. Attach the embroidery presser foot behind presser bar so that the embroidery presser foot moves up and down together with the needle. 3.
Instruction Manual
Page 74
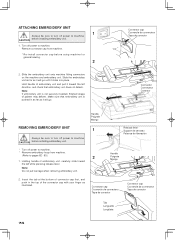
... be sure to turn off power to machine CAUTION before installing embroidery unit. * Turn off power to machine. * Remove embroidery hoop from machine. * Re-install connector cap before installing embroidery unit. 1. Turn off power to pages 82 - 83.) 2 1. Remove connector cap from machine. (Refer to machine CAUTION before using machine for general sewing. 2 2. Make sure that embroidery unit does not detach.
... be sure to turn off power to machine CAUTION before installing embroidery unit. * Turn off power to machine. * Remove embroidery hoop from machine. * Re-install connector cap before installing embroidery unit. 1. Turn off power to pages 82 - 83.) 2 1. Remove connector cap from machine. (Refer to machine CAUTION before using machine for general sewing. 2 2. Make sure that embroidery unit does not detach.
Instruction Manual
Page 86
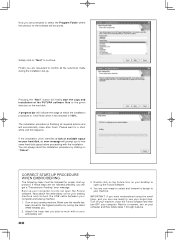
... . Turn on your desktop to your sewing machine. Make sure the needle has been moved to your large hoop. Finally you are now ready to select and transmit a design to open the Futura software. Pressing the "Next" button will finish when it has reached to use your embroidery unit. 3. It will finally start -up...
... . Turn on your desktop to your sewing machine. Make sure the needle has been moved to your large hoop. Finally you are now ready to select and transmit a design to open the Futura software. Pressing the "Next" button will finish when it has reached to use your embroidery unit. 3. It will finally start -up...
Instruction Manual
Page 94
... the embroidery machine detects that...arrête automatiquement Para automáticamente Blank stitches resulting from the machine, (DO NOT REMOVE YOUR FABRIC FROM THE HOOP), replace the empty...-insert the hoop. 4. When bobbin runs out of thread with the embroidery unit attached). 3. Remove the hoop from thread breakage Points vides ré...Thread path under transparent cover at top of machine is not broken. Step back through the embroidery data. The hoop will move back to ...sewing 1. Restart the embroidery machine and continue embroidering. HELPFUL INFORMATION FOR EMBROIDERING WITH...
... the embroidery machine detects that...arrête automatiquement Para automáticamente Blank stitches resulting from the machine, (DO NOT REMOVE YOUR FABRIC FROM THE HOOP), replace the empty...-insert the hoop. 4. When bobbin runs out of thread with the embroidery unit attached). 3. Remove the hoop from thread breakage Points vides ré...Thread path under transparent cover at top of machine is not broken. Step back through the embroidery data. The hoop will move back to ...sewing 1. Restart the embroidery machine and continue embroidering. HELPFUL INFORMATION FOR EMBROIDERING WITH...
Instruction Manual
Page 102
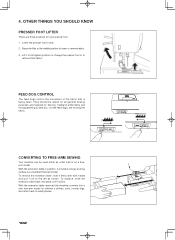
... hard-to the left as a standard flat-bed model. bed or as a flat- CONVERTING TO FREE-ARM SEWING Your machine can be raised for all general sewing purposes and lowered for darning, freehand embroidery and monogramming so that is being sewn. 4. Raise the lifter to the middle position to... sew. 2. They should be used either as a freearm model. To replace, slide the extension table back into a ...
... hard-to the left as a standard flat-bed model. bed or as a flat- CONVERTING TO FREE-ARM SEWING Your machine can be raised for all general sewing purposes and lowered for darning, freehand embroidery and monogramming so that is being sewn. 4. Raise the lifter to the middle position to... sew. 2. They should be used either as a freearm model. To replace, slide the extension table back into a ...

Instruction Manual
Page 106
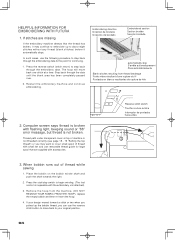
... carried out while the reverse stitch button is pushed. The machine will continue to sew in the pattern where the reverse/tacking stitch button is pushed. START/STOP SWITCH This switch works only when sewing embroidery. LED INDICATOR Green light indicates machine is operating. Flashing red light indicates a problem or an error. * Flashing...
... carried out while the reverse stitch button is pushed. The machine will continue to sew in the pattern where the reverse/tacking stitch button is pushed. START/STOP SWITCH This switch works only when sewing embroidery. LED INDICATOR Green light indicates machine is operating. Flashing red light indicates a problem or an error. * Flashing...


