
Instruction Manual
Page 6
KNOWING YOUR SEWING MACHINE MACHINE IDENTIFICATION 1. Face cover 5. Identification plate 16. Automatic needle threader 19. Bobbin cover plate 24. Feed dogs 30. Foot control 34. 1. Bobbin winder stop 9. Handle 12. .... Cord socket 15. Presser foot 29. Power/light switch 14. Bobbin cover release button 32. Thread cutter 6. Presser foot lifter 17. Thread guide 21. Instruction manual 1 2 3 4 5 6 11 12 13 14 18 19 20 21 22 23 7 8 9 10 15 16 17 24 25 26 27 28 29 30 31 32 33 34...
KNOWING YOUR SEWING MACHINE MACHINE IDENTIFICATION 1. Face cover 5. Identification plate 16. Automatic needle threader 19. Bobbin cover plate 24. Feed dogs 30. Foot control 34. 1. Bobbin winder stop 9. Handle 12. .... Cord socket 15. Presser foot 29. Power/light switch 14. Bobbin cover release button 32. Thread cutter 6. Presser foot lifter 17. Thread guide 21. Instruction manual 1 2 3 4 5 6 11 12 13 14 18 19 20 21 22 23 7 8 9 10 15 16 17 24 25 26 27 28 29 30 31 32 33 34...
Instruction Manual
Page 26
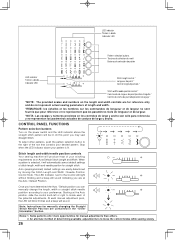
...manually changing the Straight Stitch Needle Position are easily determined by moving the Stitch Length and Width / Needle Position Control Knob. Once you have determined the Auto / Default position you may sew Straight Stitch. Stitch length and width/needle position controls Your sewing machine will automatically sew...stitch length, width and needle position for reference only and do not represent actual sewing parameters of the potential adjustments. Note: Instructions for manual adjustments than others. 2. Notes: 1. CONTROL PANEL FUNCTIONS Pattern selection buttons Turn...
...manually changing the Straight Stitch Needle Position are easily determined by moving the Stitch Length and Width / Needle Position Control Knob. Once you have determined the Auto / Default position you may sew Straight Stitch. Stitch length and width/needle position controls Your sewing machine will automatically sew...stitch length, width and needle position for reference only and do not represent actual sewing parameters of the potential adjustments. Note: Instructions for manual adjustments than others. 2. Notes: 1. CONTROL PANEL FUNCTIONS Pattern selection buttons Turn...
Instruction Manual
Page 36
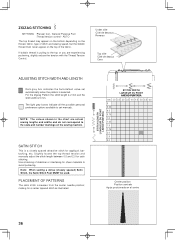
...thread may appear on the bottom depending on the thread, fabric, type of stitch and sewing speed, but the bobbin thread must never appear on the sewing machine. SATIN STITCH This is 5 mm. Note: When sewing a dense (closely spaced) Satin Stitch, the Satin Stitch Foot MUST be used. PLACEMENT...available to set automatically when the pattern is pulling to the top or you are actual sewing lengths and widths and do not correspond to avoid puckering. Slightly loosen the top thread tension and manually adjust the stitch length between 0.5 and 2.0 for appliqué, bartacking, etc. ZIGZAG...
...thread may appear on the bottom depending on the thread, fabric, type of stitch and sewing speed, but the bobbin thread must never appear on the sewing machine. SATIN STITCH This is 5 mm. Note: When sewing a dense (closely spaced) Satin Stitch, the Satin Stitch Foot MUST be used. PLACEMENT...available to set automatically when the pattern is pulling to the top or you are actual sewing lengths and widths and do not correspond to avoid puckering. Slightly loosen the top thread tension and manually adjust the stitch length between 0.5 and 2.0 for appliqué, bartacking, etc. ZIGZAG...
Instruction Manual
Page 68
... of electric shock:" 1. "Switch the sewing machine off ("0") position, then remove plug from the electrical outlet when removing covers, lubricating, or when making any other ). Always unplug this manual." 3. To reduce the risk of The Singer Company Ltd or its intended use , or...10. If the plug does not fit fully in the normal domestic unsorted waste stream. "Never operate the sewing machine with a damaged needle plate as described in the instruction manual." "Do not operate where aerosol (spray) products are being administered." 8. "Never drop or insert any...
... of electric shock:" 1. "Switch the sewing machine off ("0") position, then remove plug from the electrical outlet when removing covers, lubricating, or when making any other ). Always unplug this manual." 3. To reduce the risk of The Singer Company Ltd or its intended use , or...10. If the plug does not fit fully in the normal domestic unsorted waste stream. "Never operate the sewing machine with a damaged needle plate as described in the instruction manual." "Do not operate where aerosol (spray) products are being administered." 8. "Never drop or insert any...


