Singer 7469Q Confidence Quilter Support Question
Singer 7469Q Confidence Quilter Support Question
Find answers below for this question about Singer 7469Q Confidence Quilter.Need a Singer 7469Q Confidence Quilter manual? We have 1 online manual for this item!
Question posted by hmh612 on March 10th, 2013
Darning Foot Problem
The bent wire at the top of my darning foot keeps falling off when I am quilting. Is it supposed to be inserted into something to prevent this?
Current Answers
Related Singer 7469Q Confidence Quilter Manual Pages
Instruction Manual - Page 3
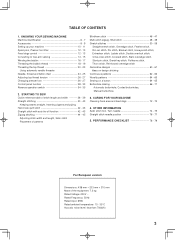
STARTING TO SEW Quick reference table of stitch length and width 36 - 39 Straight stitching 40 - 43 Keeping seams straight, Inserting zippers and piping Hand-look quilt stitch 42 - 43 Straight stitch with auto tie-off function 42 - 43 Zigzag stitching 44 - 45 Adjusting stitch width and length, Satin stitch Placement of ...
Instruction Manual - Page 6
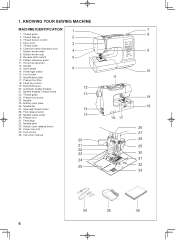
... Pattern reference guide 11. Needle clamp screw 30. Power line cord 35. Foot control 36. KNOWING YOUR SEWING MACHINE
MACHINE IDENTIFICATION
1. Identification plate 17. Needle 25. Instruction manual
1 2 3 4 ...32. Power/light switch 15. Feed dog control 19. Thread cutter 6. Presser foot screw 24. Needle bar 27. Needle threader Thread Guide 22. Bobbin cover release...
Instruction Manual - Page 8
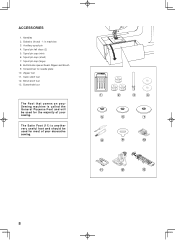
... for the majority of your sewing. Satin stitch foot 12. The Satin Foot (11) is called the General Purpose Foot and will be used for needle plate 10. Zipper foot 11. Spool pin cap (small) 7. Blind stitch foot 13. Needles 2. Buttonhole foot
The Foot that comes on your Sewing machine is another very useful foot and should be used for most...
Instruction Manual - Page 10
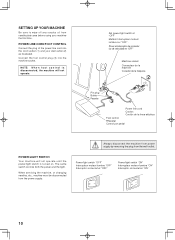
... máquina
2
1
Pin plug Butée Pasador
3
Power line cord Cordon Cordón de la linea eléctrica Foot control Rhéostat Control por pedal
POWER/LIGHT SWITCH
Your machine will not operate.
Power/light switch "OFF" Interrupteur moteur/lumière "OFF" Interruptor corriente/luz "OFF"
Power/light switch...
Instruction Manual - Page 12
... foot to insert or remove fabric.
3.
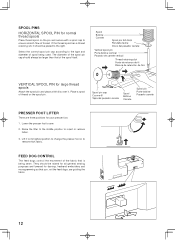
FEED DOG CONTROL
The feed dogs control the movement of thread on the pin and secure with a spool cap to the right.
Select the correct spool pin cap according to remove thick fabric.
Lift it should always be raised for all general sewing purposes and lowered for darning...
Instruction Manual - Page 14
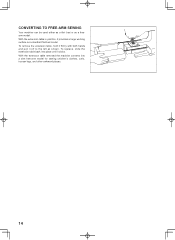
... table back into a slim free-arm model for sewing children's clothes, cuffs, trouser legs, and other awkward places.
14 bed or as a standard flat-bed model. With the extension table removed the machine converts into place until it off to the left ...extension table, hold it firmly with both hands and pull it clicks. CONVERTING TO FREE-ARM SEWING
Your machine can be used either as shown.
Instruction Manual - Page 24
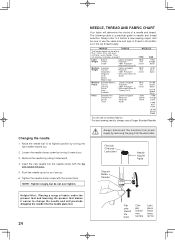
...Medium- Insert the new needle into the needle plate slot.
24
Flat side toward you .
2. Changing the needle
1. NOTE: Tighten snugly, but do not over tighten. And be of fabric under the presser foot and lowering the presser foot makes ...the needle by removing the plug from power supply by pulling it before a new sewing project. Always disconnect the machine from the wall-outlet.
Instruction Manual - Page 26
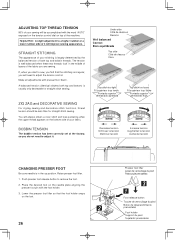
... foot.
2
26
Presser foot lifter Levier de verrouillage du pied Palanca pie prensatelas
3 1
Foot release button Touche de verrouillage du pied Boton de desprendimiento prensatelas
Foot holder Support du pied Sujetador prensatelas Push presser foot release button to sew, you find that the foot holder snaps
on top of your fabric. STRAIGHT STITCHING
The appearance of the machine...
Instruction Manual - Page 30
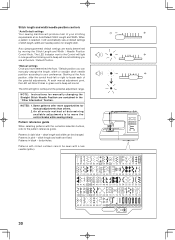
... Stitch Length and Width / Needle Position Control Knob. At each of the potential adjustments.
Stitch length and width/needle position controls
*Auto/Default settings Your sewing machine will produce most of your preference. Starting at the Auto / Default Position. *Manual settings Once you have determined the Auto / Default position you are fixed...
Instruction Manual - Page 34
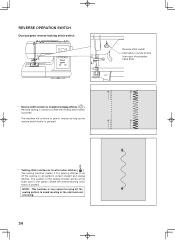
... the reverse switch button is pressed.
* Tacking stitch function for tie-off of sewing.
34
The machine will be at the start and end of other stitches ( ) The sewing machine makes 4 tiny tacking stitches to tie off the sewing pattern to sew in the pattern where the reverse/tacking stitch button is pushed. REVERSE OPERATION SWITCH...
Instruction Manual - Page 40
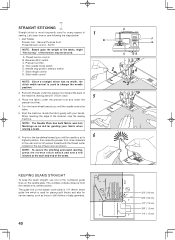
... under the presser foot and lower the
presser foot lifter.
4. KEEPING SEAMS STRAIGHT
To keep the seam straight,...foot toward you until the needle is used to the rear and cut off excess threads with your fabric when sewing a seam.
6. When reaching the edge of face cover as shown. First turn the handwheel toward the back of the tension may be desired. Needle stop the sewing machine...
Instruction Manual - Page 42
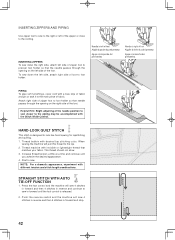
... To sew down the right side, attach left side of zipper foot to look like hand sewing for topstitching and quilting. 1. Attach right side of zipper foot to foot holder ...foot. Start to foot holder. Press the foot control and the machine will sew 4 stitches in forward and then 4 stitches in reverse and continue to sew in forward and stop.
42 INSERTING ZIPPERS AND PIPING
Use zipper foot to sew...
Instruction Manual - Page 44
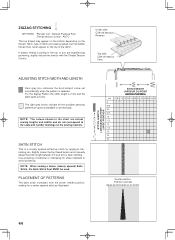
..., fabric, type of stitch and sewing speed, but the bobbin thread must never appear on the sewing machine. The light grey boxes indicate all...1.5 1.75 2.0 2.5 3.0
Center position Position centrale Aguja posicionada en el centro
44 ZIGZAG STITCHING
SETTINGS :Presser foot - General Purpose Foot :Thread tension control - SATIN STITCH
This is pulling to the scale and number markings on the top of...
Instruction Manual - Page 64
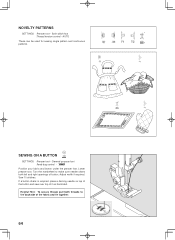
... - Adjust width if required. If a button shank is required, place a darning needle on top of the button and sew over top of it as illustrated.
AUTO
These can be used for sewing single pattern and continuous patterns. Lower presser foot. Sew 10 stitches.
General purpose foot :Feed dog control - Position your fabric and button under the...
Instruction Manual - Page 68
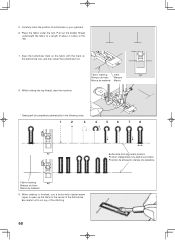
... material 9. While holding the top thread, start the machine. Fabric marking
mark
Marque du tissu Marque
Marca de material Marca
* Sewing will be completed automatically in the center of buttonhole on the buttonhole foot, and then lower the buttonhole foot.
8. Place the fabric under the foot. Align the buttonhole mark on the fabric with the...
Instruction Manual - Page 70
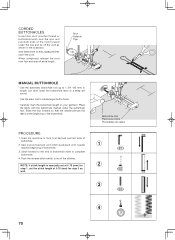
...buttonhole mark to form first bartack and left side of buttonhole.
2. Start the machine to complete buttonhole.
4.
Buttonhole foot Pied boutonnière Prensatelas de ojales
1
2
3
4
70
CORDED BUTTONHOLES...buttonhole twist) over the spur and pull both ends of the cord forward under the buttonhole foot. Sew buttonhole so that the needle pierces the fabric at 0.75 (mm) for step 3 as ...
Instruction Manual - Page 72
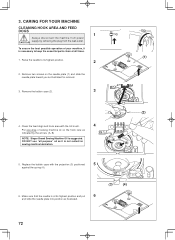
... necessary to its highest position and put
6
and slide the needle plate into position as illustrated for sewing machine lubrication.
(2)
(A) (B)
5. 3. Remove two screws on the hook race as it is at all times.
(1)
1. Remove the bobbin case (2).
3
4. Raise the needle to keep the essential parts clean at its highest position.
2
2. CARING FOR YOUR...
Instruction Manual - Page 74
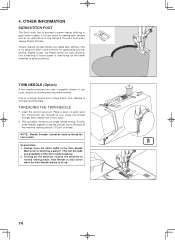
... thread. This will preclude any possibility of tissue paper or interfacing for single needle sewing. Turning off the machine returns the machine to selecting a pattern. OTHER INFORMATION
SATIN STITCH FOOT
The Satin stitch foot is lit red.
74
THREADING THE TWIN NEEDLE
1. Insert the second spool pin. Helpful Hints: 1. Use a backing of the twin needle breaking...
Instruction Manual - Page 78
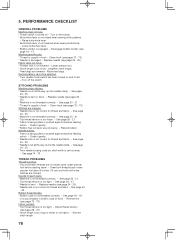
...sheer or soft fabric. - Machine jams/knocks. * Thread is too tight. - Clean hook (see page 72 - 73). Lower presser foot. * Stitch length is bent. - Raise feed dogs. ...not raised when sewing stitch patterns.
- Rewind bobbin. See page 18 - 19. * Lint accumulates in hook.- PERFORMANCE CHECKLIST
GENERAL PROBLEMS Machine does not sew. * Power switch is not lowered when sewing buttonhole.
-...
Instruction Manual - Page 82
... drop or insert any adjustments in the outlet, reverse the plug. "Always unplug sewing machine from the electrical...sewing machine with this manual. "Do not operate where aerosol (spray) products are being administered." 8. "To disconnect, turn switch to persons: "
1. "Keep fingers away from outlet." 9. "Do not pull or push fabric while stitching.
Moving parts-To machine." FOOT...
Similar Questions

I Get E7 Error Message On My Singer Model 7258 Sewing Machine. There Is No Refe
Error message E7 is up on my Singer Stylist model 7258 sewing machine. It is not working at all. I t...
Error message E7 is up on my Singer Stylist model 7258 sewing machine. It is not working at all. I t...
(Posted by ebellamybellamy9 5 years ago)

Singer Model 7469q Quilter Sewing Machine Disassembly
After pulling the screws all out from the plastic case . how do you split the cases?please no addres...
After pulling the screws all out from the plastic case . how do you split the cases?please no addres...
(Posted by sdeiter544 9 years ago)
Singer # 7469q Sewing Machine
After pulling the screws all out from the plastic case . how do you split the cases?
After pulling the screws all out from the plastic case . how do you split the cases?
(Posted by sdeiter544 9 years ago)

Beeping From Singer Sewing Machine Stylist Ii 5625
My sewing machine will beep and stop sewing after three inches of sewing. I have taken it to be repa...
My sewing machine will beep and stop sewing after three inches of sewing. I have taken it to be repa...
(Posted by arusheria 9 years ago)

How To Use Stitching On The Machine 7469q
I need to know how to use the designer stitches on the machine
I need to know how to use the designer stitches on the machine
(Posted by Anonymous-130396 10 years ago)