Singer 7469Q Confidence Quilter Support Question
Singer 7469Q Confidence Quilter Support Question
Find answers below for this question about Singer 7469Q Confidence Quilter.Need a Singer 7469Q Confidence Quilter manual? We have 1 online manual for this item!
Question posted by Anonymous-130396 on February 7th, 2014
How To Use Stitching On The Machine 7469q
I need to know how to use the designer stitches on the machine
Current Answers
Related Singer 7469Q Confidence Quilter Manual Pages
Instruction Manual - Page 3
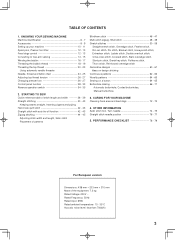
... overedge stitch, Slant pin stitch, Greek key stitch, Fishbone stitch, Thorn stitch, Reinforced overedge stitch Decorative designs 60 - 61 Ideas on design stitching Continuous patterns 62 - 63 Novelty patterns 64 - 65 Sewing on a button 64 - 65 Buttonhole making 66 - 71 Automatic buttonhole, Corded buttonholes, Manual buttonhole
3. KNOWING YOUR SEWING MACHINE Machine...
Instruction Manual - Page 6
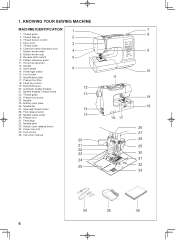
... 27. Thread guide 23. Power line cord 35. Bobbin cover plate 26. Needle clamp screw 30. Identification plate 17. Needle threader Thread Guide 22. 1. Reverse stitch switch 10. Bobbin cover release button 34. KNOWING YOUR SEWING MACHINE
MACHINE IDENTIFICATION
1. Buttonhole lever 20. Thread guide 2. Thread cutter 6. Power/light switch 15.
Instruction Manual - Page 8
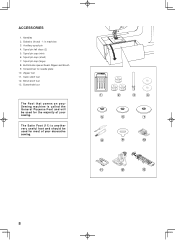
ACCESSORIES
1. Spool pin felt discs (2) 5. Buttonhole foot
The Foot that comes on your Sewing machine is another very useful foot and should be used for needle plate 10. Buttonhole opener/Seam Ripper and Brush 9. Auxiliary spool pin 4. Blind stitch foot 13.
Bobbins (4 total - 1 in machine) 3. The Satin Foot (11) is called the General Purpose Foot and will...
Instruction Manual - Page 10
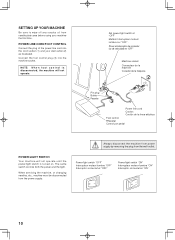
... sure to wipe off any surplus oil from needle plate area before using your wall outlet (2) as illustrated. The same switch controls both the power and the light.
When servicing the machine, or changing needles, etc., machine must be disconnected from the wall-outlet.
Connect the foot control plug (3) into the cord socket...
Instruction Manual - Page 14
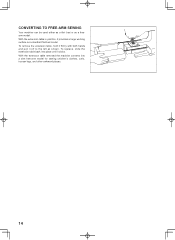
... flat-bed model. To replace, slide the extension table back into a slim free-arm model for sewing children's clothes, cuffs, trouser legs, and other awkward places.
14 CONVERTING TO FREE-ARM SEWING
Your machine can be used either as a freearm model. To remove the extension table, hold it firmly with both hands and pull...
Instruction Manual - Page 22
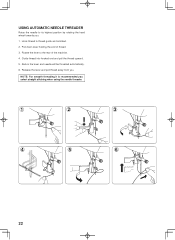
Pull down lever holding the end of the machine. 4. Release the lever and pull thread away from you select straight stitching when using the needle threader.
1
2
3
4
5
6
22 NOTE: For smooth threading it is recommended you .
Hook thread to the rear of thread. 3. Rotate the lever to thread guide ...
Instruction Manual - Page 24
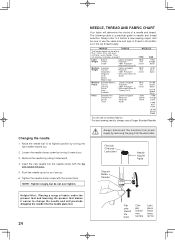
...is a practical guide to it toward you .
2. They are listed as it easier to use a Singer Branded Needle. Bonded Wovens Heavy Canvas
Coating Denim Duck Sailcloth
Cotton-wrapped Polyester 100% ... by removing the plug from power supply by turning it before a new sewing project. Always disconnect the machine from the wall-outlet.
NOTE: Tighten snugly, but do not over tighten...
Instruction Manual - Page 26
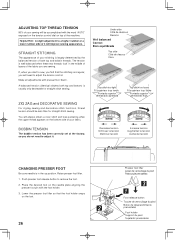
...foot pin with the word "AUTO" exposed on the tension control dial on top of the machine. The tension is largely determined by the balanced tension of both top and bottom) is ....
Lower the presser foot lifter so that the stitching is irregular, you do not need to adjust the tension control. You will need to sew, you are sewing.
BOBBIN TENSION
The bobbin tension has been correctly ...
Instruction Manual - Page 28
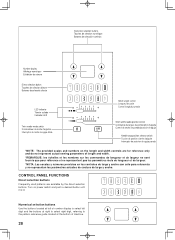
...Commutateur de mode d'aiguilles Interruptor de modo de aguja doble
Stitch length control Longueur de point Control longitud puntada
Stitch width/needle position control Commande de largeur de point/position.... CONTROL PANEL FUNCTIONS
Direct selection buttons
Frequently used patterns are for reference only and do not represent actual sewing parameters of machine.
28 Turn on the length and width ...
Instruction Manual - Page 30
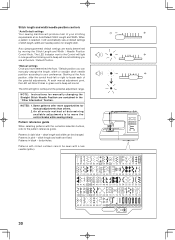
... postition according to your preference.
Patterns in pink - buttonholes. The LED will sound. Stitch length and width/needle position controls
*Auto/Default settings Your sewing machine will produce most of your stitching requirements at the Auto / Default Position. *Manual settings Once you have determined the Auto / Default position you can be sewn with the...
Instruction Manual - Page 32
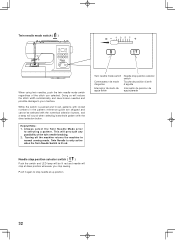
...N e e d l e M o d e p r i o r
to normal sewing mode. Turning off the machine returns the machine to selecting a pattern.
While the switch is lit red.
This will stop needle at down...the stitch width automatically and save broken needles and possible damage to stop at up position.
32 Push it again to your machine.
Helpful Hints: 1. Twin needle mode switch ( )
When using twin...
Instruction Manual - Page 34
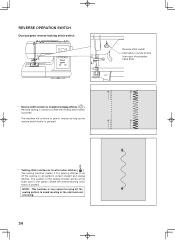
... be at the start and end of other stitches ( ) The sewing machine makes 4 tiny tacking stitches to tie off the sewing on all patterns except straight and zigzag stitches. NOTE: This function is very useful for tying off the sewing pattern to sew in the pattern where the reverse/tacking stitch button is pushed. REVERSE OPERATION SWITCH
Dual purpose reverse...
Instruction Manual - Page 40
... seam guide line which is used for every aspect of
the machine, leaving about 6" (15cm) clear.
5
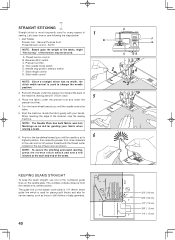
3. STRAIGHT STITCHING
A
Straight stitch is most frequently used for piecing quilt blocks and ... sewing a seam.
6. General Purpose Foot
G
Thread tension control -
Stitch width control
C
DE
2
4
NOTE: Since a straight stitch has no width, the stitch width control is used to sew ...
Instruction Manual - Page 42
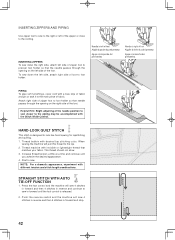
... a little at a time and continue until the foot control is designed to look like hand sewing for topstitching and quilting. 1. Press the foot control and the machine will sew 4 stitches in forward and then 4 stitches in reverse and continue to sew in forward and stop.
42
To sew down the right side, attach left side of zipper foot...
Instruction Manual - Page 44
... and number markings on the top of the fabric.
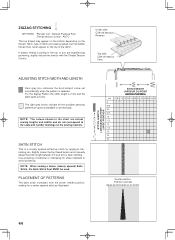
Use a backing of stitch and sewing speed, but the bobbin thread must never appear on the sewing machine. PLACEMENT OF PATTERNS
The satin stitch increases from the center needle position; STITCH LENGTH LONGUEUR DU POINT
LARGO PUNTADA
STITCH WIDTH LARGEUR DU POINT
ANCHO PUNTADA mm 0 0.5 1.0 1.5 2.0 2.5 3.0 3.5 4.0 4.5 5.0 5.5 6.0 0 0.25 0.5 0.75...
Instruction Manual - Page 68
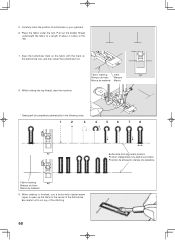
... be completed automatically in the center of the stitching.
68
Buttonhole foot alignment position Position d'alignement du pied boutonnière Posición de alineación del pie de ojaladora Place the fabric under the foot. When sewing is finished, use a buttonhole opener/seam
ripper to cut any of the buttonhole. Carefully mark...
Instruction Manual - Page 70
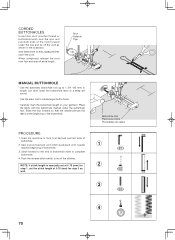
...of the buttonhole.
Sew buttonhole so that the needle pierces the fabric at 0.75 (mm) for step 1, set the stitch length at the...ojales
1
2
3
4
70
Start the machine to complete buttonhole.
4. Push the reverse stitch switch to create larger buttonholes.
* Carefully mark...will sound.
* Use the satin foot to tie off extra length. Slide the foot forward so that zigzag stitches cover the cord...
Instruction Manual - Page 74
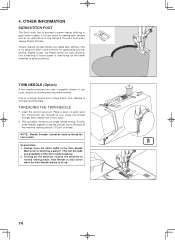
... Needle is only active when the Twin Needle Switch is an attractive stitch used to pass under the presser foot to back.
2. Always move the stitch width to the Twin Needle
Mark prior to normal sewing mode. Turning off the machine returns the machine to selecting a pattern. Place a spool on each needle from front to the...
Instruction Manual - Page 78
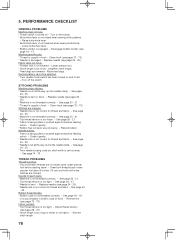
... tension is not threaded correctly. - Adjust thread tension (see page 72 - 73). PERFORMANCE CHECKLIST
GENERAL PROBLEMS Machine does not sew. * Power switch is being pulled or pushed against machine feeding
action. - Clean hook (see page 26 - 27). * Stitch length is caught in bobbin case or hook. - See page 74 - 75. Turn on and lit...
Instruction Manual - Page 82
.../EEC covering the electromagnetic compatibility. "Do not pull or push fabric while stitching. "CAUTION-- FOOT CONTROL (USA & Canada only)
Use Yamamoto Electric, Model YC-485 EC with same type rated DC 6.5 V 2.8 Watts." "Do not unplug by or near children." 2. "Always unplug sewing machine from the electrical outlet when removing covers, lubricating, or when making...
Similar Questions

Classes On How To Use Singer 9970 Sewing Machine
I bought the sewing machine during the pandemic and would like to learn how to use it- functions, st...
I bought the sewing machine during the pandemic and would like to learn how to use it- functions, st...
(Posted by Connienm 1 year ago)

Why Won't My Machine Sew, Checked Bobbin And Retreaded. Has Power Just Will Not
the machine has power and threade correctly and bobbin is in right. It did freeze on me when sewing....
the machine has power and threade correctly and bobbin is in right. It did freeze on me when sewing....
(Posted by alewis41 7 years ago)
Singer Model 7469q Quilter Sewing Machine Disassembly
After pulling the screws all out from the plastic case . how do you split the cases?please no addres...
After pulling the screws all out from the plastic case . how do you split the cases?please no addres...
(Posted by sdeiter544 9 years ago)
Singer # 7469q Sewing Machine
After pulling the screws all out from the plastic case . how do you split the cases?
After pulling the screws all out from the plastic case . how do you split the cases?
(Posted by sdeiter544 9 years ago)

Singer 7469q Confidence Quilter - Beeping Noise And Machine Freezing
I was in the midst of using one of the novelty stitches and all of a sudden the machine locked up, b...
I was in the midst of using one of the novelty stitches and all of a sudden the machine locked up, b...
(Posted by whitewavejl 10 years ago)